Do you want to create landing pages for any domain on a single WordPress website?
With the average landing page conversion rate hovering around 5.89% across all industries, it’s clear that having effective landing pages is crucial for online success. There are many ways to map domains in WordPress. Yet, with multiple domain mapping on a single site, you can create microsites without installing WordPress on every domain.
This article will first explain the different versions of WordPress domain mapping. Then, I’ll show you how to point a single WordPress landing page to a different domain.
Quick Summary: To point a WordPress landing page to a different domain, use SeedProd’s Domain Mapping feature. It lets you assign unique domains to individual pages without installing WordPress on each one.
- What Is WordPress Domain Mapping?
- What Is a WordPress Multisite Network
- What Is WordPress Multisite Domain Mapping?
- What Is WordPress Single Site Domain Mapping?
- Why Use a Different Domain Name for Landing Pages?
- How to Point Single WordPress Landing Pages to Custom Domain Names
What Is WordPress Domain Mapping?
“Domain mapping lets you manage several domains in one WordPress installation. This makes your site more efficient and easier to handle” – 10Web
You might need to do this if:
- You have several domains that all need to point to a single server.
- Your domain registrar is different from your hosting provider or hosting account.
- You’re switching to a new Content Management System (CMS) like WordPress and want to preserve the links on your website.
Simply put, WordPress domain mapping is a way to redirect users to the correct web host through your site’s address.
Now that you know what domain mapping is, how does this apply to WordPress multi-sites?
What Is a WordPress Multisite Network
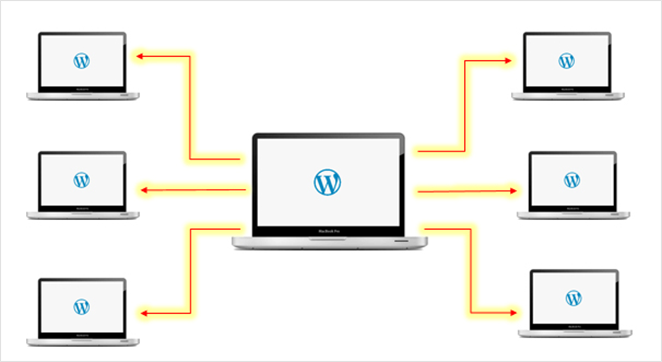
A WordPress Multisite network is an efficient and scalable way to run and manage more than one WordPress site or blog from a single WordPress installation. Major brands like Best Buy, WordPress.com, and The New York Times rely on WordPress Multisite to streamline the management of their extensive online presence.
This centralized approach allows you to create new sites instantly and manage them with the same username and password.
So how does this relate to domain mapping? Let’s find out.
What Is WordPress Multisite Domain Mapping?
By default, extra sites on your WordPress multisite network are created as:
- Subdomains like subsite.network.com
- Or subfolders such as network.com/subsite
As you can see, this doesn’t look very professional. Fortunately, there’s a way to make your multisite setup look more professional and user-friendly.
With WordPress multiple domain mapping, you can point a site on your network to a specific external domain, like yoursite.com. That way, visitors will see it as a regular, single website.

But what if you want to connect specific domains to different pages on one WordPress website? That’s where WordPress single site domain mapping comes in.
What Is WordPress Single Site Domain Mapping?
WordPress single site domain mapping involves pointing domain names to single pages on your WordPress site. This allows you to give specific landing pages on your site their own custom domain names as if they were standalone sites.
Here’s how a standard website structure looks:
- yoursite.com
- yoursite.com/ProductA
- yoursite.com/ProductB
With single-site domain mapping, you can take a custom domain like productA.com and point it to an individual landing page, yoursite.com/productA.
This means when visitors type productA.com into their address bar, the page will look like a standalone website instead of a subpage on a larger website, i.e.:
productA.com instead of yoursite.com/poductA.

What I like about this setup is you don’t need separate WordPress installs for each domain. Instead, you can manage them all from your existing website and still achieve the same effect.
If any of this sounds confusing, here’s a brief comparison:
| Feature | WordPress Multisite Domain Mapping | WordPress Single Site Domain Mapping |
|---|---|---|
| Purpose | Connect a unique domain to each site within a multisite network. | Connect a unique domain to a specific page within a single WordPress site. |
| Structure | Each site appears as a standalone website with its own domain: – subsite1.com – subsite2.org | Main website with different domains pointing to specific pages: – mainsite.com (Homepage) – productA.com (mainsite.com/productA) – productB.net (mainsite.com/productB) |
| Management | Manage all sites from a single WordPress dashboard. | Manage all domains and their corresponding pages from a single WordPress dashboard. |
| Example | A network of online stores for different brands under one company. | A business website with separate domains for individual products or services. |
Why Use a Different Domain Name for Landing Pages?
There are many reasons why creating different domains for landing pages is a good idea for your business.

Here are just a few examples:
- Website Launch: You could launch a coming soon page from your existing site and use single site domain mapping to set it up on a new domain.
- Real Estate Business: Instead of listing properties on myrealestate.com/1mainstreet and myrealestate.com/2mainstreet, you can create individual page sites like 1mainstreet.com and 2mainstreet.com.
- Webinar Marketing: You could launch a webinar for your business at howtosetupwordpress.com and have the webinar page at howtosetupwordpresswebinar.com.
With your landing pages mapped to different domain names, it’s easier to market them to the right audience and give each page a distinct look, feel, and branding.
It’s also much easier to track each page’s performance individually in Google Analytics to see if your marketing efforts are paying off.
Now that you know the benefits of mapping single landing pages to custom domains in WordPress, let’s see how to do it!
How to Point Single WordPress Landing Pages to Custom Domain Names
In WordPress, different domain landing pages typically involve using multiple WordPress plugins. For instance, you’d need:
- A WordPress landing page plugin to create a high-converting landing page
- The WordPress multiple domain mapping on single site plugin to point your landing page to a custom domain
This can be confusing if you’re unsure what the best WordPress plugins are for your needs. It can also add unnecessary bloat to WordPress, slowing down your site.
Luckily, there’s an easy solution that requires only a single plugin: SeedProd.

SeedProd is the best WordPress website builder and drag-and-drop landing page builder on the market. It allows you to create stunning landing pages quickly and easily without writing a single line of code.
Using the easy drag-and-drop visual editor, you can create custom WordPress themes and any type of landing page and customize them. Just point and click to get everything looking exactly the way you want.
You can then use the Domain Mapping feature to point a custom domain to your landing page without installing an extra plugin.
SeedProd also comes with powerful coming soon, maintenance, 404, and login page modes. This means you can:
- Create a coming soon page to promote your site while it’s under construction
- Show visitors a user-friendly maintenance page while you’re updating your site
- Build a custom 404 page to redirect visitors from broken site pages
- Create a custom WordPress login page to welcome users to your website.
All of this and more is available in 1 lightweight and bloat-free WordPress plugin to drive more leads and sales for your business.
With that in mind, here’s how to use SeedProd to create landing pages for any domain on a single WordPress site.
Step 1: Install and Activate SeedProd Landing Page Builder
SeedProd’s Domain Mapping feature is only available for Pro and Elite SeedProd plans. So, click here to get started with SeedProd and download the plugin.
Then log in to SeedProd and click the View License Key, Details, and Downloads link.
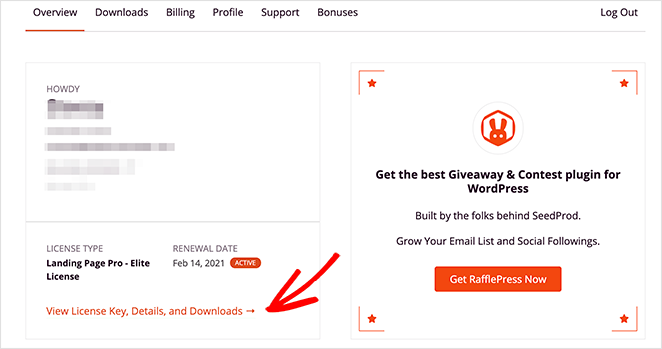
On the Downloads page, copy your license key and paste it into a blank document or notepad to use later.
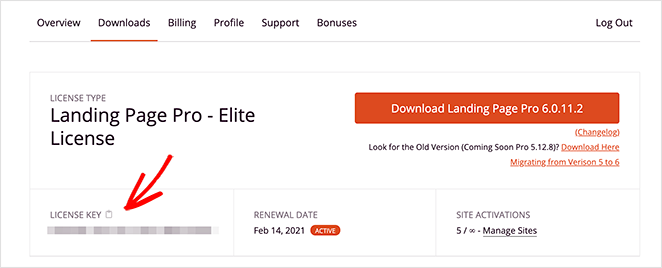
From there, you need to install and activate SeedProd on your WordPress website. If you need help with this step, follow these step-by-step instructions for installing a WordPress plugin.
After installing and activating SeedProd, you’ll see a welcome screen like the one below.

Now paste the license key you copied earlier into the field and click the Verify Key Button.
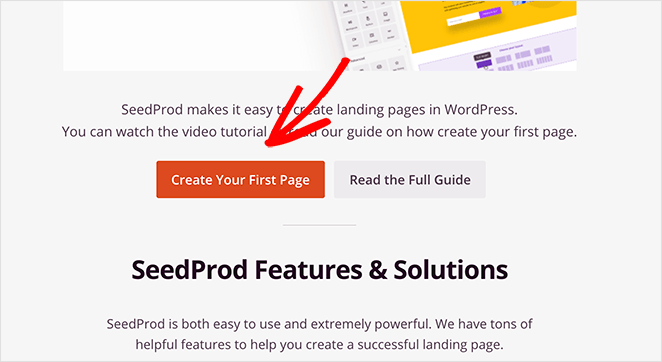
Next, scroll down the page and click the Create Your First Page button. This will take you to SeedProd’s landing page dashboard.
Step 2: Create a New Landing Page
On the next screen, you’ll see 4 different page modes you can activate in SeedProd, including:
- Coming Soon Mode
- Maintenance Mode
- Login Page
- 404 Page
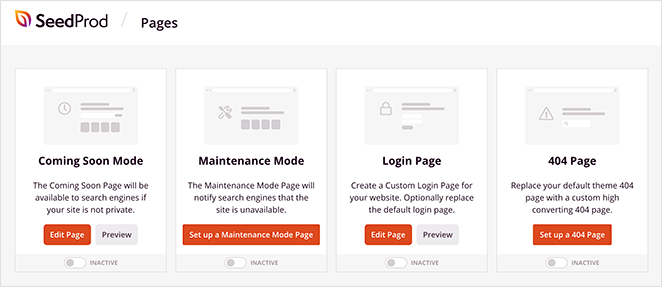
You can activate each mode with a single click to show customized landing pages to your website visitors.
Note: Domain Mapping is only available for individual landing pages, NOT for pages created with various page modes.
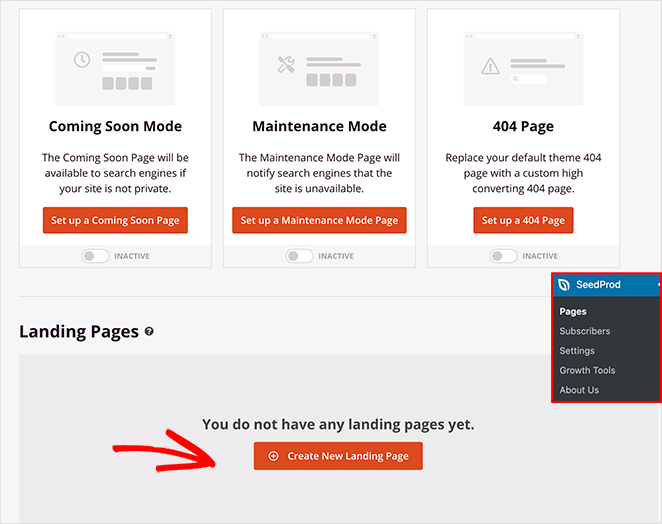
This area is where your landing pages are displayed after you create them with SeedProd. You won’t see anything in this section yet, but they’ll show up in a list once you’ve made them.
To make your first page, click the Create New Landing Page button.
After clicking the button to make a new landing page, you’ll see SeedProd’s library of customizable landing page templates. You can edit and customize these designs in the drag-and-drop page builder.
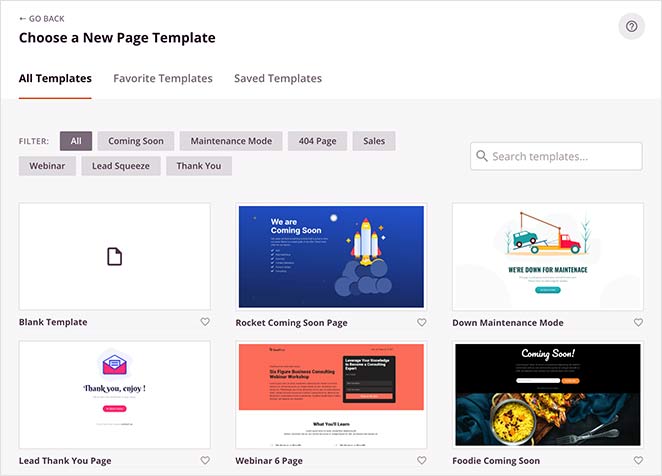
You can filter the templates by clicking any label along the top of the screen, such as:
- All
- Coming Soon
- Maintenance Mode
- 404 Page
- Sales
- Webinar
- Lead Squeeze
- Thank You
- Login
Pick any template close to the type of page you want to create. Then, hover your mouse over the template thumbnail and click the tick icon.

For this tutorial, we’ll use the “Sales” template.
After clicking the template, a popup appears asking you to enter your landing page name and URL. You can change this later if needed.
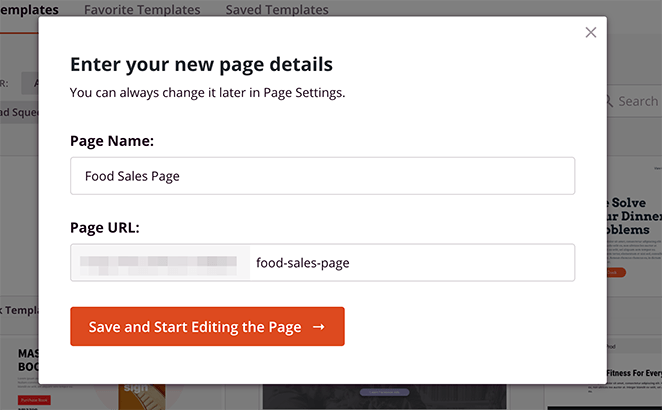
After entering the page name, click the Save and Start Editing the Page button to launch the template in the visual editor.
Step 3: Customize Your Landing Page
SeedProd’s page builder is divided into 2 sections to make customizing your page as easy as possible.
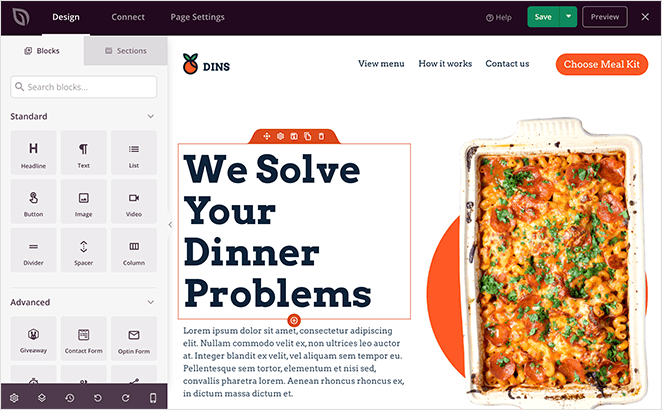
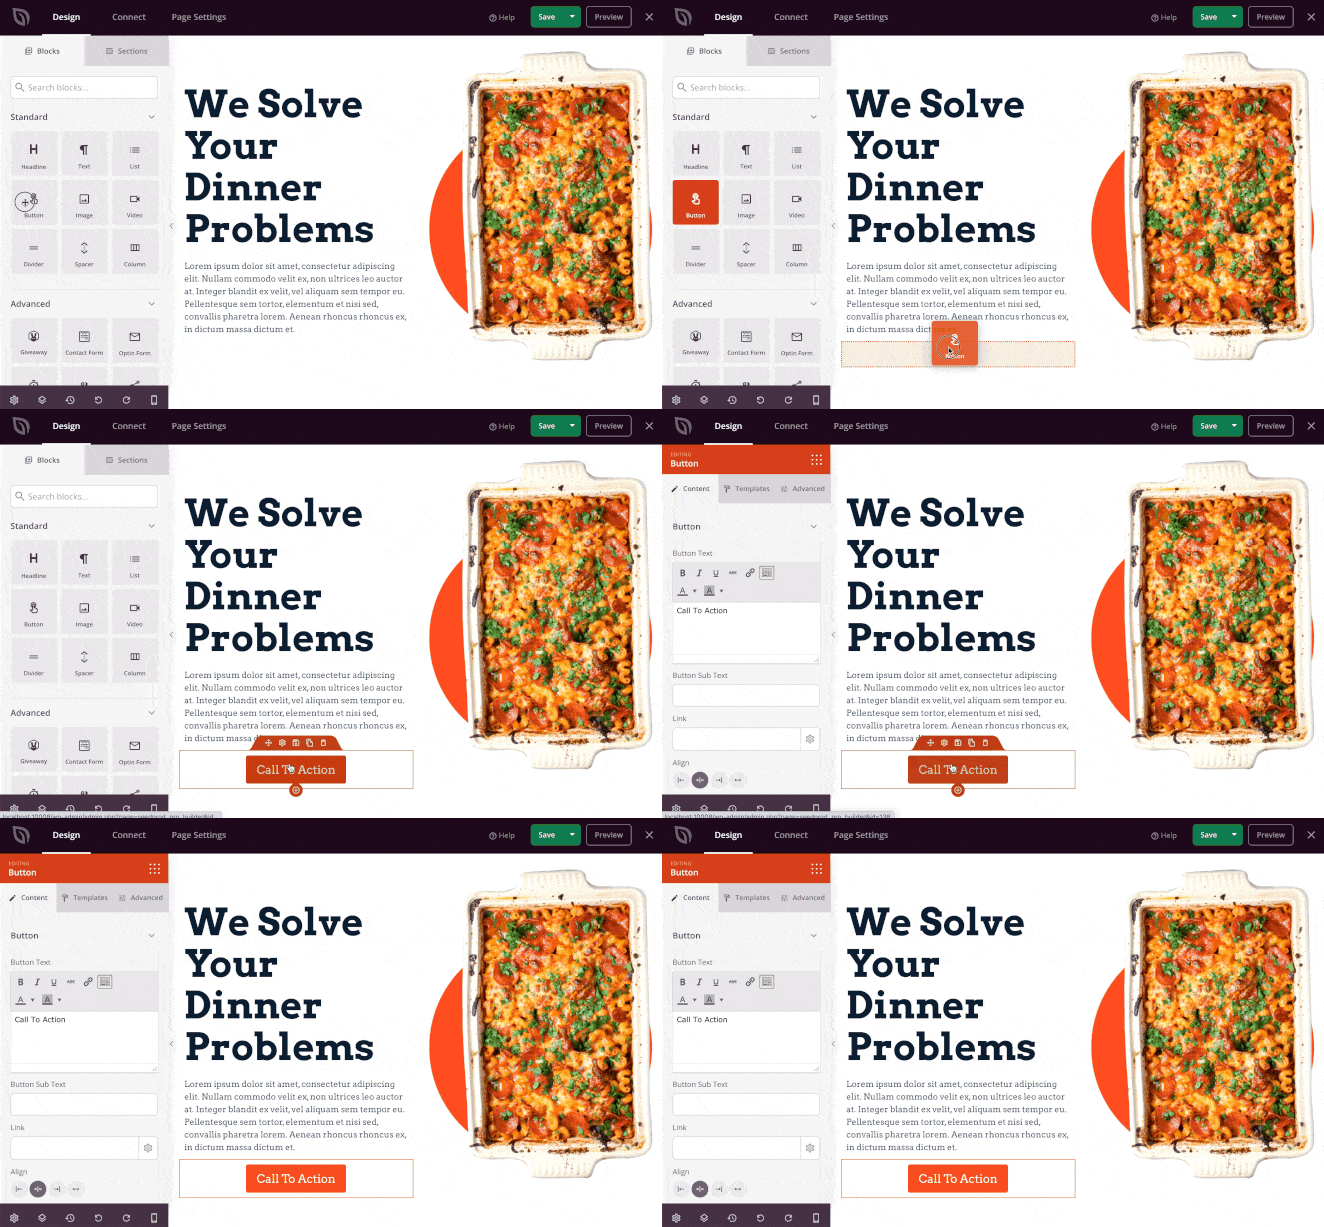
You can drag any page block from the left-hand panel and drop it onto the page preview on the right.
Customizing Page Blocks
After, you can click any element on your page preview to open customization settings in the left-hand panel.
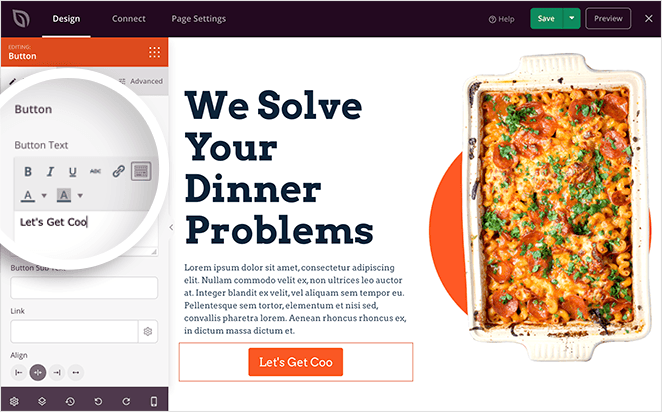
For instance, clicking the call-to-action button (CTA) on our page preview shows the option to edit the button text.
If you like, you can also click the Templates tab to choose a different button style and apply it to your page with a single click.
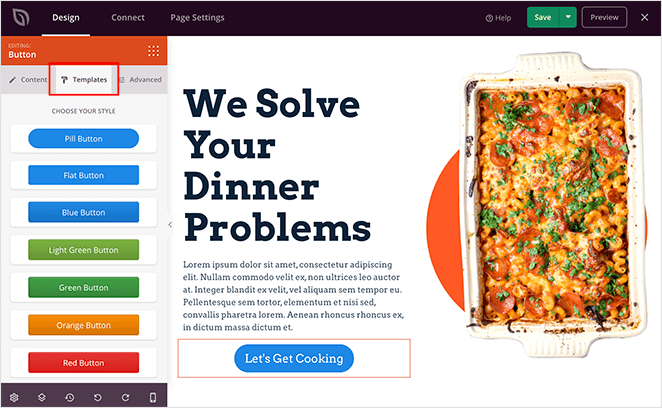
Many of SeedProd’s page blocks come with pre-made block templates like this, making it easier to customize your design.
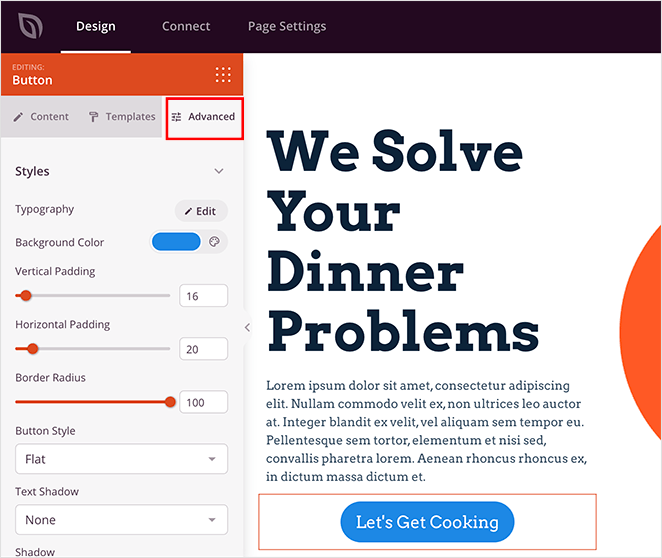
In the Advanced tab, you can tweak the block style by adding custom colors, changing borders, padding, and more.
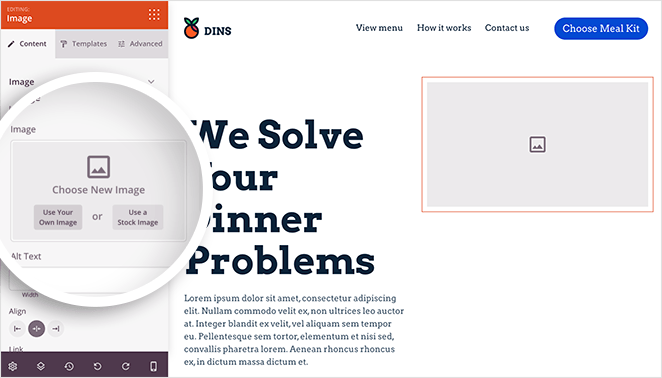
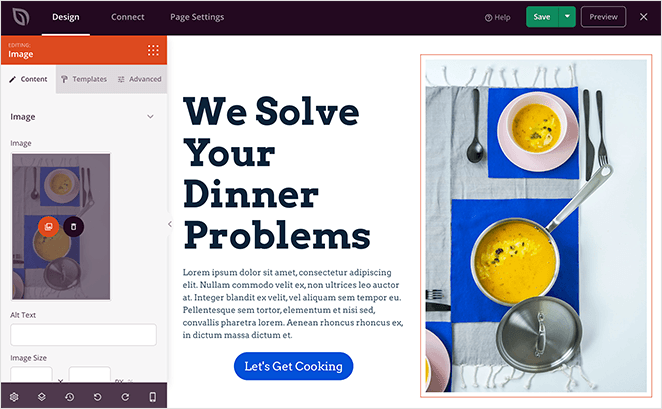
To change the default template image, click any image on your page preview to show the options in the left-hand panel.
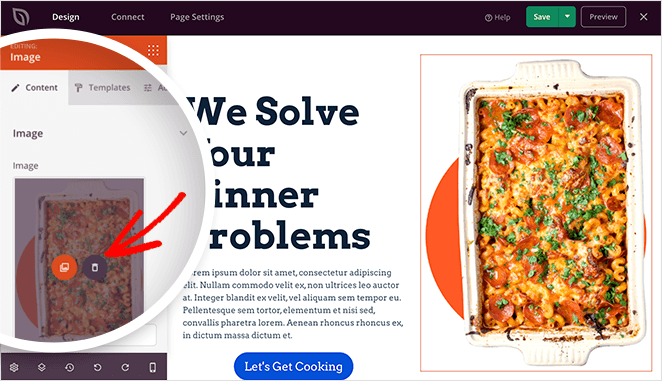
Click the trash can icon to remove the current image, then click the Use your Own Image button to upload a new photo from your computer or WordPress media library.
Advanced Page Blocks
You can also use SeedProd’s Advanced page blocks to make it easier to generate leads.
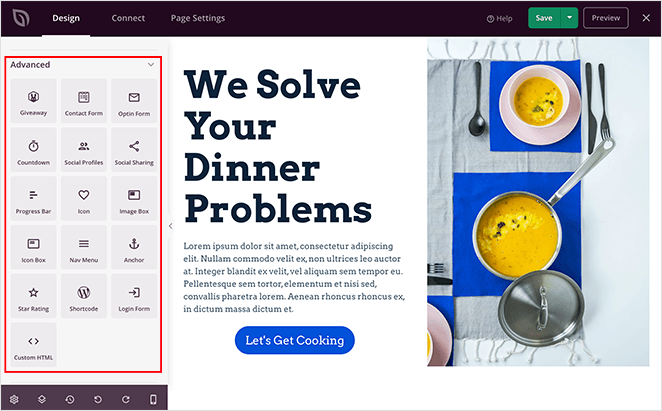
For example, you can use the following:
- Giveaway block to add a RafflePress giveaway to your landing page
- Contact Form block to add a user-friendly WPForms contact form
- Optin Form block to add a signup form to collect email addresses
- Countdown block to create a sense of urgency with a countdown timer
- Progress Bar block to add dynamic progress bars to your page
- WooCommerce blocks for custom WooCommerce checkout pages, etc
- Pricing tables for price comparisons
- And much more
Page Sections
SeedProd also makes it super-easy to add complete page sections to your landing page design.
Just click the Sections tab to see different pre-made designs for header and footer areas, hero areas, FAQ areas, and more.
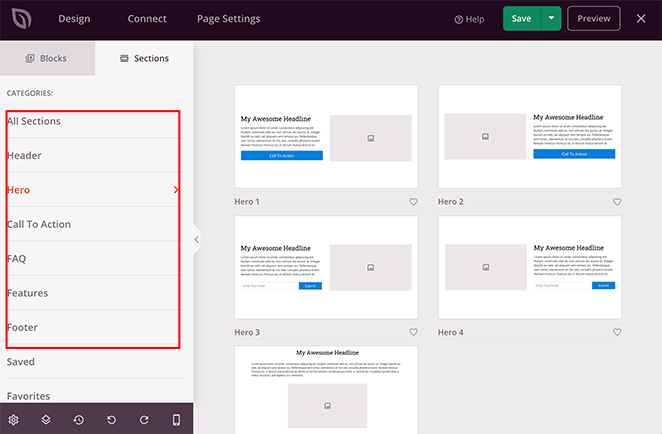
By using Sections, you won’t need to manually build each page area block-by-block. They’re already made for you, so click one you like, and it’s added to your page automatically.
Global Customization Settings
Another way to perfect the design of your page is with SeedProd’s Global Settings options. Just click the gear icon in the bottom left corner of your screen to customize your background, fonts, colors, and CSS globally.
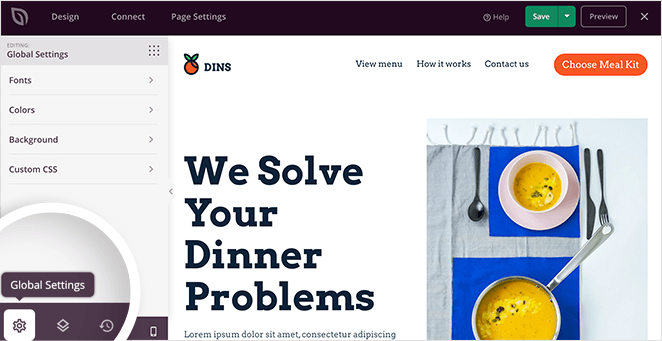
This means you can make changes, and the results are applied globally to the page without updating each element manually.
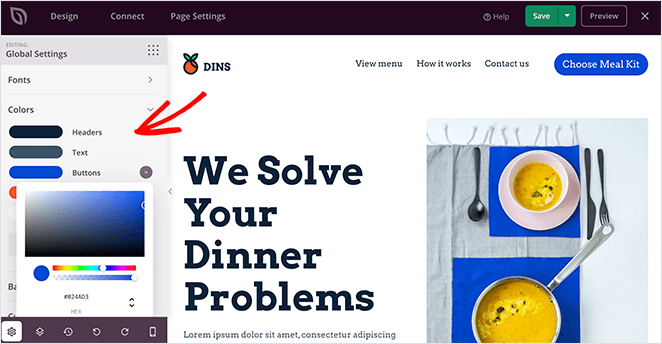
For instance, clicking the Colors option allows you to set the global colors for your landing page buttons, links, text, and more.
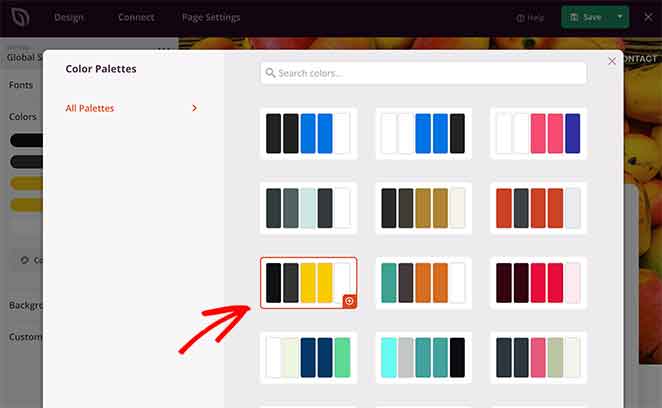
You can also click the Color Palette button and choose from over 20+ pre-designed landing page color schemes.
Just remember to click the green Save button in the top-right corner to store your changes periodically.
Step 4: Integrate Your Email Marketing Service
One of the main goals of a successful landing page is to collect email addresses from potential customers. This enables you to contact them and nurture them through your sales funnel.
SeedProd makes growing your email list easy with its many email integration options. You can find them by clicking the Connect tab at the top of the page builder.
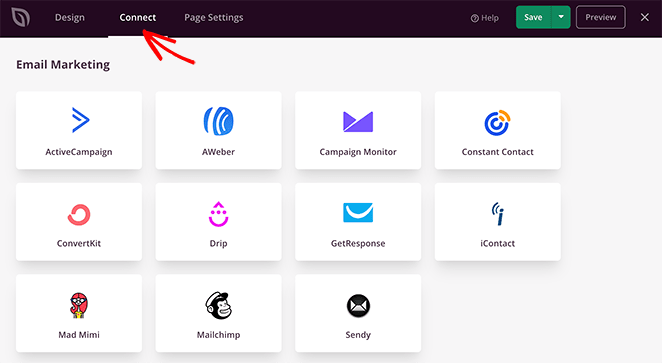
On this page, you can integrate with popular email marketing services like:
- Drip
- Constant Contact
- ConvertKit
- ActiveCampaign
- AWeber
- GetResponse
- Mailchimp
- And more
You can also connect to thousands of marketing platforms via Zapier and integrate your landing page with Google Analytics to track your page’s performance.
To learn how to connect to specific email providers, check out our email integration documentation.
If you don’t have an email marketing provider, you can still collect and track email subscribers with SeedProd’s subscriber management system.
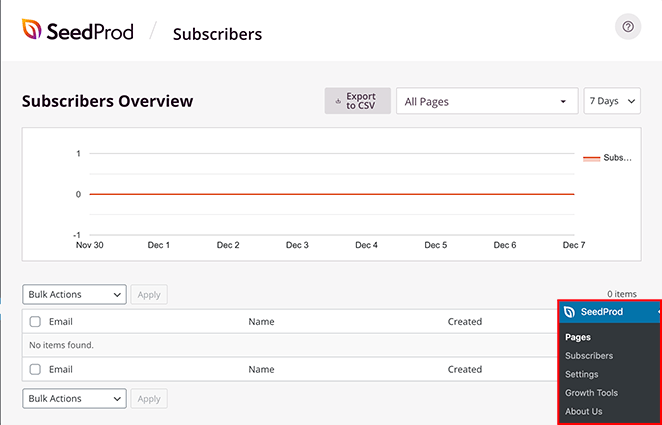
You can see the details of anyone who subscribes to your landing page in the Subscriber Overview by going to SeedProd » Subscribers from your WordPress dashboard.
Step 5: Connect Your Landing Page to a Different Domain with Domain Mapping
The next step is to connect your landing page to a custom domain name. To do this, click the Page Settings tab at the top of your screen.
Here, you can configure your General, SEO, Analytics, and Scripts settings by clicking each option.
The most important setting for this tutorial is the Custom Domain option. This allows you to point your WordPress landing page to a different domain name.
So, go ahead and click the Custom Domain tab to see the WordPress domain mapping settings.
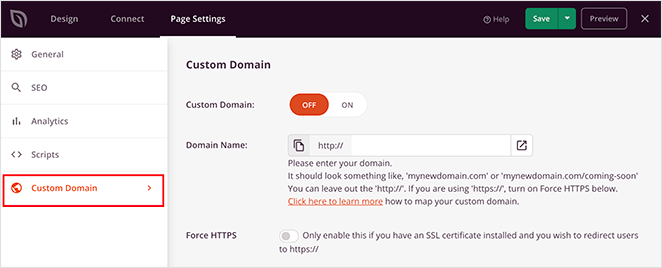
First, turn the Custom Domain toggle from “Off” to “On.” Then, in the Domain Name field, enter the domain you’d like to point your landing page to.
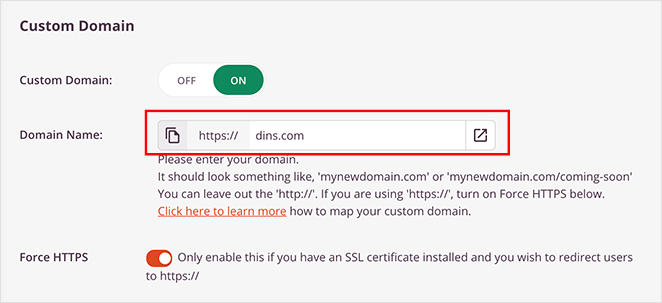
If you have an SSL certificate installed on the domain you wish to point your page to, you can use the Force HTTPS option. This redirects visitors to the secure HTTPS version of your domain instead of HTTP.
Now click Save to preserve your changes.
Step 6: Preview Your Page on Mobile
Now that you’ve created your landing page and mapped it to a custom domain name, it’s time to make sure everything looks correct on mobile devices.
So go back to the Design tab, then click the mobile icon at the bottom of the screen.
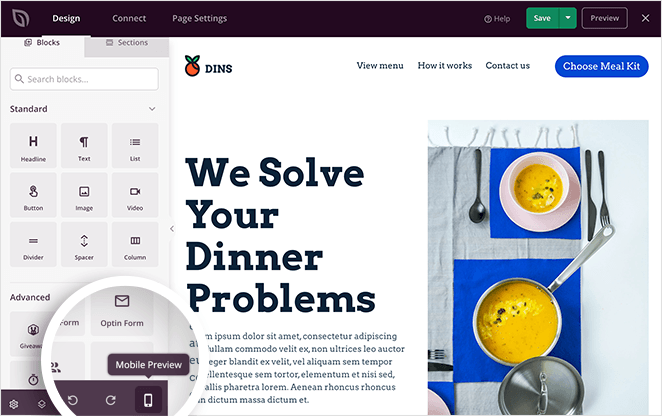
This loads your page in a mobile preview.
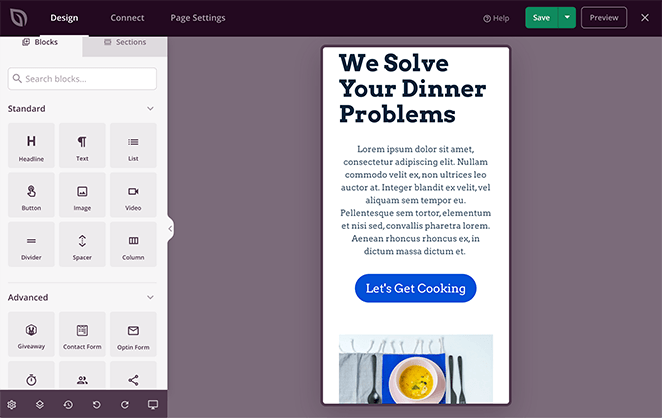
From there, you can optimize your landing page design for mobile devices. Just edit and reorganize your page as you would in the desktop preview. The changes are applied automatically to all versions of your page.
Step 7: Publish Your WordPress Landing Page
Now that you’ve learned how to point a WordPress landing page to a different domain, it’s time to make it live.
So, click the down arrow next to Save and click Publish from the top-right corner of your screen.
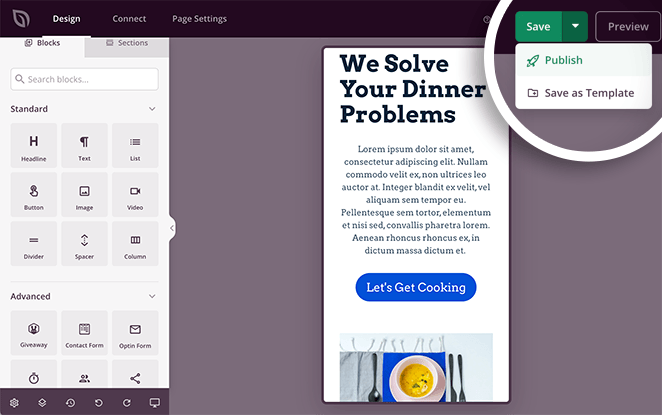
You’ll then see a popup telling you that your page has been published.
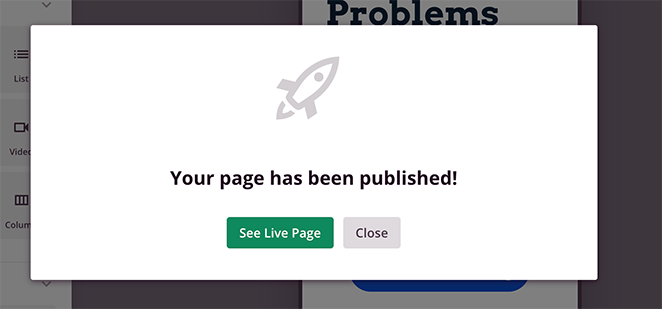
Go ahead and click the See Live Page button to see how your landing page looks.

Frequently Asked Questions
What are the SEO implications of pointing a landing page to a different domain?
I’ve set up dozens of custom domains for landing pages. If you’re doing this for SEO, just remember: the new domain won’t inherit your main site’s authority. You’ll need to treat it like a new site in Google’s eyes—focus on relevance, internal links, and content consistency.
Can I point multiple landing pages on my WordPress site to different domains using SeedProd, and if so, how does the process differ from pointing a single landing page?
When managing multiple landing pages across domains, the approach should remain consistent. Focus on clear, strategic reasons for each domain choice to ensure a seamless user experience and maintain SEO integrity.
What happens if the custom domain linked to the WordPress landing page expires or is transferred?
For expired or transferred domains linked to landing pages, proactive management and timely updates are crucial to avoid broken links and negative user experiences, which can impact both SEO and site credibility.
And that’s it!
You’ve now learned how to point a WordPress landing page to a different domain. The best part is that it only required a single lightweight WordPress plugin to make it happen!
With SeedProd, connecting any WordPress landing page to a single domain is easy; even beginners can do it. As a result, you can create multiple microsites without installing WordPress on every domain.
If you’re already using SeedProd, give this a try with one of your existing pages to see how simple it is.
You might also find the following WordPress guides helpful:
- How to Hide Page Titles in WordPress
- How to Change Margins in WordPress
- How to Make a Page Full Width in WordPress
Thanks for reading! We’d love to hear your thoughts, so please feel free to join the conversation on YouTube, X and Facebook for more helpful advice and content to grow your business.

