Ever wanted to dim background images on your WordPress website?
Adding high-quality images to your site is an excellent way to increase engagement and illustrate your content. But visitors who can’t read your content because of distracting images may leave your site without learning more about your brand.
That’s why it’s a great idea to dim background images for important content, and in this post, we’ll show you how to darken background images online without CSS or HTML.
What Is a WordPress Background Image?
A WordPress background image is any image that appears behind the main content on your website. For example, you can have a background image behind everything like this:

Or you can show an image behind specific content elements like sidebars, footers, headers, and more.
These images add interest to your website and can help keep visitors engaged with your content. They’re also essential to your business branding, helping users differentiate your site from your competitors.
Why Should You Dim Background Images in WordPress?
Sometimes, background images can make it difficult for visitors to read your content. Take a look at this example:

It’s pretty hard to see what the text says because the background image is so vibrant.
Yet if you darken the background image, you can make the content stand out more, making it easier for visitors to read, learn more about your products and services, and become potential customers.

How Do I Make My Background Dim?
The most popular way to darken background images online is to use a combination of CSS code and HTML. This allows you to change your background properties and add a filter over images so they don’t obscure your website content.
The problem with this approach is it isn’t easy for website owners without coding experience. Moreover, it involves changing the code inside your WordPress theme files, so you can break your site if you don’t know what you’re doing.
A better solution for beginners without technical knowledge is to use a WordPress plugin to make your background image darker. Our favorite WordPress plugin is SeedProd, an easy and powerful website builder.
Why Use SeedProd to Dim Background Images?

SeedProd is the best way to dim background images in WordPress because it doesn’t require coding. It comes with a drag-and-drop page builder, allowing you to point and click to customize your site.
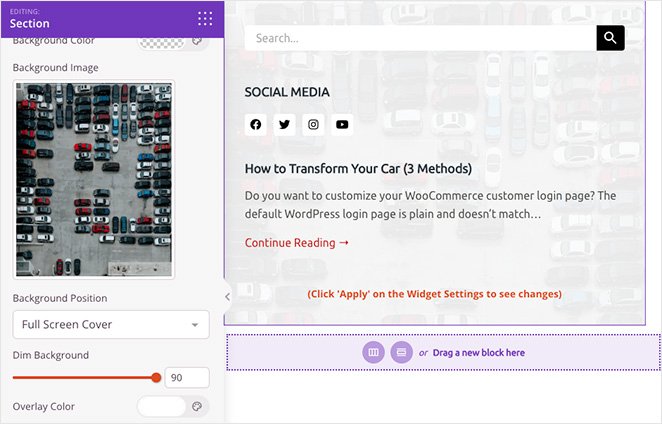
With its easy overlay feature, you can darken a background image by dragging a simple slider. You can also create a color overlay and change your background image position by choosing an option from a handy drop-down menu.
Besides helping you customize images on your WordPress site, SeedProd also allows you to:
- Create a WordPress theme from scratch
- Build entire WooCommerce stores
- Create landing pages that convert
- Manage subscribers and grow your email list
- Pre launch your site with a coming soon page
- Put your website in maintenance mode
- And much more
Bottom line: SeedProd makes it easy to customize any part of your WordPress site without code.
How to Dim a Background Image in WordPress Without CSS Code or HTML
Follow these easy steps to dim a background image in WordPress without CSS code or HTML with SeedProd. We promise it’s much easier than learning code and provides stunning results.
Video Tutorial
Step 1. Install and Activate the SeedProd Plugin
First, you’ll need to visit the SeedProd website and choose a subscription level. We recommend SeedProd Pro because it includes advanced theme-building features.
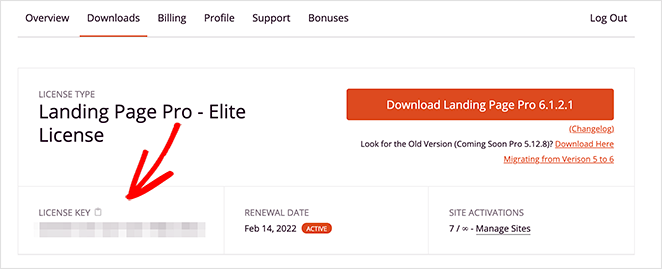
Once you’ve picked a plan and opened your account, head to the Downloads section of your user dashboard and download the plugin to your computer. While you’re there, copy your plugin license key to use later.
Next, go to your WordPress website and install and activate the SeedProd plugin. If you’ve never done this before, follow this guide on installing a WordPress plugin.
After activating SeedProd, head to the SeedProd » Settings page and paste your license key into the relevant field.
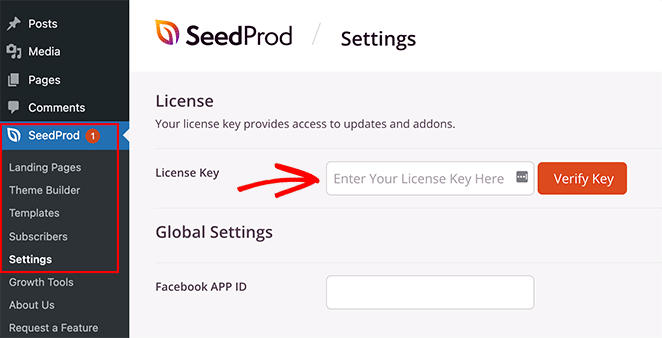
Once you click the Verify Key button, you’ll be able to access all of SeedProd’s Pro features.
Step 2. Choose a Website Kit or Landing Page Template
There are 2 ways to use SeedProd on your WordPress website. You can either:
- Create a custom WordPress theme from scratch and replace your current theme
- Build a standalone landing page and keep your existing WordPress theme
For this guide, we’ll create a custom theme, but if you’d like to make a landing page instead, you can follow our step-by-step guide: How to Create a Landing Page in WordPress.
After setting up your page, you can return to this tutorial to learn how to darken your background images.
Since we’re creating a WordPress theme for this tutorial, you’ll need to navigate to SeedProd » Theme Builder from your WordPress admin area and click the Themes button.
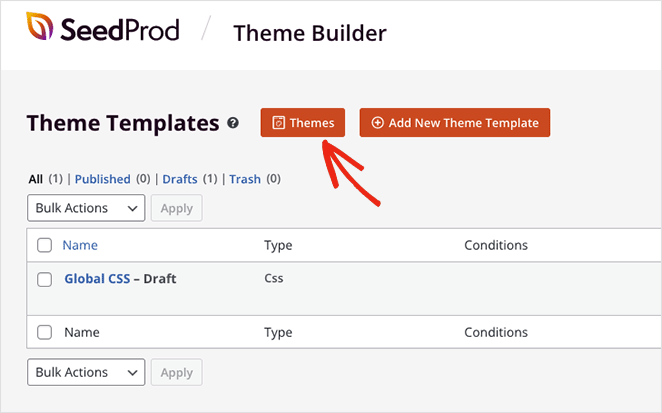
On the next screen, you’ll see a gallery of website kits you can use to create an instant WordPress theme.

Each kit comes with all the pages and theme templates your website needs. You can then customize each page with SeedProd’s drag-and-drop page builder.
Scroll through the kits until you find one that suits your business, then hover your mouse over the kit thumbnail and click the checkmark icon.

After importing the website kit, you’ll see a list of the parts that make up your new WordPress theme. To customize any part, click the Edit Design link, and it will open in the visual page builder, where you can add your custom background image.
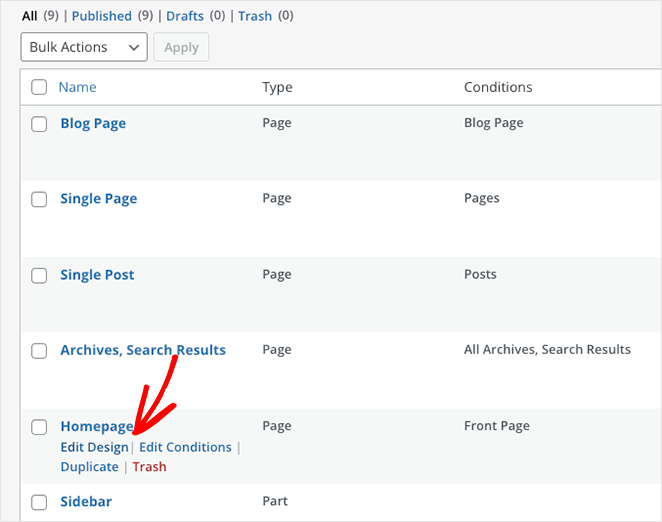
Let’s start by editing the Homepage design.
Step 3. Add Your Background Image to WordPress
When you open a template in SeedProd’s page builder, you’ll see a layout similar to the example below.

There are blocks and sections for adding content on the left and a live preview of your design on the right with elements used in your website kit.
You can customize your template easily by clicking any element on the preview. This will open a panel with settings for that element and customization options.

You can also drag a block from the left onto your page to add more content, such as optin forms, social media icons, videos, images, buttons, and more.

Adding a background image to any section is just as easy. Click the area you want to edit, and delete the default background image.

You can then upload a new image from your computer or WordPress media library.

Step 4. Add an Overlay to Dim your Background Image
As you can see in our previous example, the background image we’re using doesn’t contrast enough with the headline, making it hard to read.
Fixing this is super easy and takes only a few clicks. Simply find the Dim Background heading in the section settings and drag the slider to the right until your heading stands out.

You can also use the same panel to add a color overlay to your background image. This is an excellent way to link your brand’s colors into your web design and make your site more recognizable.
To do that, find the Overlay Color heading and click the color picker to select a custom color. Choosing a color is quite simple. You can point and click to find a color that works or use the arrows to enter a:
- Hex value
- RGBA value
- HSLA value

This is an excellent solution if you already know which color you want to use.
Besides adding an overlay to your image, you can also change the section background color, use a gradient instead of an image, and change the background image position.

For example, clicking the drop-down arrow lets you position your background in the following ways:
- Full Screen Cover
- Full Screen Cover – Fixed
- Full Screen Contain
- Full Screen Contain – Fixed
- 100% Width Top
- 100% Width Bottom
- Background Repeat
- Repeat Horizontal Top
- Repeat Horizontal Bottom
- Repeat Vertical Center
- Custom Position
Choosing the Custom Position option opens more detailed customization options.

For instance, you can change the X or Y position to show a specific portion of your image. You can also change the attachment type to fixed or scroll, set how the image repeats, and change the background size.
As a result, you can tailor each area of your background images to achieve the perfect look and feel.
Step 5. Darken Background Images Elsewhere in WordPress.
Now that you know how to dim background images with SeedProd, you can use the knowledge in other parts of your web design.
For example, you can add a background image to rows and columns and add a filter property to dim it, so your content stands out.

You can even customize your blog sidebar with a background image, so it’s easier to see in comparison to your blog posts. Simply upload your image, quickly tweak your settings, and you’re ready to publish.
Step 6. Publish Your Changes
For your website visitors to see your new background images, you’ll need to ensure you enable your custom SeedProd theme. To do that, head to SeedProd » Theme Builder and turn the Enable SeedProd Theme option to the “Yes” position.

That’s it! Now you can preview your theme and see your background overlays in action.
Here is an example of our new homepage background image:

You can also see our “About Us” section and sidebar background images below:


In this step-by-step guide, you’ve learned how to dim a background image in WordPress without CSS, HTML, or any other coding knowledge.
Here are some other guides we think you’ll find helpful:
- Landing Page Navigation Is Dead: Here’s Why
- How to Create Text Animations in WordPress (Easy Steps)
- How to Create Fancy Section Dividers for WordPress Websites
Ready to dive in and customize your WordPress site without code?
Thanks for reading! We’d love to hear your thoughts, so please feel free to leave a comment with any questions and feedback.
You can also follow us on YouTube, X (formerly Twitter), and Facebook for more helpful content to grow your business.


