Do you want to make a custom WordPress login page?
Customizing the WordPress login page is a great way to improve your website’s branding, security, and user experience.
If you run a membership site or an online store, users will need a page to log in. So customizing the default WordPress login area will help you reflect your brand and offer a better user experience.
This article will show you how to customize the WordPress login page in easy steps.
Table of Contents
- Benefits of Customizing Your WordPress Login Page?
- Custom WordPress Login Page Design Examples
- How to Customize WordPress Login Page Using SeedProd
- Customize WordPress Login Page Using WPForms
- How to Customize WordPress Login Page Manually
- Customize WordPress Login Logo and URL
- Customize WordPress Login Page Error Message
- Testing Your Customized Login Page
- Customize WordPress Login Page FAQs
Benefits of Customizing Your WordPress Login Page?
Depending on your hosting, the default WordPress login page shows the WordPress logo. It also indicates form fields for users to enter their usernames and password.
This is fine if you’re a small blogger or small business website because you’re likely the only person with wp-admin login access to the backend.
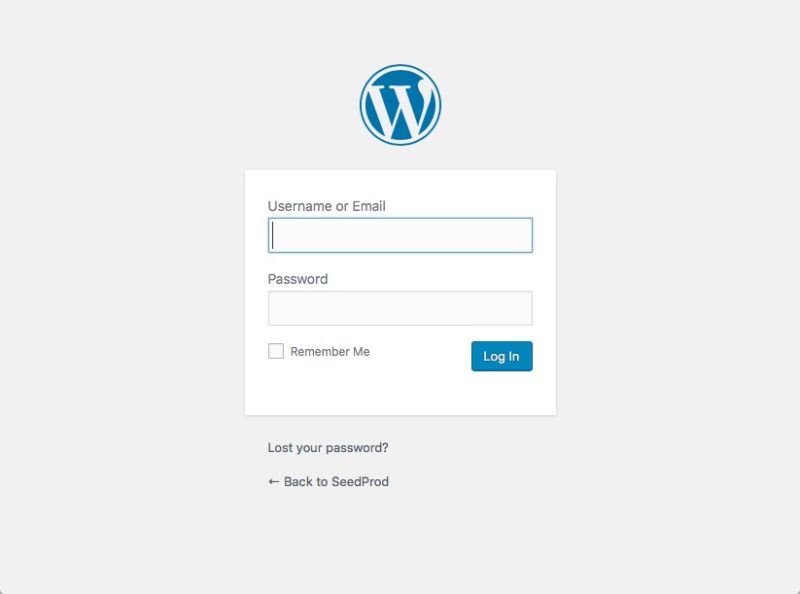
But if your site lets people register and log into your dashboard , you can replace the default WordPress login page and offer a better, more professional, user-friendly experience.
Users feel more at home with a custom login design and logo because they recognize your branding. Meanwhile, sending them to a login screen that looks nothing like your website could seem suspicious.
Furthermore, the default WordPress login screen doesn’t have anything but the login form input fields. That means you can’t easily put your stamp on it.
Custom WordPress Login Page Design Examples
Website owners can customize the WordPress login page in many ways. You can add different styles and images, link back to your homepage, include calls-to-action to upsell other products, and even add social media profile icons.
Here are some examples of what you can do:
MonsterInsights WordPress Login Page Customization
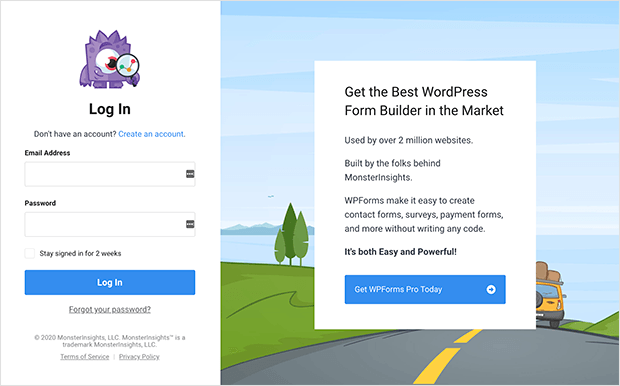
MonsterInsights uses a 2-column layout for its login page design. On the left is the login form, and on the right is a CTA for its sister product.
This login page example includes an engaging background image to create a unique login experience.
TED Custom WordPress Login Page

TED’s login page is another example with a 2-column design. On the left is an engaging image and headline, and the right column offers multiple ways to log in.
Users can also sign up for a TED account by entering their email addresses.
Church Motion Graphics Customized Login Page
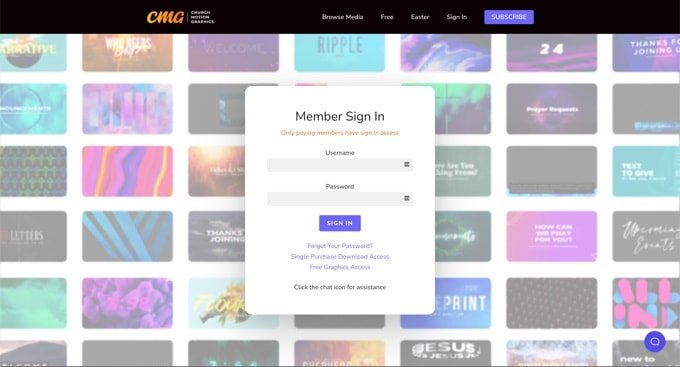
This login page instantly captures attention with its colorful background. The background image reflects what the business does and gives users an idea of what to expect.
The header, footer, and navigation menus are the same across the site. However, the login form is minimalist, contrasting the bright website image with a light background.
Here are a few more login page examples for inspiration.
With this in mind, let’s explore the different methods to customize your login page in WordPress. We promise it won’t involve any tricky custom CSS or HTML.
We’ll walk you through creating a WordPress custom login page using the best WordPress plugins for the job, SeedProd, and WPForms.
How to Customize WordPress Login Page Using SeedProd
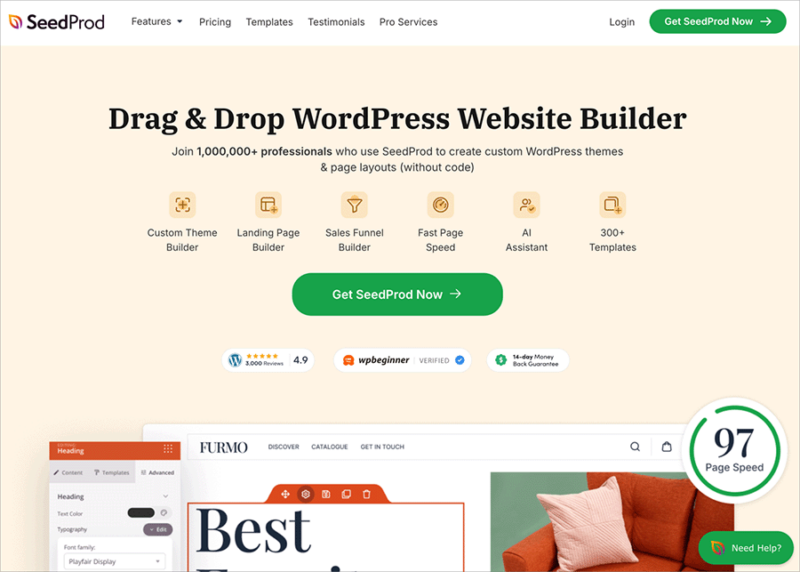
SeedProd is the best WordPress landing page builder and theme builder with coming soon and maintenance mode functionality. Like Elementor, it allows you to create any type of landing page or theme in WordPress with its beginner-friendly drag-and-drop builder.
With tons of responsive WordPress themes and landing page templates, you can make stunning:
- Coming soon pages
- Maintenance pages
- Sales pages
- Webinar registration pages
- Lead squeeze pages
- 404 error pages
- WordPress thank you pages
- Custom login pages
With the built-in front-end Login Page mode and login form block, you can completely transform your WordPress login page. Users can log in and out quickly, and it works with any WordPress theme.
Best of all, SeedProd is fast, bloat-free, and won’t slow down your website. Unlike other landing page builder plugins, its focus is on generating leads and results for your business.
Note: There is a free version of SeedProd on WordPress.org. However, we’ll use SeedProd Pro for the advanced customization features and login page modes.
Follow the steps below to style the default WordPress login page with SeedProd’s custom login page customizer.
Step 1: Install and Activate SeedProd
The first step is downloading the SeedProd plugin and installing it on your WordPress website.
If you’re unfamiliar with that, check out this step-by-step guide to installing a WordPress plugin.
After installing and activating the plugin, you’ll see the SeedProd welcome page in your WordPress admin dashboard area. This is where you can enter your license details and view the quick start video.

After entering your license key, click the Create Your First Page button.
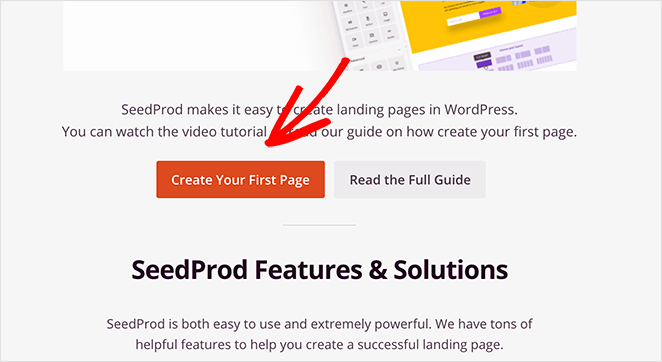
Step 2: Edit Your WordPress Login Page
After clicking to create a new page in SeedProd, you’ll see the following overview:
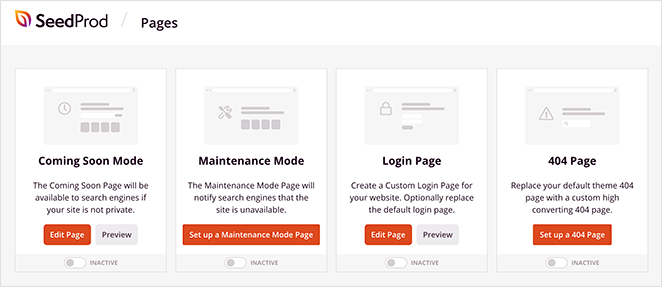
These are the different page modes you can enable in SeedProd. For this tutorial, we need the Login Page mode.
So go ahead and click Edit Page under the Login Page heading.
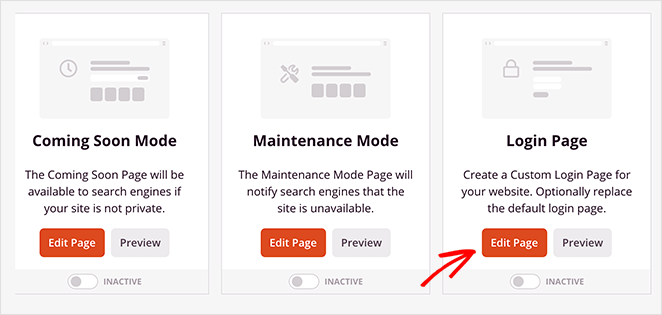
Step 3: Choose a Custom WordPress Login Page Template
You’ll see SeedProd’s library of landing page templates on the next screen. Every template is multipurpose, and you can customize them in the visual page builder.
It includes 404 error message templates, sales page templates, coming soon pages, etc.
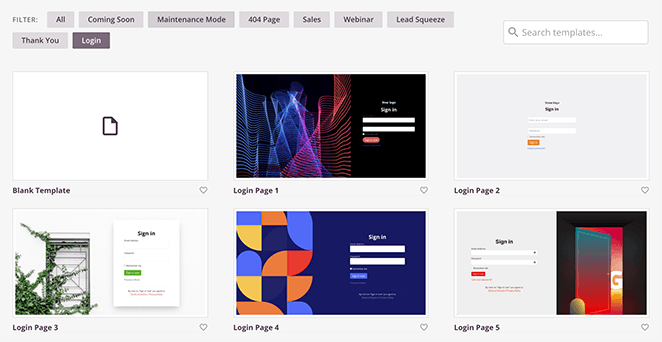
Clicking the Login button shows all the login page templates you can use. Just hover your mouse over the template you like best, and click the tick icon.
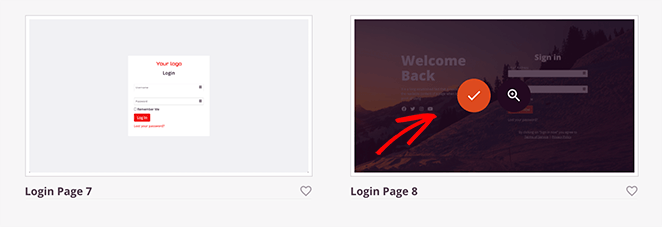
For this guide, we’ll choose Login Page 8.
After choosing your WordPress login page template, you’ll see a popup asking you to enter a custom page name and URL.
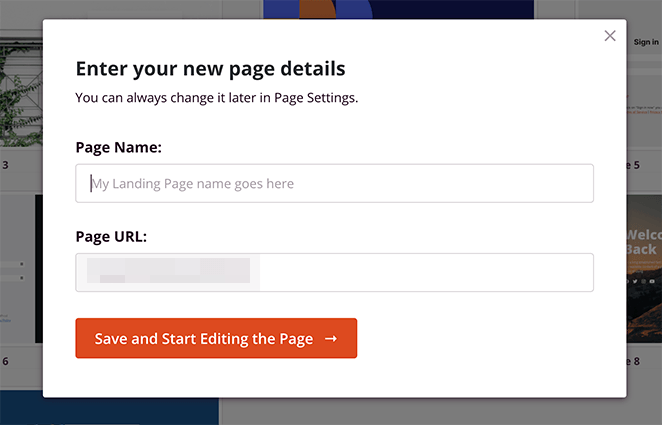
Click the Save and Start Editing Page button to launch it in the drag-and-drop editor.
Step 4: Customize Your WordPress Login Page
SeedProd’s drag-and-drop landing page editor has 2 distinct sections. You’ll see the page blocks and sections you can use on the left. And on the right-hand side is a live preview of your landing page.
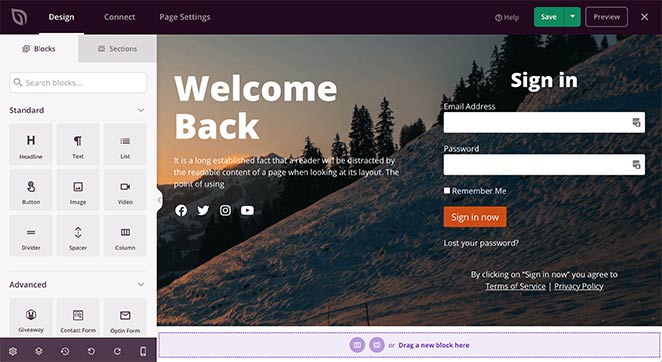
To add new content to your login page, drag a block from the left and drop it onto your page. For instance, you can add a login logo to your page with a few clicks.
Clicking on any block on your page allows you to customize the content. For instance, clicking the login form shows SeedProd’s Login block settings in the left-hand panel.
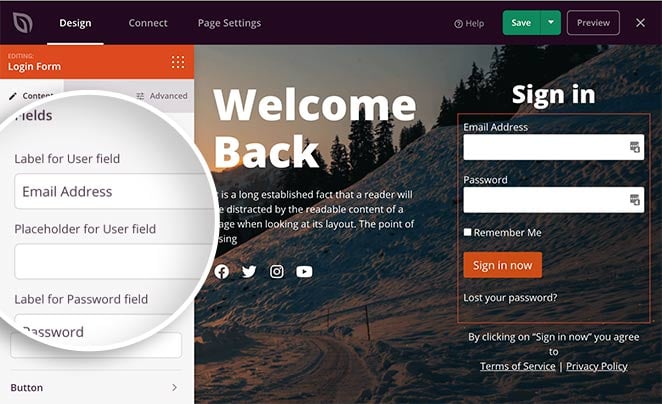
In that area, you can customize your login form labels, show and hide name and password fields, and customize the button text and checkbox.
You can choose from several different login form styles when you click the Templates tab.
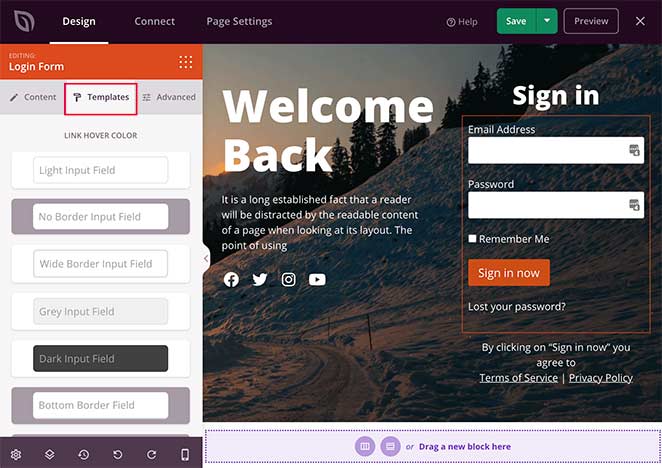
This is an easy way to customize your form without any technical knowledge. Just choose your preferred style, which instantly shows on your form.
Adding extra content to your login page is just as easy. You can add buttons, columns, images, and other layout-focused elements to any standard blocks.
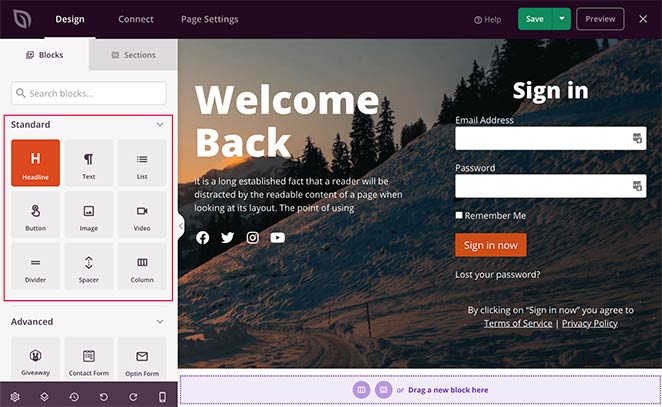
On the other hand, Advanced Blocks help generate leads for your business.
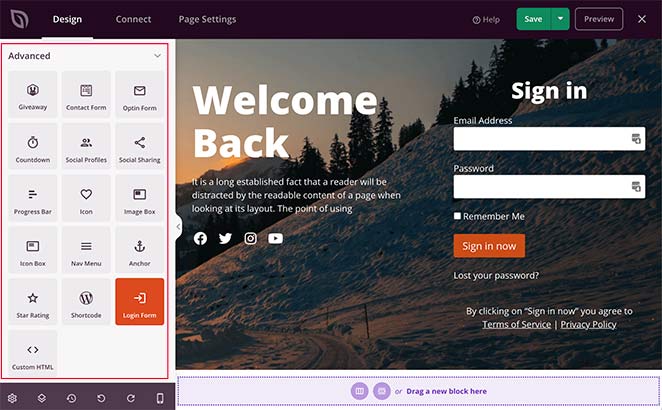
With a few clicks, you can embed:
- Giveaways
- Contact forms
- Optin forms
- Countdown timers
- Progress bars
- Social profile buttons
- Social media sharing buttons
- WooCommerce products
- And more.
This is a fantastic way to turn your login page into a lead-generating machine. For instance, you can show users a giveaway on your login page to grow your social followers, increase brand awareness, and even boost your email list.
Aside from individual blocks, SeedProd also has landing page Sections. These are page areas you don’t need to build manually, block-by-block. You can see the different sections by clicking the Sections tab.
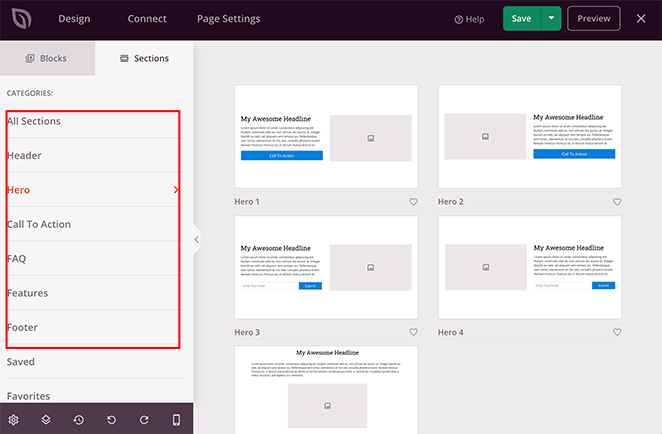
From there, you can choose a new:
- Header
- Hero area
- Call to Action
- FAQ section
- Features area
- Footer
And add them to your page automatically.
You’ll want to change your login page background, fonts, and colors. It’s time-consuming doing this individually for every block on your page.
Luckily SeedProd allows you to control these settings globally. Just click the gear icon in the bottom-right corner of your screen to see your Global Settings panel.
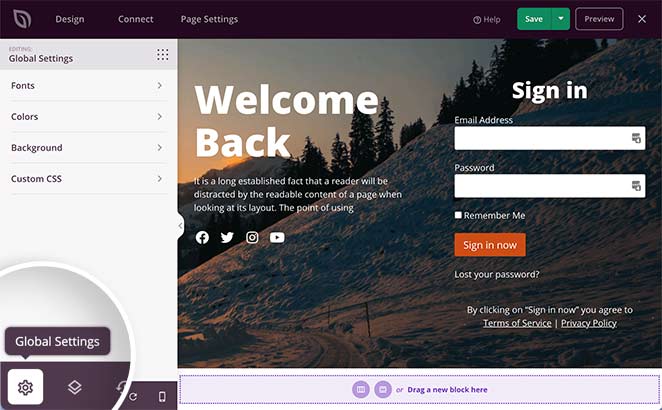
Under the Fonts tab, you can change your header and body fonts and weights. Just choose a new font size or weight from the drop-down menus.
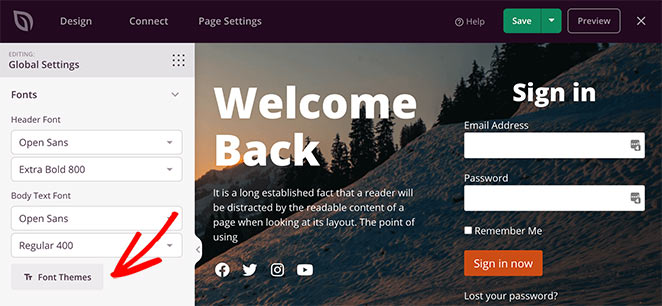
You can browse SeedProd’s library of font combinations by clicking the Font Themes button.
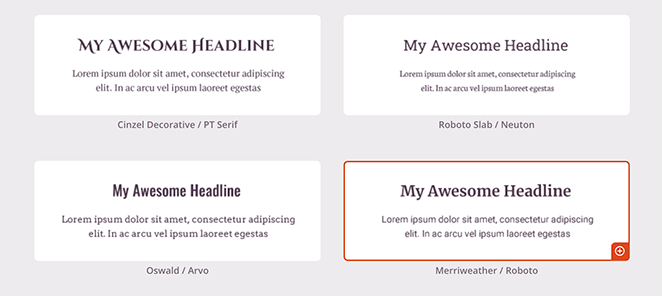
This will show you which fonts look the best together so you can click once and add them to your page.
You can select different colors for global links, headers, text, buttons, and backgrounds with the color picker tool.
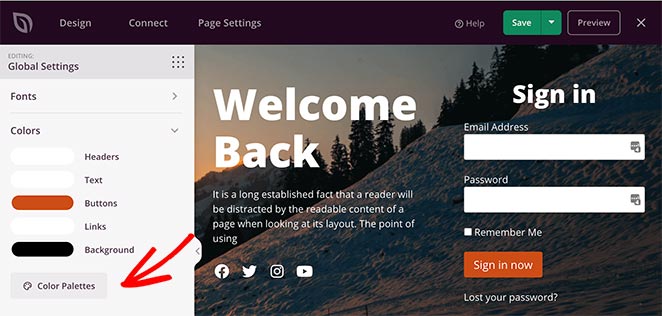
Or, you can click the Color Palettes button to choose from 20+ color schemes.

The Background section provides an easy way to customize your login page background. You can set a solid background color or gradient or upload a full-width background image.
Click the trash can icon in the background settings panel to remove the existing image.
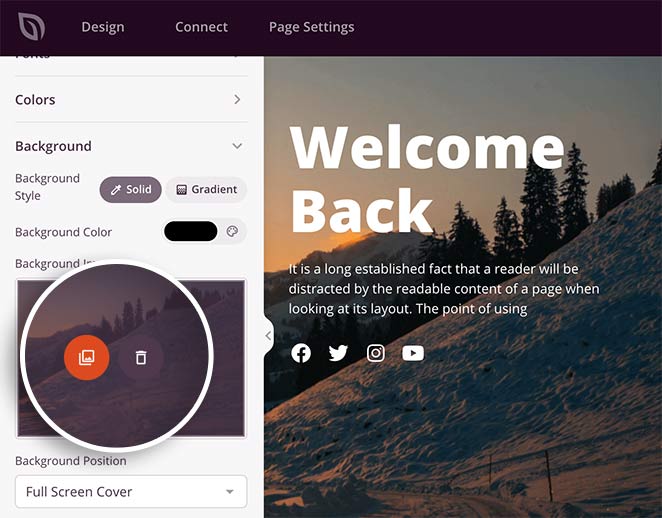
You can click the Use Your Own Image button to select a new image from your computer or WordPress media library. From there, you can adjust the background-size, background-repeat, an other options.
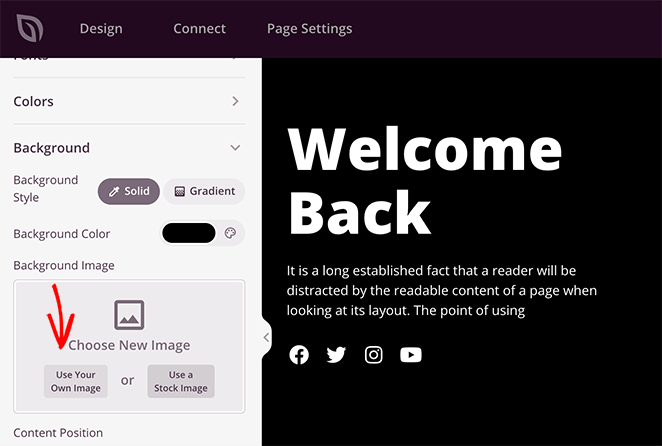
You can also add a video background or background slideshow by selecting the toggle for each setting.
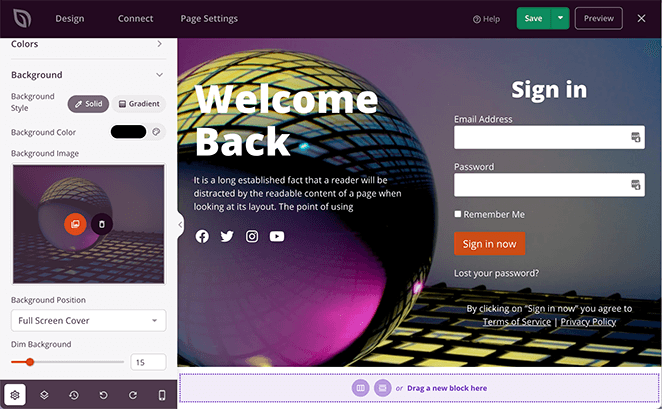
Remember to click Save to store your customization settings.
Step 5: Configure Your WordPress Login Page Settings
With your login page design in place, it’s time to configure a few necessary settings.
First, connect your email marketing service. This is useful if you have an optin form on your login page and wish to collect users’ email addresses.
To do this, click the Connect tab at the top of your screen, choose your preferred email service, and follow the steps to link your account.
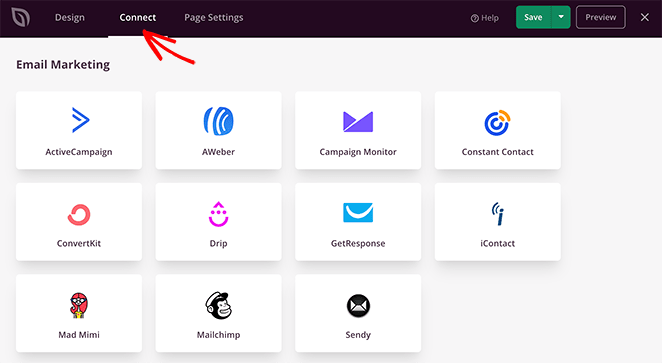
SeedProd integrates with popular email newsletter services, including:
- ActiveCampaign
- AWeber
- Campaign Monitor
- Constant Contact
- ConvertKit
- Drip
- GetResponse
- iContact
- Mad Mimi
- Sendy
- Mailchimp
There’s no need to worry if you don’t have an email provider. You can still collect email addresses with SeedProd’s subscriber management feature.
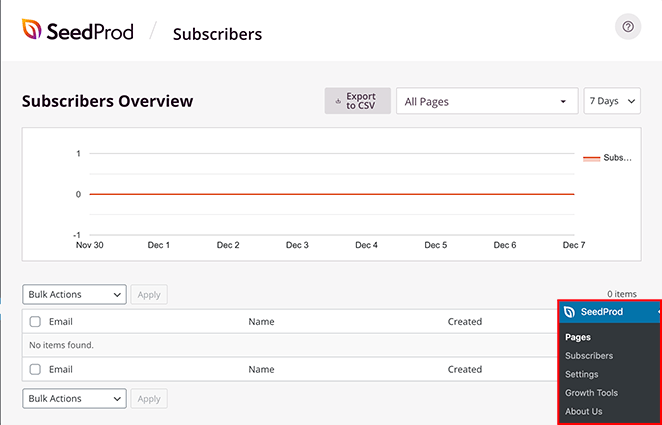
Whenever someone subscribes via your landing page, their details are stored automatically on your WordPress website. You can view your subscribers by heading to SeedProd » Subscribers from your WordPress dashboard.
The next step is to click the Page Settings tab at the top of your screen.

On this page, you can change the following settings on your landing page:
- General details – Change your page name and URL, and set it to draft or published.
- SEO – Edit your page SEO title, meta description, etc., via an SEO plugin like All in One SEO.
- Analytics – View your login page performance using an analytics plugin like MonsterInsights.
- Scripts – Enter tracking and retargeting scripts such as cookies or Facebook tracking pixels.
Remember to click the Save button before moving on to the next step.
Step 6: Check Your Login Page is Mobile Friendly
Any web page you publish must be mobile responsive. If it isn’t, it’s harder for mobile users to browse and use your website.
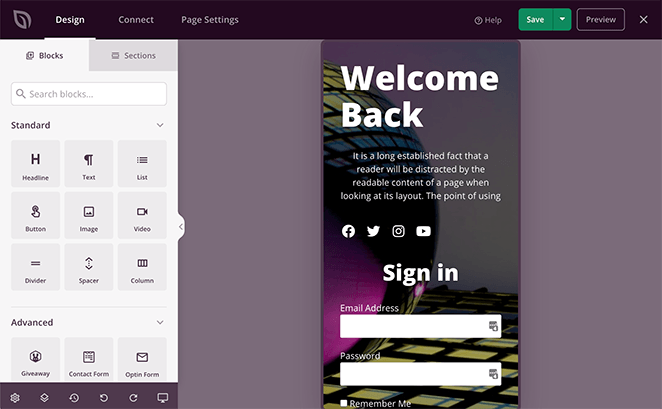
As well as our mobile responsive landing page templates, SeedProd has a handy mobile preview option. This will allow you to ensure your login page looks great on all devices.
To view your WordPress login page mobile preview, click the mobile preview icon at the bottom of your screen.
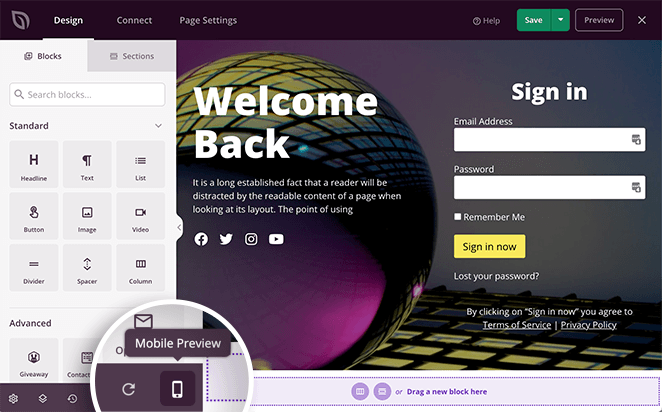
This shows your login page as mobile users would see it. With the desktop view, you can edit it as you would, and SeedProd will save the changes across both views.
Step 7: Publish Your Custom WordPress Login Page
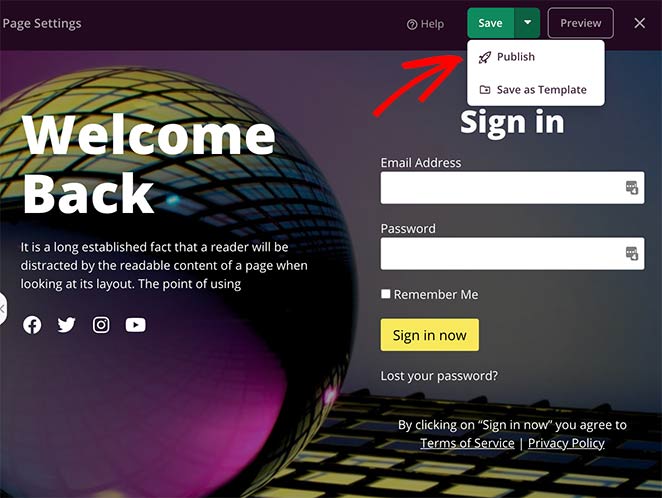
Now that you’ve created your custom WordPress login page and checked it on mobile devices, it’s time to make it live. Click the down arrow next to the green Save button and select Publish to do this.
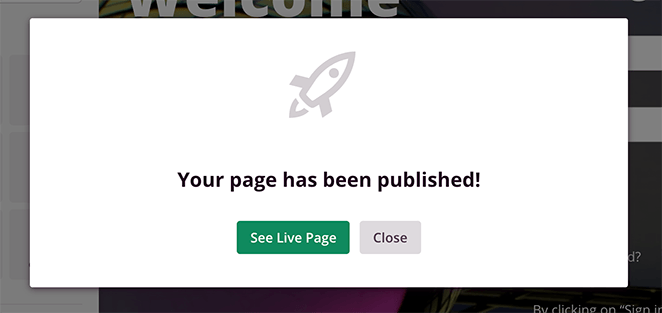
Afterward, you’ll see a popup telling you your page is live.
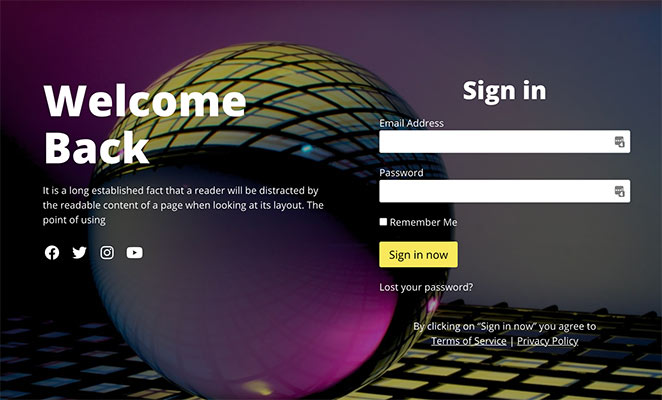
Go ahead and click the See Live Page button to see how it looks.
The last thing you need to do is enable login page mode in your WordPress admin area.
Click the “X” icon to exit the page builder and see your SeedProd landing page dashboard.
Then, under the Login Page heading, switch the toggle from inactive to Active.
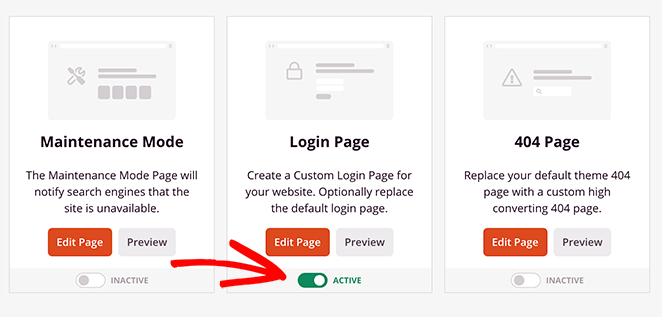
Congratulations! Now anyone visiting your WordPress login page will see your custom design.
Customize WordPress Login Page Using WPForms
The second method to customize the WordPress Login screen we’ll cover today involves using the popular WPForms plugin.
WPForms is the best drag-and-drop form builder for WordPress. And what you might not realize is that you can use its handy User Registration Form add-on to build a login page for your website.
With over 3 million website owners using WPForms to build smarter forms and surveys, you can be confident knowing you’re in good hands.
So if you don’t need a form plugin dedicated to creating login pages, follow this step-by-step tutorial to create a WordPress custom login form using WPForms. The guide will also tell you how to add a lost password link to your form and display your login form using a shortcode.
How to Customize WordPress Login Page Manually
If you prefer to make changes or add custom styling to your existing login page instead of creating a brand new login page or using a WordPress login plugin, you can. This method involves adding code to your theme’s functions.php file or in a site-specific plugin.
It’s more difficult than using a page builder or WordPress customizer, so it may not suit your needs.
If you’re new to this, you can refer to this guide on how to add code snippets in WordPress. This is so you don’t break your website accidentally.
Now add the following code to your theme’s functions.php file:
//Custom login page
function clp_login_head() {

    echo '<style>'; //Begin custom styles
    echo '.login #nav a, .login #backtoblog a { color: # !important; }'; //Login page link color
    echo '.login h1 a { background:url("' . get_bloginfo('stylesheet_directory') . '/images/IMAGE GOES HERE"); width: px; height: px; }'; //Login page logo
    echo '.login .button-primary { background:#; border-color:#; }'; //Login page button color
    echo '</style>'; //End custom styles

}
add_action('login_head', 'clp_login_head');
You can change the CSS and image URL using the code above. This will add custom styling to your WordPress login page.
Show Your WordPress Login Form Anywhere Without a Plugin
You can add this code to your theme’s template file if you want to display your WordPress login form on any page without a WordPress login plugin, sidebar login widget, or footer area.
<?php
          wp_login_form();
?>
This code will only display the general WordPress login page in the place where you add the code.
If you want to add a custom WordPress form page with additional fields and options, then you can use this code:
<?php $args = array(
        'echo' => true,
        'redirect' => 'http://wpsnipp.com',
        'form_id' => 'loginform',
        'label_username' => __( 'Username' ),
        'label_password' => __( 'Password' ),
        'label_remember' => __( 'Remember Me' ),
        'label_log_in' => __( 'Log In' ),
        'id_username' => 'user_login',
        'id_password' => 'user_pass',
        'id_remember' => 'rememberme',
        'id_submit' => 'wp-submit',
        'remember' => true,
        'value_username' => NULL,
        'value_remember' => false );
wp_login_form($args);
?>
Customize WordPress Login Logo and URL
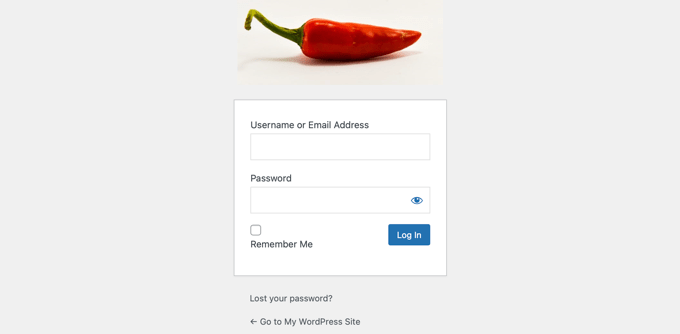
You don’t always have to make a custom login page for your WordPress website. Sometimes, you can simply change the logo and the link to the logo on the default login page.
If you want to change the logo on the login screen to your own, you can easily use a plugin for WordPress.
To that, first install and activate the Colorlib Login Customizer plugin. After activating it, navigate to Appearance » Customize from your WordPress admin and click the new ‘Colorlib Login Customizer’ item.
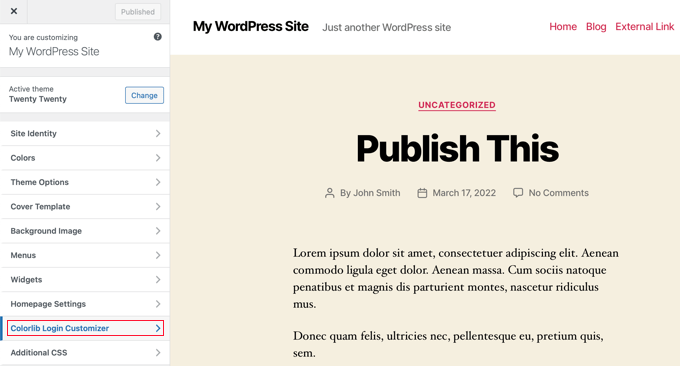
The customizer will load your default WordPress login screen with customization settings on the left and a live preview on the right.
To replace the default WordPress logo with yours, click the Logo options tab.
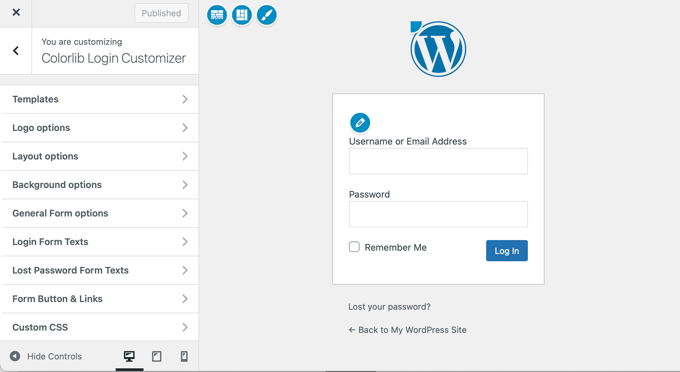
Now you can hide the WordPress logo, upload your custom logo, and change its URL and text.
Additionally, you can change the size of the text and the width and height of your logo.
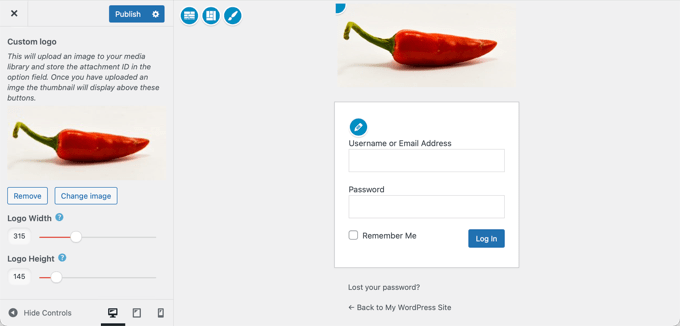
If you like, you can even customize the default WordPress login page completely with columns, background images, custom colors, and more. Make sure you publish the changes when you’re happy with your new login page logo.
Customize WordPress Login Page Error Message
If a user enters the wrong username or password in WordPress, they’ll see default error notifications. These messages, such as “Invalid Username” or “The email address isn’t correct”, clearly explain what the issue is.
LoginPress is a tool you can use to modify these login error messages. For instance, you might want to add more detail to the default messages to show how to fix it.
However, while this can help genuine users access their accounts, it can inadvertently aid hackers. They often try to infiltrate websites using combinations of popular usernames and passwords. The default error notifications can help hackers learn when they’ve entered the correct username or password.
As a protective measure, you may want a more generalized error notification. To modify these, choose Error Messages from the WordPress Customizer menu:
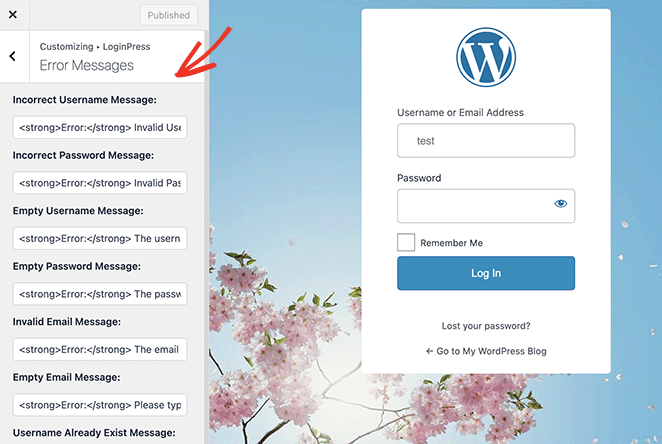
From there, you can make any changes you want to the login error message. They are compatible with HTML formatting, allowing you to include stylistic features such as bolding or italicizing significant text.
Testing Your Customized Login Page
Testing is an essential step in the process of customizing your WordPress login page. Here’s a brief guideline on how to perform the test:
- Page Loading: Check whether the page loads correctly without any glitches or broken elements.
- Logo & Design: Ensure the new logo and design appear as expected.
- Functionality Test: Try to log in with your username and password. Ensure the process is smooth and successful.
- Error Messages: Enter incorrect login credentials and check if error messages display appropriately.
- Forgot Password Feature: Test the “Forgot Password” feature to ensure that it sends an email with the password reset link correctly.
- Custom URL: If you have set a custom URL for the login page, verify that it redirects correctly to the new login page.
- Responsiveness: Check the page’s look and feel on different devices (mobile, tablet, and desktop) to ensure it is responsive and user-friendly.
Customize WordPress Login Page FAQs
What If I can’t find my WordPress login page?
You can find your WordPress login area in 2 ways using the WordPress login URL or link.
- Add wp-login.php to the end of your URL, for instance: http://example.com/wp-login.php.
- Or add wpadmin to the end of your URL, such as http://example.com/wpadmin.
If you keep forgetting your login details, you can always check the “remember me” box so you won’t need to log in each time.
Is it necessary to customize my WordPress login page?
No, but customization can enhance your site’s appearance and increase security.
Will customizing the login page affect my website’s performance?
No, if done correctly, it should not affect your website’s performance.
What if I face issues after customizing the login page?
You can always seek help from the plugin’s support, WordPress forums, or hire a professional.
That’s it!
You now know how to create a WordPress custom login page. You can keep your WordPress site looking professional and offer an excellent user experience for your customers.
Try SeedProd today to easily customize your WordPress login page. With SeedProd, you can change the colors, fonts, logo, and more, all without writing any code.
Thanks for reading! We’d love to hear your thoughts, so please feel free to join the conversation on YouTube, X and Facebook for more helpful advice and content to grow your business.

