Need an easy way to make a link in bio landing page for Instagram or TikTok?
Many influencers and social media personalities create a custom link in bio page to drive traffic to web pages and other social media profiles. They’re a great way to combat the problem of only being able to add one link to your bio on sites like Instagram and TikTok.
But what many people don’t realize is that you can easily build these pages in WordPress, add multiple links, and drive lots of traffic to your business website. That’s why I’ve put together this guide, which will show you how to create a link page in WordPress.
How to Create a Link in Bio Landing Page:
What Is a Link in Bio Landing Page?
A link-in-bio page is a webpage that lets you add a link in your Instagram or other social meida bios and send followers to important links, like your website, products, or special offers. This is really helpful because platforms like Instagram only let you have one clickable link in your profile.
Adding a link in bio can bring way more people to your website from social media. For example, one study found it can increase traffic from Instagram by 10-15% (source). These pages are commonly used to promote what you do and connect with your followers better.
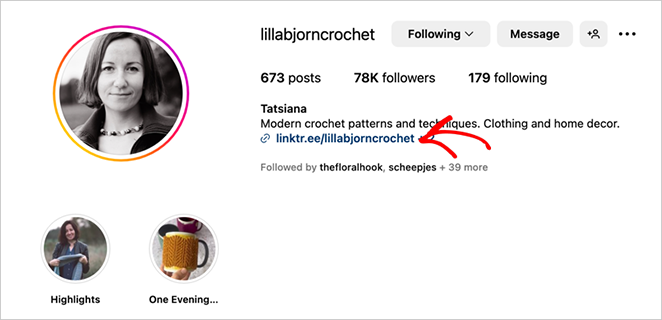
For example, craft influencer Lillabjorn Crochet’s Instagram link in bio page uses clear, easy-to-see buttons for each of her crochet patterns, so her fans can quickly find what they’re looking for. The simple design and consistent branding make it easy to use.
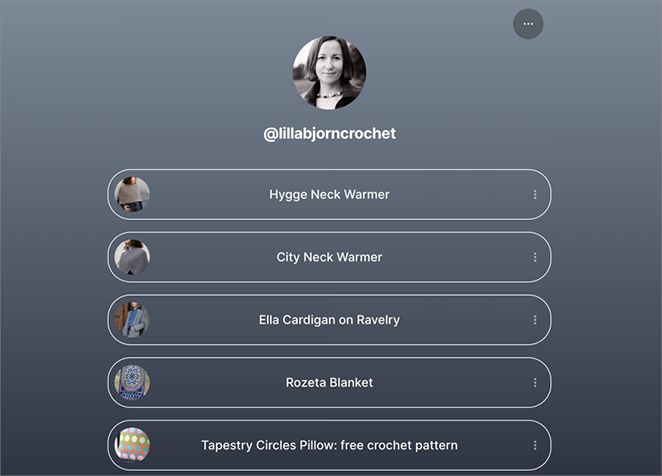
She could even use this page to add link to her, Instagarm Stories, blog posts, and other posts with a clear call to action. Without this type of page, she would only be able to show a single link to fans.
The tool I’ll show you how to use in this guide, includes templates and drag-and-drop builder so you can build a similar page with the same clean look and easy customization.
Why Use WordPress for Your Bio Link Page?
Before we dive into the how-to, let’s look at why creating your link in bio page in WordPress is a smart move:
- Complete Control and Customization: A popular link in bio tool specifically made for bio links can make it hard to match your brand’s look and feel. WordPress lets you design your page exactly how you want.
- Seamless Integration: Manage your link in bio page alongside your website content, all within your familiar WordPress dashboard.
- Analytics Integration: Easily connect your page to powerful analytics tools like Google Analytics to track clicks, engagement, and conversions.
- Avoid Third-Party Limitations: A third-party link in bio tool may come with restrictions on design, link in bio features, or link quantities. WordPress puts you in the driver’s seat.
- Own Your Data: When you use a separate bio link service, they keep your data. With a self-hosted option like WordPress, you control your own data.
- Cost-Effective: Linktree, is a popular free link in bio tool, but it’s limited in what you can do and how you can customize it. If you already have a WordPress website, you can create a similar page without paying extra each month, and you have total control over its design.
How to Create a Link in Bio Landing Page
For this tutorial, we’ll use SeedProd to create a WordPress bio link page.
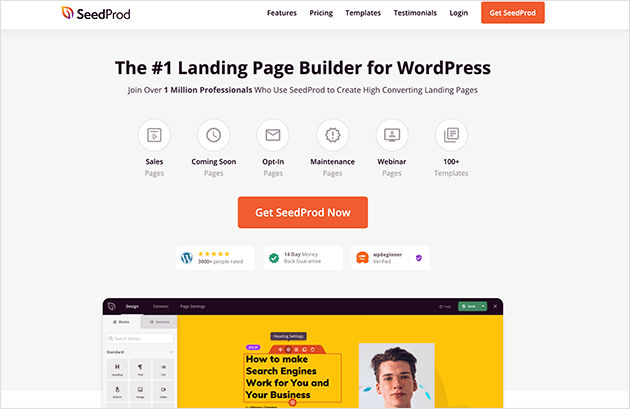
SeedProd is a popular WordPress drag-and-drop page builder.. It lets you customize any WordPress page easily without writing any code.
With SeedProd, you can create any type of landing page, and with its visual editor, you can easily create, edit, and customize your page and see the changes in real-time.
You can also use SeedProd for creating a link in bio page for your social profiles.
For this guide, we’ll focus on making an Instagram bio link landing page so you can show multiple links to fans on your Instagram account. That said, you can easily use this tutorial to create a similar multi-link page for other social media networks.
With that in mind, let’s jump into the tutorial!
Video Tutorial
If you would prefer to read the written instructions, follow the steps below.
1. Install and Activate the SeedProd Plugin
The first step is to download, install, and activate the SeedProd plugin by clicking the link below.
For help with adding it to your WordPress site, see this tutorial on how to install a WordPress plugin.
Note: SeedProd offers a free version or free plan you can use to create a free WordPress landing page. But today, we’ll use the paid plan for the advanced features and templates.
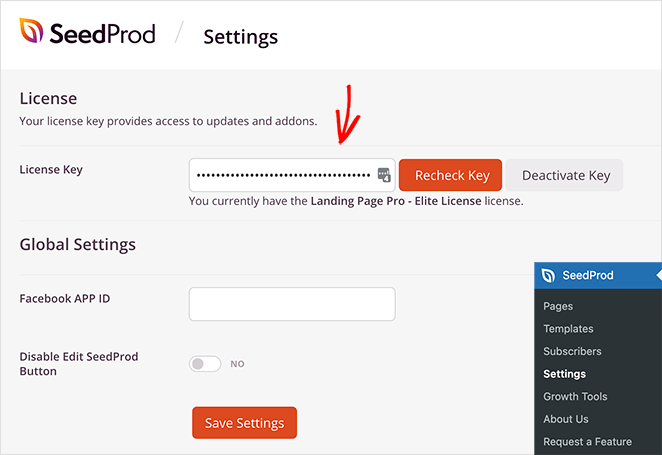
After activating the plugin, head to SeedProd » Settings, where you can enter your SeedProd license key. You can find this information in your SeedProd account area in the Downloads section.
2. Create a New Landing Page
The next step is to visit SeedProd » Pages, where you can create a new landing page.
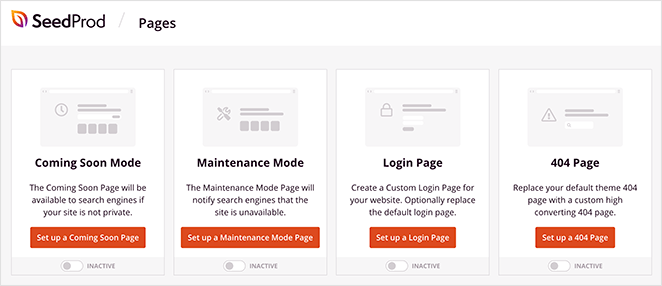
At the top of this page are several page modes you can activate with a single click, including:
- Coming soon
- Maintenance mode
- Login
- 404
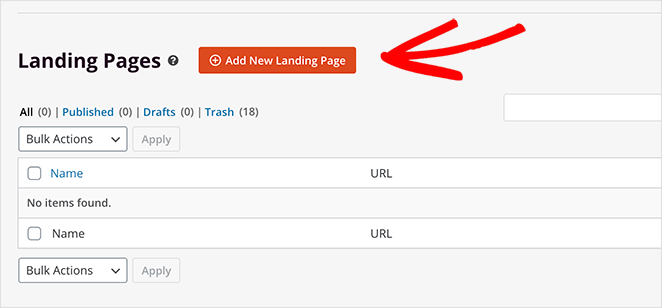
Under that section is where you can see any landing page you create with the SeedProd plugin. You can make as many custom WordPress pages as you like.
Click the Add New Landing Page button to make a new page.
3. Choose a Landing Page Template
You can choose a landing page template to use as a starting point for your bio link page on the following screen.
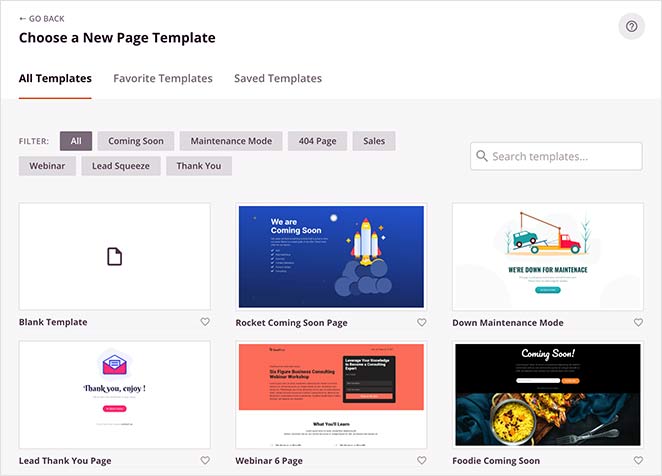
For this guide, we’ll use the Personal Links template, which you can find by clicking the Lead Squeeze filter.
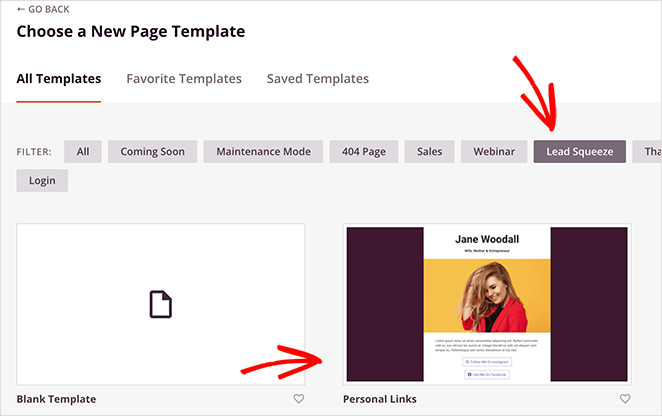
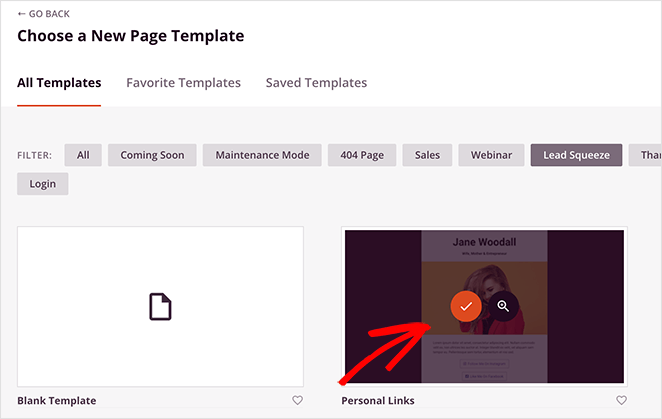
To choose this template, hover your mouse over the thumbnail and click the orange tick icon.
Next, you’ll see a popup where you can add a page name. The page name won’t appear on your landing page design, but it does set your page’s URL. So, choose a name that will make sense to your fans when you add the link to your Instagram bio.
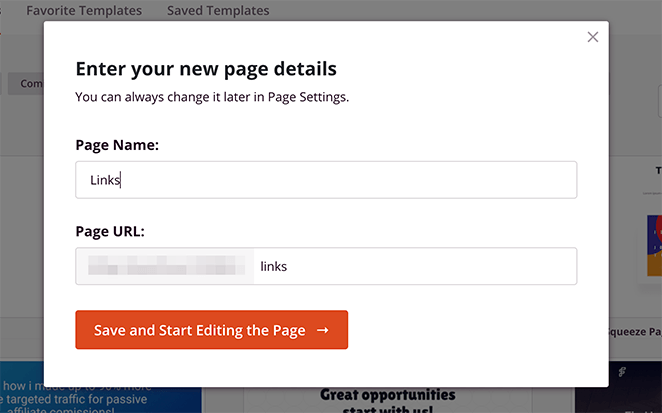
Now you can go ahead and click the Save and Start Editing the Page button.
4. Customize Your Landing Page Template
After launching your template, you’ll see SeedProd’s page builder screen. With the drag-and-drop interface, you can edit every part of your template.
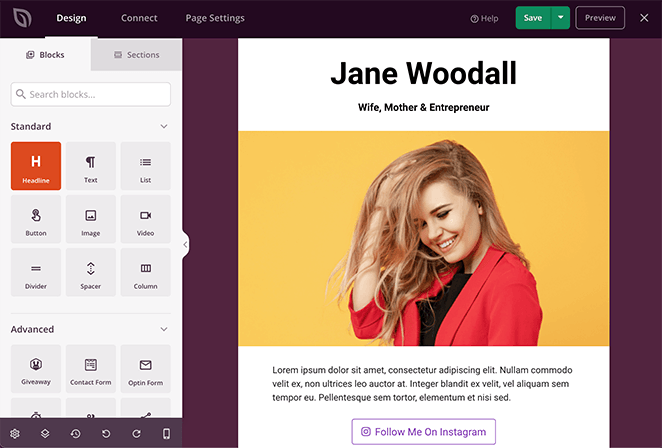
The left-hand sidebar offers a wide selection of blocks that you can drag and drop onto your page. And once a block is on your page, you can click it to show the content, templates, and advanced customization settings, again on the left.
Adding Your Logo
Since we’re making an Instagram bio link page, we’ll remove the main image and place-holder text.
To do that, hover over the image and click the trash can icon.
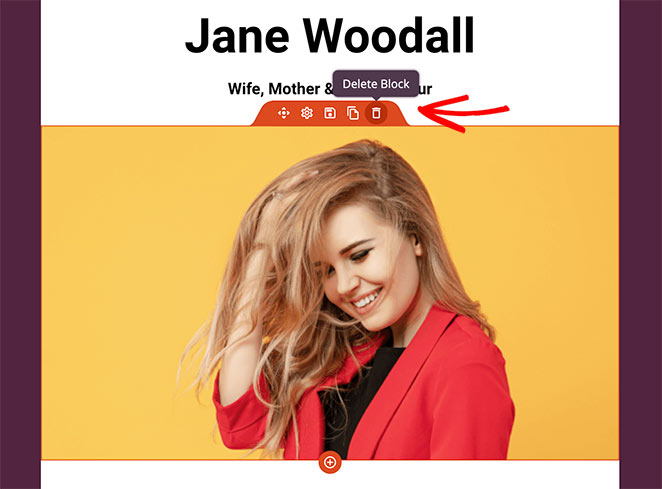
Then click, Yes Delete It on the following popup. You can then follow the same steps to delete the placeholder text.
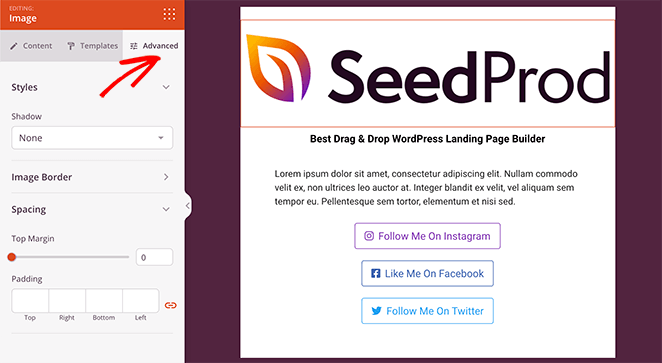
Now you can replace the default page header with your business name, tagline, and logo. To add your logo, click the Image block in the left-hand panel and drag it to the top of your page.
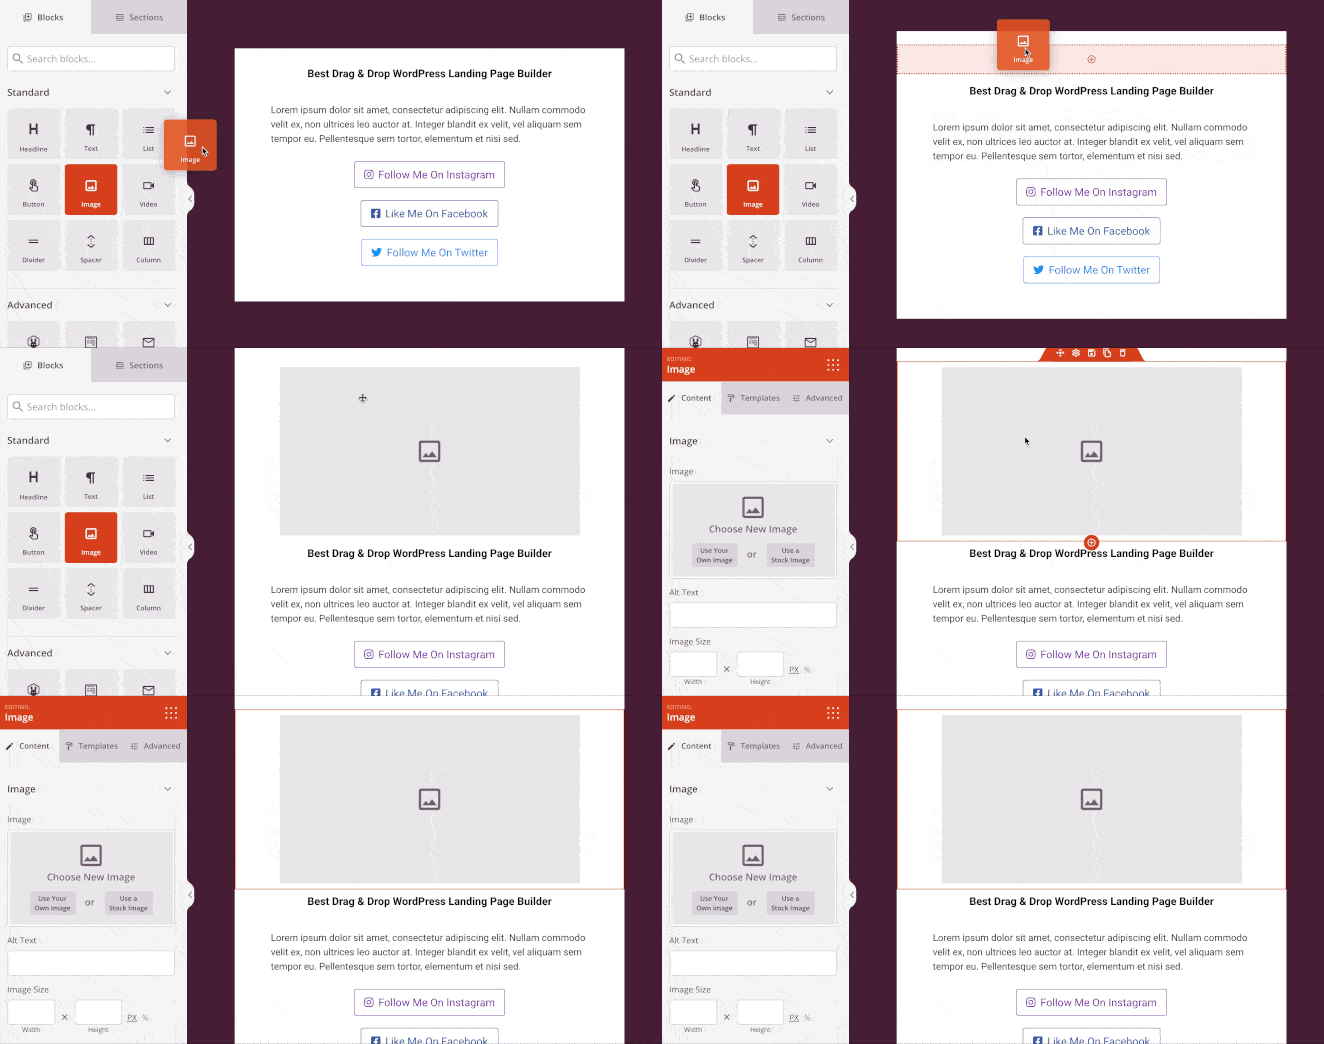
You can then click the block to see its settings on the left. Click the Use Your Own Image button to add your logo from your media library or upload it from your computer.
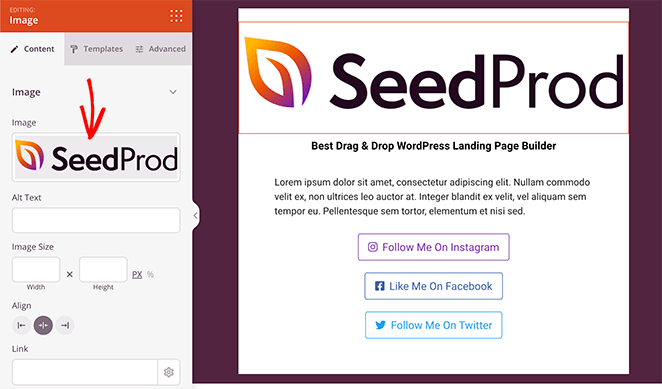
In the same panel, you can change the image size, alignment, and link to the image.
Clicking the Templates tab allows you to choose from several preset image styles.
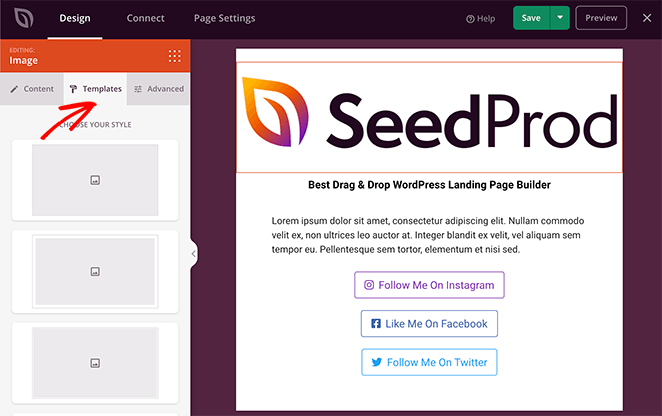
And in the Advanced tab, you can control the styles, padding, margins, and more.
Adding Your Links
Now let’s look at how to add custom links to your page. To start, you can customize the existing links with your own content.
To do this, click any of the link buttons and edit the content on the left.
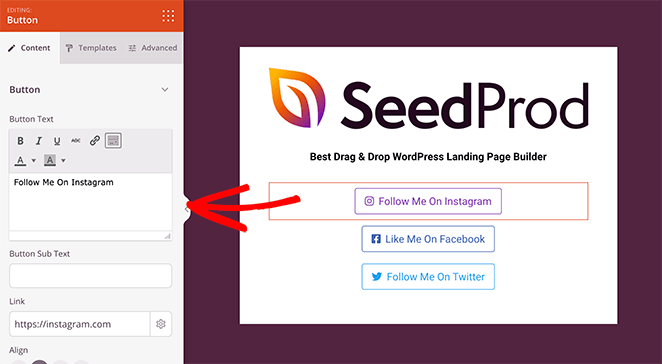
In the content panel, you can change the:
- Button text
- Subtext
- Button link,
- Alignment
- Size
- Icon
If you’d like to change the look of your button completely, click the Templates tab. In this area, there are several preset button styles you can choose from.
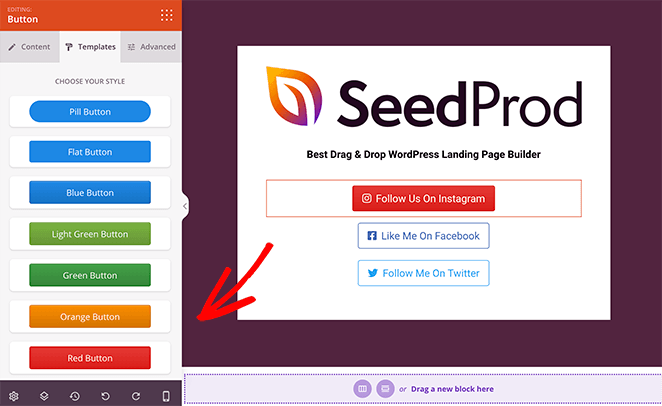
Click any style to add it instantly to your button link.
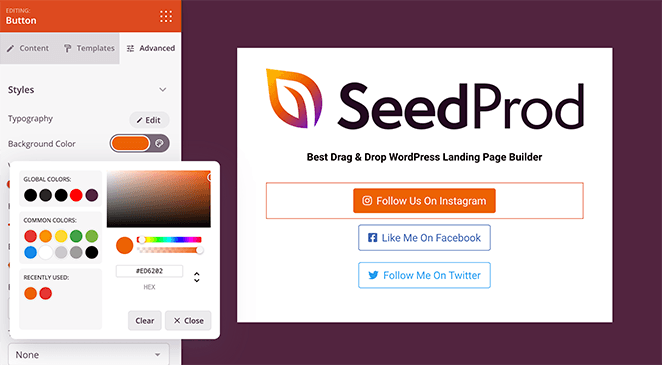
If you need a different style, click the Advanced tab, where you can select a custom color, button style, font, and more.
To add more links to your page, you can duplicate your customized link button. Just hover over a link and click the Duplicate Block icon.
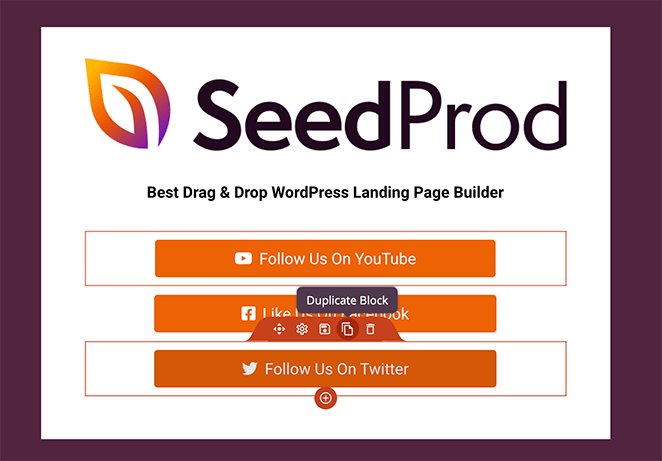
A copy of that block will then appear beneath the original block. Then it’s just a case of customizing the content as you did before.
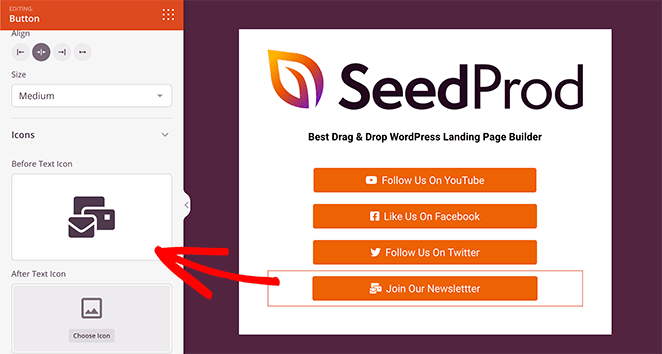
If you’d like to add different icons to your button links, scroll down to the Icons section of your content settings, click the icon image, and pick a new one from the icons library.
Changing your Background
The default background color of your link in bio template may not match your website or branding. The good news is, that you can change it easily in the global settings panel.
To find it, click the Gear icon in the bottom-left corner of your screen. This shows different options to customize your background, fonts, colors, and CSS and apply the changes to your page globally.
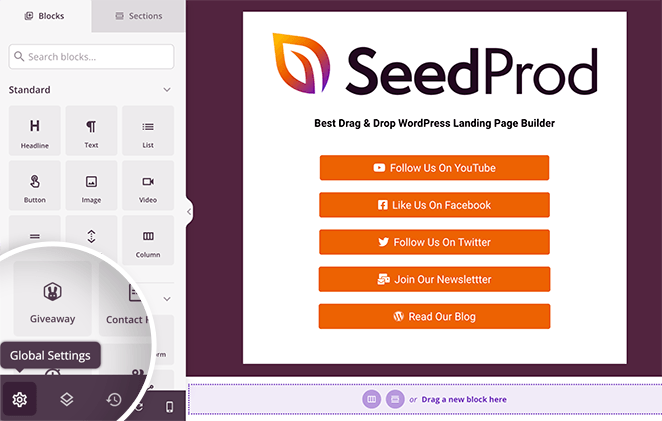
Note: Using this option won’t override any styles you’ve set in your Advanced block settings.
If you’d like to change your background color, click the Background heading. In this area, you can change the default background color or add a gradient background effect.
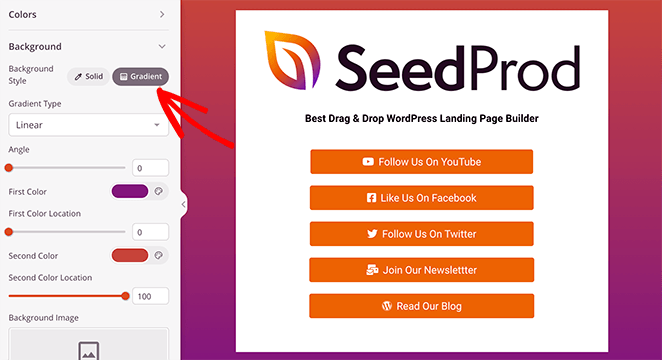
You can also use the same panel to add a custom background image, video, or slideshow.
When you’re happy with how your link in bio landing page looks, click the Save button in the top-right corner.

5. Publish Your Link in Bio Landing Page
Now that your page is ready, there’s one more thing to do before publishing. That is, to preview it on mobile. You should do this to ensure your design looks good for mobile users; otherwise, it can hurt their user experience.
To do this, click the Mobile Preview icon at the bottom of your screen.
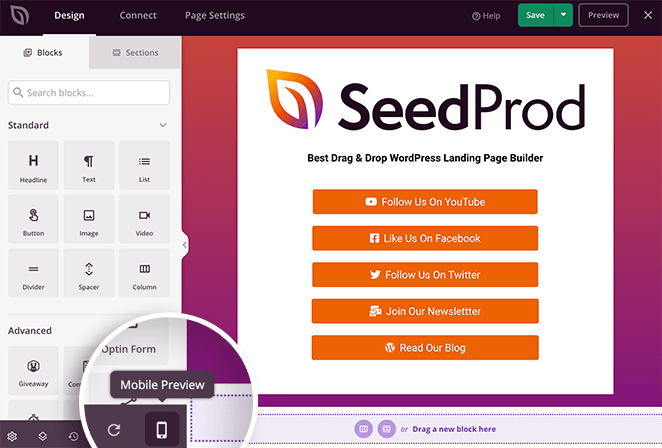
This shows a preview of how your page looks on mobile devices.
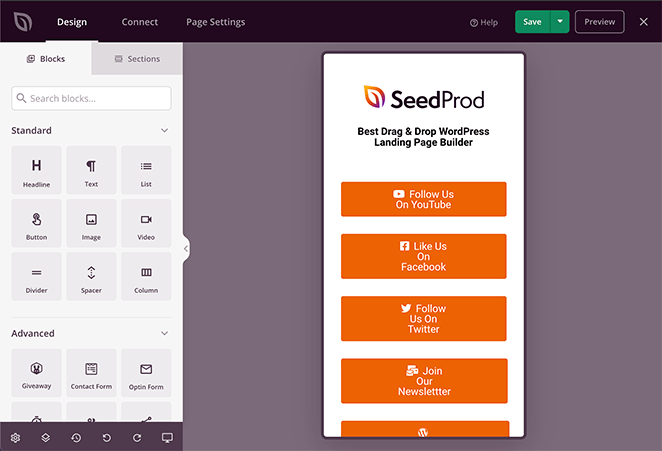
As you can see from the image above, our button links are too big on mobile, making them look out of place. To change that, all you need to do is click any block, as you would on the desktop view, and edit it until it looks how you want.
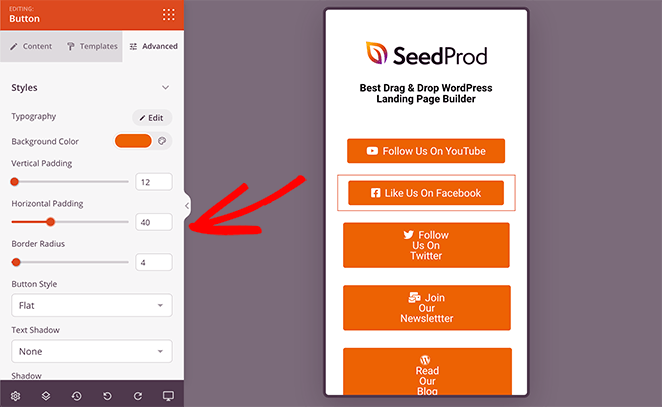
In our case, we wanted the button text all on a single line. So we simply changed the horizontal padding slider until it looked right.
Now, you’re ready to publish your Instagram bio link page in WordPress. To do that, click the down arrow next to the Save button and click Publish.
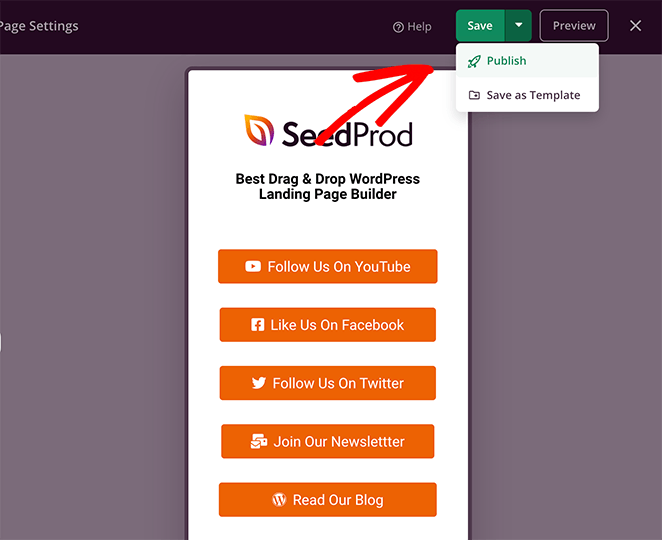
You can then click the popup button to see your live page.
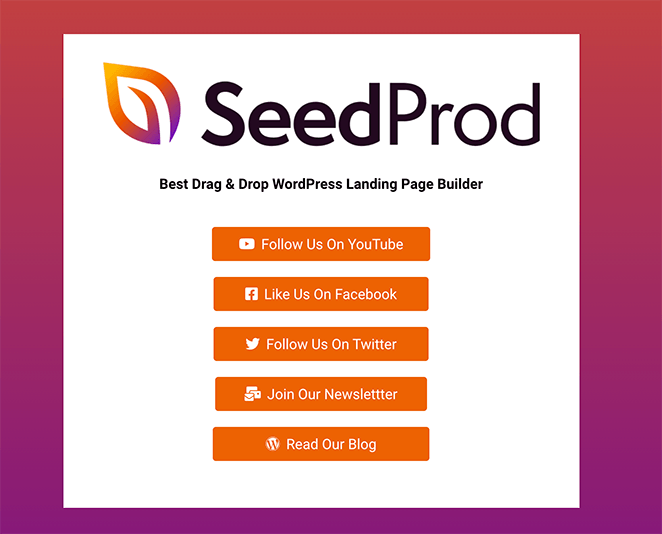
Your page is now live, and you can add the link to your Instagram bio and other social media profiles. Best of all, your custom page is fully responsive, so it’ll look good no matter what screen size your fans view it on.
Related: How to Add a Link to Your TikTok Bio
Bonus: How to Add Analytics to Your Link in Bio Page
Many link in bio tools, like LinkTree, also offer page analytics. Yet, in our opinion, th best way to track your website analytics is with Google Analytics.
One of the most starightfofward ways to add Google Analytics to your WordPress website is with MonsterInsights.
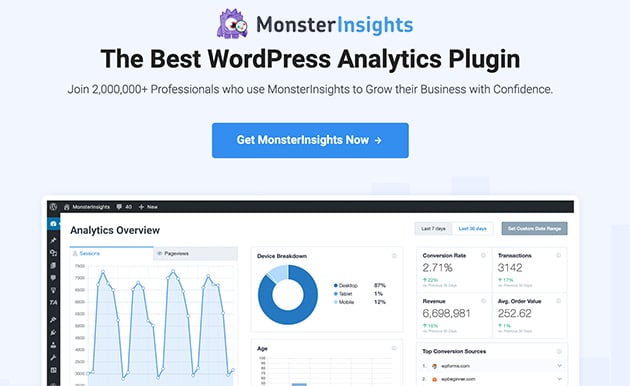
MonsterInsights is a powerful Google Analytics plugin for WordPress. It’s easy to use and allows you to track your site’s performance right inside your WordPress dashboard.
As a result, you can see how your bio link page is performing with just a glance. Check out this step-by-step guide on how to add Google Analytics to WordPress.
After setting up MonsterInsights with your Google Analytics account, navigate to Insights » Addons. From there, find the Page Insights addon, then install and activate it.

Now, go to Page » All Pages and find the link in bio page you made earlier.

Then, click the Insights icon that looks like a traffic graph.
This shows your page statistics, bounce rate, number of entrances, time on page, and more.
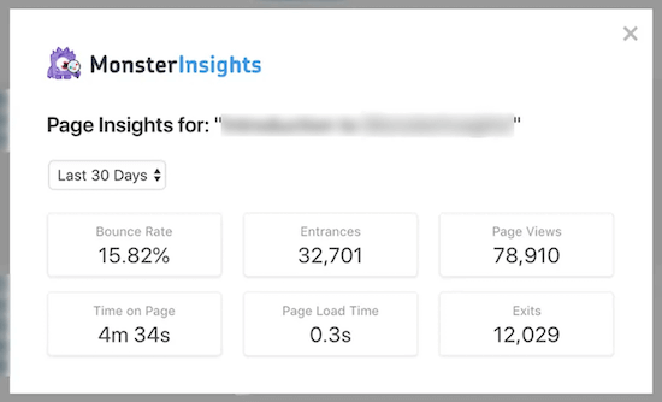
If you’ve only recently added the link to your social media profiles, it will take some time for this data to show up.
Set Your Bio Link Page Up for Success
Want to make your bio link page work harder for your brand? Check out the following guides to level up your landing page:
- Perfect your Layout: Anatomy of a Landing Page
- SEO Tips: WordPress Search Engine Optimization
- Choosing Fonts: Typography in Web Design
- Split Testing: A/B Testing for Landing Pages
- Creating Headlines: Landing Page Headline Formulas
- Better URLs: Landing Page URL Examples
- Optimization: Landing Page Optimization Tips
Frequently Asked Questions About Link in Bio Pages
What is a link in bio?
A “link in bio” is a clickable URL that a social media user can add to their profile’s bio or about section. The link can take followers to a variety of pages, including websites, product pages, landing pages, or specific articles.
What’s the best way to make a link-in-bio page?
It depends on your needs and budget. Linktree, Shorby, and Tap Bio are easy to use and have free options, but you can’t customize them as much. Making your own page with WordPress and SeedProd gives you more control, but you’ll need a WordPress website and it takes a bit more setup. If you’re already using WordPress, SeedProd might be a good choice because it works with your site and you only pay once.
How do you add a landing page to your Instagram bio?
To add a landing page to your Instagram bio, log into your Instagram account, click Edit Profile, and paste your landing page URL.
How do I track clicks on my bio link page?
Most bio link services have built-in stats. If you use WordPress, MonsterInsights can connect your page to Google Analytics to track clicks and where your visitors are coming from.
And there you have it!
We hope this article helped you learn how to create a link in bio landing page in WordPress.
Creating and customizing any WordPress page with SeedProd is super easy. It doesn’t require any code, you won’t need to hire a developer, and the result is a landing page focused on converting your traffic into leads and sales.
So, what are you waiting for?
You can also follow this step-by-step guide to create an Instagram landing page specifically designed for your Instagram advertisements.
Thanks for reading! We’d love to hear your thoughts, so please feel free to leave a comment with any questions and feedback.
You can also follow us on YouTube, X (formerly Twitter), and Facebook for more helpful content to grow your business.

