You can use custom fonts with SeedProd by employing the CSS3 @font-face method. This method enables you to integrate any preferred font into your website.
To begin, you must download your desired font in a web-compatible format. Ideally, you should also convert your custom fonts to the following formats to ensure they are visible across multiple browsers and devices. You can use the FontSquirrel Webfont generator to generate the following font files.
- WOFF: Web Open Font Format suitable for web pages.
- WOFF2: An improved version of WOFF with enhanced compression.
- TTF: TrueType font, common across Mac OS and Windows.
- SVG: Scalable Vector Graphics font allowing SVG as glyphs.
- EOT: Embedded OpenType fonts for web page usage.
- OTF: OpenType format widely used on various platforms.
After obtaining your font files, the next step is to upload them to your WordPress hosting server. You can do this via FTP, your cPanel’s File Manager, or by using a File Manager plugin. Select any folder within your /wp-content/ directory to upload your custom fonts.
Adding Custom Fonts in SeedProd’s Global CSS Settings
After successful font upload, you’ll use the CSS3 @font-face technique with direct links to your custom font files.
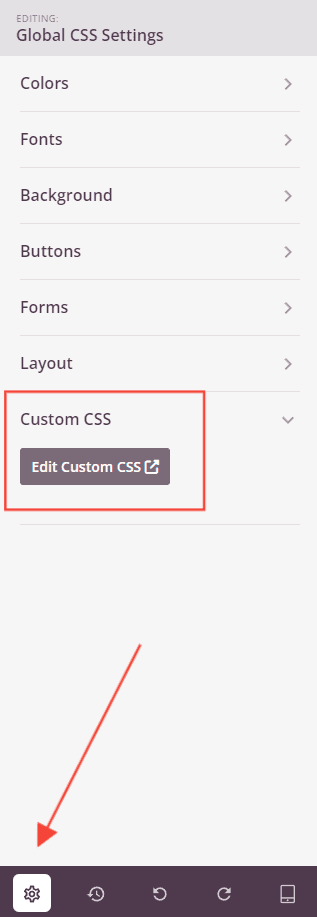
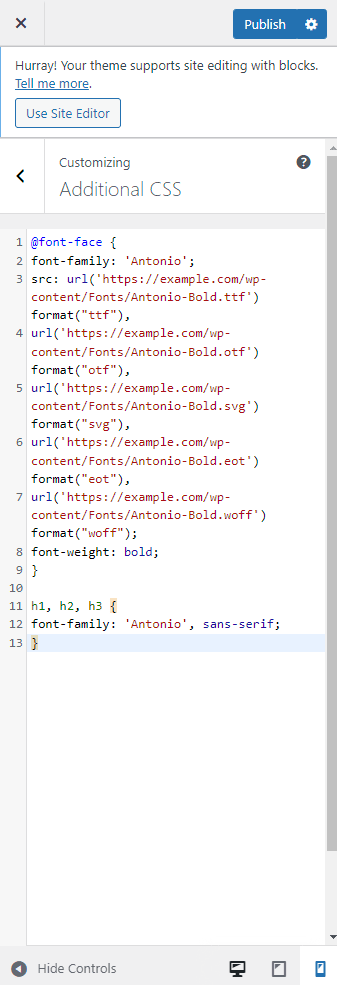
Insert this CSS code, referencing your custom font, within the Global Settings > Custom CSS section found in your SeedProd editor. Update the font-family and URL with your font details. 
@font-face {
font-family: 'YourFontName';
src: url('https://example.com/wp-content/Fonts/YourFont.ttf') format("ttf"),
url('https://example.com/wp-content/Fonts/YourFont.otf') format("otf"),
url('https://example.com/wp-content/Fonts/YourFont.svg') format("svg"),
url('https://example.com/wp-content/Fonts/YourFont.eot') format("eot"),
url('https://example.com/wp-content/Fonts/YourFont.woff') format("woff");
}
Following this, you can apply the font across your site:
h1, h2, h3 {
font-family: 'YourFontName', sans-serif;
}
Example:
