

要約:WooCommerceメンテナンスモードの設定方法
サイト全体をオフラインにすることなく、アップデート中にストアを非表示にします。手順は次のとおりです。
- SeedProdのインストール:WordPressサイトでProプラグインをダウンロードして有効化します。
- テンプレートの選択:SeedProdのライブラリからメンテナンスページテンプレートを選択し、ブランド、カウントダウンタイマー、連絡先情報でカスタマイズします。
- アクセス制御の設定:SeedProdのアクセス制御を使用して、ホームページとブログは公開したまま、WooCommerceのページ(/shop、/cart、/checkout)のみを非表示にします。
- 有効化と確認:メンテナンスページを発行し、SeedProd » Pagesでメンテナンスモードをアクティブに切り替え、シークレットウィンドウでテストします。
ライブサイトでプラグインを更新したり、チェックアウトフローを再構築したりするストアオーナーは、しばしば苦い経験をします。購入途中の買い物客がエラーメッセージに遭遇し、売上が完全に停止してしまうのです。
だからこそ、真剣なWooCommerceストアにとって適切なメンテナンスモードは交渉の余地がありません。これにより、裏でストアページを完全に自信を持って作業できます。
サイト全体をオフラインにするプラグインとは異なり、SeedProdのアクセス制御では、ショップ、カート、チェックアウトページのみを対象とすることができ、コードに触れることなく数分で完了できます。
このガイドでは、WooCommerceストアを適切な方法でメンテナンスモードにするために私が使用する正確な手順を説明します。
WooCommerceメンテナンスモードとは?
WooCommerceメンテナンスモードとは、バックグラウンドでアップデートを行っている間に、一時的にストアを訪問者から非表示にするWordPressの機能です。
買い物客がエラーを見るのを防ぎ、サイトをプロフェッショナルに見せ続けます。適切なメンテナンスページは、HTTP 503 Service Unavailableステータスを返します。これにより、Googleはダウンタイムが一時的なものであることを認識し、ランキングを維持できます。
WooCommerceメンテナンスモードを使用するタイミング
メンテナンスモードは、ストアが買い物客にとって壊れているか混乱しているように見える可能性がある場合はいつでも役立ちます。

一般的な状況とそれらを処理する最良の方法を次に示します。
| 状況 | 最適なモード | 必要な時間 | 買い物客が見るもの | 分析 |
|---|---|---|---|---|
| アップデートまたはプラグインのインストール | 完全な503メンテナンス | 15〜30分 | 「まもなく再開します」メッセージ | 失われるデータはほとんどまたは全くない |
| 製品の一括追加 | 近日公開ページ(503なし) | 数時間 | カウントダウンまたはローンチ通知 | トラフィックは引き続き追跡されます |
| デザインまたはテーマの変更 | ブランドメッセージ付き503 | 数時間または1日 | 「サイト改善実施中」 | 訪問者数が減少する可能性があります |
| 緊急のセキュリティ問題を修正する | 即時503 | できるだけ短く | 簡単な「メンテナンス中」メモ | データの短いギャップ |
| 新機能のテスト | ステージングサイトを使用する(ダウンタイムなし) | 該当なし | 該当なし | 影響なし |
適切なモードを使用することで、顧客に情報を伝え、SEOを保護し、売上の損失を回避することができます。
オフラインになる前に顧客に通知する方法
メンテナンスページを公開する前に、顧客に通知してください。
- メンテナンス開始の少なくとも24時間前に、予定されているダウンタイムの期間を記載したメールをリストに送信する
- WooCommerceストアが一時的にオフラインになることをフォロワーに知らせるために、ソーシャルチャネルに投稿する
- メンテナンスページにカウントダウンタイマーを追加して、訪問者がいつ戻ってくるかを正確に把握できるようにする
- ストアが再び公開されたら、「戻りました」というメールを送信して買い物客を呼び戻す
WooCommerceメンテナンスモードにはコードとプラグインのどちらを使用すべきか?
WooCommerceメンテナンスモードを設定する前に、プラグインの速度と安全性、またはコードを追加する手動制御のどちらを望むかを決定してください。
プラグインの使用(ほとんどのユーザーに最適)

SeedProdのようなプラグインは、WooCommerceメンテナンスモードを有効にする最も簡単な方法です。コードに触れる必要がなく、ロゴ、ブランドカラー、さらにはメールオプトインフォームを備えたカスタムページをデザインできます。テーマファイルを編集してサイトを壊すリスクがないため、より安全でもあります。
コードの使用(上級ユーザー向け)
PHPに慣れている場合は、テーマのfunctions.phpファイルに短いコードスニペットを追加できます。これにより、訪問者に基本的な「メンテナンス中」メッセージが表示されます。
注意:テーマファイルを直接編集すると、間違いがあった場合にエラーが発生する可能性があります。コードを追加する前に必ずサイトをバックアップしてください。また、プラグインを使用する場合のようなデザインオプションは得られないことを覚えておいてください。
大規模なアップデート、新しいテーマ、メジャーなWooCommerceバージョンアップ、またはカスタムコードの変更の場合は、メンテナンスモードよりもステージングサイトの方が安全なオプションです。ライブストアに触れる前に、サイトのコピーで変更を加え、テストするため、顧客にとっては全くダウンタイムがありません。
WooCommerceをメンテナンスモードにする方法(ステップバイステップ)
ここでは、コードやプラグインの競合なしにSeedProdを使用してWooCommerceをメンテナンスモードにする正確な方法を説明します。
ステップ1. WooCommerceメンテナンスモードプラグインのインストール
まず、WordPressサイトでSeedProdをセットアップする必要があります。SeedProdはWordPress用のドラッグ&ドロップウェブサイトビルダーです。これを使用して、コードなしでメンテナンスページ、近日公開ページ、およびサイト全体のテーマを作成できます。
- SeedProd Proをダウンロード:SeedProdのウェブサイトにアクセスし、Proプランを選択してください。このチュートリアルに従って、アクセス制御を使用して特定のWooCommerceページを非表示にするには、Proバージョンが必要です。
- プラグインのインストール: SeedProdをダウンロードしたら、WordPressダッシュボードに移動し、プラグイン » 新規追加に移動して、プラグインファイルをアップロードします。
- SeedProdのアクティブ化: インストール後、「アクティブ化」ボタンをクリックします。
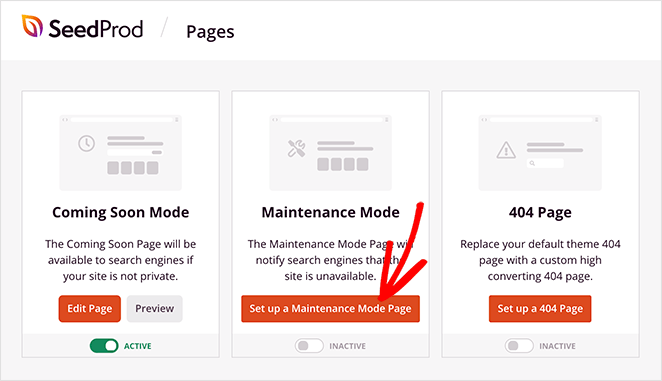
- 構築を開始: WordPressダッシュボードに新しい「SeedProd」メニューが表示されます。それをクリックし、「メンテナンスモードページのセットアップ」ボタンをクリックします。これで、カスタムメンテナンスページの作成準備が整いました。
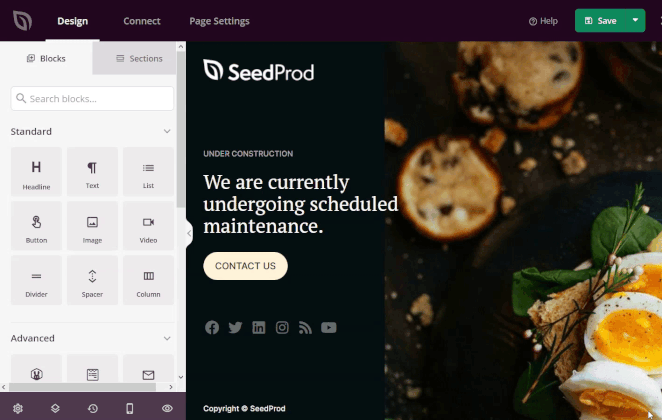
ステップ2. WooCommerceメンテナンスページのデザイン
優れたWooCommerceメンテナンスページは、「すぐに戻ります」と言う以上のことをします。顧客を安心させ、信頼を築き、リードを獲得するチャンスです。SeedProdのドラッグ&ドロップビルダーを使用すると、数分で洗練されたデザインを作成できます。
メンテナンスモードテンプレートを選択(または最初から作成)
SeedProdには、専門的にデザインされたテンプレートのライブラリが含まれているため、最初から始める必要はありません。ブランドに合ったものを選択し、それをあなた自身のものにしてください。
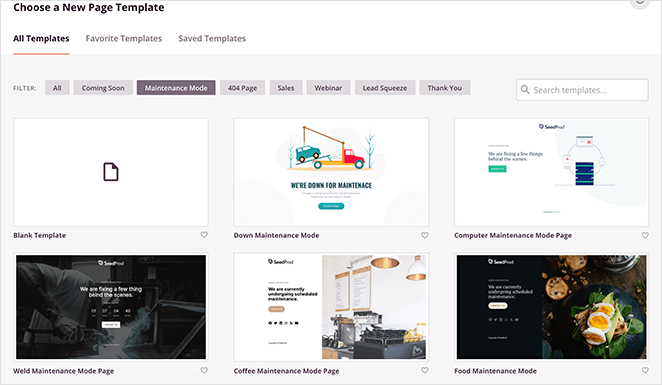
完全に制御したい場合は、空白のテンプレートを選択してゼロからデザインしてください。好きなテンプレートにカーソルを合わせ、チェックマークをクリックして使用します。
メンテナンスモードページをカスタマイズ
ビジュアルビルダーにより、編集が簡単になります。テキスト、画像、動画、カウントダウンタイマー、フォームをレイアウトに直接ドラッグ&ドロップするだけで、コーディングは不要です。
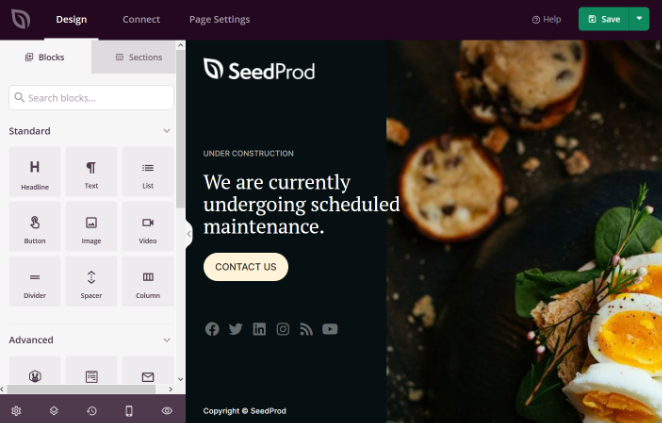
たとえば、ストアが再開する時間を表示するためにカウントダウンタイマーを追加できます。ブロックをクリックしてスタイルを設定し、日時を設定し、ページに合わせてカスタマイズします。
FAQ、機能、またはコールトゥアクションなどの事前作成済みセクションを追加することもできます。ストアが再開したら訪問者を引き戻すために、割引コードまたはオプトインフォームを含めてみてください。
WooCommerceメンテナンスページに含めるべきもの
一般的な「工事中」ページは訪問者をイライラさせることが多いと学びました。買い物客を満足させ、潜在的な販売を維持するために、特定のレイアウト戦略を使用しています。
すべてのメンテナンスページに含める3つの必須要素は次のとおりです。
- 具体的なタイムライン:常にカウントダウンタイマーブロックを使用します。これにより、顧客はサイトが永久に壊れているのではなく、一時的にオフラインになっていることを安心できます。
- 「お知らせください」オプション:そのトラフィックを失いたくありません。興味のある買い物客がカタログが再び利用可能になった瞬間にメールで通知できるように、オプトインフォームを前面中央に配置します。
- 緊急連絡先情報:顧客が注文を待っている場合、あなたに連絡する方法が必要です。通常、下部に簡単なソーシャルプロフィールブロックまたはサポートメールリンクを追加します。
ページが希望どおりの外観になったら、ビルダーの右上にある「保存」をクリックします。
ステップ3. 作業中にWooCommerceストアページを非表示にする
デフォルトでは、SeedProd はウェブサイト全体を非表示にします。ただし、製品の作業中にブログとホームページを公開しておきたい場合があります。
これを行うために、アクセス制御を使用して特定のWooCommerceページのみを非表示にし、ホームページとブログは通常の訪問者向けに公開したまま、WooCommerceストアをオフラインにします。
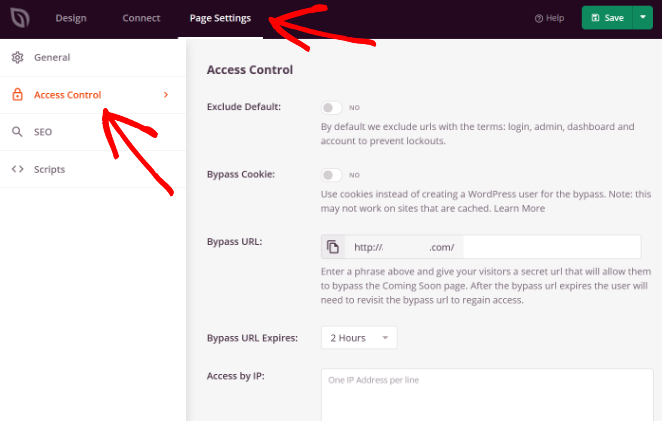
- アクセス制御を開く: SeedProd ビルダーで、ページ設定 » アクセス制御 に移動します。
- URL を含める: 「URL を含める」オプションを選択します。これにより、SeedProd は、ここにリストした特定のリンクにのみメンテナンスページを表示するようになります。
- WooCommerce ページを追加する: 非表示にしたい URL を貼り付けます。「example.com」を実際のドメイン名に置き換えるようにしてください。
- https://yourdomain.com/shop
- https://yourdomain.com/cart
- https://yourdomain.com/checkout
- https://yourdomain.com/my-account
プロのヒント: 既存のお客様がダウンロードや注文履歴にアクセスできるようにしたい場合は、このリストから「my-account」リンクを削除してください。
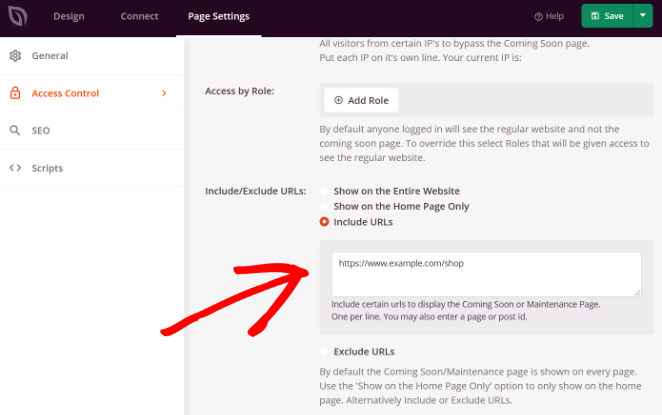
- 商品ページを保護する: すべての商品リストを非表示にするには、ワイルドカード URL を使用して、すべての商品またはカテゴリページが非表示のままになるようにします。
- https://yourdomain.com/product/*
- https://yourdomain.com/product-category/*
- https://yourdomain.com/product-tag/*
ステップ 4. WooCommerce メンテナンスモードを有効にする
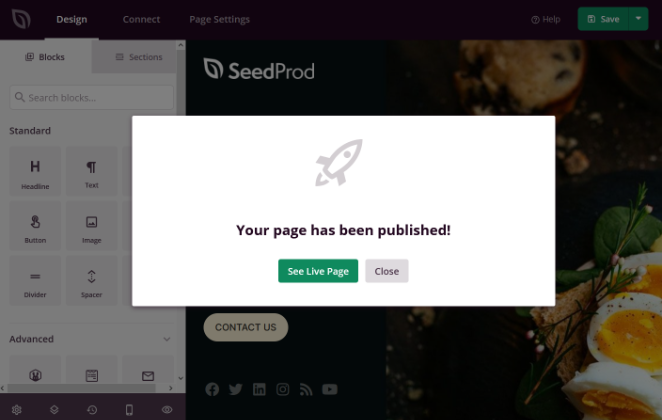
- 公開: SeedProd ビルダーの「保存」ボタンの横にあるドロップダウン矢印をクリックし、「公開」を選択します。
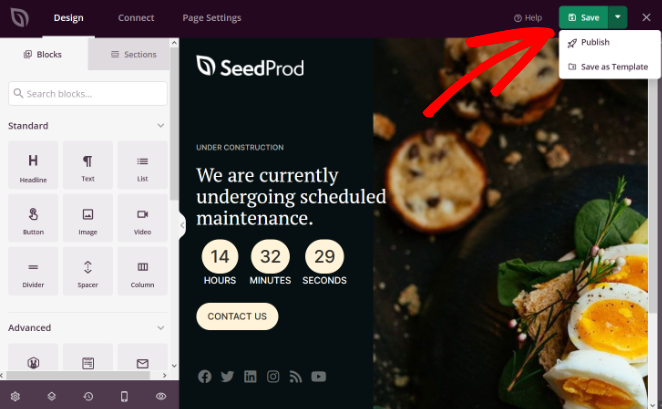
- プレビュー: ページが公開されたら、「ライブページを表示」をクリックして、すべてが正しく表示されていることを確認します。
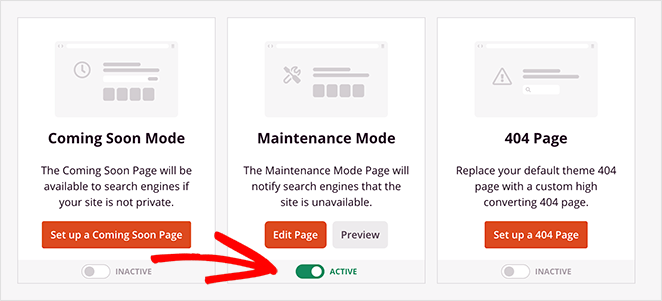
- メンテナンスモードを有効にする: WordPress ダッシュボードで、SeedProd » ページ に移動します。「メンテナンスモード」の下で、スイッチを「非アクティブ」から「アクティブ」に切り替えます。
WooCommerceストアは現在メンテナンスモードです。バックグラウンドで安全に更新を行っている間、訪問者はカスタムWooCommerceメンテナンスページを表示します。
ここに、WooCommerce のメンテナンスページが公開されたときの例を示します。

メンテナンスページが機能していることを確認する
変更を加える前に、60秒かけてメンテナンスページが実際に訪問者に表示されていることを確認してください。ストアの所有者がこの手順をスキップして、顧客に完全に表示されているストアの更新に何時間も費やしたのを見たことがあります。
- シークレットまたはプライベートブラウザウィンドウを開き、/shop URLに移動します。商品ではなく、メンテナンスページが表示されるはずです。
- 同じシークレットウィンドウで、ホームページとブログにアクセスします。これらは「URLを含める」リストに含まれていないため、通常どおり読み込まれるはずです。
- 通常のブラウザでWordPress管理画面にログインして、訪問者がオフラインページを見ている間もダッシュボードにアクセスして作業できることを確認します。
メンテナンスモードをオフにする
更新が完了したら、SeedProd » ページ に戻り、「メンテナンスモード」を「非アクティブ」に切り替えます。

これで WooCommerce ストアはオンラインに戻り、買い物客に対応できるようになりました。
ボーナス:近日公開ページでリードを獲得する
ストアがオフラインの間にリードを獲得したい場合は、SeedProdの近日公開モードでウェイトリストサインアップフォームを追加できます。SeedProdでウェイトリストランディングページをデザインする方法を見る。
よくある質問(FAQ)
メンテナンスモードはWooCommerceのWebhookやAPIコールを壊しますか?
できます。完全な503ブロックは、Webhook、支払いゲートウェイ、またはサードパーティの統合を停止する可能性があります。
更新中にそれらをアクティブにする必要がある場合は、厳密なメンテナンスモードの代わりに近日公開ページを使用してください。API接続を中断する可能性のある503ステータスをトリガーすることなく、サイトにアクセスできるようにします。
CloudflareまたはCDNはメンテナンスページをキャッシュしますか?
はい、これは確認すべき重要な手順です。CDNとブラウザは一時ページをキャッシュできます。
メンテナンスモードをオフにした後にキャッシュをクリアしないと、訪問者はライブストアの代わりに古いメンテナンスページを引き続き表示する可能性があります。完了したら、必ずCDNとウェブサイトのキャッシュをクリアしてください。
SEOに悪影響を与えることなく、ストアをメンテナンスモードにどれくらいの期間置いておくことができますか?
このガイドではストアページのみを非表示にする方法を説明しているため、全体的なリスクは低いです。非表示のページについては、理想的にはダウンタイムを24時間未満に抑えてください。
ダウンタイムが長くなると、Googleは503ステータスを永続的なエラーとして扱う可能性があります。ダウンタイムを延長する必要がある場合は、代わりに「近日公開」ページに切り替えることを検討してください。これは503シグナルを送信しません。
WooCommerceのメンテナンスモードには503またはnoindexを使用すべきですか?
503 Service UnavailableステータスとRetry-Afterヘッダーを使用します。これにより、検索エンジンはダウンタイムが一時的であることを認識し、後で再確認するように指示されます。
ストアページが検索結果から除外される可能性があるため、noindexは避けてください。503アプローチは、ダウンタイムが短い限り、ランキングを維持します。
プラグインの更新のためにWooCommerceをメンテナンスモードにする必要がありますか?
更新の規模によります。安定したサイトでのマイナーなプラグイン更新の場合、メンテナンスモードは任意ですが、予防策として推奨されます。
メジャーなWooCommerceバージョン更新や、プラグインの競合を引き起こす可能性のある変更については、必ず最初にメンテナンスモードを有効にしてください。これにより、更新中に問題が発生した場合でも、顧客がエラーを目にするのを防ぎます。
更新が完了し、買い物客が正常に動作するストアに戻ってきます。これが正しいやり方です。SeedProdで始めることで、数分でWooCommerceメンテナンスモードを設定できます。
さらに実用的なWooCommerceのヒントについては、これらの役立つガイドをご覧ください。
- 売上を最大化するための最高の WooCommerce アフィリエイトプラグイン
- 売上を急増させる最高のWooCommerceプラグイン
- WooCommerceのチェックアウトページをカスタマイズする方法
- ランキング向上のための最高の WooCommerce SEO プラグイン
- カスタムWooCommerceサンキューページを作成する方法
- WooCommerce ストアを高速化する方法 (簡単な 10 の方法)
お読みいただきありがとうございます!ご意見をお聞かせいただければ幸いですので、ビジネスを成長させるための役立つアドバイスやコンテンツについては、お気軽にYouTube、X、Facebookで会話にご参加ください。


