Need an easy guide on how to create a WordPress website for beginners? WordPress powers over 43% of all websites, making it perfect for beginners like you.
Whether you’re dreaming of a blog, a stunning portfolio, or an online store, WordPress can help bring your vision to life. And the best part? You don’t need any coding skills to get started.
In this step-by-step guide, I’ll show you exactly how to build your site in easy steps. By the end, you’ll have the confidence to build your dream WordPress website.
How to Create a WordPress Website for Beginners:
- Step 1. Plan Your Website Like a Pro
- Step 2. Set Up Your Domain Name and Hosting
- Step 3. Install WordPress
- Step 4. Choose a WordPress Theme
- Step 5. Add Content to Your Website
- Step 6. Tweak Your Website Settings
- Step 7. Install Essential WordPress Plugins
- Step 8. Launch Your Website on WordPress
- Step 9. Take Your Website Further
What Is WordPress?
WordPress is an open-source content management system (CMS) for building websites and blogs. It’s widely used because it’s easy to set up, offers lots of themes and plugins for customization, and works for beginners and advanced users alike.
WordPress.com vs WordPress.org: What’s the Difference?
When you’re first exploring WordPress, you might come across two different websites: WordPress.com and WordPress.org.
The main difference between WordPress.com and WordPress.org is in control and hosting:
- WordPress.com is a hosted platform that takes care of your website’s hosting and maintenance. It’s easier to set up and includes automatic updates, but it limits customization, themes, and plugins unless you upgrade to a paid plan.
- WordPress.org is self-hosted, meaning you download the software and host it on your own server. This option gives you full control, unlimited theme and plugin choices, and the ability to monetize. However, it requires managing your own hosting and updates.
In this guide, I’ll focus on using WordPress.org, as it offers more flexibility and control for creating your website. When you see “WordPress” mentioned throughout this article, I’m referring to WordPress.org.
What You Need to Make a WordPress Website
Before we jump into the complete guide, let’s make sure you understand what you need to create a WordPress website and why these elements are essential.
To make a WordPress website, you need:
- Domain Name – Your website’s address (e.g., www.example.com).
- Web Hosting – A service that stores your website files and makes them accessible online. Many providers offer WordPress-specific hosting.
- WordPress Installation – Install WordPress on your hosting server; most hosts offer one-click installations.
- Theme and Plugins – Choose a theme to control your site’s appearance and plugins to add features like contact forms, SEO tools, and more.
- Content – Prepare text, images, and other media to populate your pages.
If you’re unsure how to do any of this, don’t worry. I’ll walk you through each part of the process next.
How to Create a WordPress Website for Beginners Step-by-Step
Alright, now that we’ve covered the basics, it’s time for the fun part—actually building your WordPress website. Don’t worry if you’re feeling a bit nervous. I’ll break this down into easy-to-follow steps.
Think of this as putting together a puzzle. We’ve already looked at the pieces, and now I’m going to show you how they all fit together. By the end of this guide, you’ll have a fully functioning WordPress website that you built yourself.
Step 1. Plan Your Website Like a Pro
Building a WordPress website is fun, but before you pick designs, let’s plan. It’s like building a treehouse – you need a plan before grabbing the hammer and nails.
Here’s your plan in a nutshell:
- Website Mission: What do you want your website to DO? (Sell stuff? Share your knowledge? Build a community?)
- Your People: Who are you trying to reach with your website? (Think about their age, interests, and what they like online.)
- Pick a Focus: Is there a specific topic you want your website to be known for? This helps you stand out and attract the right people.
- Content Plan: What will you share on your website? (posts, videos, pictures?) Use words your audience understands.
- Check Out the Competition: Look at similar websites. What are they doing well? What could they do better? Ask your audience what they want to see.
Step 2. Set Up Your Domain Name and Hosting
To build a website, you first need to get a domain name. A well-chosen domain can make it easier for people to remember and find your site.
Here are some tips to help you choose the perfect domain name:
- Keep it short and sweet – easier to remember.
- Use keywords related to your business or niche.
- Avoid numbers and hyphens – they can be confusing.
- Consider different extensions (.com, .org, .net) – pick what fits your brand best.
Now, let’s talk about hosting. This is where your website’s files will live, and there are several types of web hosting to choose from:
| Hosting Type | Best For | Price |
|---|---|---|
| Shared Hosting | Small websites, beginners | Cheapest |
| VPS Hosting | Growing websites, need more control | Mid-priced |
| Cloud Hosting | Websites with changing traffic, high uptime needs | Can be expensive |
| Dedicated Hosting | Very large websites, ultimate control | Most expensive |
| Managed WordPress | Easy WordPress hosting, good performance | A bit pricier than basic shared |
There are lots of hosting providers out there, but for WordPress, I recommend these top picks:
- Bluehost: WordPress.org’s official recommendation. They offer great support and throw in a free domain name for the first year.
- SiteGround: Known for excellent customer service and reliability.
- WP Engine: A bit pricier, but offers top-notch performance and security.
My Top Pick: Bluehost
I’m a big fan of Bluehost for WordPress hosting. Here’s how to get started with them:
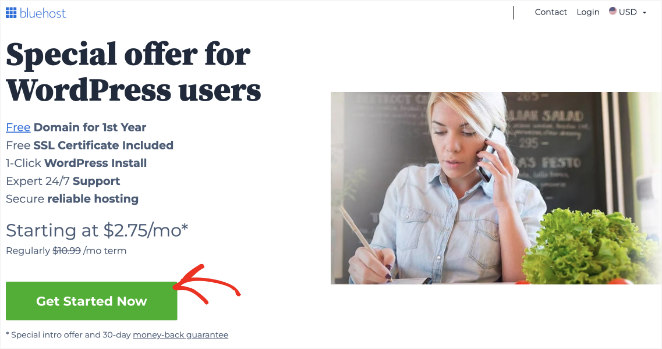
First, go to the Bluehost website and click “Get Started Now”
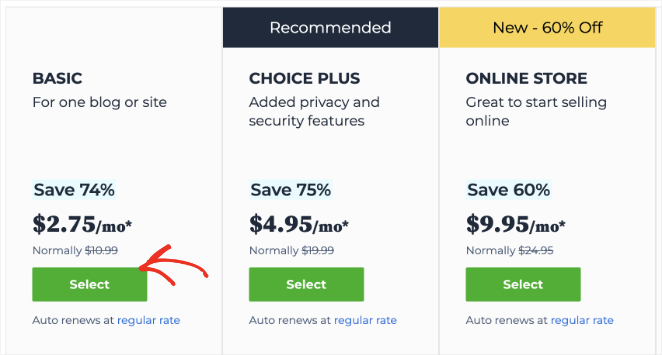
From there, find a plan that best suits your needs and click the Select button to choose it.
You can choose a new custom domain name for your website on the following screen.
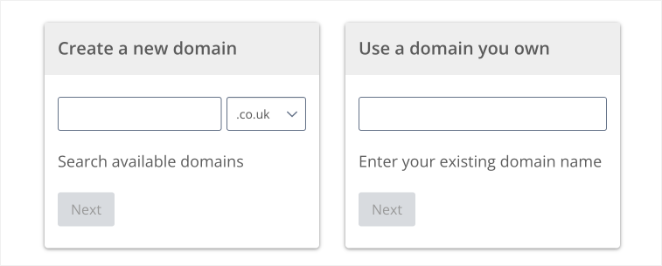
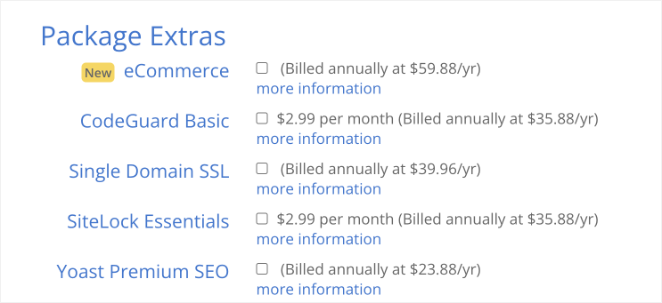
After you choose a domain, enter other account details, such as your name, address, and email address. You can add optional extras to your plan, but we recommend leaving these unchecked to avoid confusion.
When you’re ready, enter your payment details and complete your purchase.
That’s it. You’ve got your domain name and hosting set up. You’re one step closer to your very own WordPress website.
Step 3. Install WordPress
Now that you’ve got your domain and hosting sorted, it’s time to install WordPress. Bluehost often does the heavy lifting for you. In many cases, WordPress comes pre-installed when you set up your hosting account.
But if WordPress isn’t already there, no sweat. Here’s how to get it installed in just a few clicks:
- Log in to Your Bluehost Account: Access your Bluehost dashboard by entering your credentials.
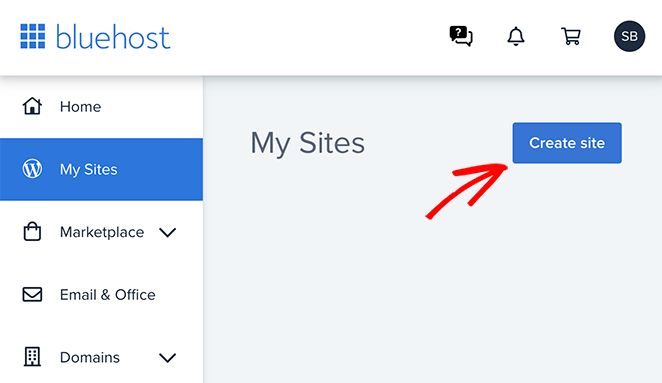
- Navigate to the Website Section: Once logged in, go to the My Sites section and click the Create Site button.
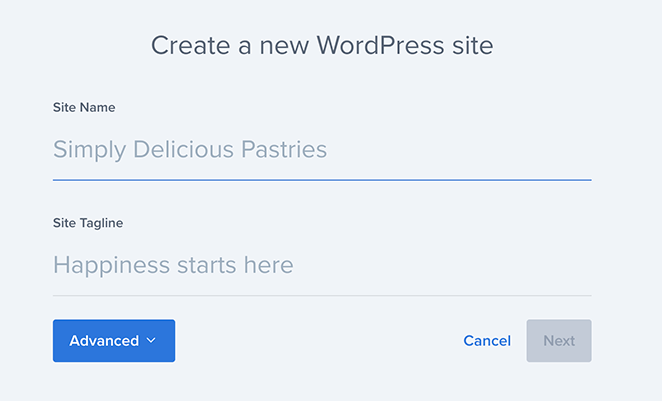
- Enter Site Details: You’ll be prompted to enter your site title and a tagline. Fill these in and click Next.
- Choose Domain: Select the domain name you’ve registered from the dropdown list.

- Install: Finally, click the ‘Install’ button. Bluehost will take care of the rest, installing WordPress for you.
And just like that, you’ve successfully installed WordPress on Bluehost. After your WordPress installation is complete, you’ll receive login details.
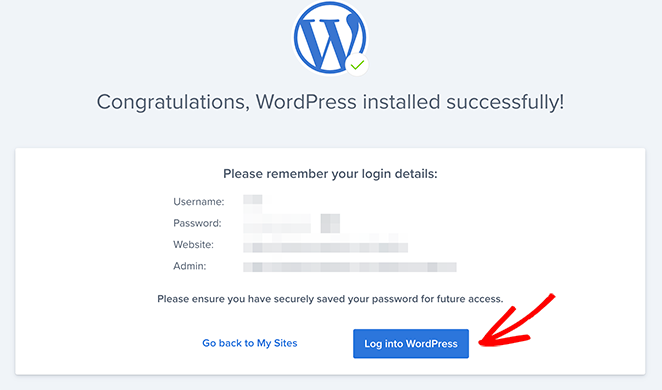
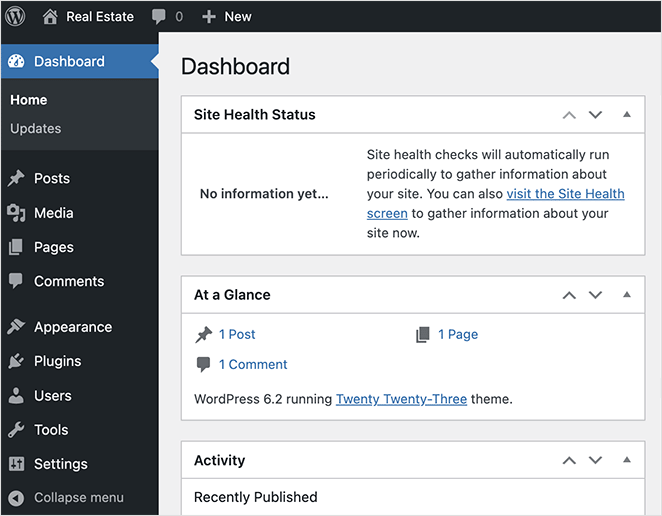
When you log in for the first time, you’ll see something called the WordPress dashboard. It might look a bit overwhelming at first, but think of it as the control center for your website.
From here, you can:
- Add new content to your site
- Change how your site looks
- Install cool new features (we call these ‘plugins’)
- Manage your site settings
Don’t worry if it all looks a bit alien right now. We’ll explore the dashboard more as we go along. The important thing is, you’ve now got WordPress installed and ready to go.
Step 4. Choose a WordPress Theme
After installing WordPress, the next step is choosing a theme. A theme is like your website’s outfit. It determines how your site looks and feels. Just like you choose clothes to express your style, you pick a theme to show off your brand’s personality.
When you first install WordPress, it comes with a basic theme. It’s like a plain T-shirt—it does the job, but it might not be exactly what you’re looking for.
Want something fancier, can choose:
- Free Themes: WordPress offers many free themes, which are great for getting started.
- Premium Themes: These cost a bit but often come with more features and support.
- Page Builders: Website builders and page builders like SeedProd and Elementor let you customize your theme even more.
How to Choose the Right WordPress Theme
Don’t just pick a theme because it looks pretty. Think about these factors:
- Your Niche/Industry: Does the theme’s style fit your website’s purpose (e.g., blog, portfolio, online store)?
- Design and Layout: Do you like the overall aesthetic? Does it have layout options that suit your content?
- Features: Does the theme include features you need (e.g., contact forms, image galleries, e-commerce integration)?
- Responsiveness: Your site MUST look good on all devices (phones, tablets, desktops). Test the theme’s responsiveness.
- Customization: How easy is it to make changes (colors, fonts, layout)? Do you need a page builder for that?
- Reviews and Support: Read reviews from other users. Does the theme developer offer good documentation and support?
For help, you can see our list of the best and most popular WordPress themes.
A Super Easy Option: SeedProd
If you want to create a truly unique site without any coding, check out SeedProd. It’s one of the best drag-and-drop WordPress website builders, and it powers over 1 million websites.

With SeedProd, you can:
- Build your site using drag-and-drop (no coding needed)
- Customize every part of your website
- Create a site that perfectly matches your brand
Don’t worry if you’re not a tech whiz. SeedProd makes it easy for anyone to create a stunning website.
💡 Quick Tip
Launch a custom website in seconds using SeedProd’s AI website builder. Simply provide a brief description of your site, and it will generate a fully custom theme, helping you save time and get online faster.
After installing the SeedProd plugin, you’ll find a ‘Theme Builder’ option in your WordPress dashboard under the SeedProd menu.
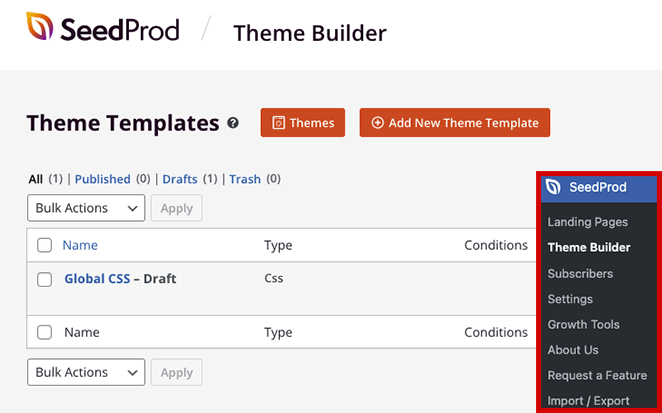
On this page, you can choose from pre-designed templates or start from scratch.
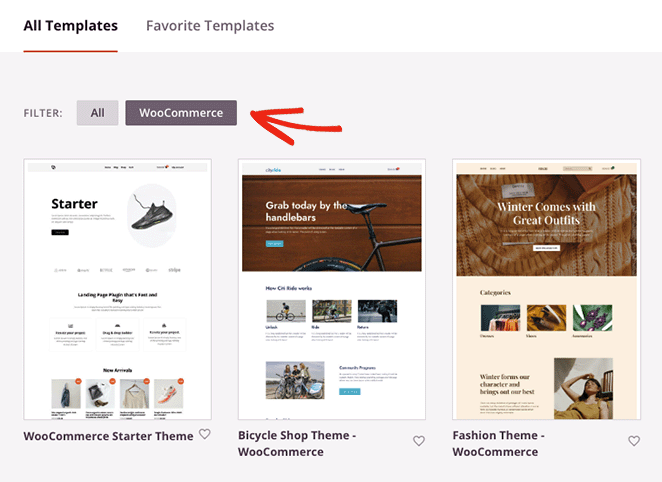
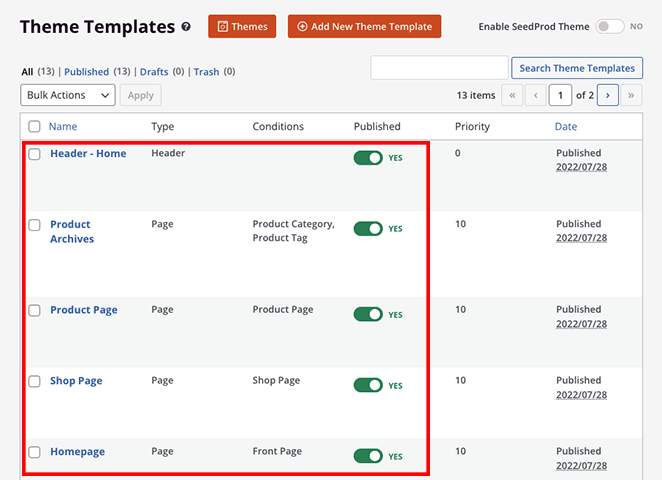
Once you’ve picked a website theme, SeedProd will show each part of the theme in a list. These templates make up a complete theme; you can edit them visually with the drag-and-drop page builder.
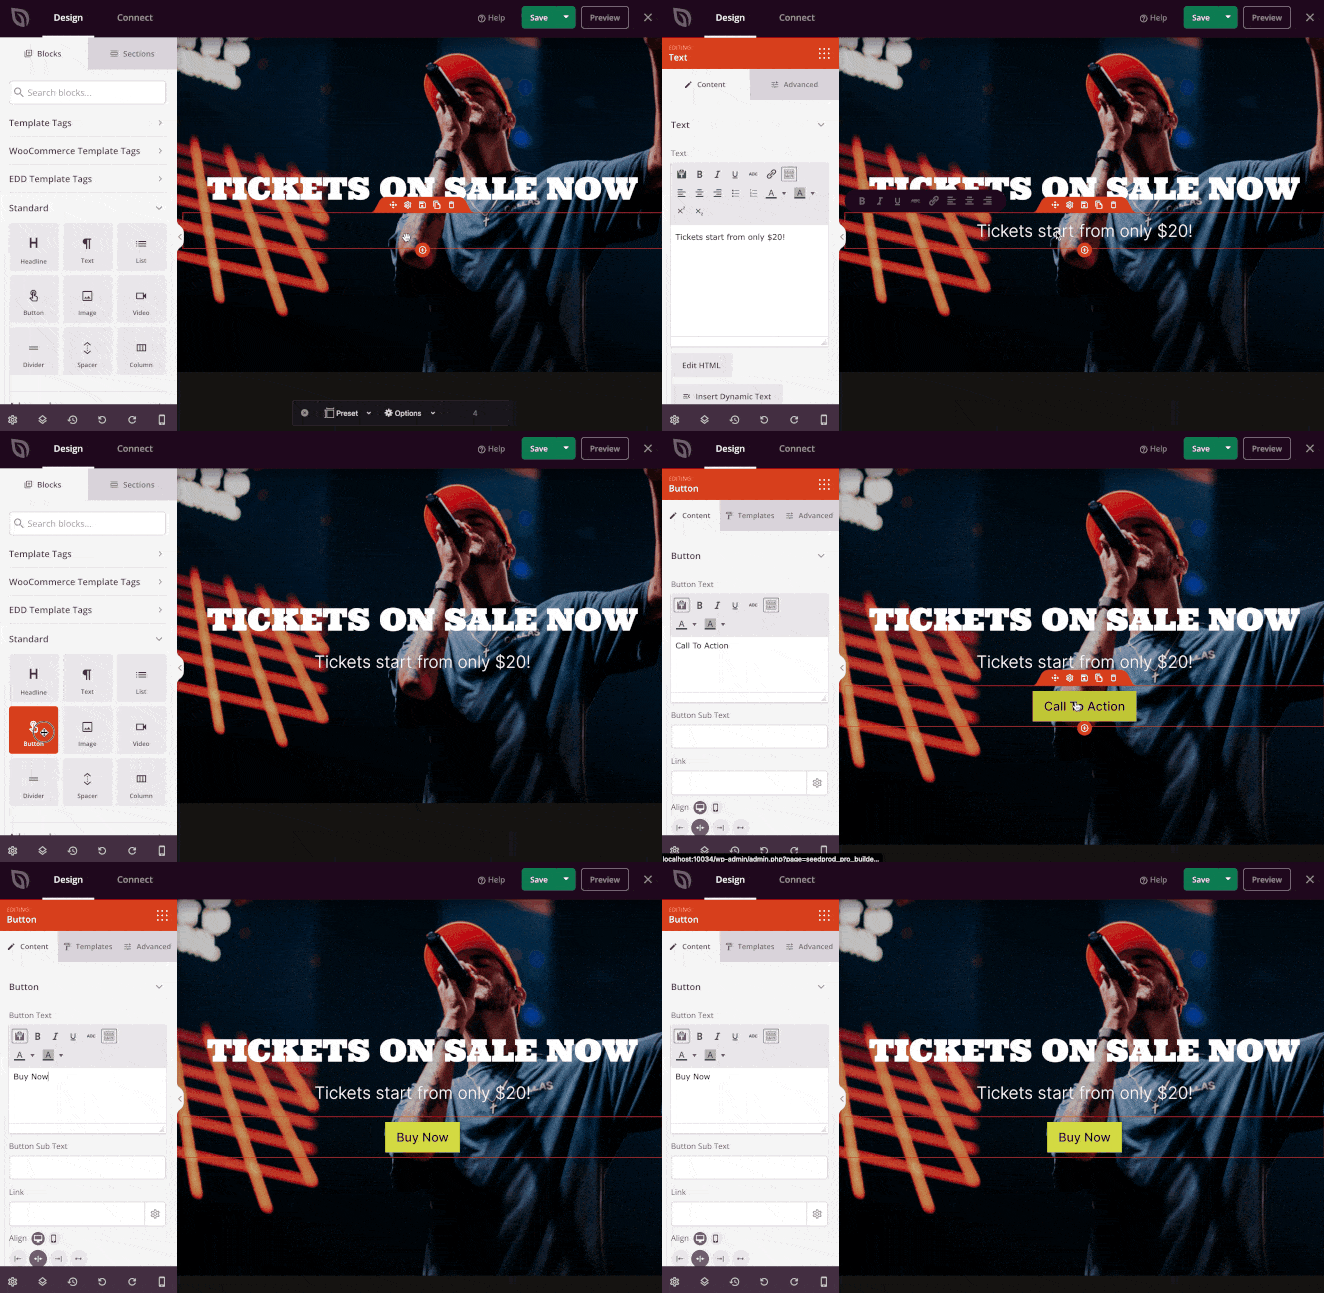
SeedProd’s builder is incredibly user-friendly. It allows you to easily add elements like text, images, and buttons to any web page.
For example, you can set up a custom homepage and add widgets, like a recent posts list, social media buttons, or a search bar.
This guide will show you how to create a custom WordPress theme with SeedProd. It covers everything from setting up a custom header and footer to building sidebars, blog pages, archives, and other essential static pages.
Step 5. Add Content to Your Website
Now that your site looks great, it’s time to add some content that will keep visitors coming back. Let’s create pages and posts.
Creating Pages in WordPress
Pages are the foundation of your website. They’re for content that doesn’t change often, like your ‘About Us’ or ‘Contact’ pages.
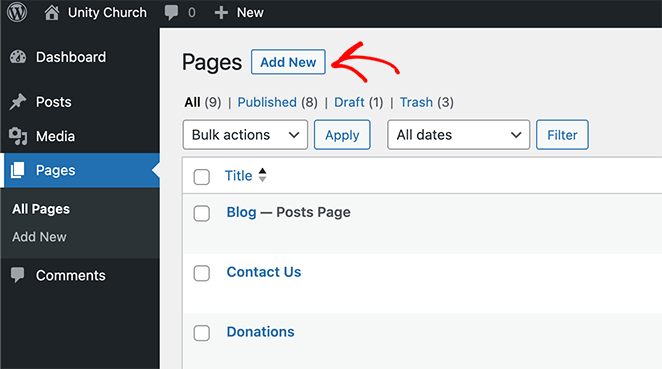
To create a new page, go to your WordPress dashboard, navigate to Pages on the left-hand menu, and click Add New.
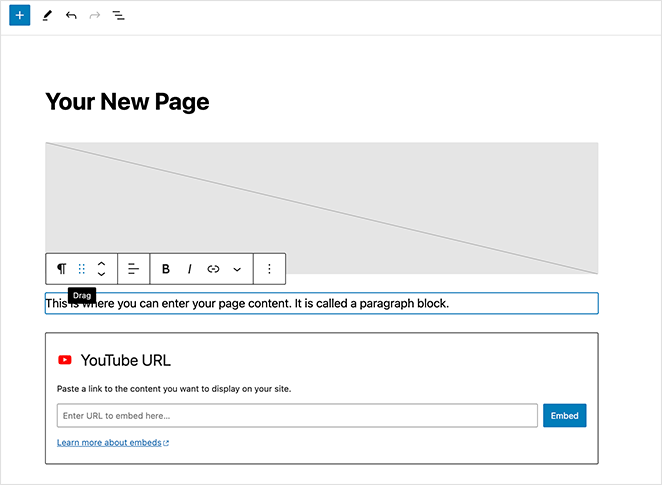
You’ll see the WordPress block editor, where you can add new content.
The block editor, also known as Gutenberg, lets you add different types of content (text, images, videos) as ‘blocks’. It’s super easy to move these around and create a layout you love.
You can also use SeedProd to customize these pages. When you create a new page, click the Edit with SeedProd button.
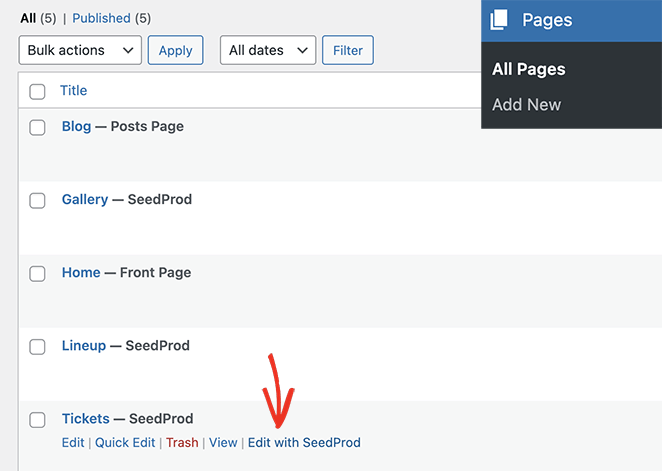
You’ll see the same drag-and-drop page builder you used to create your theme.
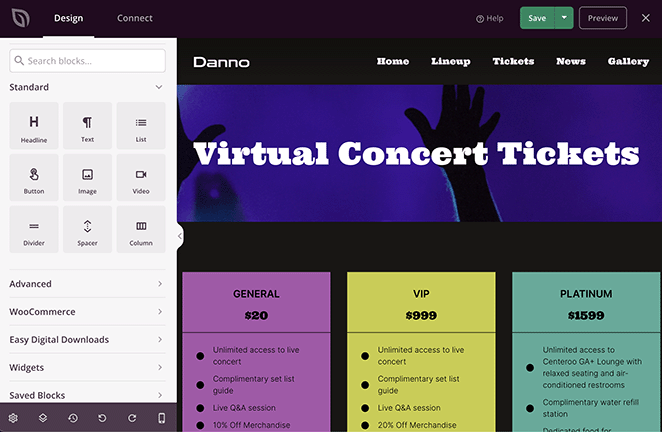
Depending on your website niche, you can create the following essential pages:
- About page
- Contact page
- Services page
- Team Members page
- Testimonials page
- Author page
- Login page
Once you’re satisfied with the content on each page, click the Publish button to make it live.
Creating WordPress Blog Posts
If you’re planning to blog, WordPress has everything you need to write, edit, and publish your posts. Posts are for content you’ll update regularly.
Here’s how to create a blog post in WordPress:
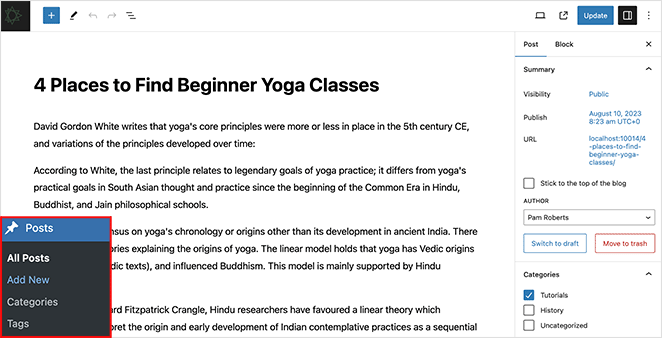
- In your WordPress dashboard, click Posts, then Add New.
- Use the block editor to craft your post.
- Click ‘Publish’ when you’re ready to share your thoughts with the world.
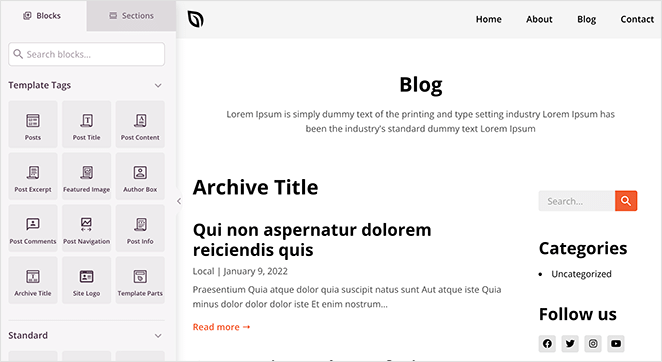
If you’re using SeedProd, you can change the look of your blog page and individual posts. Click the ‘Edit Design’ link on your Blog Page or Single Post template, and customize the design with the drag-and-drop page builder.
Step 6. Tweak Your Website Settings
Now that you’ve got some content on your site, let’s make sure everything is set up just right for your visitors. We’ll cover three key areas: setting up your homepage, tweaking your site title, and managing comments.
Create a Welcoming Homepage
Some themes display posts on your homepage by default. This is great if you’re a blogger, but if you’re building a more traditional website layout, you’ll want a static homepage with information about your business, services, and more.
To set up a static homepage, go to the Settings » Reading page from your WordPress dashboard. Under the ‘Your homepage displays’ option, choose ‘A static page’ and pick the pages you created when building your theme earlier for your home and blog pages.
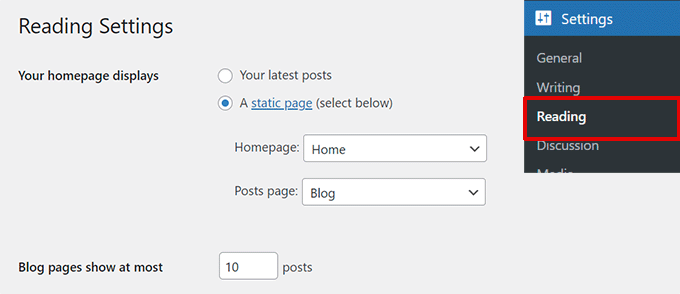
Remember to save your changes.
Now, your site will use your ‘Home’ page as the front page and your ‘Blog’ page to show your posts.
Perfect Your Site Title and Tagline
When first setting up your website, you had the chance to choose a tile. But what if you want to add a shot tagline to add more context?
To set it up, head over to Settings » General in your WordPress dashboard.
Here, you can edit your site title and add a brief tagline that summarizes your site.

Once you’re happy with both, don’t forget to click Save Changes.
Manage Your Comments Section
Comments can be a great way to engage with your audience, but they can also attract unwanted spam. To keep things tidy, let’s set up comment moderation.
Navigate to Settings » Discussion in your dashboard. Scroll down until you see ‘Before a comment appears’. Here, check the box next to ‘Comment must be manually approved’.
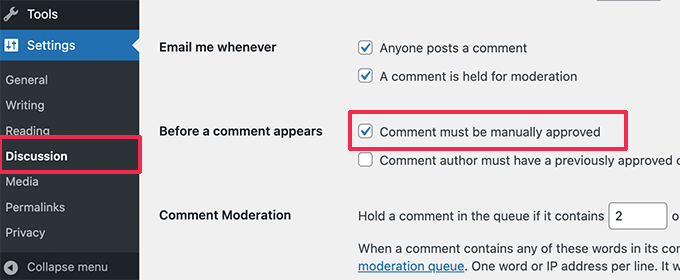
Don’t forget to save your changes.
With this setting, you can review comments before they appear on your site. This gives you control over the conversation and helps keep spam at bay.
Step 7. Install Essential WordPress Plugins
Now that your site looks good, let’s give it some superpowers. This is where plugins come in handy.
WordPress plugins are like smartphone apps but for your WordPress site. They can add new features or improve existing ones, making your site more powerful and user-friendly.
There are thousands of plugins out there, but here are some of the best WordPress plugins for beginners:
- SeedProd: Hide your site behind a coming soon page while working on it.
- All-in-One SEO: Help search engines find your site.
- WPForms: Add contact forms easily.
- MonsterInsights: See how many people visit your site.
- OptinMonster: Create eye-catching sign-up forms.
- Duplicator: Keep your site backed up.
- Sucuri: Keep your site safe from hackers.
- WooCommerce: Turn your site into an online store.
To install plugins, follow these steps:
- Go to Your WordPress Dashboard: Log in to your WordPress admin area.
- Navigate to Plugins: On the left-hand menu, click Plugins, then Add New.
- Search for Plugins: Use the search bar to find the plugin you want to install.
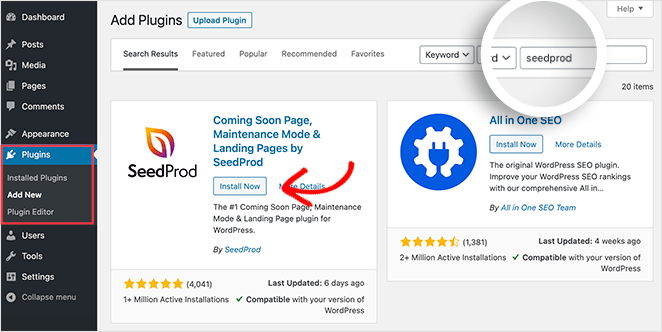
- Install: Click the Install Now button next to your desired plugin.
- Or Upload a Plugin: Click Add New to upload a plugin .zip file from your computer.

- Activate: Click Activate once the installation is complete.
Pro Tip: You can also upload plugins you’ve downloaded from other sources. Just click ‘Upload Plugin’ and follow the instructions.
Step 8. Launch Your Website on WordPress
Congratulations! You’ve come a long way in your journey. You’ve built, customized, and optimized your site; now it’s time for the grand unveiling.
But before you hit that publish button, let’s review a pre-launch checklist and discuss how to make your website live.
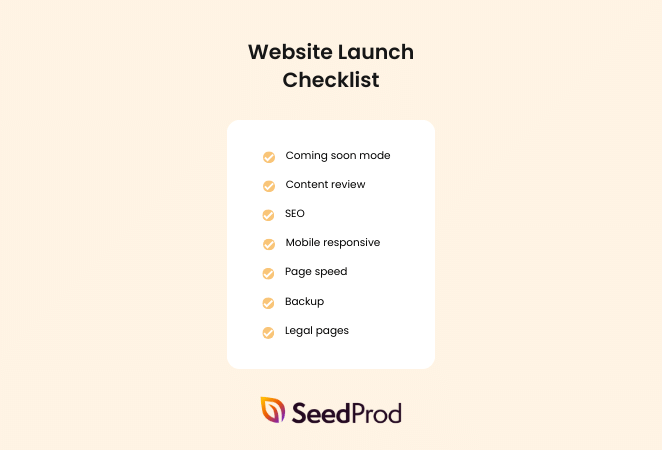
Before launching, make sure to tick off these boxes:
- Enable Coming Soon Mode: Temporarily hide your site behind a coming soon page before your launch so you can test new features before going live.
- Content Review: Double-check all your pages and posts for errors, broken links, and incomplete sections.
- SEO: Ensure all meta descriptions are filled out and your content is optimized for relevant keywords.
- Mobile Responsiveness: Test your site on various devices to ensure it’s fully responsive.
- Page Speed: Run speed tests to ensure your site loads quickly, optimizing any elements that slow it down.
- Backup: Make a complete backup of your site.
- Legal Pages: Ensure your site has essential legal pages like a Privacy Policy and Terms of Service.
For a more detailed list, see our 24-point checklist for a successful website launch.
Making your website live is often as simple as clicking Save and Publish. If you have a coming soon page active, you’ll need to deactivate this first.
In SeedProd, click the toggle under Coming Soon Mode until it’s inactive.
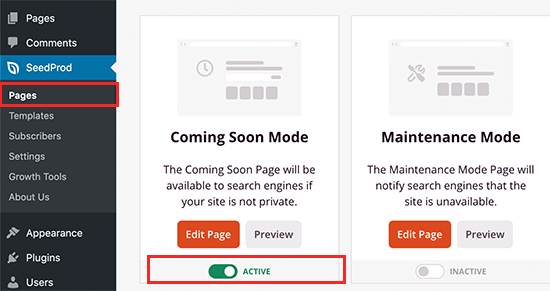
Additionally, if you’re using SeedProd’s theme builder to design your website, you’ll need to ensure it’s active. You can do that by navigating to SeedProd and Theme Builder and turning the toggle labeled “Enable SeedProd Theme” to the active position.

If you’ve built your site on a temporary domain or subdomain, you’ll need to point your primary domain to your new website. The exact steps can vary depending on your hosting provider, but most offer detailed guides to help you through this process.
Step 9. Take Your Website Further
In this guide, I’ve shown you how to make a website, choose a theme, build your pages, install must-have plugins, and successfully launch your site. But with WordPress, you can create a niche website that can do so much more, like:
- Build a personal trainer website
- Start a mom blog
- Make a wedding website
- Start a fashion blog
- Create an author website
- Build a church website
- Create a real estate website
- Design a restaurant website
- Set up an online store
- Create a photography website
See our guide for a list of all the types of websites you can create in WordPress.
Frequently Asked Questions
How to create a website in WordPress for free?
It’s possible to build a website for free by using WordPress.com, which offers a basic, no-cost plan. However, limitations include having a subdomain (e.g., yoursite.wordpress.com) and limited customization options.
Free hosting services are also available, but they often have restrictions and may place ads on your site. If you’re serious about building a website, we recommend investing in a domain name and quality hosting.
What are WordPress website templates?
Website templates, often called themes, are pre-designed layouts you can apply to your website. These templates come with preset styles and functionalities, making website building easier without starting from scratch.
Many WordPress page builders also refer to their premade designs as templates. SeedProd, for example, offers many website template kits to use as a starting point for a custom WordPress theme.
How do you install a WordPress theme?
After downloading your theme’s zip file, head to your WordPress settings, go to Appearance, click» Themes,” click “Add New,” and then click the “Upload Theme” button. Click “Choose File,” select the theme’s ZIP file from your computer, and click “Install Now.” After installation, click “Activate.”
Building a website with a WordPress tutorial vs. hiring a developer?
Building a website yourself using a tutorial is a cost-effective way to get your site up and running. It’s ideal for beginners or those with simple website needs.
On the other hand, if you have specific, complex requirements that can’t be met with existing themes or plugins, hiring a web developer is a good option.
Next, Discover More WordPress Guides
And there you have it! You’ve successfully navigated the process of creating a WordPress website from scratch in 8 simple steps. It’s a significant achievement, and now the world is ready to see your professional website design.
If you’re concerned about the learning curve of WordPress, tools like SeedProd can make the design and customization process much smoother and more intuitive.
If you need more help, please check out our other ultimate guides for WordPress:
- How to Rank a New Website (16+ Proven Tips)
- How to Create a Landing Page in WordPress (Step-by-Step Guide)
- The 15 Most Common WordPress Issues (And How to Resolve Them)
- How to Make a Click-to-Call Link in WordPress
- How to Set Up Link Tracking in WordPress (the Easy Way)
Thanks for reading! We’d love to hear your thoughts, so please feel free to leave a comment with any questions and feedback.
You can also follow us on YouTube, X (formerly Twitter), and Facebook for more helpful content to grow your business.

