Back in 2013, I wanted to create a simple landing page for my first WordPress website. But every tutorial I found involved writing code, which always looked like gibberish to me. I knew there had to be an easier way.
Fast-forward to today, and I’ve helped thousands of WordPress users build landing pages (through tutorials just like this) without ever touching code. And with modern WordPress tools, you can create one in under 30 minutes, even if you’re a beginner.
In this guide, I’ll walk you through my favorite no-code method to create landing pages in WordPress. I’ll show you exactly which tools to use and share simple steps that anyone can follow.
How to Create a Landing Page in WordPress:
Benefits of a WordPress Landing Page
I build landing pages in WordPress every day, so I can tell you from experience why they’re so good at getting results. Here’s what I’ve learned from creating hundreds of pages for both SeedProd and my own projects.
Unlike your homepage, which needs to serve many purposes, a landing page has one specific job. I’ve seen this make a real difference in how visitors interact with your page.
Here’s what I’ve found makes landing pages so effective:

- Higher Conversion Rates: I test this daily. When visitors land on a page with one clear action to take, they’re more likely to take it. In fact, every time I remove navigation menus and sidebars from a landing page, I see more people focusing on the signup form or buy button.
- Design Control: I use SeedProd’s landing page builder to design pages that match what each campaign needs. Just recently, I created a webinar registration page with custom colors, fonts, and layouts that wouldn’t be possible with a regular WordPress theme.
- Perfect for Temporary Campaigns: I often create landing pages for limited-time offers because they’re so easy to manage. When I run a sale or special promotion, I can publish the page when it starts and remove it when it ends, all without touching my main website navigation.
- Better Analytics: One of my favorite things about standalone landing pages is tracking exactly how they perform. Each time I launch a new page, I can see precisely how many people visit and take action, helping me improve future pages.
None of this is theory, either. I use landing pages every day to collect leads, promote events, and launch products. They’re the most reliable tool I’ve found for focusing visitors’ attention on what matters most, your offer.
If you need ideas, here are some great landing page examples to give you some inspiration.
Now, let’s see how you can easily make a landing page in WordPress.
Plus, there are many plugins, including page builders, that help create landing pages easily. These page builders are user-friendly and don’t require coding skills. They let beginners make effective landing pages without needing a developer.
How to Create a Landing Page in WordPress with SeedProd
While you don’t technically need a WordPress landing page plugin to build your page, using one is always my first choice. They’re easy to use, don’t require any coding skills, and allow you to spin up a page in minutes.
I also always use SeedProd instead of the other options available. Let’s look at why.

First off, SeedProd is fast. Really fast. Independent tests show SeedProd pages loading in under a second, which is crucial because slow pages lose visitors and sales. This speed advantage gives you a head start.
But SeedProd is more than just fast. It’s also packed with tools to boost your conversions. Features like countdown timers (proven to be effective – one company saw a 300% increase in conversions using them) are built-in and ready to go.
And the best part? Building your pages is incredibly easy. You don’t need any coding skills. The drag-and-drop system and pre-built templates make designing a professional-looking landing page (or even a whole website) a breeze.

I built my entire site with SeedProd without writing a single line of code.
So, let’s jump right into the steps for using SeedProd to create a landing page in WordPress:
Step 1. Install SeedProd Landing Page Plugin
Click here to get started with SeedProd and quickly download the plugin. In just a few clicks, you’ll have it installed on your WordPress site.
If you’d like a walkthrough, we have a guide on installing SeedProd.
✏️ Note
While there’s a free version available, this tutorial will focus on the Pro version, which provides access to advanced features like premium templates and powerful integrations.
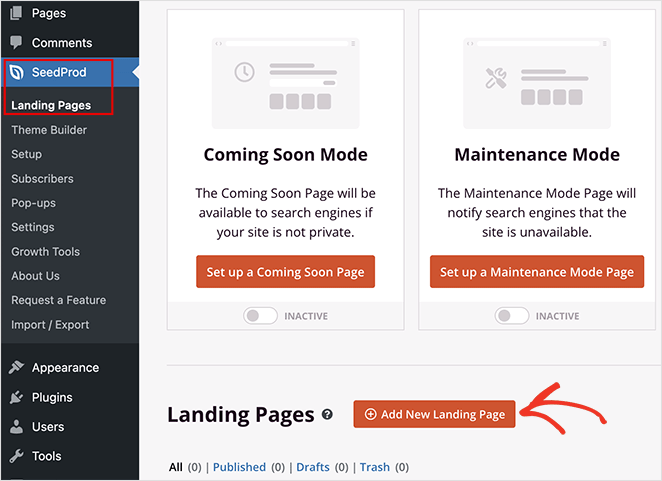
After activating the plugin, navigate to SeedProd » Landing Pages from your WordPress dashboard and click the Add New Landing Page button.
Step 2. Choose a Landing Page Template
On the next page, you can choose a landing page template to jumpstart your design process. Whether you need a landing page for sales, lead generation, webinar registrations, or a custom project, there’s a template to match your goals.
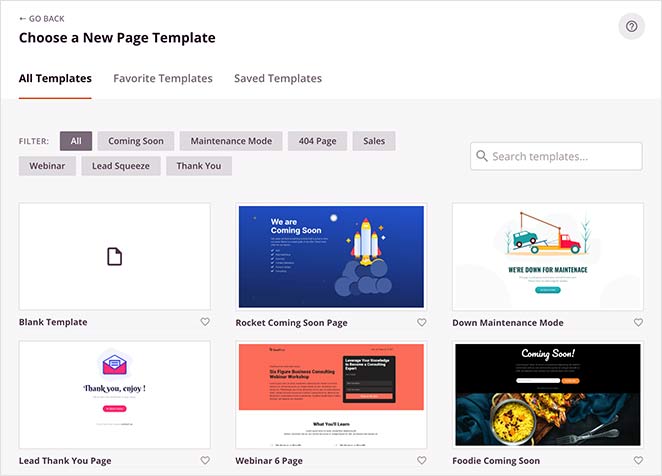
These fully customizable templates eliminate the need for design experience, allowing you to create a professional-looking landing page with ease.
Alternatively, you can select the Blank Template to build and design your own page in the visual editor.
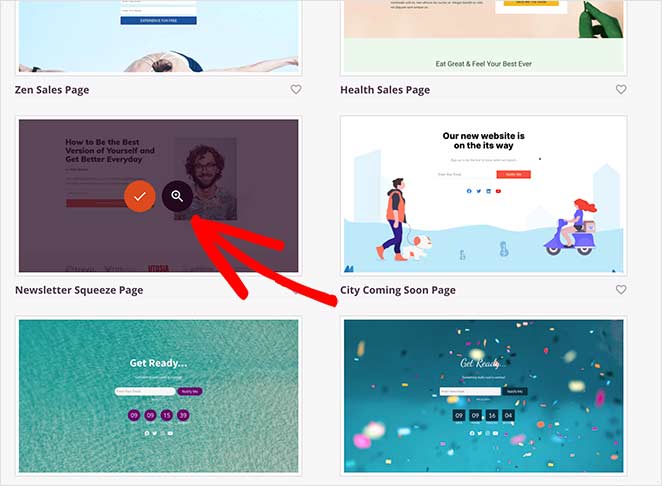
For this tutorial, I’ll choose the Newsletter Squeeze Page Template. To use it, hover your mouse over the template and click the tick icon.
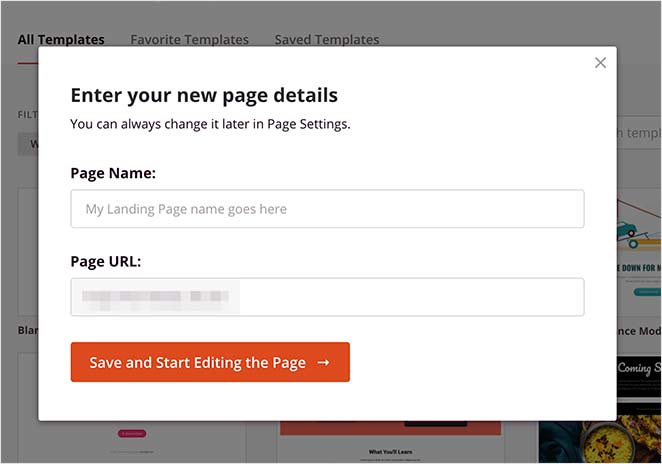
After that, a lightbox popup will appear where you can give your page a name and a custom URL. Then click the Save and Start Editing the Page button to load your template in the drag-and-drop builder.
Step 3. Customize Your Landing Page Template
After creating your new page, you’ll see the visual drag-and-drop page builder. This makes it simple to customize your landing page’s layout and content.
Drag and drop elements like headlines, images, buttons, and more directly onto the page. No coding required.
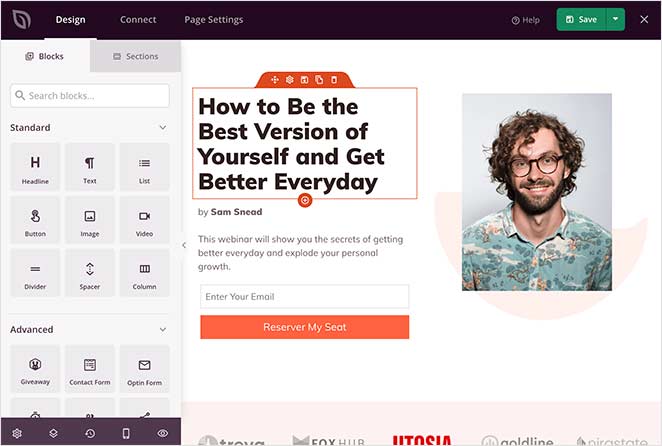
You’ll find various blocks in the sidebar, each with customizable options to match your brand.
For instance, if you click the Button block to open the settings, you’ll see several template styles, colors, gradients, and outlines.
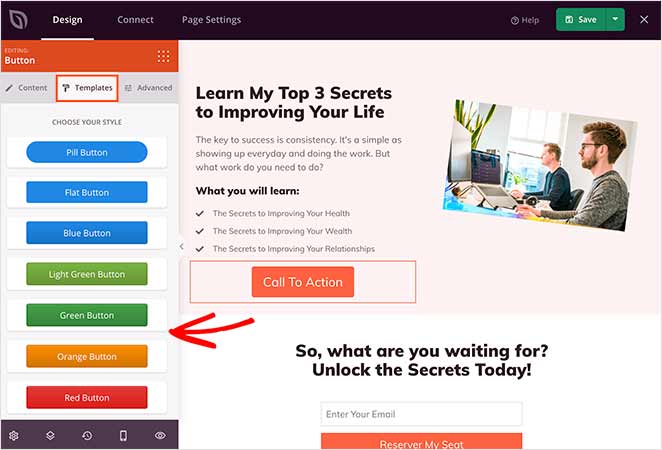
The Advanced tab also allows you to change the block’s content, size, alignment, color, and typography.
Need to boost conversions? The Advanced blocks have you covered, with options for lead generation forms, countdown timers, testimonials, and more.
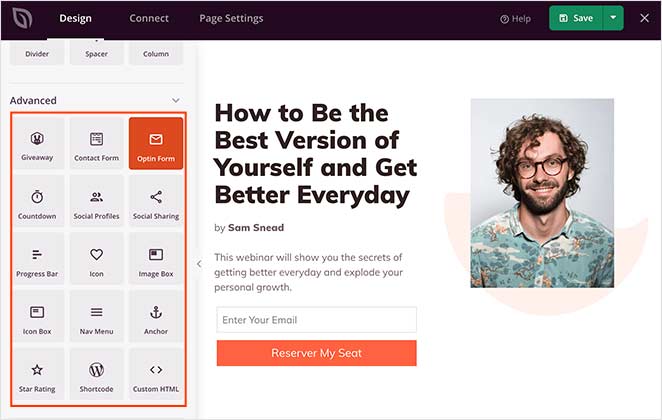
To learn how to add some of these features, check out the following tutorials:
- How to Embed Google Maps in WordPress
- How To Add Before and After Photo Slider to WordPress
- How to Add Testimonials to WordPress
- How to Create a Landing Page with Countdown Timer
- How to Add Business Hours to WordPress
- How to Add Custom WordPress Social Media Icons to Your Website
Adding Landing Page Sections
Want to create entire sections quickly? SeedProd offers pre-made layouts for headers, hero areas, FAQs, and more, giving you a head start on your design.
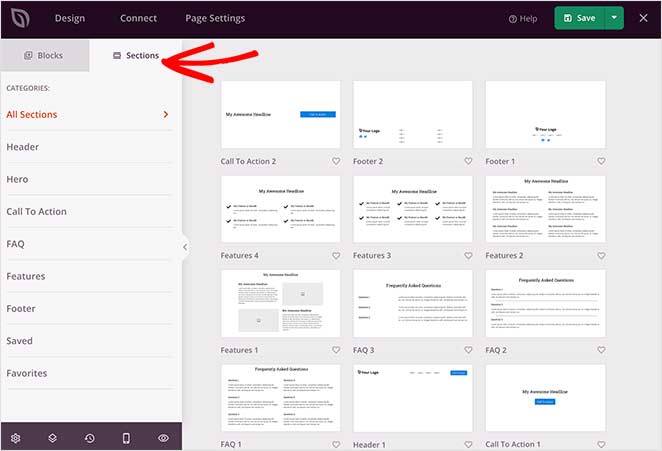
To add a section to your landing page, hover over an example with your mouse and click the plus + icon.
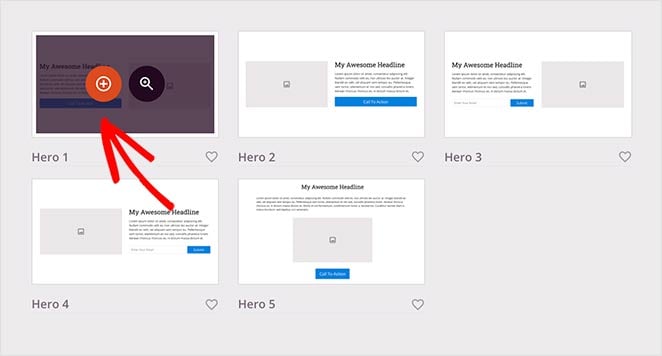
SeedProd then inserts the section into your page. You can then click and edit the elements as you would with the blocks.
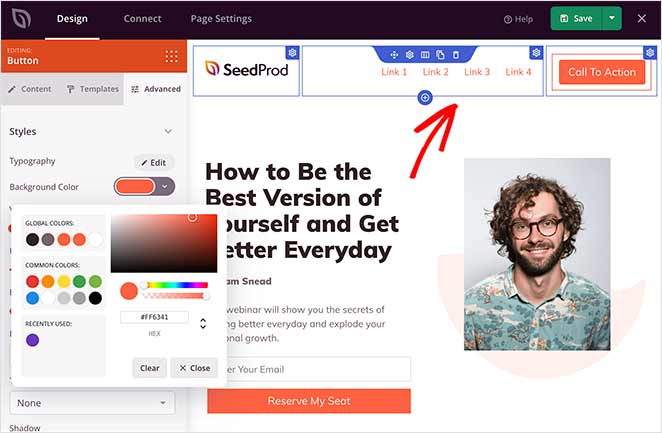
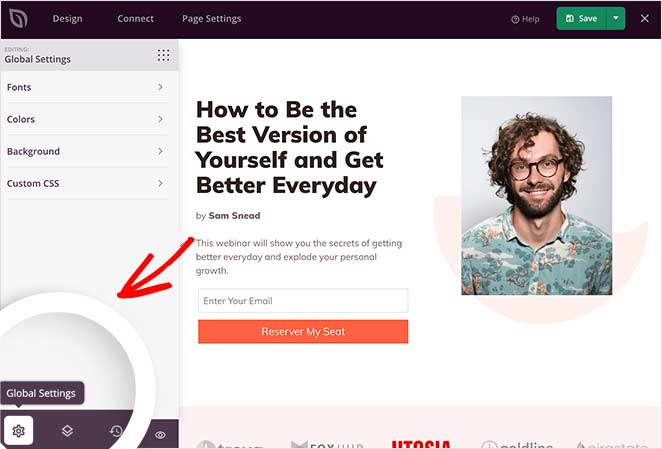
Customizing Global Styling Options
To maintain a consistent look and feel across your landing page, use the global styling options to easily control colors, fonts, and background images.
For example, you can add a video background or background slideshow functionality to your page. Or you can change the background color and give your landing page a consistent color palette.
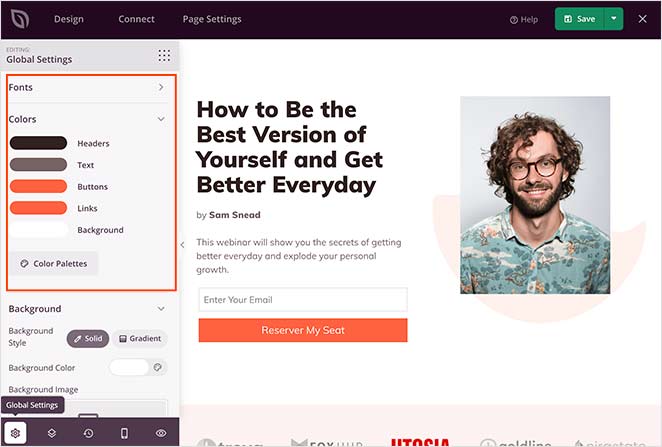
Remember to save your changes during the design process by clicking the Save button at the top-right corner.
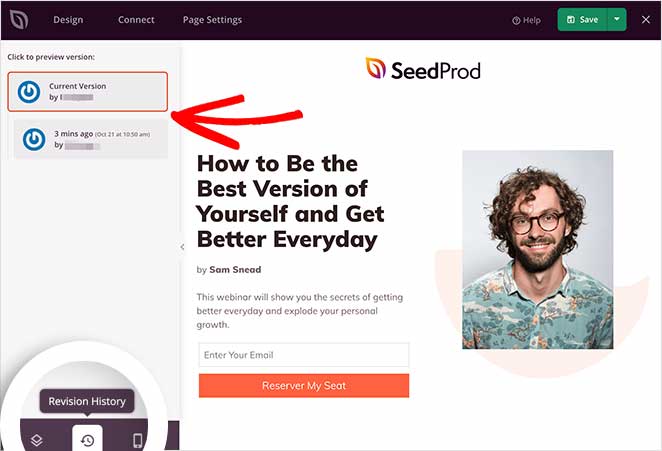
Restoring to an Older Landing Page Version
Sometimes, you might need to go back to a previous landing page version.
Click the clock icon at the bottom left of your screen to do that. Then, you can view your revision history and switch to a different version.
Step 4: Connect Your Email Marketing Service
Seamlessly grow your email list by integrating your favorite marketing tools.
Connect to popular email providers like Constant Contact, GetResponse, Mailchimp, ActiveCampaign, and more, ensuring every lead captured through your landing page goes straight to your email list.
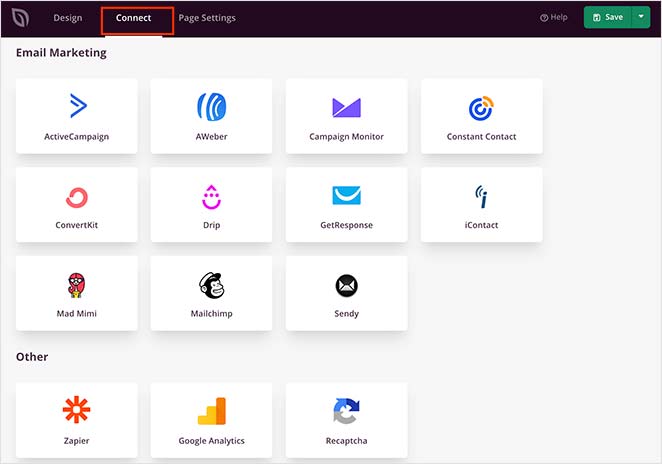
You can also set up Google Analytics tracking, spam protection, and other apps with Zapier.
Find it in the integration list and click Connect to link your email service.
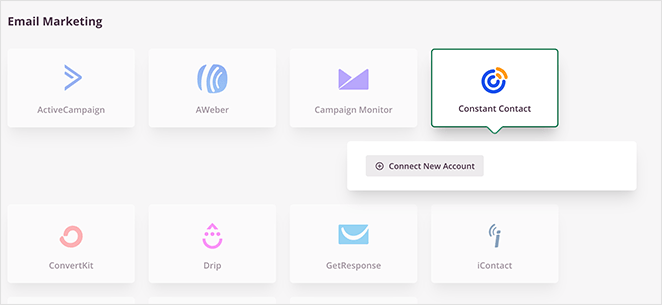
Then, follow the instructions to connect and verify your account. After that, you can link all your opt-in forms to your email list.
Step 5: Configure Your Landing Page Settings
Next, take control of your landing page’s performance with easy-to-use settings.

Adjust SEO settings to boost your page’s visibility in search results, ensuring more potential customers can find you. You can also connect to analytics platforms to track your landing page’s effectiveness.
For advanced users, there are options for custom header, body, and footer scripts, giving you full control over your page’s functionality.
Remember to click Save to preserve your changes.
Step 6: Publish Your Landing Page in WordPress
Before publishing your landing page, you should preview it. That way, you can see if it looks good on both desktop and mobile devices.
To preview your page, click the preview icon in the landing page builder. You’ll see a mobile page preview instantly, so you can scroll through and make any changes. Just click the icon again to switch back to the desktop preview.
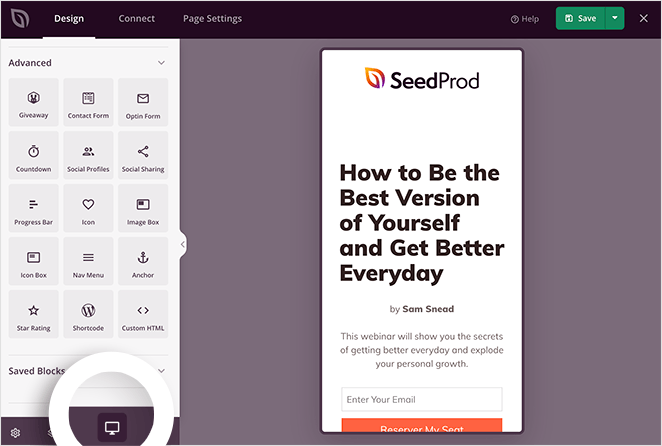
If you’d like to see a live preview of your page, click the eye icon to open your landing page in a new tab.
When you’re happy with how everything looks, click the arrow under the Save button and click Publish.
Here’s an example of a landing page I created for this guide on my test website:

💡 Expert Tip
This landing page took me around 15 minutes to create.
You can make that time even quicker by using SeedProd’s Import and Export feature. It lets you export your designs as a .zip file so you can quickly reuse them for other projects.
For example, design a stock template and use it as a framework for your client projects to make the design process faster.
How Do I Make My WordPress Homepage a Landing Page?
If you want your landing page to be the first thing website visitors see, you’ll need to set it as your static homepage.
To do this, go to Settings » Reading from your WordPress dashboard. Then, select the ‘A static page’ option, and choose the landing page you just created from the dropdown menu.
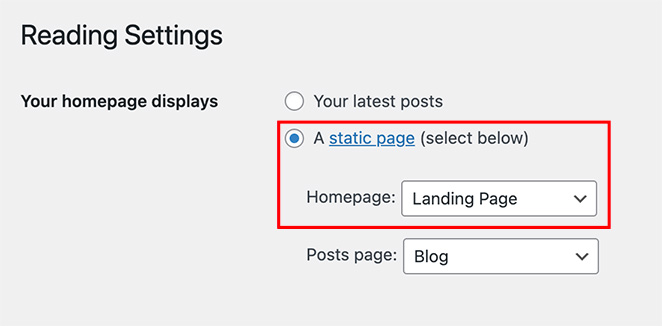
It won’t be the same as your regular homepage. Instead, it means your custom landing page is where visitors land when they click through to your main WordPress site.
Next, Optimize Your Landing Page
I hope this guide helped you learn how to create a landing page in WordPress. Once your page is up and running, don’t forget to test and optimize for the very best results.
To help you with this, you may find the following guides useful:
- Expert Landing Page Optimization Tips
- How to A/B Test Your Landing Page
- Types of Landing Pages Guaranteed to Convert
- Landing Page Best Practices for Incredible Conversion Rates
- Landing Page URL Examples and Best Practices
- How to Create a Quick Landing Page to Test Ideas
- Landing Page Headline Formulas to Boost Conversion Rates
- Landing Page Not Converting? 9 Tips to Fix It Fast
Thanks for reading! We’d love to hear your thoughts, so please feel free to leave a comment with any questions and feedback.
You can also follow us on YouTube, X (formerly Twitter), and Facebook for more helpful content to grow your business.

