Ever wondered how to add a gallery to WordPress pages and posts?
Image galleries showcase your photos, artwork, and other visual content to your audience. They also break up text-heavy sections, keep visitors engaged, and add flair to your website.
In this guide, I’ll share 3 popular methods for adding galleries to your WordPress site with tips to optimize them for the best user experience.
Why Add a Gallery to WordPress?
As I mentioned above, image galleries make your WordPress site more engaging for visitors. They convey emotions and messages more easily than text, which is ideal for telling your story and highlighting your work.
However, doing this with the standard WordPress image block isn’t always easy. With it, you can only add one image at a time.

Since the images appear one after another, users have to scroll to view them. Not only is this frustrating for users, but it also doesn’t look professional.
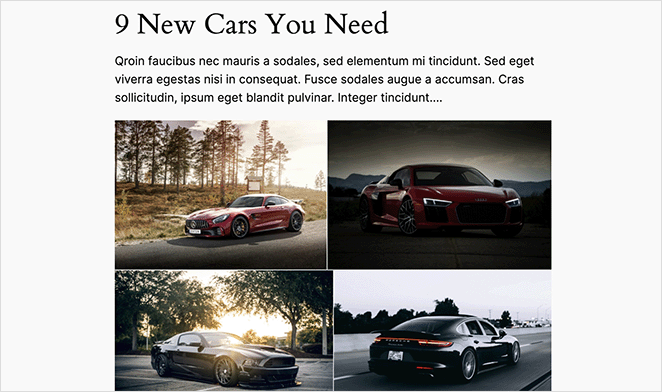
With an image gallery, you solve that problem by displaying photos and graphics in an attractive grid. It saves space on your page and looks much more professional. Users can often click an image in the gallery and view it in full-screen mode for a closer look.
Options for Adding Galleries to WordPress
There are several ways to add a gallery to WordPress pages and posts. The most straightforward is to use the built-in WordPress Gallery block.
It’s a good solution for a beginner because it’s easy to use. However, you have little control over its appearance beyond image size and captions. So, I wouldn’t recommend it for sites that need more customization options.
You can also use WordPress image gallery plugins. They come with many more customization options and advanced features. For example, the most popular gallery plugins offer:
- Lightbox popups
- Unique layouts
- Animations and hover effects
- Image protection (watermarking)
- And more.
Alternatively, many WordPress page builders have unique image gallery modules. They make adding galleries to your landing pages easy without installing extra plugins.
Don’t worry if you can’t choose just yet. I’ll cover all three options in the tutorial below so you can find one that best suits your needs.
I’ll kick things off with my favorite method, adding a gallery to WordPress using a page builder.
How to Add a Gallery to WordPress with a Page Builder
When you’re creating a high-converting gallery page, like a portfolio, you want tools that make generating leads and conversions easier.
You could create a landing page in the WordPress editor and use the Gallery block. However, it likely won’t have the other features you need, like:
- Countdown timers
- Testimonials
- Opt-in forms
- Pricing tables
- Star ratings
In this case, using a WordPress page builder with everything you need in a single WordPress plugin makes more sense.

My top choice is SeedProd, one of the best drag-and-drop WordPress page builders. With it, you can create landing pages that convert and display your work with its advanced gallery block.
First, you’ll need to install and activate the SeedProd plugin on your WordPress site. If you need help with this, please see our guide on how to install SeedProd Pro.
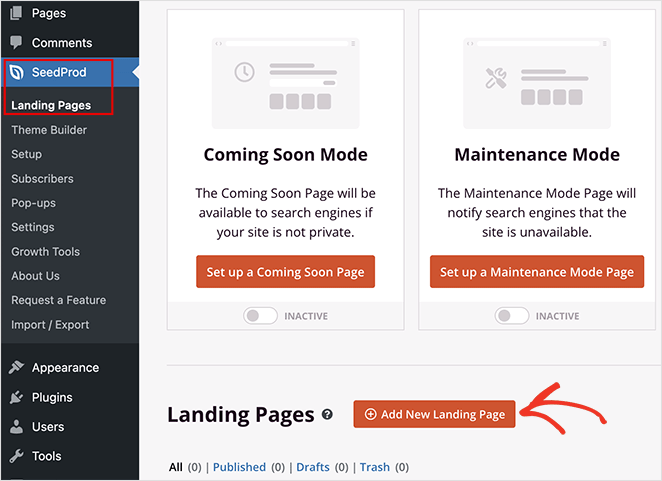
After activating the plugin, go to SeedProd » Landing Pages from your WordPress dashboard, and click the “Add New Landing Page” button.
Now, browse the landing page templates to find a pre-made design that suits your needs. You can also start from scratch with a blank page template.
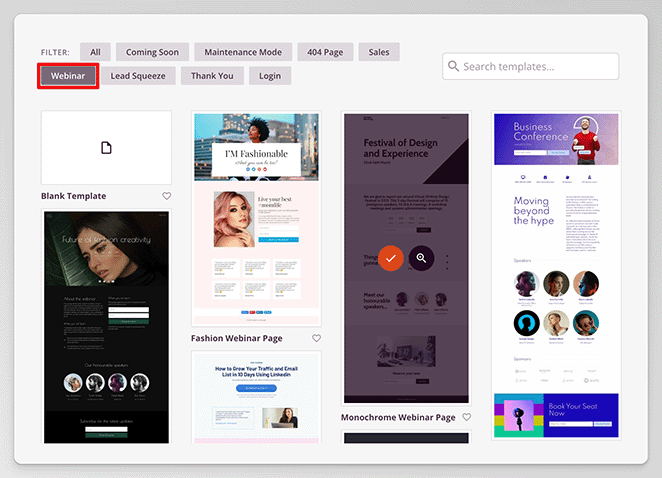
Simply hover over a template and click the checkmark icon to launch it in SeedProd’s drag-and-drop builder. Then, you can customize the page visually to make it your own.
For more detailed steps, please see my step-by-step guide on how to create a landing page in WordPress.
Note: With SeedProd, you can only add galleries to WordPress pages; not posts.
Adding a Gallery to Your WordPress Landing Page
After setting up your landing page, you’ll want to customize it with a WordPress photo gallery. There are 3 ways to do this in SeedProd:
- Gallery Block: A simple multi-column gallery.
- Advanced Gallery Block: A single or multiple gallery with filters, overlays, and text descriptions.
- Image Carousel Block: A single-column sliding image gallery with autoplay options.
Using the Gallery Block
To add the Gallery block, find it in the blocks sidebar on the left and drag it into place on your page.
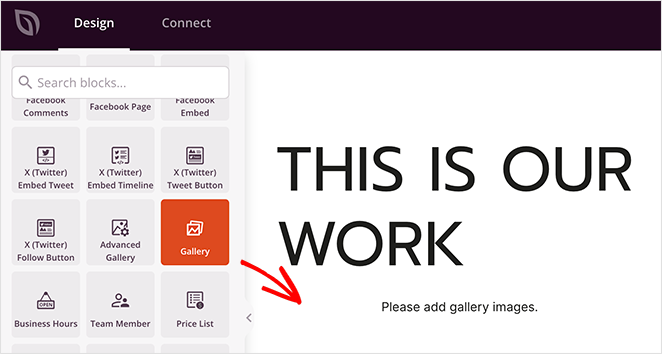
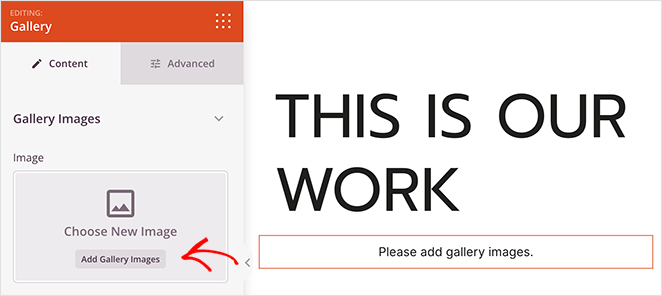
Then click the “Add Gallery Images” option in the block settings.
Now, you can upload new images from your computer or select images from your WordPress media library. Select all the images you want to add to your gallery, then click “Create Gallery.”
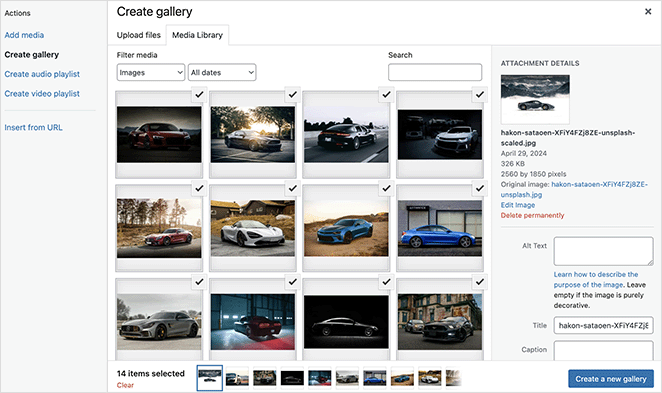
You can then give each image a caption and click the “insert Gallery” button.
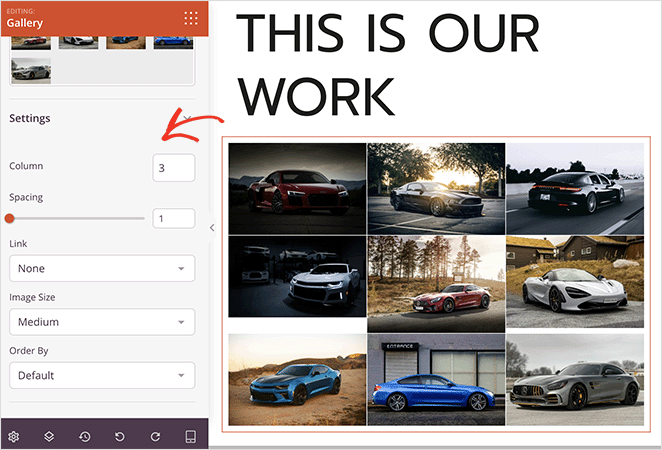
You’ll now see the gallery on your landing page. From there, click the “Settings” tab in the block options to adjust the gallery columns, link, image size, and order.
Using the Advanced Gallery Block
The Advanced Gallery block works similarly. However, instead of a single gallery, you can add multiple galleries and display filters for users to easily choose what they want to see.
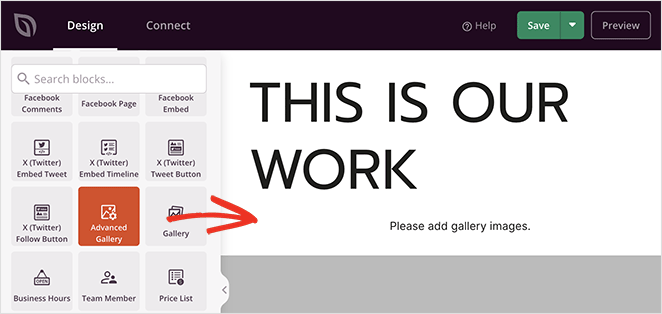
As before, find the Advanced Gallery block in the left-hand sidebar and drag it onto your page.
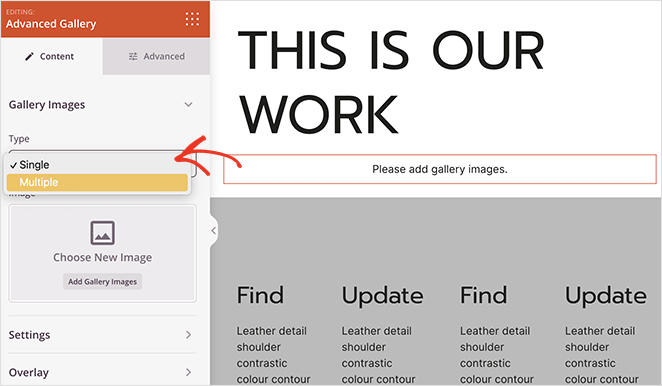
This time, there’s a dropdown menu to choose “single” or “multiple.” I’ll select multiple to show you how it works.
As you can see, choosing that gives you a “tab” option. This is your first gallery.
Click the tab to expand it and see the gallery settings.
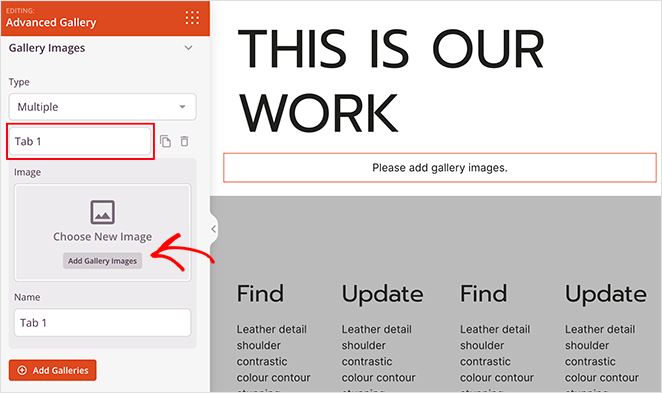
Here, click the “Add Gallery Images” option and follow the steps like before to add media and insert your photos.
Now, click the “Add Galleries” button to add another image gallery.
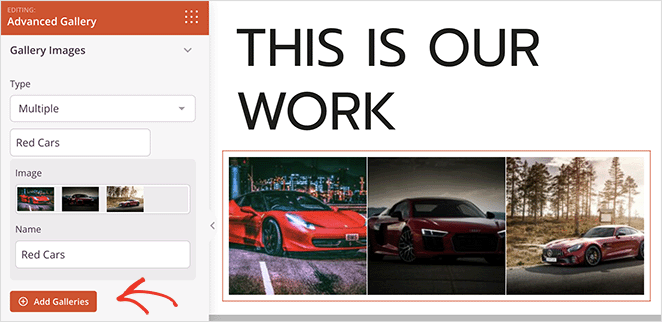
On the gallery preview, you’ll see several headings. In my example, they’re “All,” “Red Cars,” and “Black Cars.”
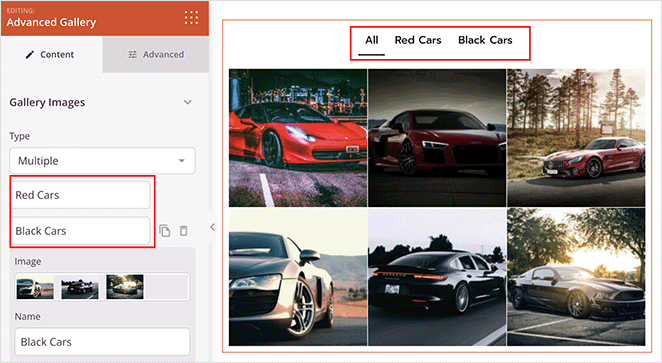
This means users can view all images at once or one gallery at a time.
In this block, there’s an extra setting called “Overlay”. Expand it, and you can enable the overlay effect. This effect let’s you add a color overlay to the gallery image thumbnails that show when you hover over it.
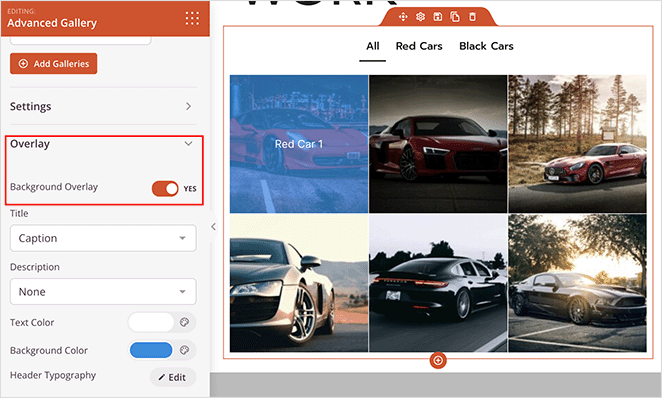
You can also display the image caption, title, or description to give visitors more context.
Using the Image Carousel Block
If you want your images to take up less room on the page, use the Image Carousel block.

In the block settings, you can upload images individually, but instead of a grid, they’ll appear as a slideshow with pagination.
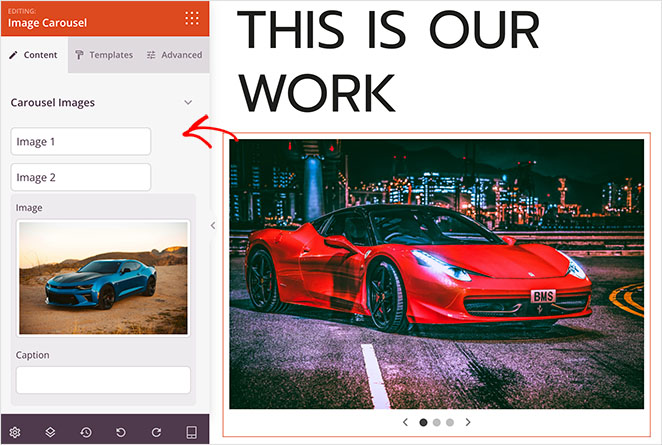
Users can manually click to slide through each image, or you can set the carousel to autoplay in the settings area.
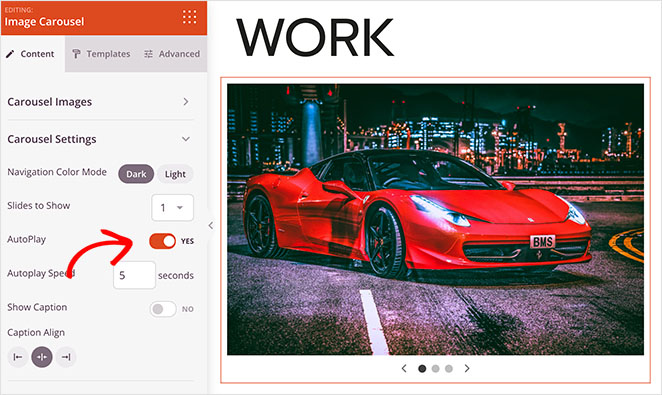
Choose the method that works best for you. And don’t forget to click “Save” and “Publish” to make the changes live on your website.
How to Create an Image Gallery with a Plugin
Now, I’ll walk you through an alternative: a WordPress gallery plugin. This method is ideal if you want image galleries with plenty of features to add to pages and posts.
For this, I recommend Envira Gallery, one of the best photo gallery plugins for WordPress.
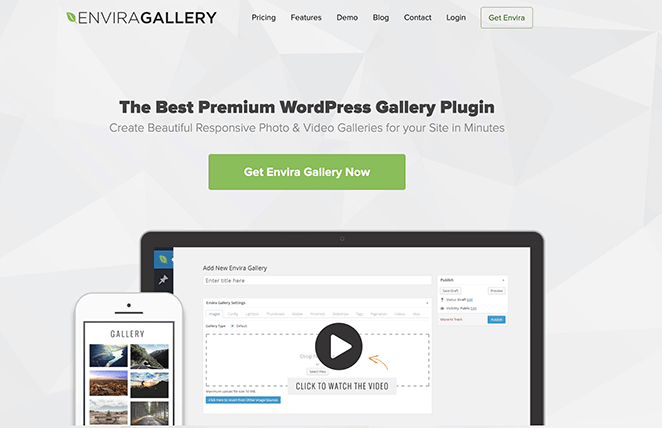
Its drag-and-drop functionality makes it easy to use, and has all the features you need to build a responsive, user-friendly gallery layout.
First, you’ll need to install and activate the Envira Gallery plugin. I’m using the free version for this example, but the Pro version unlocks many more addons, like watermarking, password protection, social media icons, WooCommerce galleries for eCommerce sites, and more.
For help, please see this handy guide on how to install a WordPress plugin.
Adding Envira Gallery to a WordPress Page
Upon activation, create a new page or edit an existing one. Then, click the plus icon to add a new WordPress block, search for “Envira,” and click to add it to your page.
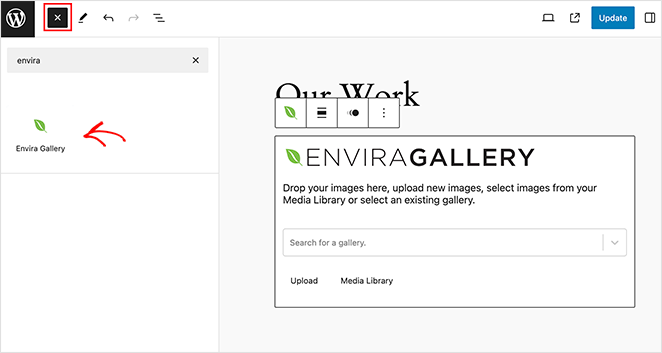
Next, click the “Media Library” button to choose images from your library to add to the gallery.
To edit your gallery, click the “Edit Gallery” option in the toolbar or the right-hand sidebar.
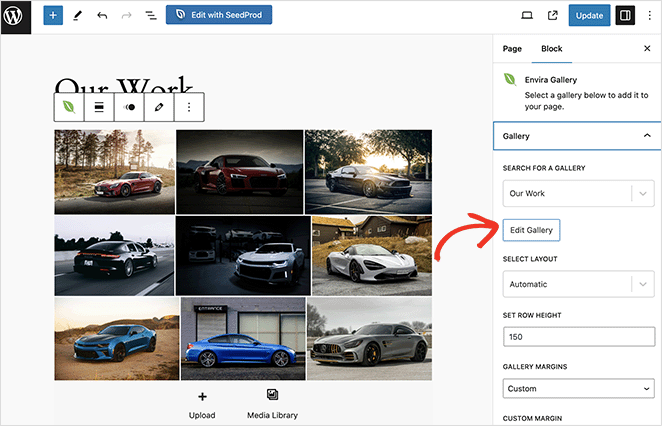
This opens a new tab with various customization options.
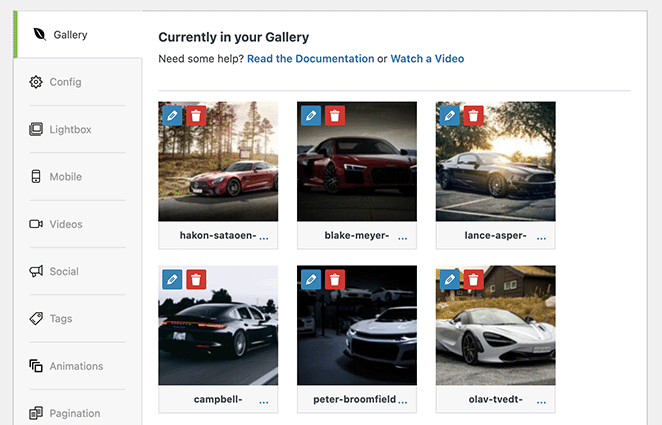
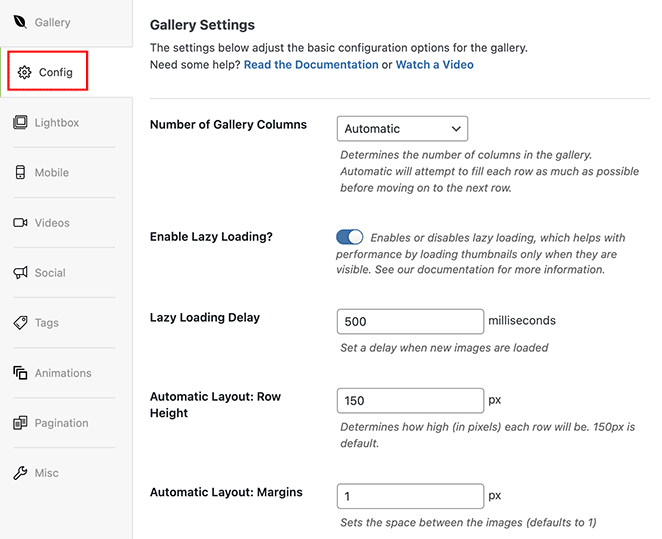
For example, in the “Config” tab, you can set the number of columns, turn lazy loading on or off, set the automatic row height and margins, and choose the image size and dimensions.
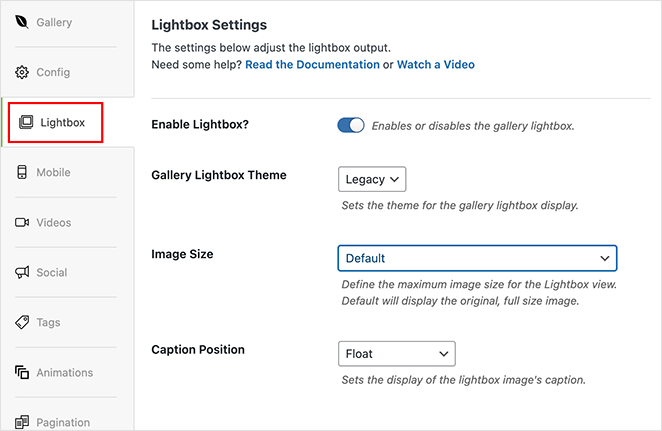
You can also click the “Lightbox” tab to enable a gallery lightbox effect that opens your images in full size when users click them.
When you’re happy with your settings, click “Update” in the top-right corner, then return your page. From there, save and publish your page to show the gallery live on your website.
You can also use this method to add a gallery to WordPress posts.
How to Add a Gallery to WordPress Without a Plugin
If you prefer a website with minimal WordPress plugins or need something simple without the bells and whistles, the built-in WordPress Gallery block is a solid choice.
To use it, edit or create a new page or post, click the plus icon to add a block in the block editor (Gutenberg), and look for the Gallery block.
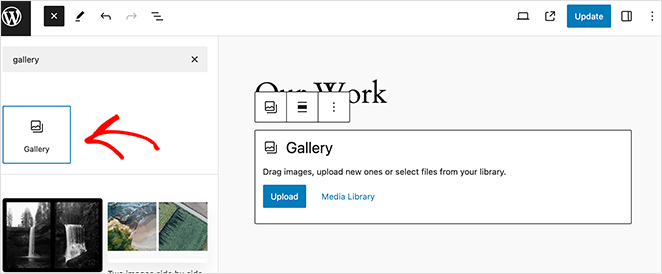
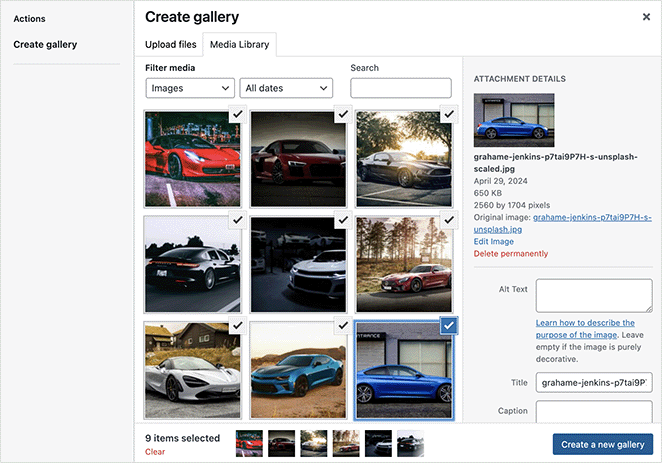
Next, upload your images or choose them from the WordPress media library and click the “Create New Gallery” button.
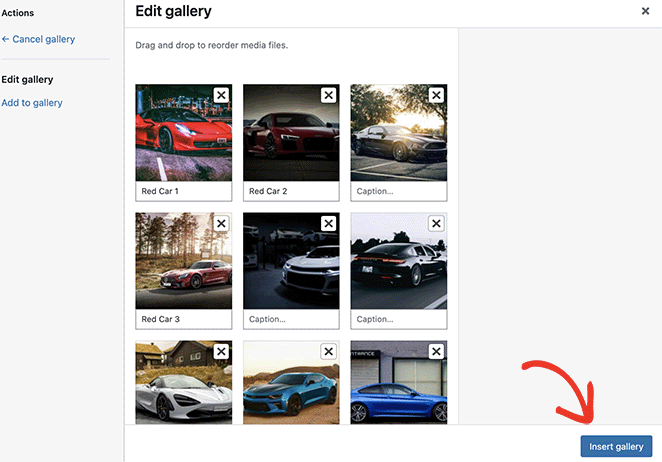
Then, add captions or rearrange your gallery, and select the “Insert Gallery” button.
Once it’s in your post or page, you can customize the gallery by choosing options in the right-hand sidebar.
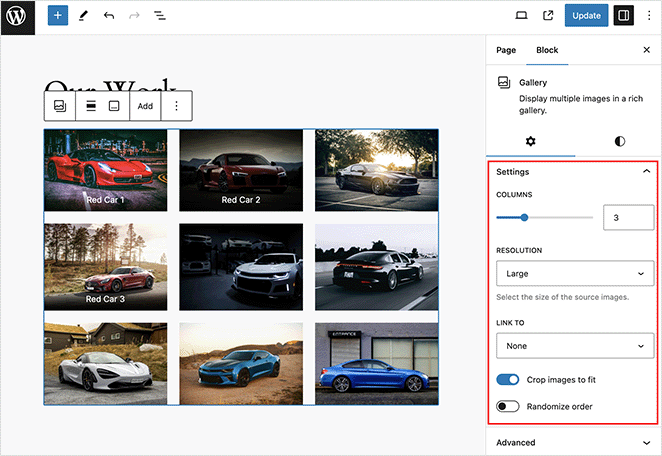
For instance, you can set the number of columns and resolution, link to the media file or attachment page, and crop images to fit.
Switching to the “Styles” settings allows you to set a custom background color and adjust the spacing between images.
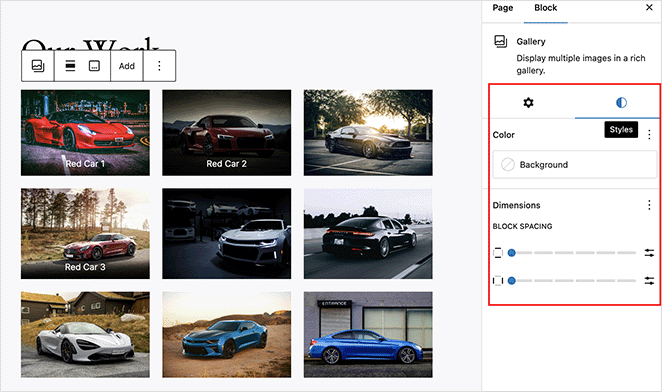
When you’re happy with the changes, click update or publish to make them live.
How to Optimize Your Images for the Web
I’m sure you’ll want to jump in and get your galleries up and running. But before you do that, you should know how to optimize them.
According to Microsoft, our attention spans have gone from an average of 12 seconds to 8 seconds. So if your images take longer than 8 seconds or less to load, readers will get impatient and leave.
Optimizing the images in your gallery reduces their file sizes without reducing their quality. As a result, they’ll load faster, which is excellent for user experience.
But how do you optimize images for the web? Here are some easy image optimization tactics to try:
- Resize Images: Ensure your images are the right size for your site’s layout. Use an image editing software like Photoshop or a free online tool to change the image dimensions.
- Compress Images: Use image compression tools like TinyPNG or TinyJPEG to reduce file sizes.
- Choose the Right Format: The most common image formats for the web are JPEG and PNG. JPEG is best for photographs, while PNG is better for graphics with sharp lines and text.
- Use Lazy Loading: Lazy loading delays loading images until they’re about to become visible on the screen, which can improve perceived page load times.
Search engine optimization (SEO) is just as important as image size. Give your images rich descriptions and file names to help search engines like Google understand what they are.
Besides helping your images show up in search results, good alt-text descriptions help users with screen readers understand the context of your pictures. This makes your website more accessible to those with visual impairments.
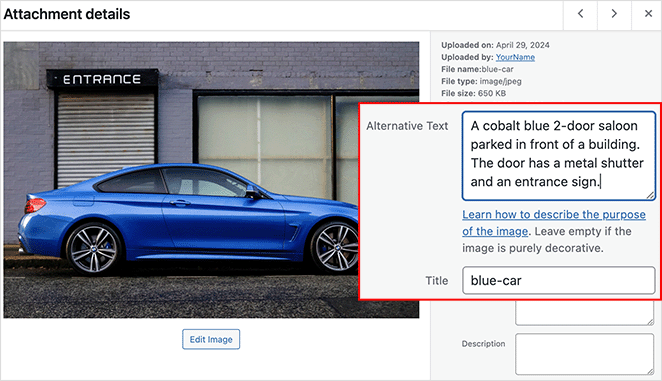
The WordPress media library lets you easily edit the file name, description/caption, and images’ alt text. Select an image, and you can type in the information on the right-hand side.
Create Your Next Image Gallery
I hope the methods in this guide have helped you learn how to add a gallery to WordPress. Pick one that works for you, then bring your website to life with engaging visual content.
You might also like the following WordPress tutorials on using images:
- How to Use AI to Generate Images on Your WordPress Website
- How to Add a Featured Image to WordPress
- How to Add Hotspot Images to WordPress
- How to Add Text on an Image in WordPress
- How to Dim a Background Image in WordPress Without CSS
Thanks for reading! We’d love to hear your thoughts, so please feel free to leave a comment with any questions and feedback.
You can also follow us on YouTube, X (formerly Twitter), and Facebook for more helpful content to grow your business.

