Want to learn how to sell workout programs online? It’s one of the best ways to grow your fitness business without spending all day at the gym.
I’ve seen fitness coaches and personal trainers turn simple workout plans into steady income just by setting up a membership site. You don’t need to be a tech expert or have a big team. If you have workouts to share, I’ll show you exactly how to sell them online using WordPress.
In this guide, you’ll get a step-by-step walkthrough for setting up your site, protecting your content, and accepting payments, everything you need to start selling right away.
Quick steps to sell workout programs online:
- Step 1: Choose a WordPress Membership Plugin
- Step 2: Set Up Your WordPress Site with MemberPress
- Step 3: Add Payment Methods to Accept Sales
- Step 4: Create Membership Tiers for Your Programs
- Step 5: Set Access Rules for Premium Workout Content
- Step 6: Upload and Protect Your Workout Program Content
- Step 7: Build a Transparent Pricing Page
- Step 8: Add Login and Sign-Up Forms to Your Site
But first, let’s take a look at why selling your programs online is a smart choice.
Why Should You Sell Workout Programs Online?
Let’s face it; you want to help as many people reach their fitness goals as you can. But with only so many hours in the day, how can you physically be in the gym where potential clients are?
That’s where your website comes into play. By selling your workout programs from your site to paying members, you can reach far more people than usual. And you won’t need to be on the gym floor hustling for clients.
From your website, you can put the following features in place:
- Offer free content to engage and attract new paying clients.
- Make money online by letting users pay for premium content.
- Set different membership levels with specific prices.
- Offer recurring subscriptions to encourage clients to stick around.
And if you share excellent content from your site to social networks like YouTube, Instagram, Twitter, and Facebook, you can encourage users to visit your website and sign up.
With this in mind, let’s look at the steps involved to get your workouts ready to sell online.
How to Sell Workout Programs Online (Step-by-Step)
For this tutorial, we’ll be showing you how to sell your workouts using a WordPress membership plugin. So we’re going to presume that you already have a WordPress website to install it.
However, if you haven’t yet set one up for your business, you can follow the instructions for starting a WordPress site here.
Then you can return and follow each of the steps outlined below to sell your workouts on the internet.
Step 1: Choose a WordPress Membership Plugin
As we mentioned above, in this article, you’ll learn to sell workout programs from your website using a membership plugin. This type of plugin lets you restrict your content to paying members, so you can earn money from your classes without having to be in the gym physically.
There are a ton of free and paid membership plugins for WordPress. And each plugin has several pros and cons.
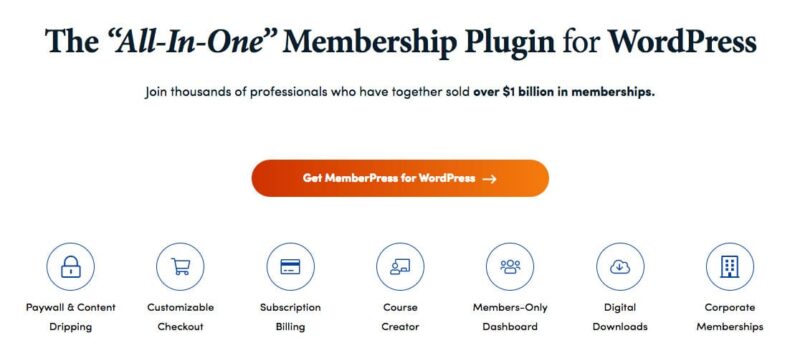
However, for this guide, we’ll be using MemberPress, the most robust membership plugin for WordPress.
MemberPress has heaps of advanced features for you to accept payments, restrict access to your workout programs, allow program downloads, sell online courses, and much more.
So with this in mind, let’s take a look at how to get MemberPress installed on your website.
Step 2: Set Up Your WordPress Site with MemberPress
The first thing you need to do to set up your membership site is to install and activate the MemberPress plugin. To help you out, see this step-by-step guide on how to install a WordPress plugin.
When you’ve activated MemberPress, click MemberPress » Settings to enter your license key.
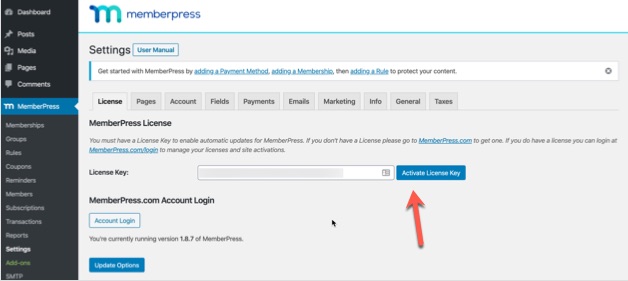
Once this is activated, you’ll be able to access all the features included in your plan. You can then configure the settings to your liking by clicking each tab along the top of the settings pages or choosing one from the left-hand admin bar.
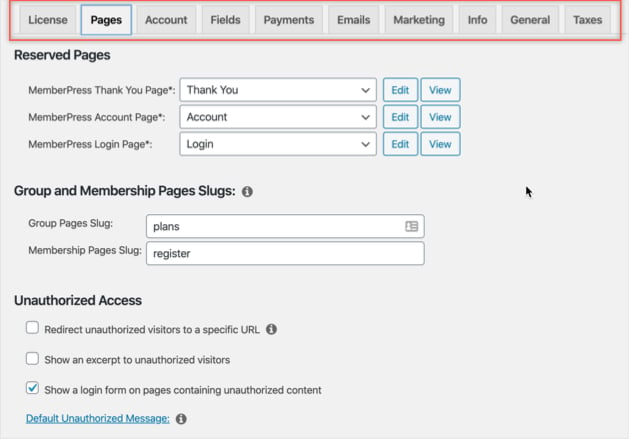
With your options configured, let’s look at setting up payments for your site.
Step 3: Add Payment Methods to Accept Sales
To add payment methods to your membership website, click the Payments tab at the top of the options page.
Clicking the plus icon reveals the payment options available to you, which include:
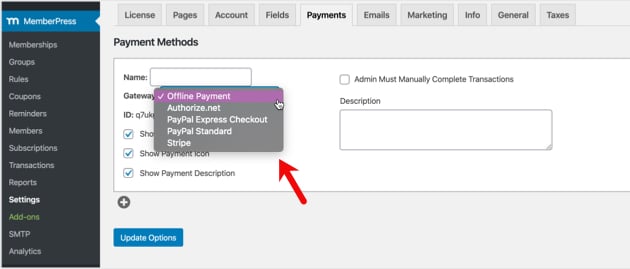
You can add as many payment gateways as you like to your site. Then once you’ve finished setting them up, click Update Options to save your changes.
You’re now ready to create membership levels for your programs, which we’ll cover next.
Step 4: Create Membership Tiers for Your Programs
Membership levels are a way to set different pricing options, features, and content for different membership types.
For example, you could have a bronze membership level at a low price that includes access to basic workout programs. Then you can scale up member levels with higher pricing by granting access to your premium workouts.
The great thing about MemberPress is you can create unlimited member levels, so you can have plans that suit all your customers’ needs.
To set up your member levels, go to MemberPress » Memberships from the left-hand admin menu. Then click the Add New button.
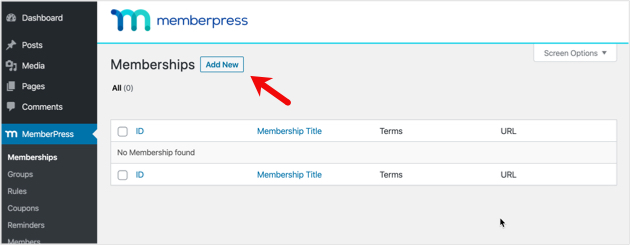
An editor will open where you can set a title and description for the membership level. Then go ahead and set the membership price, billing type, and access time under the Membership Terms heading on the right-hand side.
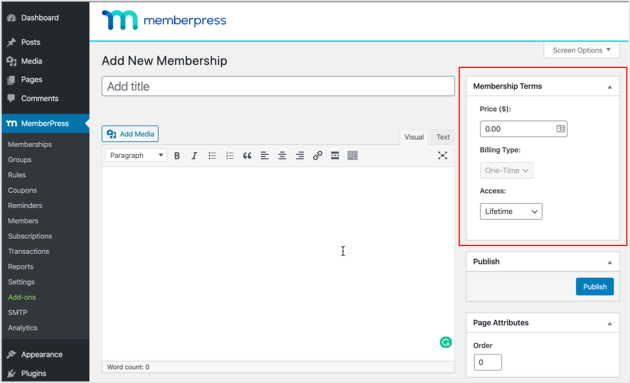
After you’ve done that, scroll down to the Membership Options area and configure that to your liking.
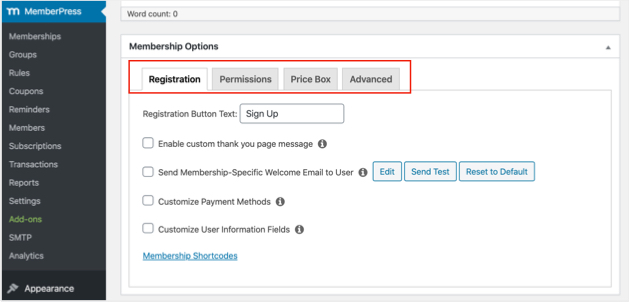
There you can set the following options by clicking each tab along the top:
- Registration – Choose the registration button text, enable a thank you page, send a welcome email, and customize the payment options.
- Permissions – Select who can purchase that membership type and create a custom message for users without permission.
- Price Box – Set the look for the price box by including benefits, custom text, and a highlight option.
- Advanced – Add a URL for members to access their content, add pricing terms, and redirect to a custom login page.
When you’re done, click the Publish button to publish your membership levels.
Step 5: Set Access Rules for Premium Workout Content
With your member levels set up, you’ll want to define who has access to the specific programs on your site. That means setting up access rules for each membership level.
To do that, go to MemberPress » Rules and click Add New.
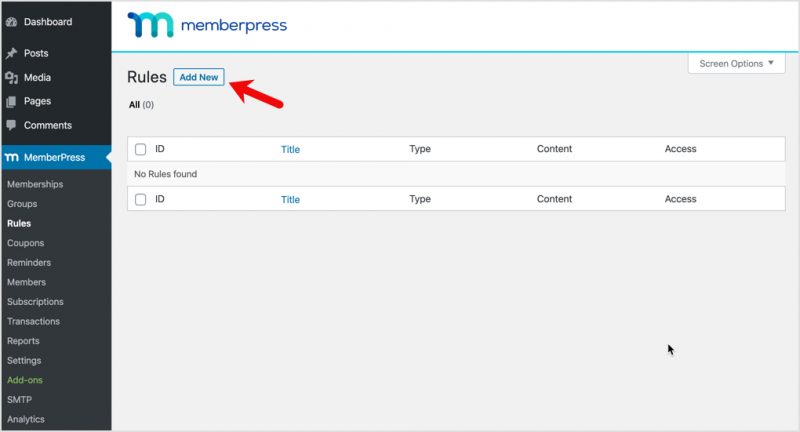
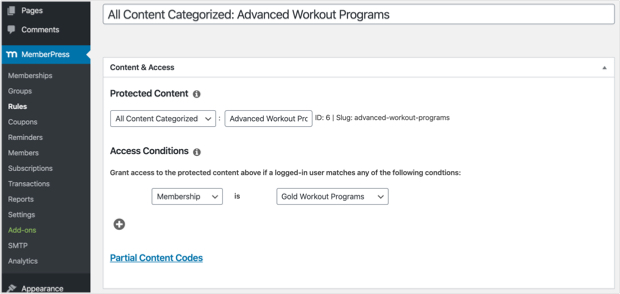
Next, you’ll see a screen where you can link specific content to certain membership types you’ve created.
For instance, you can set all content in a specific category for only your most expensive member plan. In the example below, we set all content in the Advanced Workout Programs category to be accessible to only our Gold members.
Next, scroll down to the Drip/Expiration settings.
Enabling the Drip option lets you gradually release content over time.
And the Expiration option lets you pick when the content is no longer available.

Once everything is set up how you want it, save your rules and move on to the next step.
Step 6: Upload and Protect Your Workout Program Content
Now it’s time to add your workout programs to WordPress so you have premium content to offer your members once they register.
You can add your workout programs in any of the following ways:
- In a WordPress blog post as written content.
- As a stand-alone WordPress page including written content and videos.
- As PDFs, members can download and use them offline.
- Other digital downloads, including ebooks, videos, and more.
For this tutorial, we’ll show you how to add your workout program to a blog post for members.
First, go to Posts » Add New from your WordPress admin panel.
Then add your workout program to the WordPress editor. When you’ve finished adding your content, select the category for your content under the Category heading on the right-hand side.
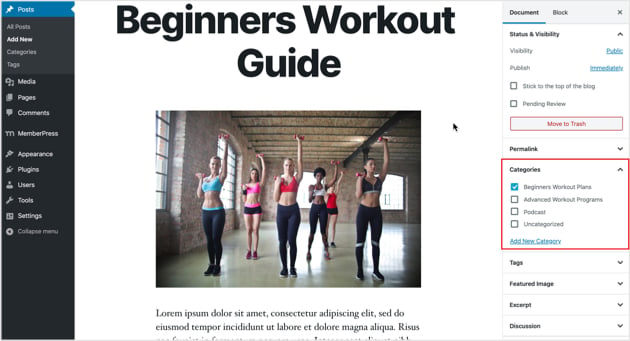
In this example, we’re adding our workout program to the beginner category.
Next, scroll down to the MemberPress Unauthorized Access area. Here you can choose what unregistered members can see when they try to access this content.
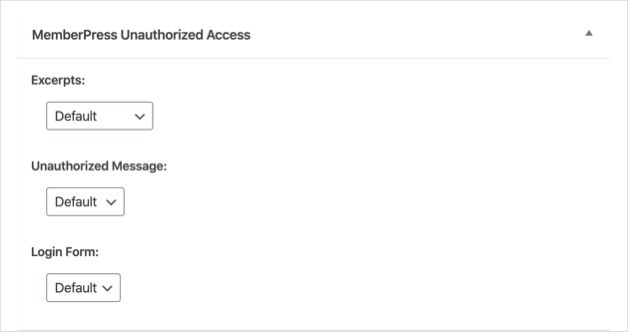
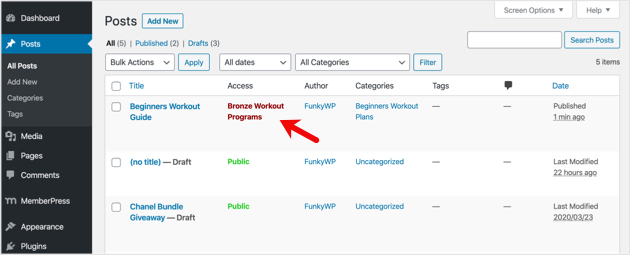
When everything’s looking how you want it to, click Publish. Then when you head to Posts » All Posts, you can see that this content is locked to the member levels you defined.
Step 7: Build a Transparent Pricing Page
In this next step, we’ll show you how to build a pricing page for your programs. A transparent pricing page lets visitors see the different membership options available, so they can sign up for the plan that suits them best.
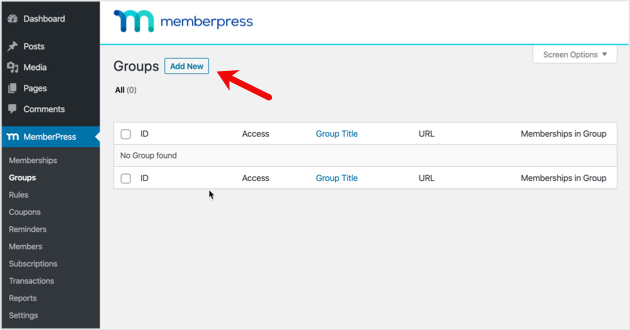
You can easily set this up in MemberPress by clicking MemberPress » Groups and clicking the Add New button.
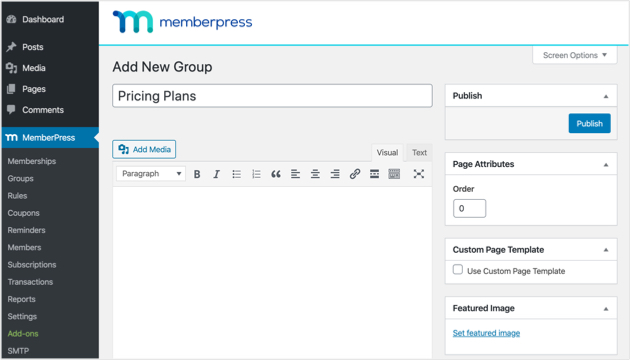
From there, name your group so people know what the page is for. Pricing Plans is a generally a good choice.
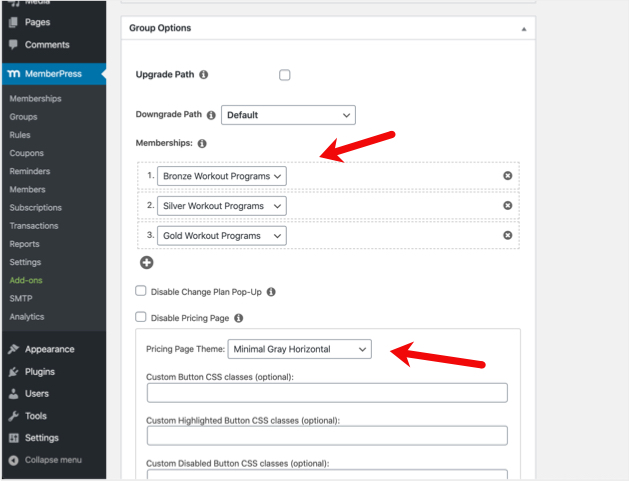
After, scroll down to the Group Options section. In that area, you can add the membership plans you’d like to make available to visitors. And you can even change the theme in this section so your page looks eye-catching.
Then publish the page when you’re done and click preview to see how it looks live on your website.
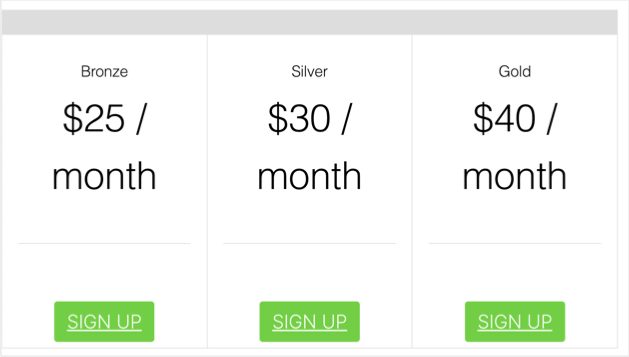
Here’s what a pricing page using the Clean group theme on the default Twenty Twenty WordPress theme looks like.
Now to ensure unregistered users see your pricing page, you’ll want to set MemberPress to direct those users to your pricing page when they try to access your paid content.
In other words, when someone tries to access a premium workout program, they’ll get sent to your pricing page to signup.
To set that up, go to MemberPress » Groups and copy the URL of the group you created.
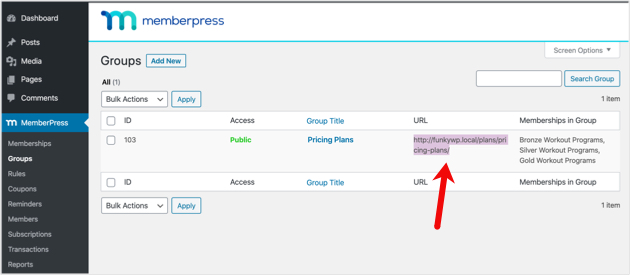
Then head to MemberPress » Settings and click the Pages tab.
From there, scroll down to the Unauthorized Access area and check the box labeled Redirect unauthorized visitors to a specific URL. Then go ahead and paste the URL you copied into the box, as shown below.
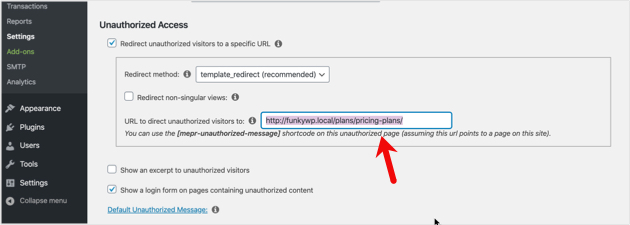
Now click the Update Options button so that unregistered users will be sent to your pricing page.
Step 8: Add Login and Sign-Up Forms to Your Site
Great work, you’re almost there. But there’s one more step required. And that is to add sign-up and login forms to your site so members can access your workout programs.
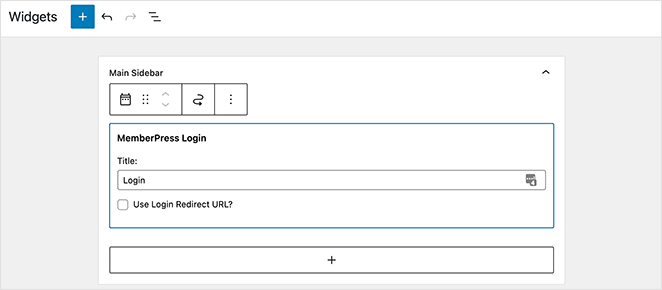
To keep this step as easy as possible, let’s add the forms using a widget. So go to Appearance » Widgets to view the widget-ready areas for your site and the widgets you can add to them.
Then click the MemberPress Login block to add it to a widget-ready area.
Next, you’ll need to add your pricing page to your website’s navigation menu, so people can access it when visiting your site.
You can do this by heading to Appearance » Menus. Then either create a new menu or add to an existing one.
Next, select your pricing page under the Groups heading on the left of your screen and click the Add to Menu button.
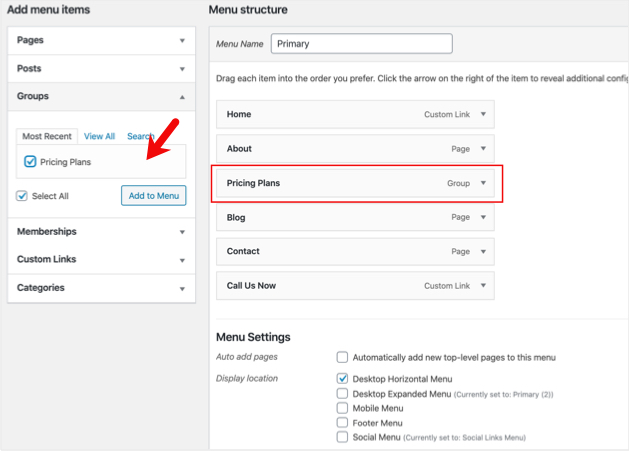
Then you can drag it to rearrange it on the menu to where you’d like it to appear.
FAQs About Selling Online Workout Programs
Selling workout programs online is one of the smartest ways to grow your fitness business. You get to share your expertise, build passive income, and help more people — all from your own website.
With WordPress and a tool like MemberPress, you can create a full membership site without touching code. If you want more design control, SeedProd makes it easy to build your pages visually with drag-and-drop blocks.
Once your site is live, don’t forget to set up tracking with Google Analytics so you can see which programs convert best. You can also improve your checkout experience using this WordPress checkout page guide.
That’s it! You’re ready to sell your first workout plan online.
Want more tips for building your fitness business with WordPress? Here are a few guides that might help:
- How to Make a High-Converting Membership Landing Page
- How to Build a Personal Trainer Website in WordPress
- Best Ecommerce WordPress Themes for Online Sales
- How to Sell Videos Online in WordPress (Step-by-Step)
That’s it! You’re ready to sell your first workout plan online.
If you found this article helpful, please do follow us on Twitter and Facebook for more useful WordPress content.

