Do you want to learn how to sell digital downloads for your online business?
Whether you’re an artist, writer, designer, or entrepreneur, selling digital products is an effective way to monetize your skills and knowledge. But where can you sell your digital goods other than popular platforms like Etsy? The answer is WordPress.
In this guide, we’ll show you how to sell digital downloads in WordPress for beginners.
Is Selling Digital Downloads Profitable?
Selling digital downloads is a great way to make money. With digital products, you don’t have to worry about inventory or shipping costs. Plus, digital products can be sold repeatedly, creating a steady stream of passive income.
The key to profitability lies in the value of your digital product and how effectively you market it to potential customers.
Where Can I Sell Digital Downloads Other Than Etsy?
While Etsy is a popular eCommerce platform for selling physical and digital content, it’s not the only one. Alternatives to an Etsy Shop include Shopify, eBay, and Amazon.
However, if you want full control over your store, selling directly from your own website is a great option. This is where WordPress comes in handy.
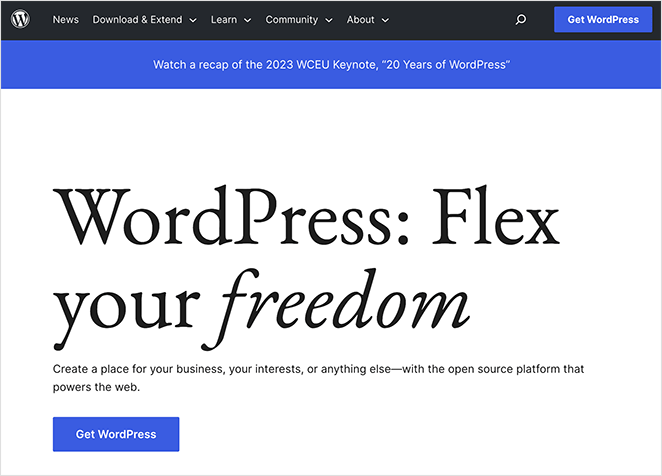
Besides full autonomy over your store, WordPress has the following benefits:
- Complete Control: Unlike other platforms, WordPress gives you total control over your store’s design. You can customize every aspect of your store to match your brand, from the design and layout to the user experience.
- Cost-Effective: With WordPress, you don’t have to pay monthly fees or commissions on small business sales (minus transaction fees). All you need is a domain name and hosting, which are relatively inexpensive.
- Extendability: WordPress is highly extendible, thanks to its many plugins. You can add functionality to your store, from SEO optimization and analytics to email marketing, memberships, and payment gateways.
- Ownership: When you build your store on WordPress, you own it. You’re not at the mercy of any third-party platform. You can decide how to run your store and the types of digital products you’ll sell, and you can take it with you if you choose to change hosting providers.
- Community Support: WordPress has a large and active community. If you ever have issues or need help, you can always turn to the community for support.
How to Sell Digital Downloads in WordPress Step-by-Step
Below, we’ll walk you through setting up your own digital downloads store on WordPress.
We’ll be using two of the best WordPress plugins to make it super easy:
- Easy Digital Downloads (EDD): The best digital eCommerce plugin for setting up your online store.
- SeedProd: The best WordPress website builder for customizing your store’s design using drag-and-drop.
By following the steps below, you can create, customize, and launch your digital downloads store quickly and easily without hiring a developer.
- Step 1. Set Up Your WordPress Website
- Step 2. Install Easy Digital Downloads
- Step 3. Set Up Your Payment Methods
- Step 4. Add Your Digital Downloads to WordPress
- Step 5. Install and Activate SeedProd
- Step 6. Choose a WordPress Theme Kit
- Step 7. Customize Your Theme Pages
- Step 8. Publish Your Digital Download Website
- Frequently Asked Questions (FAQs)
Step 1. Set Up Your WordPress Website
Before you can sell online, you first need to set up your WordPress website. This involves choosing a domain name and a hosting provider.
A domain name is your website’s address on the internet, like ‘yourwebsite.com.’ It’s how your customers find you, so choose a name representing your brand.
Hosting, on the other hand, is where your website files are stored. It’s like the home of your website. A good hosting provider ensures that your website is fast, secure, and always available to your customers.
One popular hosting provider that we recommend is Bluehost.

Bluehost is officially recommended by WordPress and is known for its reliability and excellent customer service. Plus, it comes with a free domain name for the first year and a free SSL certificate, which is a great way to save money when starting out.
To set up your WordPress website with Bluehost, follow these steps:
- Go to the Bluehost website and click ‘Get Started.’
- Choose a hosting plan that suits your needs.
- Register your free domain name.
- Fill in your account details and complete the payment.
Once your account is set up, Bluehost will automatically install WordPress for you. Then you can log into your WordPress site using the handy button.
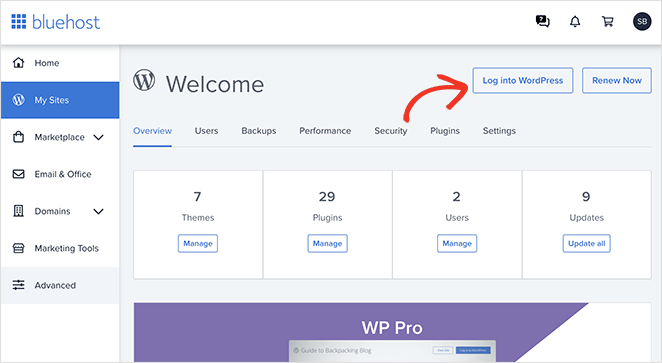
Bluehost will install a default WordPress theme for the design of your site. Don’t worry about this for now, we’ll show you how to customize it later.
With your WordPress website set up, you can start selling digital downloads. The next step is to install the Easy Digital Downloads plugin, which we’ll cover in the next section.
Step 2. Install Easy Digital Downloads
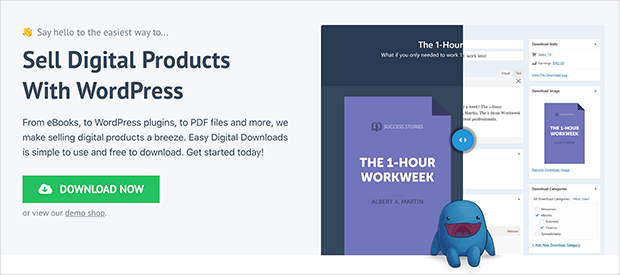
Easy Digital Downloads is one of the best plugins for creating a digital downloads store in WordPress. It includes everything you need to list your digital products and deliver them to your customers.
Click here to get the Easy Digital Downloads plugin and download it to your computer. From there, you’ll need to install it on your WordPress website.
If you need help, you can follow this guide on how to install a WordPress plugin.
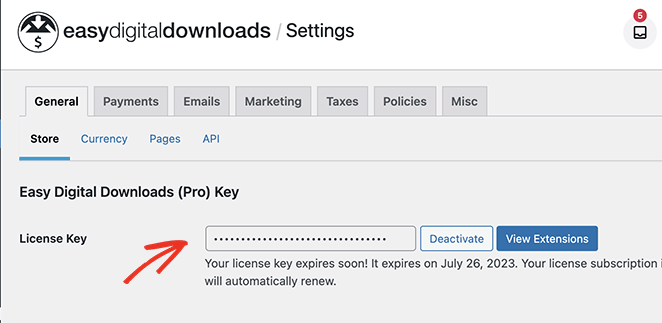
Once the plugin is active on your WordPress site, navigate to Downloads » Settings from your WordPress admin, enter your license key, and click Activate.
Next, scroll down the page and enter your business location in the relevant fields.
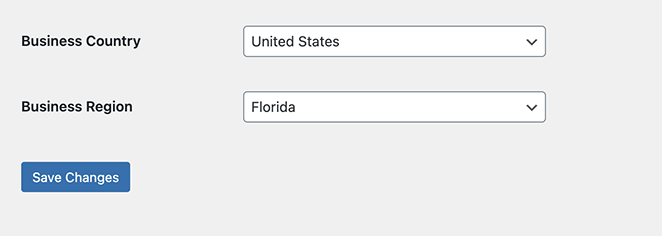
By adding your location, you allow Easy Digital Downloads to calculate taxes for you automatically.
Now click the Currency link where, depending on your location, you can change the currency of your online store.
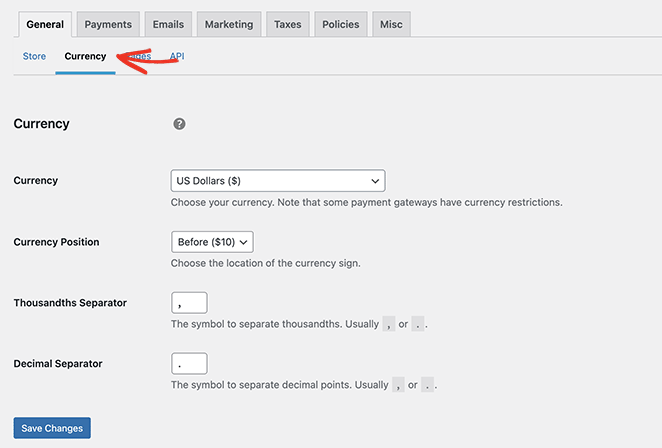
Click the Save Changes button to store your settings and move on to the next step.
Step 3. Set Up Your Payment Methods
To sell digital downloads from your WordPress site, you’ll need a way to take payments from your customers. Easy Digital Downloads supports various payment gateways, including Amazon Payments, Stripe, and PayPal.
For even more payment providers, you can install the Easy Digital Downloads extensions, which include Authorize.net, Braintree, and other solutions.
For now, let’s work with the default payment providers. To do this, click the Payments tab and select the checkbox next to your preferred payment methods.
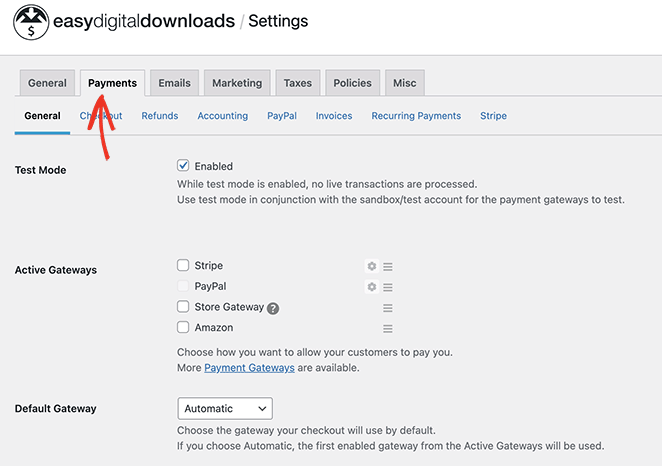
If you’re using multiple payment methods, choose a default gateway that will load automatically on the checkout page.
Next, scroll down and click the Save Changes button.
When the page reloads, you’ll see tabs along the top for your chosen payment methods. Clicking them allows you to configure their settings. To do that, click their respective tabs in the top menu.
For example, by clicking the Stripe tab, you can work through the easy setup wizard to connect your Stripe account to WordPress.
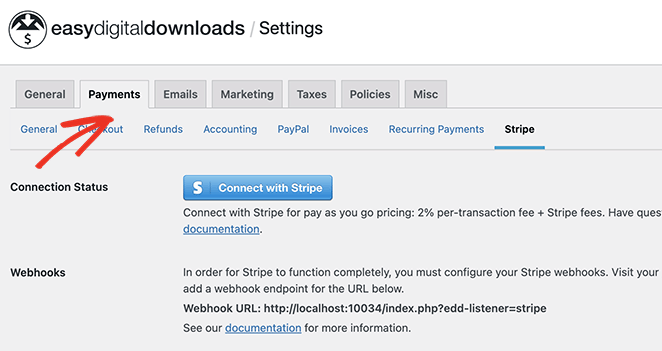
Remember to click the Save Changes button before moving on.
Step 4. Add Your Digital Downloads to WordPress
Now that Easy Digital Downloads is configured, you can start adding new products. To add your first product, go to Downloads » Add New from your WordPress dashboard.
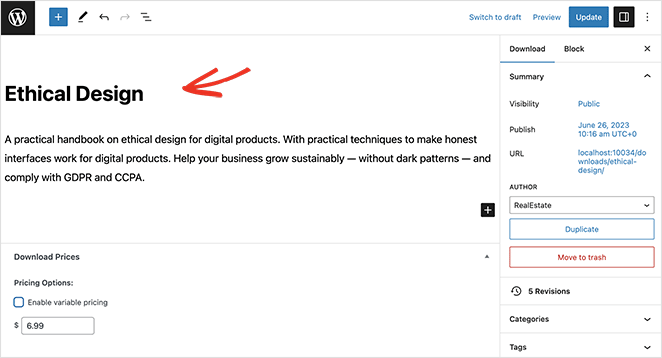
Here, you can add the product name, description, price, and other important details.
For example, you can use the headings in the right-hand sidebar to add a product category and tags to organize your goods. This makes it easier for shoppers to find them when browsing your website.
Further down the page, you can upload a product image to make the listing stand out.
Next to that is a section to add the digital file shoppers will receive after purchasing. Simply click the Add New File button and upload your product to the WordPress Media Library.
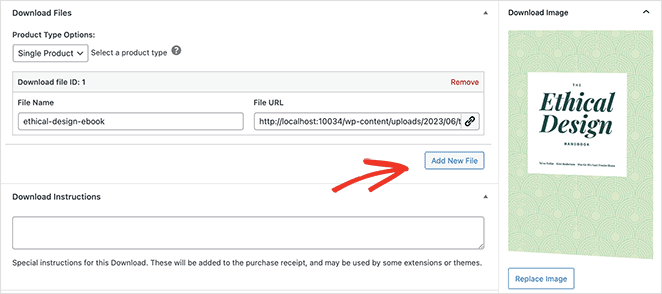
You can even add instructions on where users can find their download link to get their files.
When you’re happy with the product details, click the Publish button to make it live on your WordPress website. From there, follow the same steps to add more digital products to your new online store.

As you can see from the screenshot above, your product detail page will adapt to the design of your current WordPress Theme. This is ideal if you only want a simple website to sell a small selection of products.
However, if you want more control over the look and feel of your store, you can use a drag-and-drop page builder to customize it easily.
The good news is that SeedProd, one of the easiest WordPress page builders, has built-in design options for Easy Digital Downloads. Not only can you customize your product pages, but you can also design every inch of your website.
Follow the steps below to learn how.
Step 5. Install and Activate SeedProd

First, install and activate the SeedProd plugin. You’ll need SeedProd Pro for this to access its WordPress theme-building features.
For help with this, you can see our detailed documentation on installing SeedProd Pro.
Step 6. Choose a WordPress Theme Kit
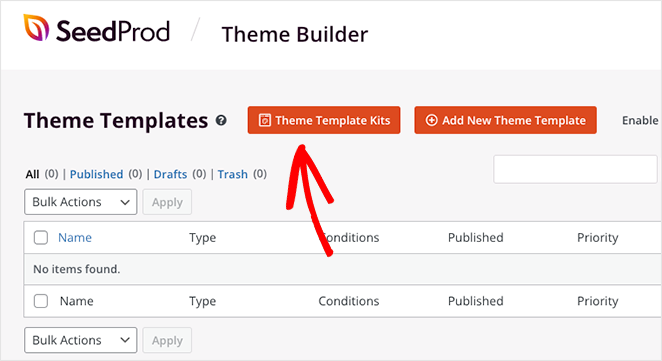
Next, navigate to SeedProd » Theme Builder and click the Theme Template Kits button.
On the next screen, you can choose a pre-made WordPress theme template. These templates will replace your current theme with a completely customizable design.
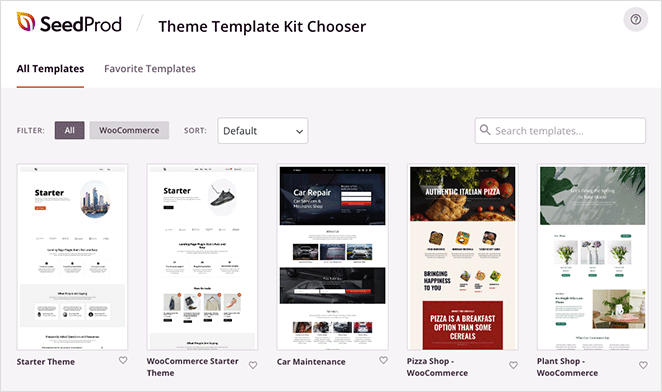
You can either scroll through for a theme you like or use the search box to filter them by keyword.
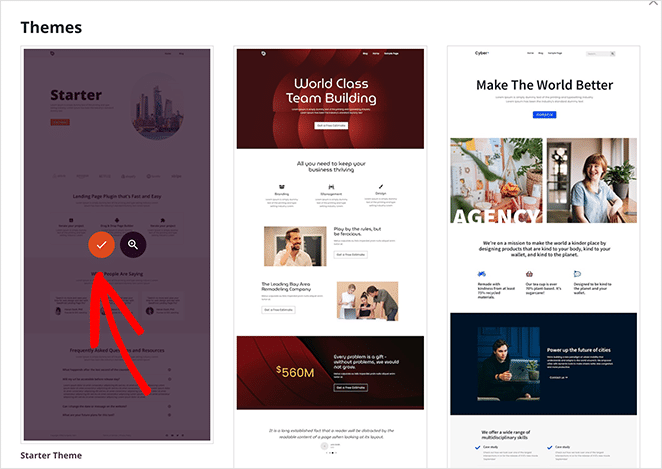
Once you find a theme you like, hover over it and click the checkmark icon. SeedProd will now import the theme in a few seconds.
Step 7. Customize Your Theme Pages
After importing your theme, the plugin will display the theme templates in a list like this:
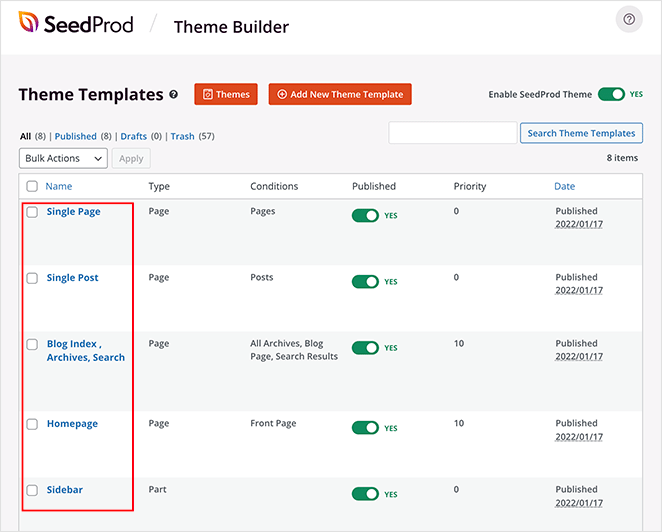
From there, it’s a breeze to customize each template with the visual drag-and-drop builder.
Creating a Product Details Page
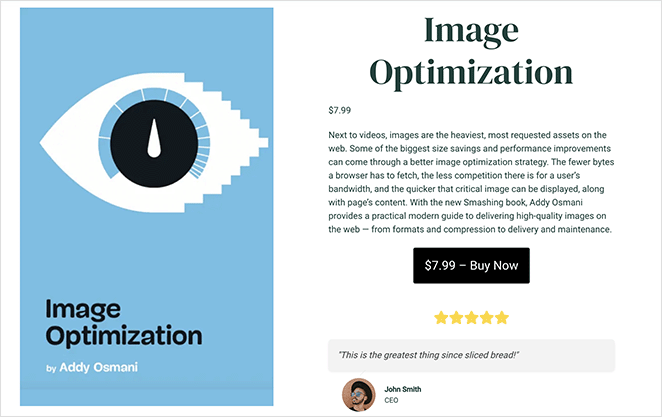
Your product detail page is one of the first pages you’ll want to customize. Users will see this after clicking a product listing to get more information.
SeedProd lets you make a custom template for this. That way, every product page will have the same design options.
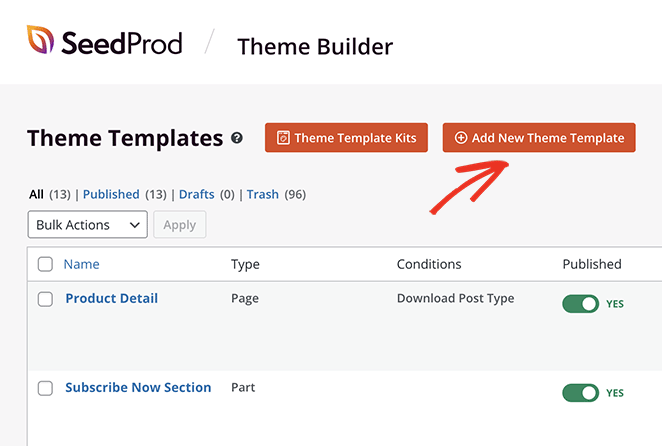
To create this template, click the Add New Theme Template button.
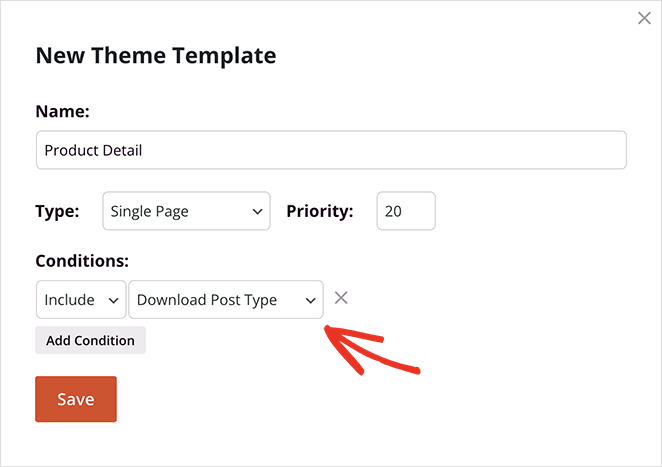
From there, name the template something you’ll easily recognize. Then, select Single Page, choose the Download Post Type option from the dropdown menu, and click Save.
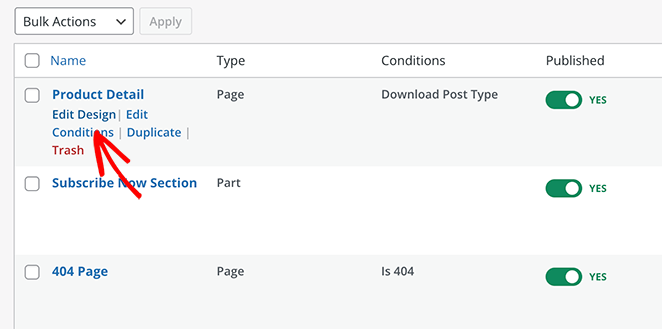
Now you’ll see a new template in your list. Hover over it and click the Edit Design link to customize it.
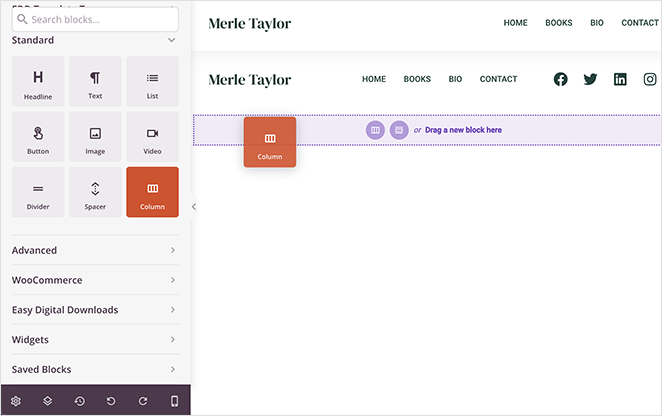
On the next screen, you’ll see the visual drag-and-drop editor. This is where you can tailor your product detail page design with easy building blocks.
Let’s start by adding a section to house your page content. To do this, drag over the “Columns” block from the left-hand sidebar and drop it onto your page.
Next, choose a column layout from the list. We’re going with a 2-column layout.
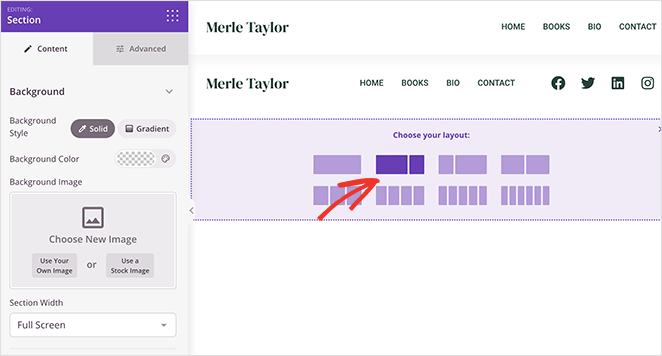
Now it’s time to add your product information. You can do this by finding the EDD Template Tags heading in the left-hand panel and dragging the different blocks onto your page preview.
For example, we’ll drag over the Download Featured Image block to show a high-quality product image.
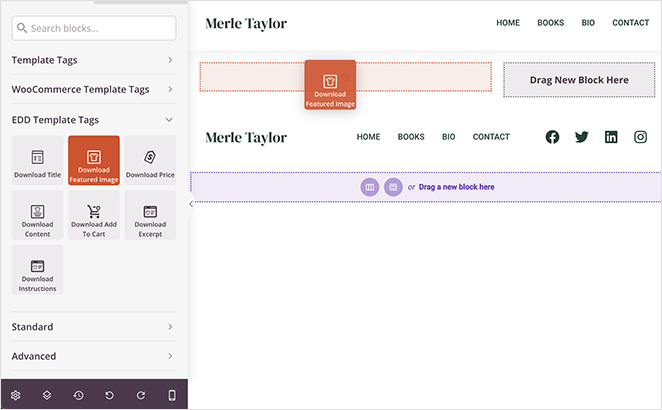
Other blocks to include on your page are:
- Title
- Excerpt
- Price
- Add to Cart
Each EDD block has several customization options. For example, the Download Add to Cart block has the option to send shoppers direct to checkout, as well as styling options for the button color, content, and more.
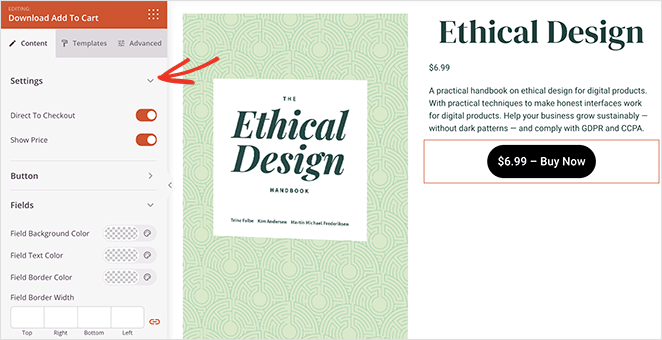
This is a great place to add some of SeedProd’s other powerful blocks. For instance, with the Star Rating and Testimonial blocks, you can show valuable social proof to encourage shoppers to buy.
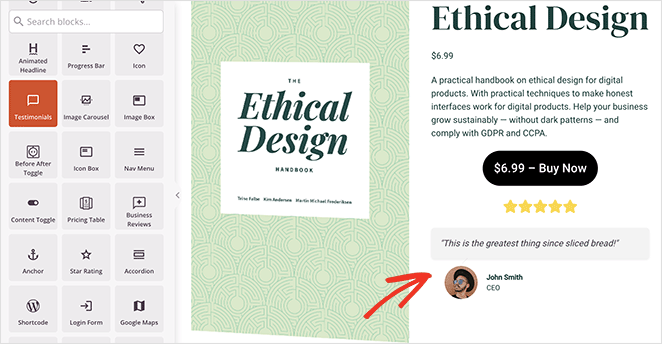
Click the Save button when you’re happy with this page and return to the Theme Builder dashboard.
Creating a Download Listings Page
Another page you can add to your online store is a showcase page. This is where you can list all your products in one place for users to browse.
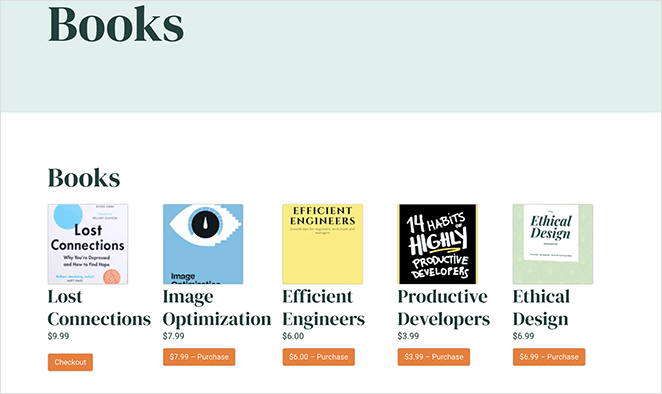
For example, if you’re selling ebooks, you can make a “Books” page highlighting all the available ebooks.
In SeedProd, you can do this by going to Pages » Add New and creating a new WordPress page. From there, click the Edit with SeedProd button to customize the page with the drag-and-drop builder.
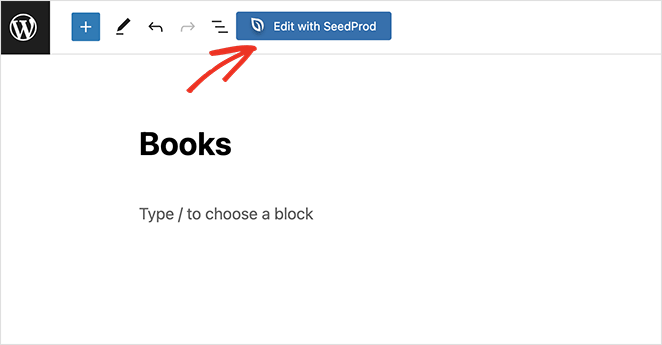
Editing this page’s design is the same as before. However, instead of using the EDD Template Tags to pull dynamic product information, we’ll use the core EDD blocks under the Easy Digital Downloads heading.
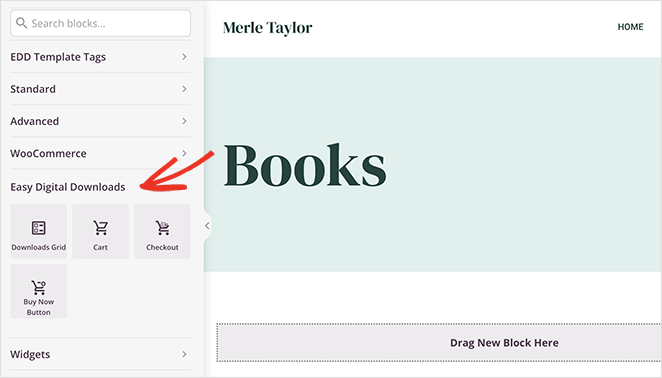
Let’s start by adding the Downloads Grid block.
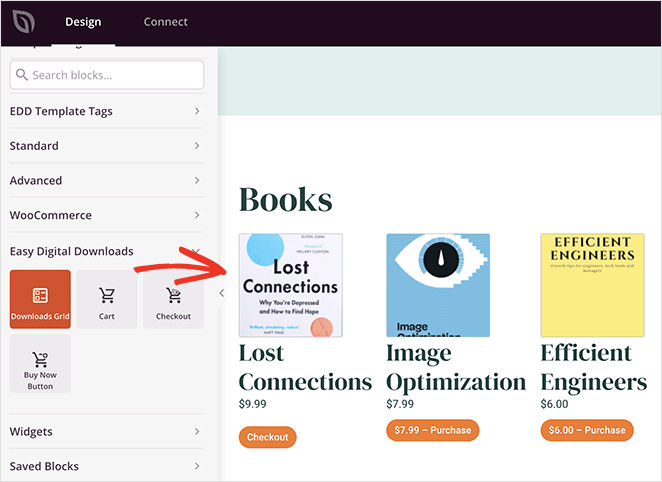
With this block, you can display a grid of downloads without adding each product individually. In the block settings, you can set the number of columns and products and even add pagination if you have a lot of products to showcase.
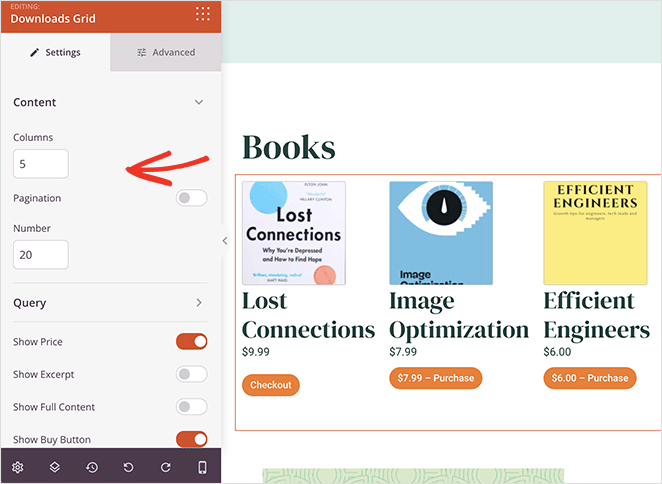
Additionally, you can display products by queries, such as ID, tag, or category, and show or hide the following details:
- Price
- Excerpt
- Full Content
- Buy Button
- Thumbnails
- And more.
To highlight a specific product, like an upcoming release, you can add the information using SeedProd’s text and image blocks to generate buzz.
Then you can drag over the Buy Now Button to encourage users to pre-order it.

Once you’re happy with the page, click Save and Publish.
Creating a Custom EDD Checkout Page
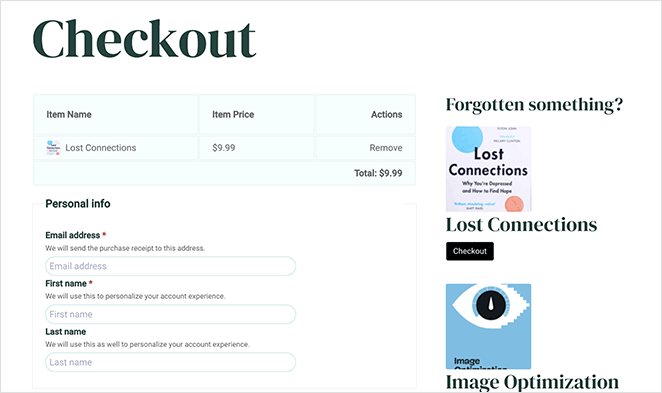
The next page we’ll create is a checkout page, where users can enter their payment details. Easy Digital Downloads does a great job with its default checkout page, however, you may want to customize it further.
To do this, create a new WordPress page like before and click the Edit with SeedProd button. Now drag over the Checkout block to your page preview.
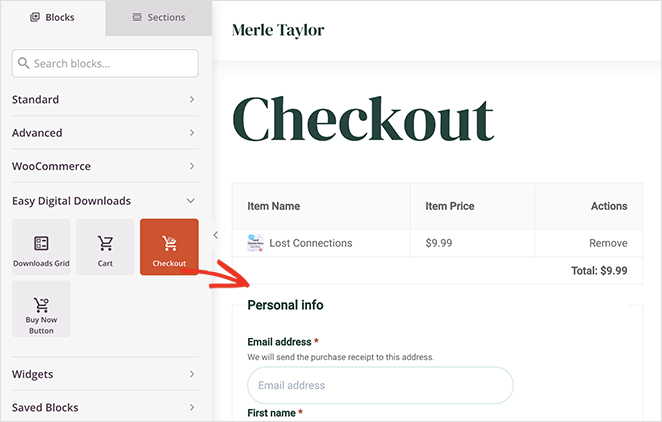
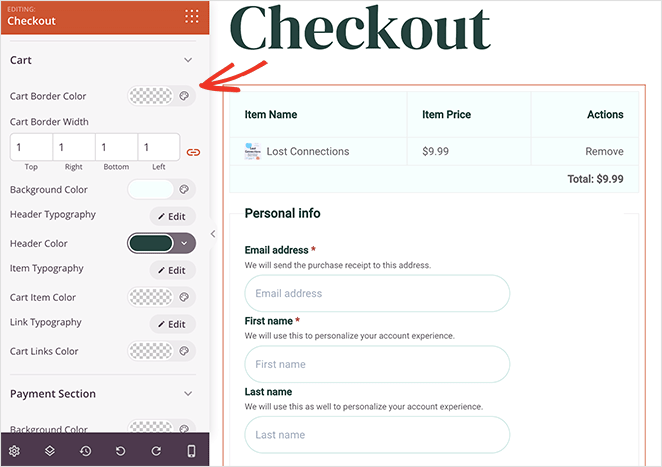
You’ll now see a full EDD checkout that you can customize in the block settings. For example, you can change the form field colors and fonts, adjust borders, and customize the look of the payment section.
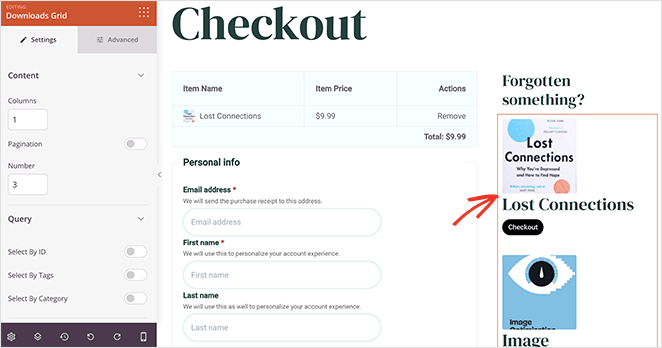
Want to increase the average order value for each purchase? Consider adding relevant products to your checkout page. Shoppers are more likely to add more items to their cart if you make it easy and relevant.
Plus, it’s easy to do. Simply drag over the Downloads Grid block, configure your settings, and it’s done.
You can now Save your changes and exit back to your WordPress admin.
Step 8. Publish Your Digital Download Website
After customizing your digital downloads store, you’re ready to publish it. Before you do that, you’ll need to assign your checkout page in the EDD settings.
From your WordPress dashboard, go to Downloads » Settings » General and click the Pages tab.
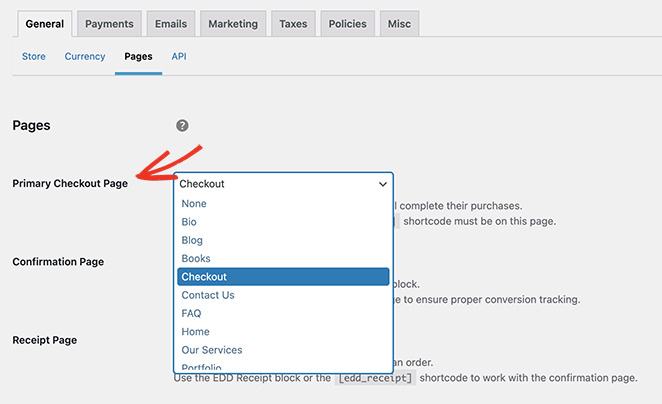
Next to the Primary Checkout Page heading, choose the checkout page you just made with SeedProd from the dropdown menu, and click Save Changes.
Now let’s activate your website design. Navigate to SeedProd » Theme Builder and click the Enable SeedProd Theme toggle until it’s in the Yes position.

Your online store is now ready to go.
Here’s a preview of the different pages we’ve made in this guide:
Click any image to see a larger version in a new tab.
Frequently Asked Questions (FAQs)
Can I sell both digital and physical products in my store?
While Easy Digital Downloads is designed for selling digital products, it’s possible to sell physical products as well. However, for a store that sells both digital and physical products, WooCommerce might be a better option. Here’s a comparison of WooCommerce vs Easy Digital Downloads to help you choose.
What are some good digital product ideas?
You can sell various digital goods, including online courses, stock photos, digital art, audiobooks, planners, printables, worksheets, ebooks, and graphic design assets.
How can I promote my digital downloads store?
There are many ways to promote your store, including SEO, content marketing, social media marketing, upselling, discount codes, email list marketing, and paid advertising. You can also use plugins to add social share buttons, email signup forms, and other marketing tools to your store.
We hope this guide has helped you learn how to sell digital downloads in WordPress. With SeedProd’s Easy Digital Downloads integration, creating a pixel-perfect online store is easier than ever, and you don’t need any coding know-how.
Here are some other tutorials for pages you can create using this powerful WordPress page builder:
- How to Create a Service Page Design in WordPress
- How to Make a 404 Page in WordPress That Generates Leads
- How to Customize Your WordPress Login Page (Easy Steps)
Thanks for reading! We’d love to hear your thoughts, so please feel free to leave a comment with any questions and feedback.
You can also follow us on YouTube, X (formerly Twitter), and Facebook for more helpful content to grow your business.

