Want to learn how to make a wedding website to celebrate your big day?
A wedding website is a central hub for all your wedding information, making it easy for your loved ones to stay informed and celebrate with you.
Here’s the good news: you don’t need coding skills to build a beautiful website. SeedProd is a user-friendly website builder that allows you to create a stunning wedding website design in just a few steps.
In this guide, I’ll walk you through the entire process, from setting up your website to adding those special finishing touches.
Why Do You Need a Wedding Website?
Imagine having all your wedding details – from the ceremony location to the RSVP deadline – conveniently accessible in one place. That’s the magic of a wedding website.
Here are some reasons why creating a wedding website is a must-have for your big day:
- Central Hub: Keep your wedding information in one place, including your guest list, registry information, and details about the rehearsal dinner.
- Easy RSVP Management: Streamline the RSVP process with an online form and allow guests to submit their responses electronically. For a more personalized touch, you can even collect dietary restrictions or song requests.
- Sharing Photos and Videos: Showcase your love story and wedding journey with beautiful photos and videos. A dedicated photo gallery on your website allows guests to relive special moments and celebrate with you virtually.
- Event Updates and Communication: Keep your guests informed of the latest wedding updates. Your website is the perfect platform to share any changes to the schedule, accommodation details, or dress code.
How to Make a Wedding Website with WordPress
Building a wedding website might seem daunting when there are so many wedding website builders. Luckily, I’ve tried many of the top solutions and always recommend SeedProd because it’s surprisingly easy to use.
Here’s a step-by-step breakdown to get you started:
Step 1: Set Up Your WordPress Site
The first step is finding a home for your wedding website. Here’s what you’ll need:
- Domain Name: Think of this as your website’s address online, something your guests will type in their browser to find your special day.
- Hosting Provider: This is where your website files live, like renting space online to store your wedding website.
The good news is many hosting providers offer packages that include a free domain name for the first year.

My favorite solution for beginners is Bluehost. It’s easy to use, has competitive pricing, and is officially recommended by WordPress. However, you can explore other top hosting providers to find the perfect fit.
If you choose Bluehost, I’ll walk you through the setup process below. If you go with a different host, you can find specific instructions in their documentation.
Here’s how to set up your WordPress site with Bluehost:
First, visit the Bluehost website in any web browser and click the “Get Started” button.

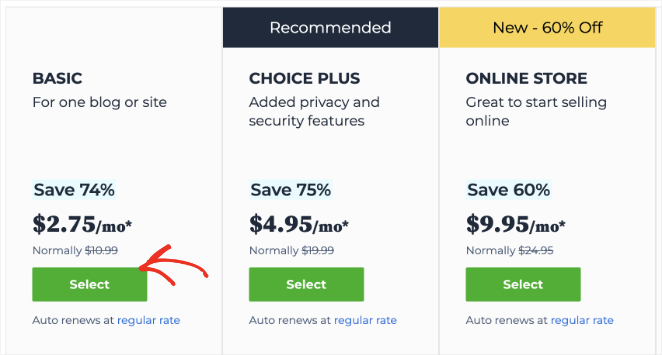
From there, you can choose a hosting plan.
Bluehost offers different hosting plans, but their “Basic” and “Choice Plus” plans are usually a good starting point for a basic wedding website. It provides enough storage and bandwidth for your website’s needs.
On the next screen, you can pick a domain name. Bluehost offers a free domain name for the first year when you sign up for a hosting plan. You can even use a custom domain if you have one.

Brainstorm a domain name that reflects your love story or wedding theme. Keep it memorable and easy for guests to type in.
Next, you’ll need to complete your account information. Fill out the signup form with your contact details and choose a password.
From there, you can set up your billing details.
Bluehost offers different billing cycles, so choose the one that works best for you. They accept most major credit cards and payment methods.
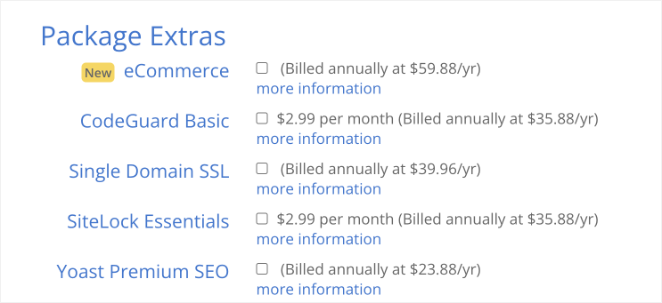
After completing the purchase, you’ll get an email with details on logging in to your web hosting dashboard.
This is your control panel where you manage everything, like getting support, setting up emails, and, most importantly, where you’ll install WordPress.
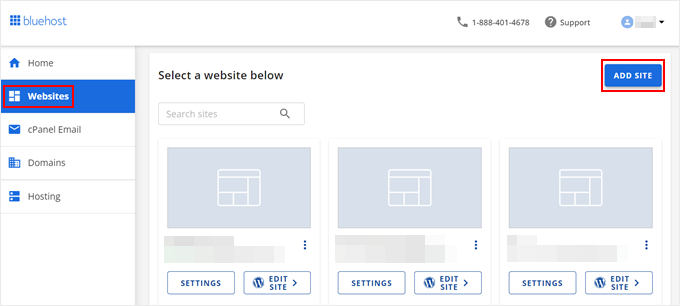
The great thing about Bluehost is that they make installing WordPress super easy. After logging into your Bluehost control panel, you only need to click the “Add Site” button.
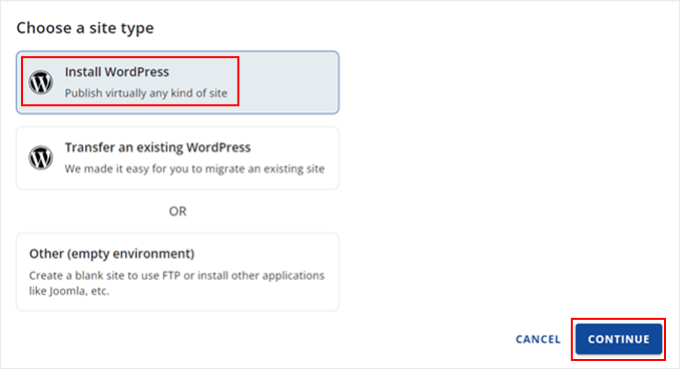
From there, the installation wizard will run, and you can select the Install WordPress option.
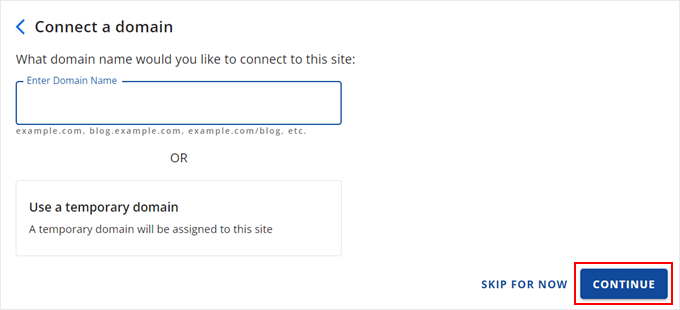
After that, enter the domain name you chose when you set up your account or skip the step and handle it later.
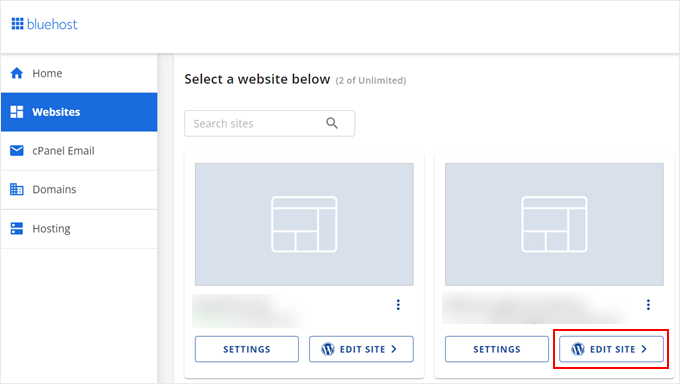
Once those tasks are completed, Bluehost will install WordPress for you. A new website will then appear under the ‘Websites’ tab.
Then, you can click the ‘Edit Site’ button to log in to your WordPress site and view the dashboard.
Congratulations. You now have the foundation for your beautiful wedding website.
Step 2: Install and Activate SeedProd Pro
Now that your WordPress site is ready, it’s time to add SeedProd Pro, the powerful website builder that will transform your simple site into a breathtaking wedding website.
SeedProd Pro’s user-friendly drag-and-drop theme builder allows you to create and customize every aspect of your website without needing coding skills.
💡 Expert Tip
Launch a custom website in seconds using SeedProd’s AI website builder. Simply provide a brief description of your site, and it will generate a fully custom theme, helping you save time and get online faster.
Here’s how to install and activate SeedProd Pro on your WordPress site:
Unlike the free version, SeedProd Pro requires a license key. If you still need to purchase one, head to SeedProd’s website to get yours.
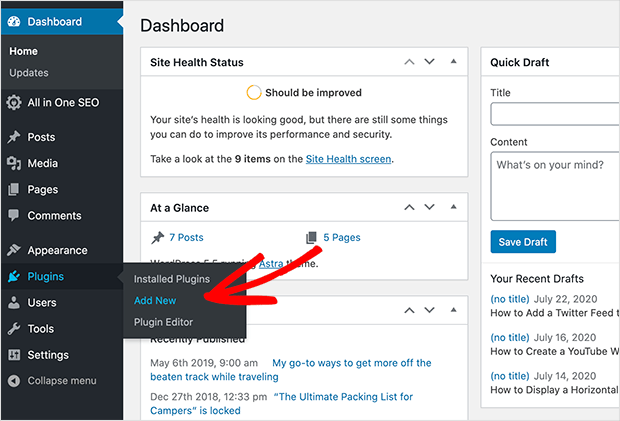
Once you have your license key, go to your WordPress dashboard and navigate to Plugins » Add New.
Click “Upload Plugin” on this page and select the SeedProd Pro installation file. Then, click “Install Now” and follow the on-screen instructions.
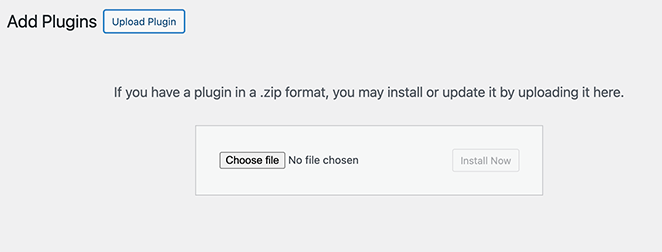
Once the installation is complete, click “Activate”.
Finally, navigate to SeedProd » Settings and enter the license key you received when purchasing the plugin to unlock the full power of SeedProd Pro’s theme builder and wedding website functionalities.

Step 3: Choose a Wedding Website Template
With SeedProd installed, you’re ready to pick the perfect look for your wedding website. From your WordPress dashboard, navigate to SeedProd » Theme Builder and click the “Theme Template Kits” button.
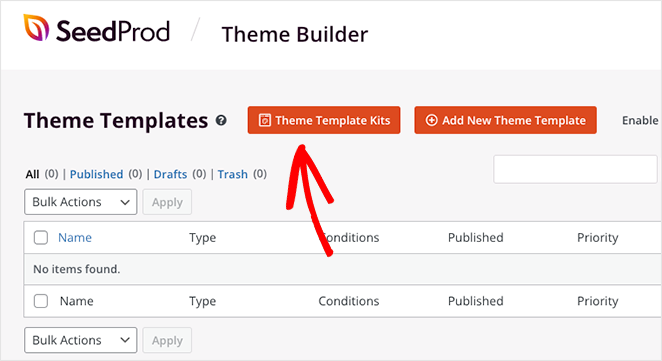
Here, you’ll see a library with hundreds of pre-made website kits you can import and customize to fit your brand.
Browse them or type a keyword like “wedding” into the search box to see wedding website templates for various niches.
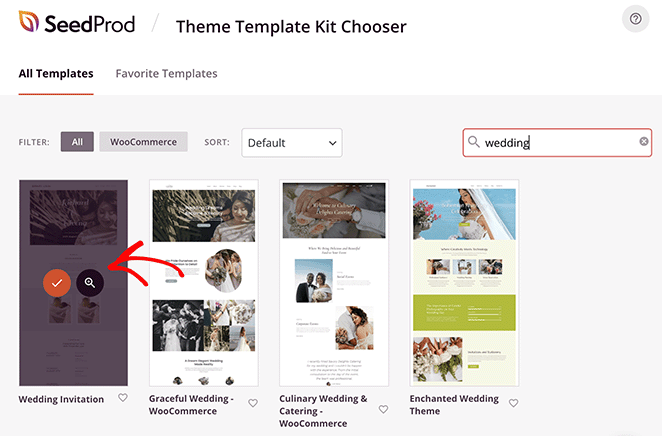
Many of the wedding themes include special features like pre-built sections for engagement photos, wedding party introductions, accommodation suggestions, and more. This makes it easy to create a site that covers all the important details for your guests.
Once you find a template you like, hover over it and click the checkmark icon to import it. For this guide, I’ll choose the “Wedding Invitation” website kit.
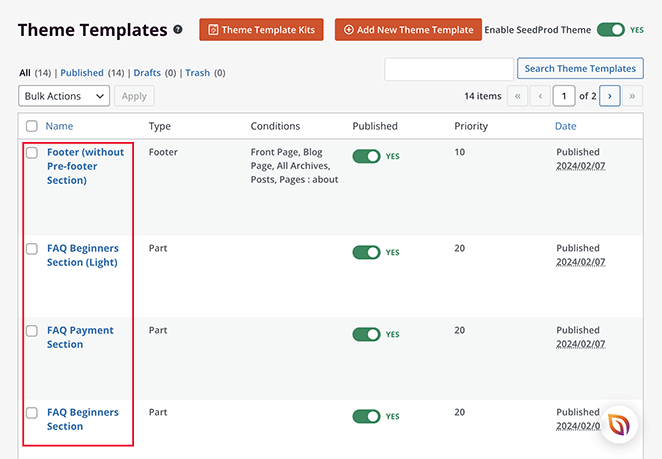
SeedProd should only take a few seconds to add the template files to your WordPress site. After that, you’ll see them in a list, where you can click to edit them with the drag-and-drop builder.
Step 4: Customize Your Wedding Website
Now, let’s make this wedding website truly yours. We’ll start with your homepage, which is like the welcome mat for your guests.
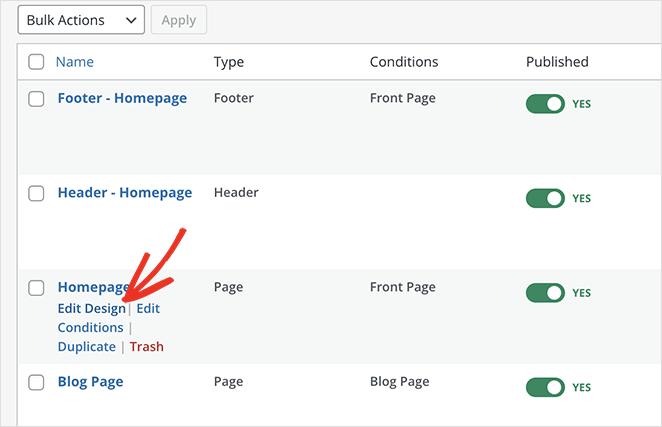
Look for the homepage in your template list, hover over it, and click “Edit Design.” The template will now launch in SeedProd’s page builder.
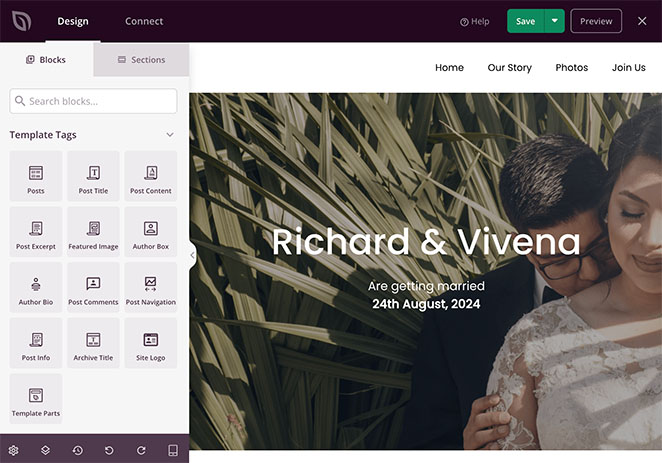
The great thing about SeedProd is how easy it is to use. You can simply click on different parts of the page to change things, such as fonts and colors, and add extra design elements, to get the perfect look.
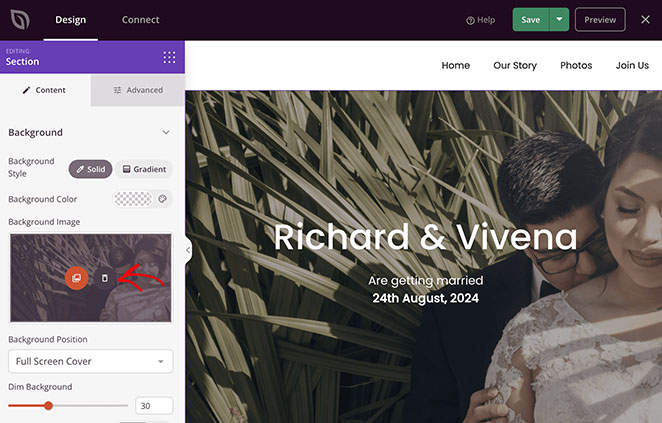
For example, to change the main image, select the section and click the trashcan icon in the left-hand sidebar. From there, you can upload a new photo to your WordPress media library to replace it.
If you want to move things around, just drag and drop them where you want them to go.
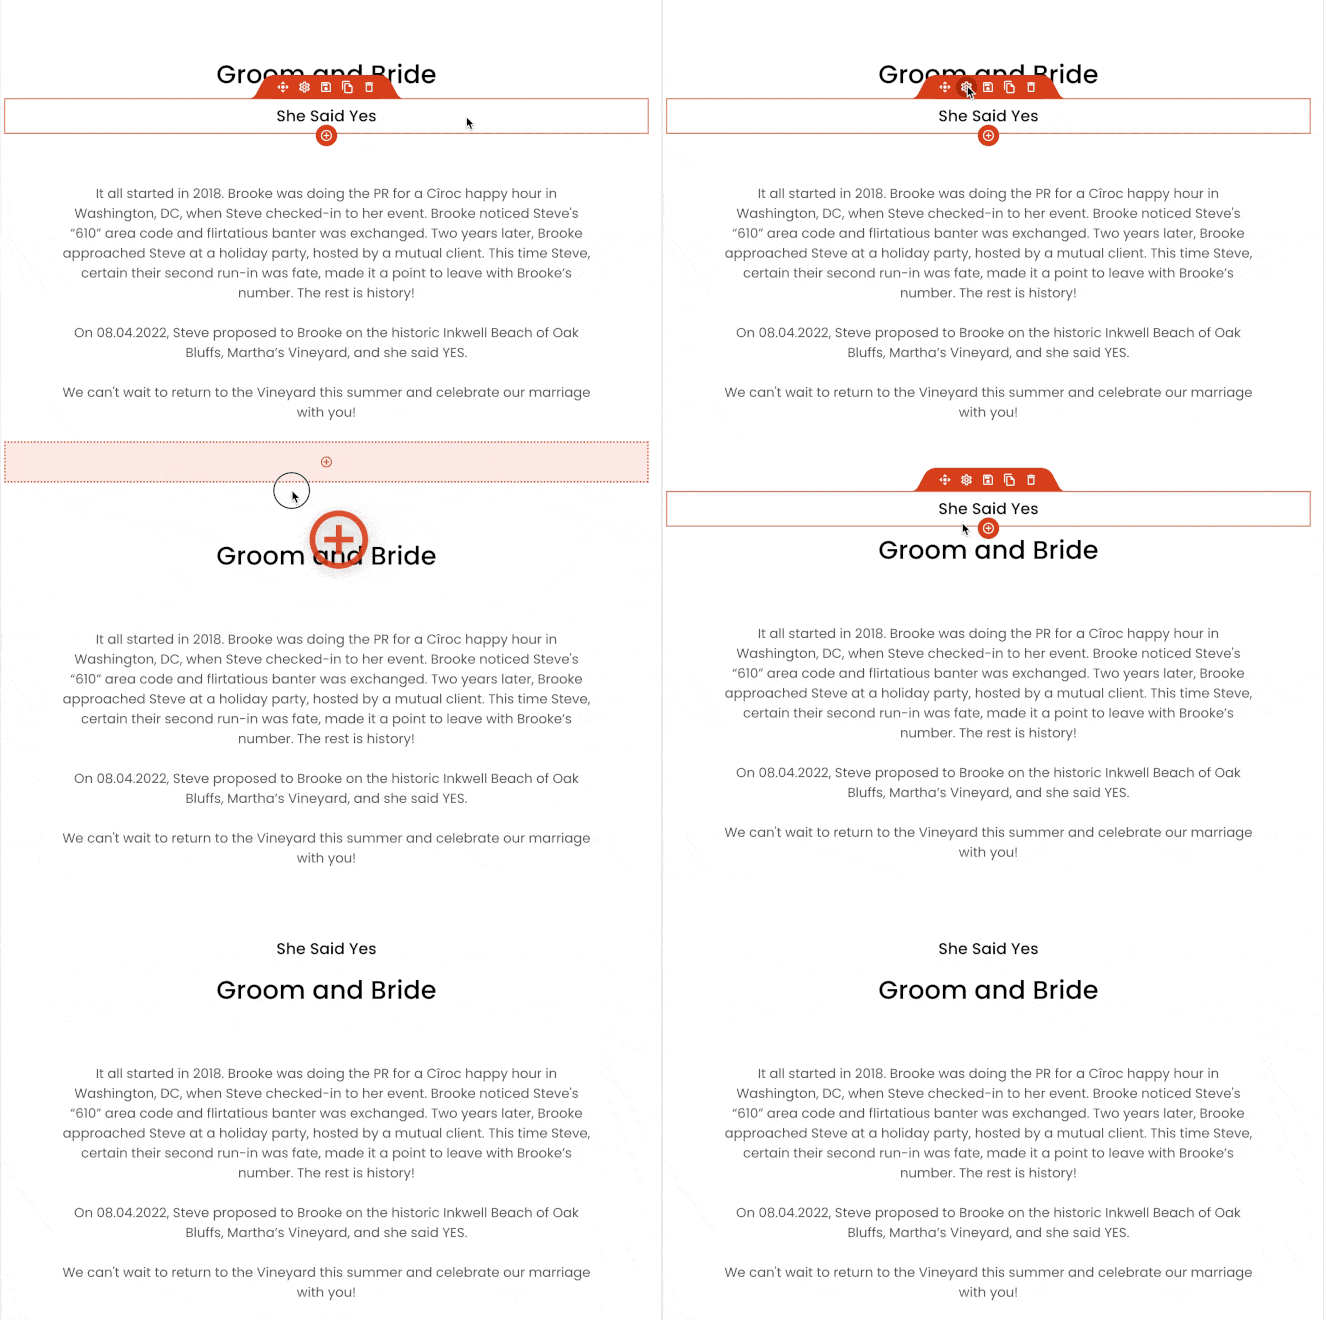
Think about what your guests need to know. You’ll likely want sections like:
- About Us: Share your love story and photos here.
- Event Details: Include the date, time, location, and special instructions for your guests.
- Photo Gallery: Use the wedding website builder to add a personal touch with photos.
- Social Profiles: Encourage friends and family to follow your celebration updates on social media.
Many of these details are already included in the template. However, you can select a block from the left-hand panel and drag it onto your page to add more.
For example, you can add a countdown timer. This will get your guests excited by showing them how many days are left until your wedding.
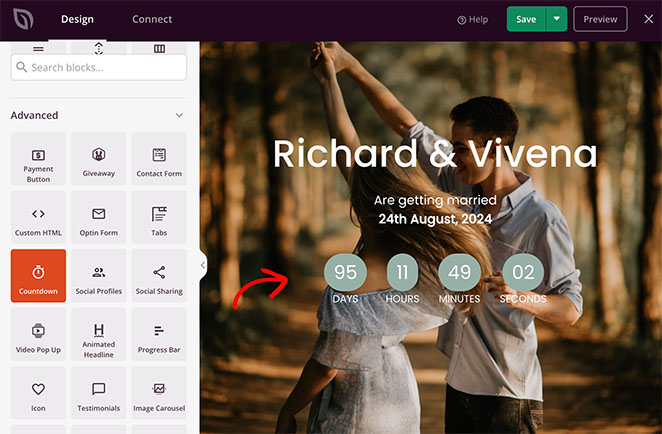
When you’re happy with your homepage, don’t forget to click “Save” to save your changes.
Step 5: Add Essential Wedding Website Pages
While the homepage is the heart of your wedding website, several other pages are crucial for providing guests with all the information they need. Let’s take a look at some of these essential pages and how you can create them using SeedProd.
Our Story
This page is your chance to share the unique story of your love. You can easily create one if the template you chose doesn’t automatically include this page.
Simply navigate to Pages » Add New Page from your WordPress dashboard and give the page a title. Then, click the “Edit with SeedProd” button.
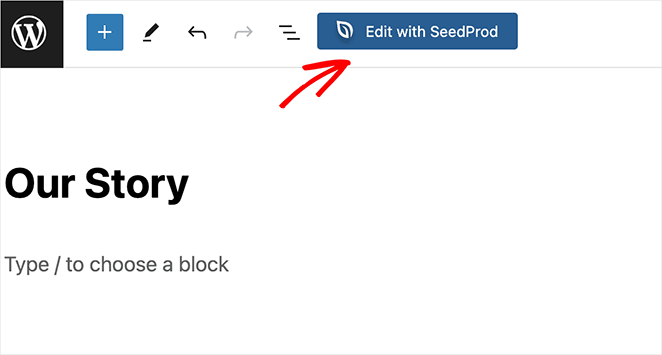
You’ll now see the same page builder you used for the homepage.
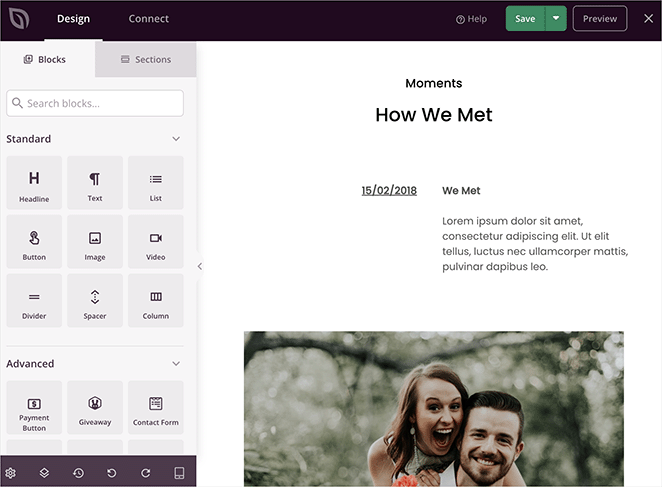
Use SeedProd’s text and image blocks to weave together personal anecdotes, cherished photos, and a timeline showcasing key milestones in your relationship.
Event Details
This page should provide guests with all the logistical information they need to attend your wedding. Be sure to include the following details:
- Venue: Name and address of the ceremony and reception locations
- Date and Time: Specify the date and time of the wedding events
- Itinerary: Outline the schedule for the day, including the ceremony, cocktail hour, reception, and any other planned activities
- Accommodation: If applicable, provide details about recommended hotels or accommodations for out-of-town wedding guests
- Parking and Transportation: Offer guidance on parking options or transportation arrangements
- Dress Code: Let guests know if there’s a specific dress code for the wedding
- Playlist: Consider adding a section for your wedding playlist, showcasing your wedding style
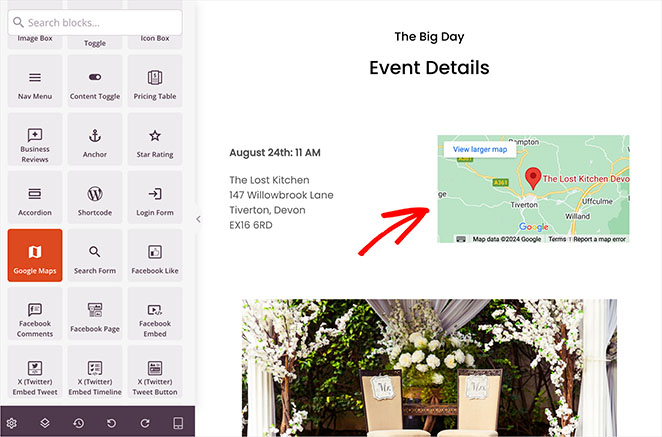
You can use SeedProd’s Google Maps block to help guests quickly locate the venue.
RSVP Form
This page is where you can collect guest responses, manage your guest list, and track plus-ones. SeedProd makes creating and adding an RSVP form to your website easy through its integration with WPForms, the best WordPress form builder plugin.

To get started, you’ll need to install and activate the WPForms plugin on your WordPress site. Once that’s done, you can create a new form for RSVPs, including fields for the guest’s name, email address, and whether they can attend.
If you need help, you can see this guide on how to create an RSVP form in WordPress.
SeedProd’s drag-and-drop interface makes adding this form to your RSVP page easy. Simply drag the Contact Form block onto the page and select your newly created RSVP form from the dropdown menu.
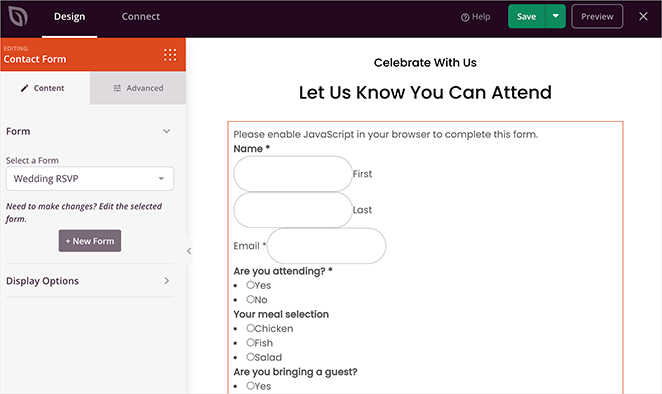
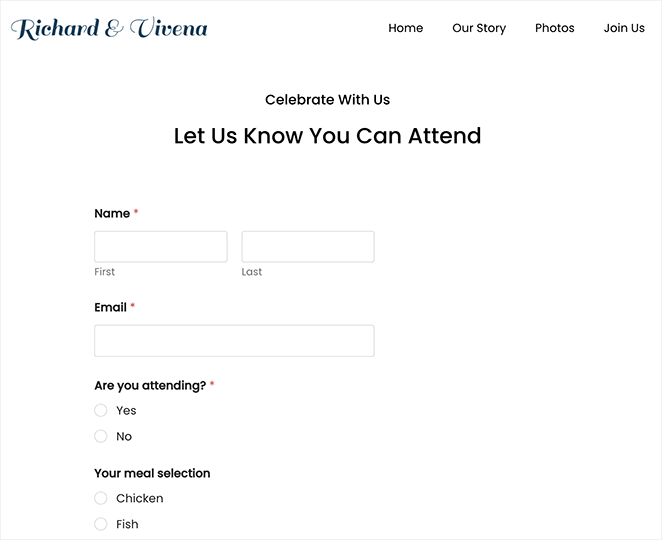
Remember to customize your RSVP form to collect any additional information you might need from your guests. This could include dietary restrictions, song requests, or other preferences to help you personalize their experience and ensure a smooth wedding day.
Important Note: While you can create an RSVP form using SeedProd and WPForms, many couples also use popular wedding platforms like The Knot, which offer built-in wedding registries and RSVP management tools.
Consider linking your SeedProd website to your The Knot registry for a seamless guest experience.
Other pages you may want to add to your site include:
- Gift Registry: Share links to your registries or create a custom wishlist.
- Wedding Party: Introduce your bridesmaids, groomsmen, and other important wedding party members.
- Guestbook: Provide a space for guests to leave well wishes and messages.
- FAQs: Answer common questions guests might have about your wedding.
- Travel Information: Offer details about airports, transportation, and local attractions for out-of-town guests.
- Things to Do: Suggest activities and attractions for guests in the wedding location.
- Blog or Updates Section: Share updates about your wedding planning or offer glimpses behind the scenes.
- Honeymoon Fund: Create a page where guests can contribute to your honeymoon fund.
Step 6: Optimize Your Website for SEO
While SEO might sound technical, it’s simply about helping the right people find your website. If yours is a personal wedding website, this means making it easy for your friends and family to discover your online celebration just like they would on The Knot or another wedding site.
SeedProd’s built-in plugin integration feature can connect with popular SEO plugins like All in One SEO. These plugins act like helpful guides, giving tips on making your website more visible to search engines.
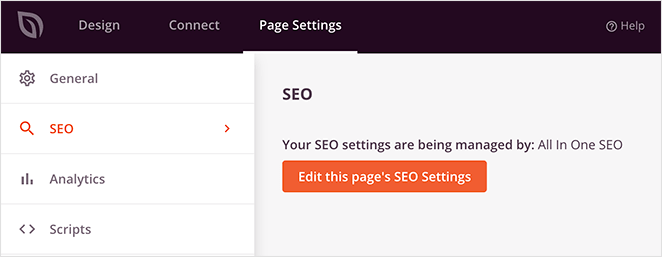
When optimizing your site, consider the words your loved ones might use to search for it. It could be your name, your wedding date, or your wedding location. When writing your website content, naturally weave these words into your sentences.
Beyond this, there are a few more ways to make your website stand out in search results:
- Title Tags: These are like the headlines of your website’s pages. Make sure they’re descriptive and include your name or wedding date.
- Descriptions: These are short summaries of your pages under the title in search results. Write a few sentences that capture the essence of your wedding and encourage people to click.
Need more in-depth instructions? See my guide on WordPress search engine optimization.
Step 7: Launch Your Wedding Website
Your wedding website is nearly ready for its grand debut. The final step is activating your theme and sharing your beautiful creation with the world.
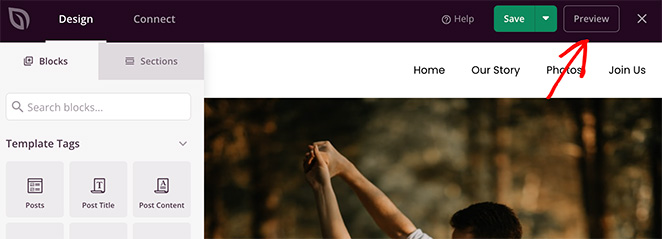
Before going live, preview your website. Click the “Preview” button in the SeedProd builder to see how your website will look to your guests.
It’s also important to ensure your website looks great on all devices. Check your website’s appearance on different screen sizes, such as smartphones and tablets.
SeedProd themes are typically responsive, so they should adjust automatically, but it’s always good to double-check.
You can edit any page with the builder and then click the mobile icon in the bottom toolbar.
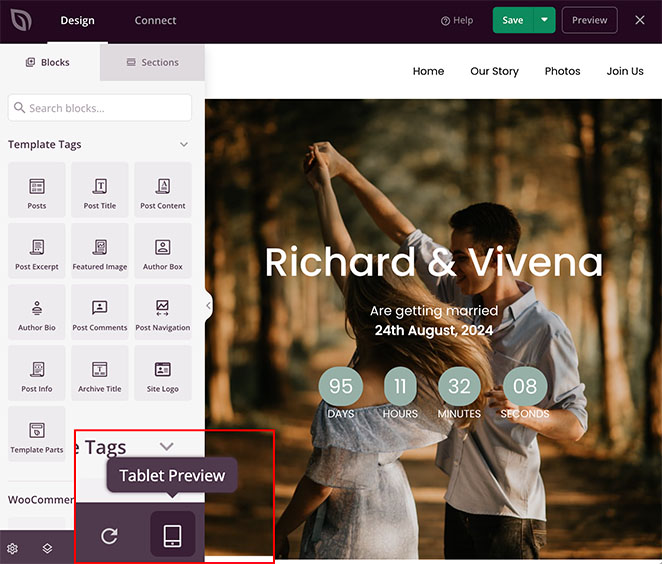
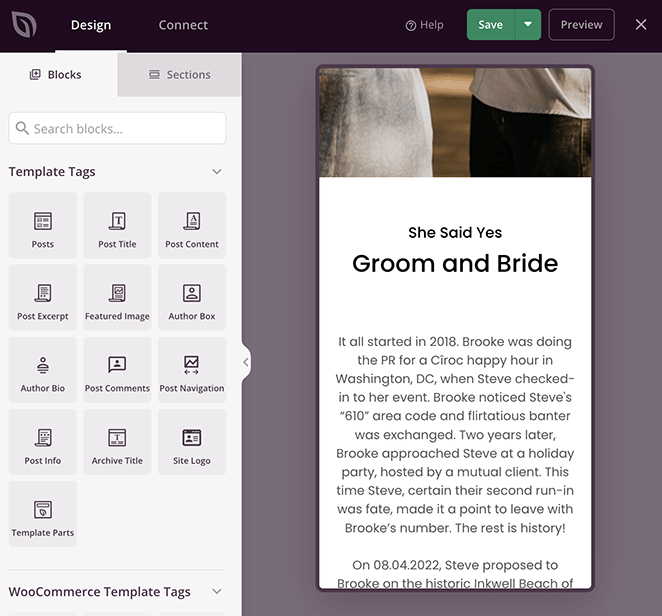
Continue clicking the icon to preview your desktop, tablet, and mobile site.
If you’re happy with how everything looks, it’s time to make your website public.
Head to SeedProd » Theme Builder and click the “Enable SeedProd Theme” toggle. This will activate your theme and make your website live for everyone to see.

Here’s a quick look at the wedding website I created for this guide:

Now that your wedding website is live, it’s time to spread the word. Share the wedding website URL with your guests via email, social media, or traditional invitations.
When sharing, include your wedding hashtag or the name of your wedding venue. You can also add a QR code to your printed materials for easy access.
Pro Tip: Share this step-by-step guide with your wedding planner to keep them in the loop.
Wedding Website FAQ
Is WordPress good for a wedding website?
WordPress is an excellent platform for creating a wedding website. It’s user-friendly, highly customizable, and offers many themes and plugins designed for weddings. With tools like SeedProd, which many consider the best wedding website builder, you can easily build a beautiful and functional wedding website without any coding knowledge.
Do I need to password protect my wedding website?
If you’re having a destination wedding and want to keep your plans private and only accessible to guests, password protection is a good option. However, if you’re comfortable sharing your wedding details with a broader audience, you don’t necessarily need a password. SeedProd allows you to password protect WordPress easily.
How do I make my wedding website not searchable?
There are a few ways to make your wedding website less visible to search engines:
- Password Protection: As mentioned earlier, adding a password will prevent search engines from indexing your site.
- Discourage Search Engines: You can add a line of code to your website’s header that tells search engines not to index your site. However, this is a more technical solution and might require some coding knowledge or assistance from a developer.
- Avoid Sharing Publicly: If you don’t share your website’s custom URL on social media or other public platforms, it’s less likely to be found by search engines.
Happily Ever After Starts Here
There you have it!
With SeedProd’s user-friendly website builder, you’ve learned how to make a wedding website to share your joy, connect with loved ones, and make your special day even more memorable. It makes the planning process more manageable, even for last-minute details.
Ready to build your dream wedding website?
You might also find the following guides helpful:
- How to Make a Calendar in WordPress to Display Events
- How to Backup a WordPress Site: A Beginner’s Guide
- How to Create a New Website Launch Marketing Plan
Thanks for reading! We’d love to hear your thoughts, so please feel free to leave a comment with any questions and feedback.
You can also follow us on YouTube, X (formerly Twitter), and Facebook for more helpful content to grow your business.

