Do you want to create a WordPress file upload form? Giving visitors the ability to upload files to your WordPress website is the ideal way to gather important information about them. Then you can learn more about your users and improve your business to serve them better.
In this article, we’ll show you how to use the best WordPress file upload plugin to build your own form to collect that information.
But first of all, why should you let users upload files to your website?
Why Use a WordPress File Upload Form?
Using a WordPress form with a file upload option is a great way to gather files, photos, screenshots, and other media from your site visitors.
If you accept job applications, for example, you’ll need a file upload option for people to submit their resumes or application forms to your WordPress media library.
On the other hand, if you’re a business or blogger, you may want to collect user-generated content to display images with product reviews or for use on social media to boost engagement and subscribers.
A file upload form can even be used by podcasters to accept audio clips to play during a session.
As you can see there are many reasons why you might need to let your users upload images or files to your WordPress site. So how about we show you how to create a form that allows any type of file upload?
How to Create a WordPress File Upload Form with a Plugin
To add a file upload form to WordPress, you should first choose the right WordPress plugin for the job.
In this tutorial, we’ll be using WPForms to build a WordPress form with the functionality for uploading a number of file types.

WPForms is the best WordPress file upload plugin on the market. It’s easy to use and simple enough for beginners to get started quickly without the hassle of building forms from scratch with HTML and CSS. Plus, the powerful form templates and drag-and-drop builder make building any form a breeze.
And if you don’t believe us, just take a look at these comments from happy WPForms users.

Why not check out this in-depth WPForms review for the full details?
So go ahead and get your copy of WPForms here. Then install the plugin on WordPress following these instructions.
Note: There is a free version of WPForms in the WordPress.org plugin repository. For this guide, we’ll use WPForms Pro for advanced integrations and features.
When you’ve activated your plugin on your WordPress dashboard, follow these steps to create your own file upload form:
- Step 1: Create a Contact Form in WordPress
- Step 2: Add the File Upload Field
- Step 3: Configure the General Form Settings
- Step 4: Set Up Notifications for Your File Upload Form
- Step 5: Add the For Confirmation Message
- Step 6: Publish Your WordPress File Upload Form
- Step 7: View the Files Uploaded to WordPress
Step 1: Create a Contact Form in WordPress
The first step is to create a form using one of the pre-built WPForms templates. We’ll be using a standard contact form for this tutorial.
To do this, from your WordPress Admin area, head to WPForms » Add New.
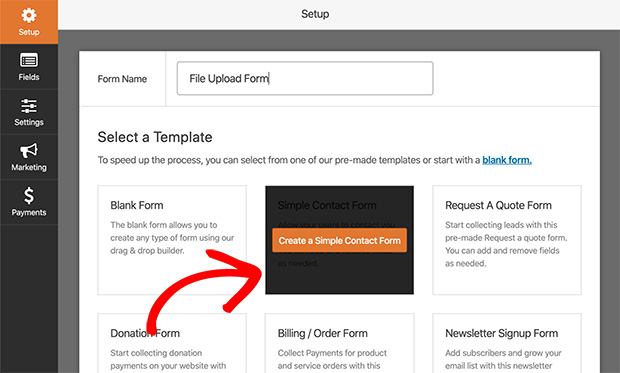
You’ll see a screen similar to the one above where you can give your form a name and choose a template.
Select the Simple Contact Form template.
Then you’ll be taken to the form builder, where you can customize and add new fields to the default template.
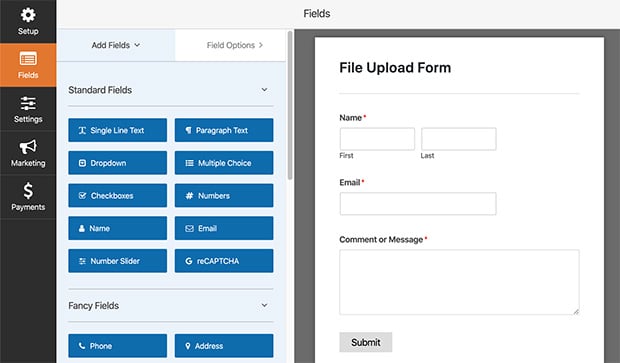
The default field labels included in the Simple Contact Form template are as follows:
- Name
- Comment or Message
And you can click any of these fields to drag and rearrange them. To add more fields, simply click an option from the left-hand side of the screen and drag it to your form.
Step 2: Add the File Upload Field
With your simple contact form in place, you’re ready to add the file upload option to your form.
To do this, head to the Fancy Fields heading and select the File Uploads field.
Then drag the field from the left-hand panel and drop it to where you’d like it to be on your form. You can also simply click the File Uploads field to have it appear on your form.
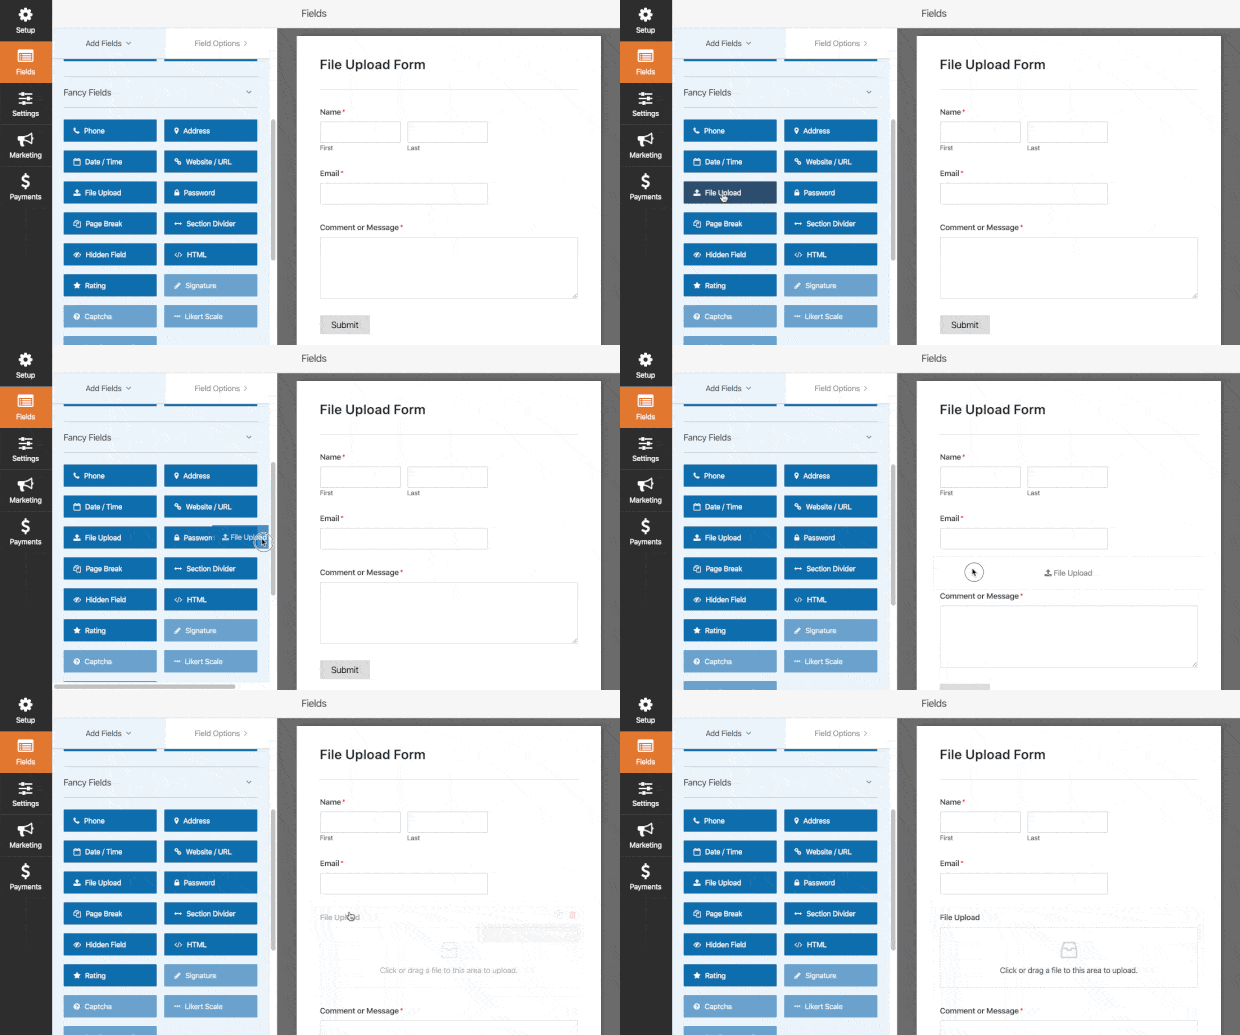
To edit the file upload field on your form, simply click it to open up the Field Options.
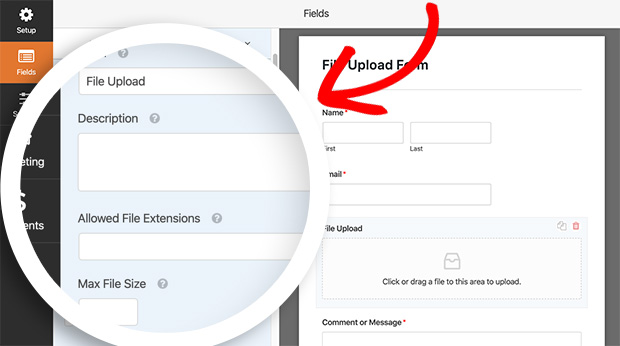
Here you can edit the following options:
- Label – change the name of the field.
- Description – enter text for the form field description.
- Allowed File Extensions – enter the file extensions you’d like to allow, separated by commas.
- Max File Size – enter the maximum file size limit in megabytes. The minimum size is 300 MB.
- Max File Number – enter how many files users are allowed to upload. The default is 1.
- Required – tick this checkbox to make uploading a file a requirement.
The great thing about file uploads with WPForms is you’re able to allow users to attach files in multiples at once. All users have to do is drag and drop the files into the upload area on the front end of your site.
By default, all files are stored in the WPForms folder inside the Uploads directory of your website. You can also store your files in your WordPress Media Library by selecting the “Store field in WordPress Media Library” checkbox under Advanced Options.
Step 3: Configure the General Form Settings
With your form now set up with the ability to accept file uploads, it’s time to configure your general form settings.
To do this, go to Settings » General.
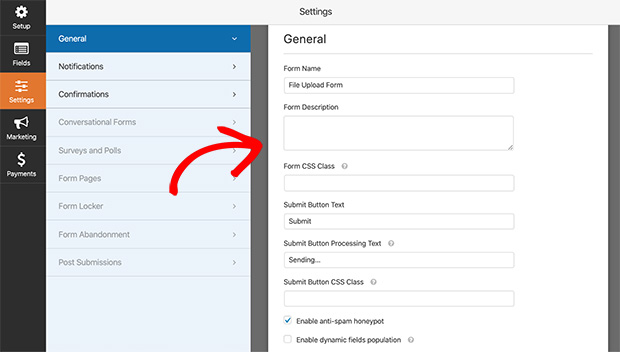
In the general form settings, you can configure the following options:
- Form Name – give your form a new name if you’d like.
- Form Description – add a description to your form to better understand what it’s for. For example, you say which file types you accept, such as GIF, PNG, JPG, etc.
- Submit Button Text – change the text of the submit button.
- Spam Prevention – reduce unwanted form submissions by checking the anti-spam honeypot option.
- Information Storage – disable storing entry information in WordPress to comply with GDPR laws.
Click Save when you’ve configured these settings, then move on to the next step.
Step 4: Set Up Notifications for Your File Upload Form
Now click Notifications under the General Settings tab.
Here you can choose to turn notifications on so that you’ll receive an email whenever a form is submitted.
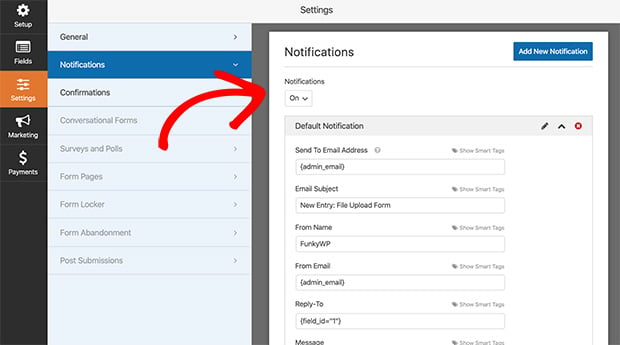
To keep things quick and to improve email deliverability, WPForms doesn’t attach submitted files to the email notification. Instead, a link is provided for you to click and view the uploads.
By default, notifications are turned on. However, you can choose to disable them by selecting Off from the dropdown menu.
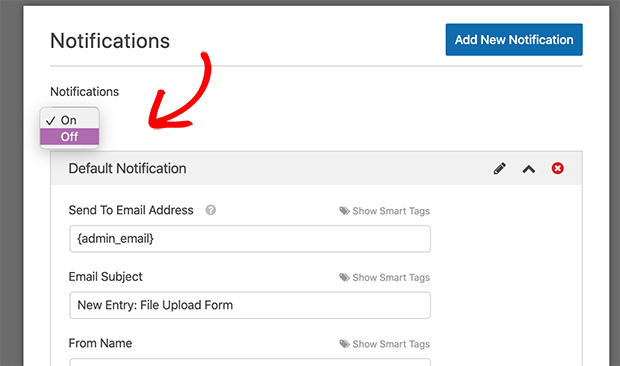
Then make sure you save your changes.
Step 5: Add the For Confirmation Message
Next, click the Confirmations tab to set up the message people will see after submitting their form.
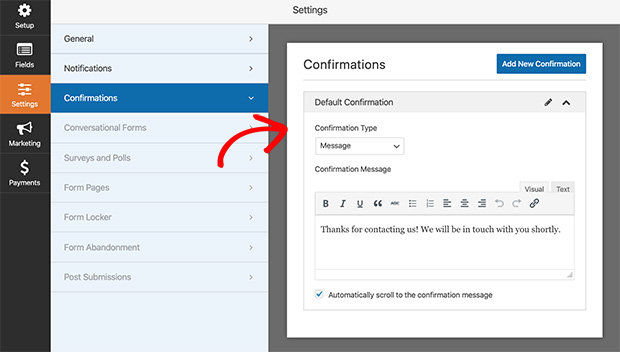
There are 3 types of confirmation messages available with WPForms, and they are:
- Message – display a simple thank you message confirming the form has been submitted.
- Show Page – redirect visitors to a thank you page on your website.
- Go to URL (Redirect) – send visitors to a different website after submitting their form.
To use the default message confirmation option, simply enter a message into the confirmation message box provided, then save your changes.
Step 6: Publish Your WordPress File Upload Form
Now it’s time to embed your file upload form in WordPress. WPForms makes publishing a form really easy. You can add your form to a post, page, or even in the sidebar of your website with the WPForms widget and shortcodes.
Here’s how to publish a form on a WordPress page.
First, head to Pages » Add New to create a new WordPress page. Then click the plus icon to add a new content block.
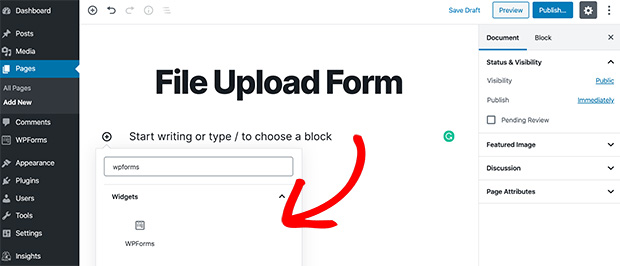
In the search box, type WPForms, and the form block will pop up. Go ahead and click it to add it to your page.
Now select your WordPress file upload form from the dropdown box to insert it.
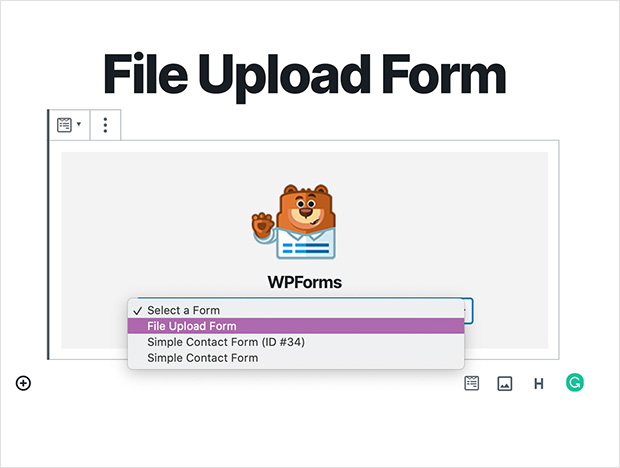
Click Publish to publish your page, and you’re done.
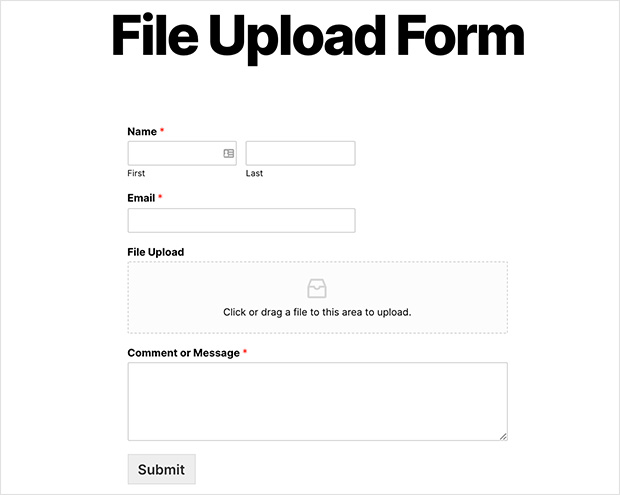
Here’s how it will look from the front of your website.
Step 7: View the Files Uploaded to WordPress
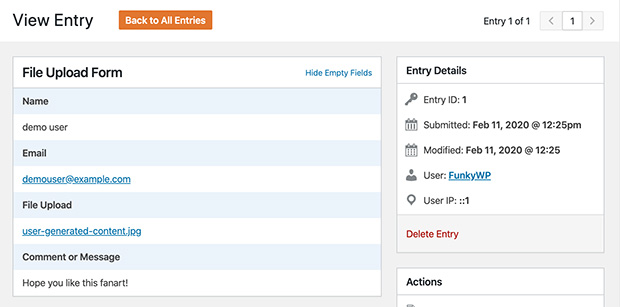
Once people have started uploading files to your website, you can view those files by heading to WPForms » Entries.
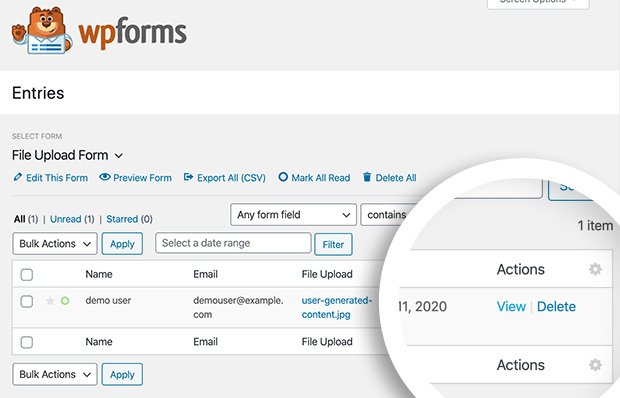
And click view on any file to see the details. The file will open in a new browser tab where you can view more details and click to download the file to your computer.
If you need more features, the WPForms plugin offers several add-ons you can install. For example, you can use the Zapier addon to automatically save all file uploads to Google Drive, Dropbox, and other cloud storage services. You can also accept payments with the Pro version of WPForms.
Frequently Asked Questions
To limit the file types and sizes, you can configure the settings within your file upload plugin. For example, in WPForms, navigate to the ‘Allowed File Extensions’ field to set the allowed file types and adjust the ‘Max File Size’ field to limit the file size.
You can solve this error by locating your php.ini file and looking for the following parameters:
“upload_max_filesize =” and “post_max_size =”
Set the ‘=’ value to 32M and save. You can also contact your hosting provider for assistance.
Congratulations! You now know how to create a WordPress form that lets users upload their own files. All by using a powerful WordPress form plugin with file upload features.
We hope you found this tutorial helpful. Here are some other step-by-step guides you may find useful:
- How to Put WooCommerce in Maintenance Mode (4 Easy Steps)
- How To Add A Survey To Your WordPress Website (Step by Step)
- How to Create an Online Order Form for Your WordPress Site
Thanks for reading! We’d love to hear your thoughts, so please feel free to leave a comment with any questions and feedback.
You can also follow us on YouTube, X (formerly Twitter), and Facebook for more helpful content to grow your business.

