When I started my first blog, I was on a tight budget. Every penny counted. I knew landing pages were important, but I couldn’t afford to hire a designer.
So I was thrilled to learn I could create a free landing page directly in WordPress. No coding skills required.
If you’re looking for a free and effective way to create a WordPress landing page for free, this tutorial is for you. I’ll show you how to get professional results without spending a dime.
How to Build a WordPress Landing Page for Free:

Frequently Asked Questions About Landing Pages
What to Consider When Creating a Free Landing Page
Before you start creating your landing page in WordPress, there are a few things you should keep in mind, including:
- Landing page goal: Define what you want your landing page to accomplish and keep those details consistent across your entire design.
- Clear visual hierarchy: Figure out which page elements are the most important and make them stand out to encourage people to take action.
- Create action with CTAs: Make it very clear what your landing page visitors should do and make it easy for them to do it.
- Attractive design: Engage your visitors with an engaging design that makes them want to click. You should also try to keep important page elements above the page fold.
- Concise copy: Keep your body copy short, to-the-point, and informative. Use enticing headlines that make people want to read the next sentence and the next.
- High-quality images: Use images to illustrate what you’re talking about. Avoid generic stock photos and choose images that tell a story.
- Focus on value: Explain to people how clicking your CTA button will benefit them. What will they get? How will it improve their lives?
How to Create a Free Landing Page in Under 30 Mins
Now that you know what a landing page is and how it works, let’s look at how to make one with a website builder.
For this tutorial, I’ll be using SeedProd‘s landing page builder to build a free landing page.

SeedProd is a popular free landing page builder for WordPress, with coming soon and maintenance mode functionality. It makes it easy to build a custom landing page on your WordPress site without hiring a developer.
With its drag-and-drop visual page editor, you can create custom landing pages quickly without writing a single line of code. SeedProd also includes various customizable landing page templates. You can then customize them in the visual editor by adding signup forms, contact forms, and other page elements.
SeedProd also integrates with various email marketing tools to help grow your email list.
Unlike other page builders, SeedProd is very fast and won’t slow down your website. It uses minimal code and best design practices to ensure your site is as fast as possible.
Let’s dive in!
Video Tutorial
If you’d prefer to read the written tutorial, follow the steps below.
1. Install SeedProd’s Free Landing Page Creator
The first step is to install SeedProd’s free WordPress landing page plugin. You can do this by navigating to Plugins » Add New from your WordPress dashboard.
Then type “SeedProd” into the search box on the right. This will show you the following results:
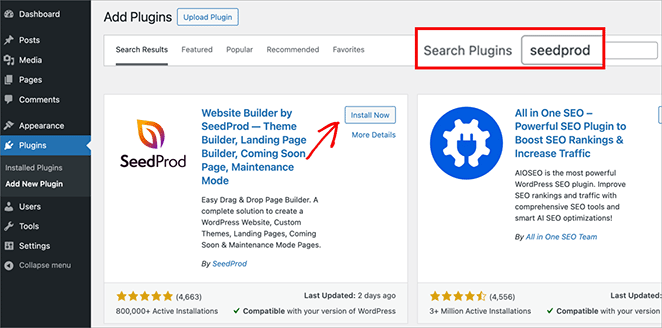
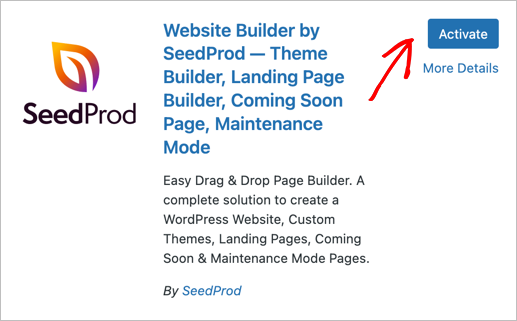
Click Install next to the Website Builder by SeedProd option. Then, go ahead and click Activate.
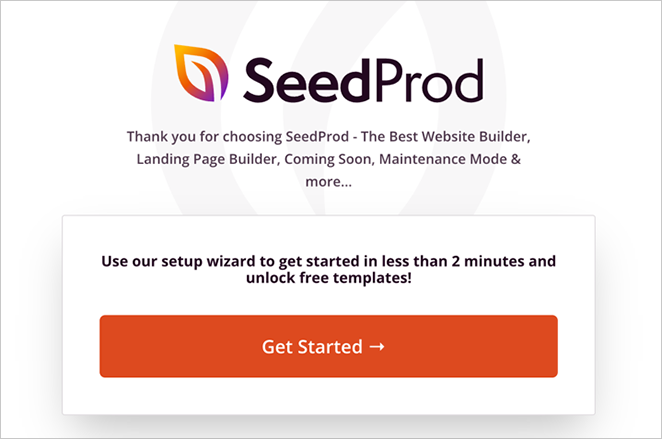
After activating the plugin, you’ll see the SeedProd setup wizard, which helps you get started with building a landing page in just 2 minutes. So go ahead and click “Get Started”.
For the first step in the wizard, you’ll need to enter an email address to create your free SeedProd account. Then, decide what type of landing page you want to create.
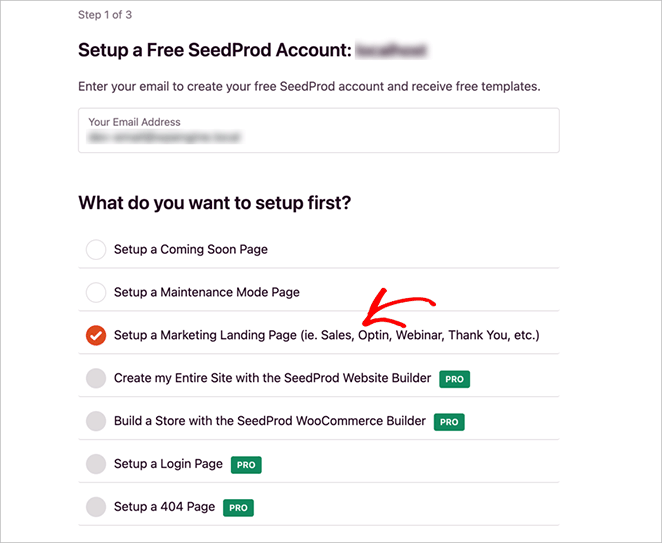
There are 3 free options to choose from:
- Set Up a Coming Soon Page
- Set Up a Maintenance Mode Page
- Setup a Marketing Landing Page (ie. Sales, Optin, Webinar, Thank You, etc.)
You’ll also see several Pro options which allow you to setup login pages, 404 pages, online stores, and even a custom WordPress theme.
For this guide, let’s focus on the free options and select the “Marketing Landing Page”, then click “Save and Continue”.
2. Select a Free Landing Page Template
The next step in the setup wizard allows you to choose a free landing page template.
You can filter the templates by clicking the different categories along the top of the screen:
- Coming Soon
- Maintenance Mode
- 404 Page
- Sales
- Webinar
- Lead Squeeze
- Thank You
- Login
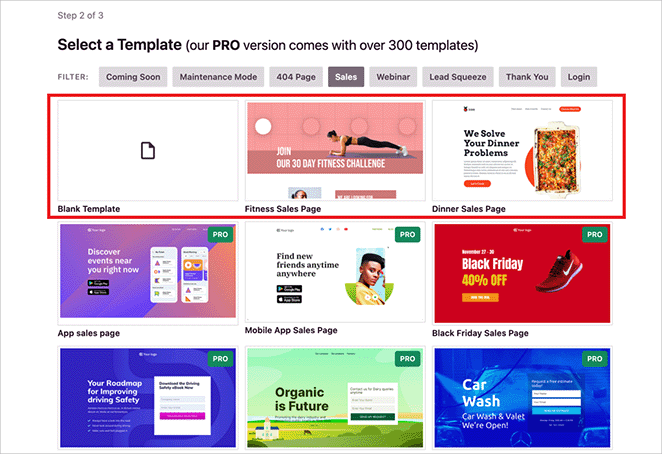
By default, there are 7 free landing page templates across the different page categories. You can also unlock 9 more free templates by subscribing to the email list for free. To unlock over 300 more templates, you can upgrade to SeedProd Pro.
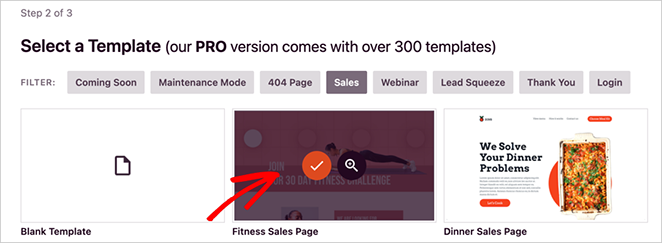
For this tutorial, we’ll use the free Fitness Sales Page template. Just hover your mouse over the template icon and click the tick icon.
After choosing your template, you’ll automatically move onto the final step of the setup wizard. Here, you can take advantage of a discount for upgrading to SeedProd Pro. You can also choose to install other optional free WordPress plugins.
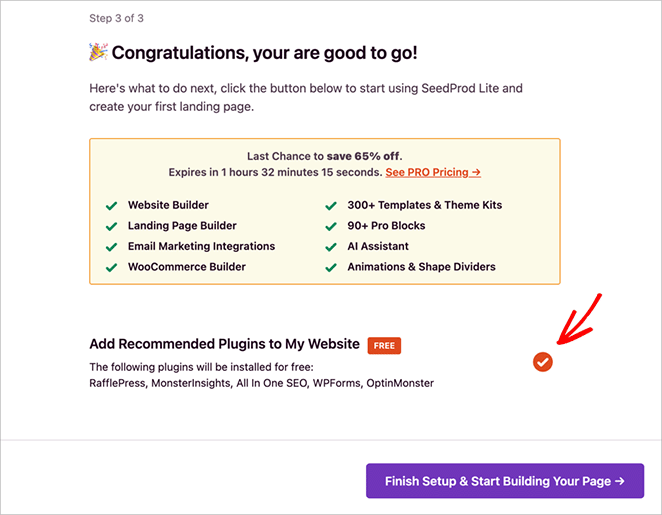
If you’d prefer not to install these plugins, unclick the toggle. Then, go ahead and click “Finish Setup & Start Building Your Page”.
Now you’ll exit the setup wizard onto the SeedProd setup page. Here, you’ll see that the “Setup a Landing Page” option is crossed out, which means you’ve completed this task.
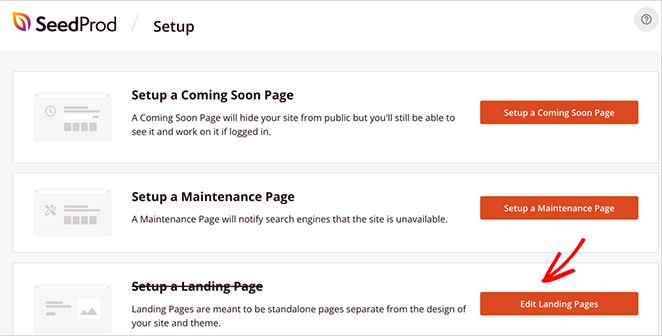
You’ll also notice the option to “Edit Landing Pages”. Click this button.
Now, SeedProd will take you to the landing page dashboard. Here, you can see the free landing page you just setup under the “Landing Pages” heading.
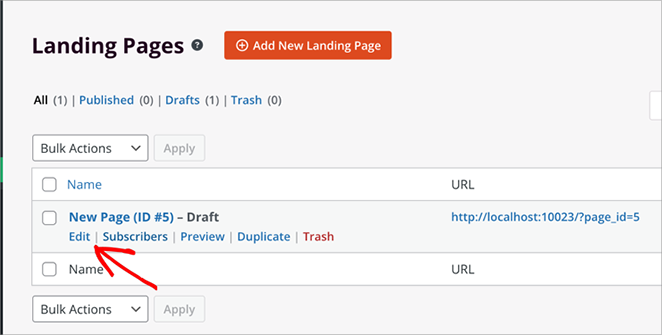
Hover your cursor over the landing page link, then click the Edit option to open and start customizing your page.
3. Add Your Unique Landing Page Content
SeedProd’s visual page builder is divided into 2 distinct sections. On the left-hand side are the different blocks used to design your page, while on the right is a live preview of your landing page.
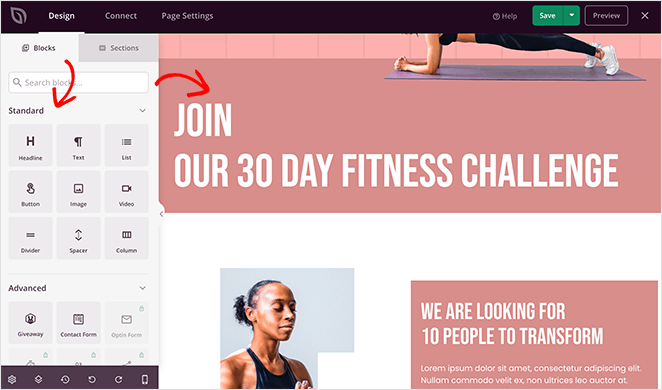
To add content, just drag a block from the left panel and drop it onto your live preview. You’ll then see the changes in real time.
There are various landing page blocks to choose from, including:
- Headline
- Text
- List
- Button
- Image
- Video
- Divider
- Spacer
- Column
You can also use 5 of SeedProd’s Advanced page blocks – Giveaway, Payment Button, Contact Form, Envira Gallery, and Custom HTML – for free.
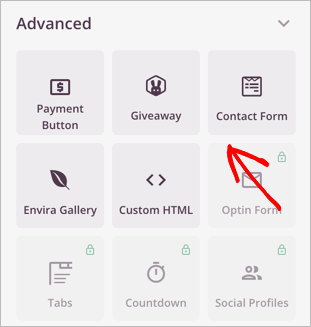
With these blocks, you can:
- Create an online contest and display it on your page
- Build and embed custom WordPress forms
- Create stunning image sliders for your page
- Add custom HTML that works seamlessly with your design
Start adding your unique content by clicking any block on your live preview. This will show a settings panel on the left-hand side, where you can replace the default content with your own.
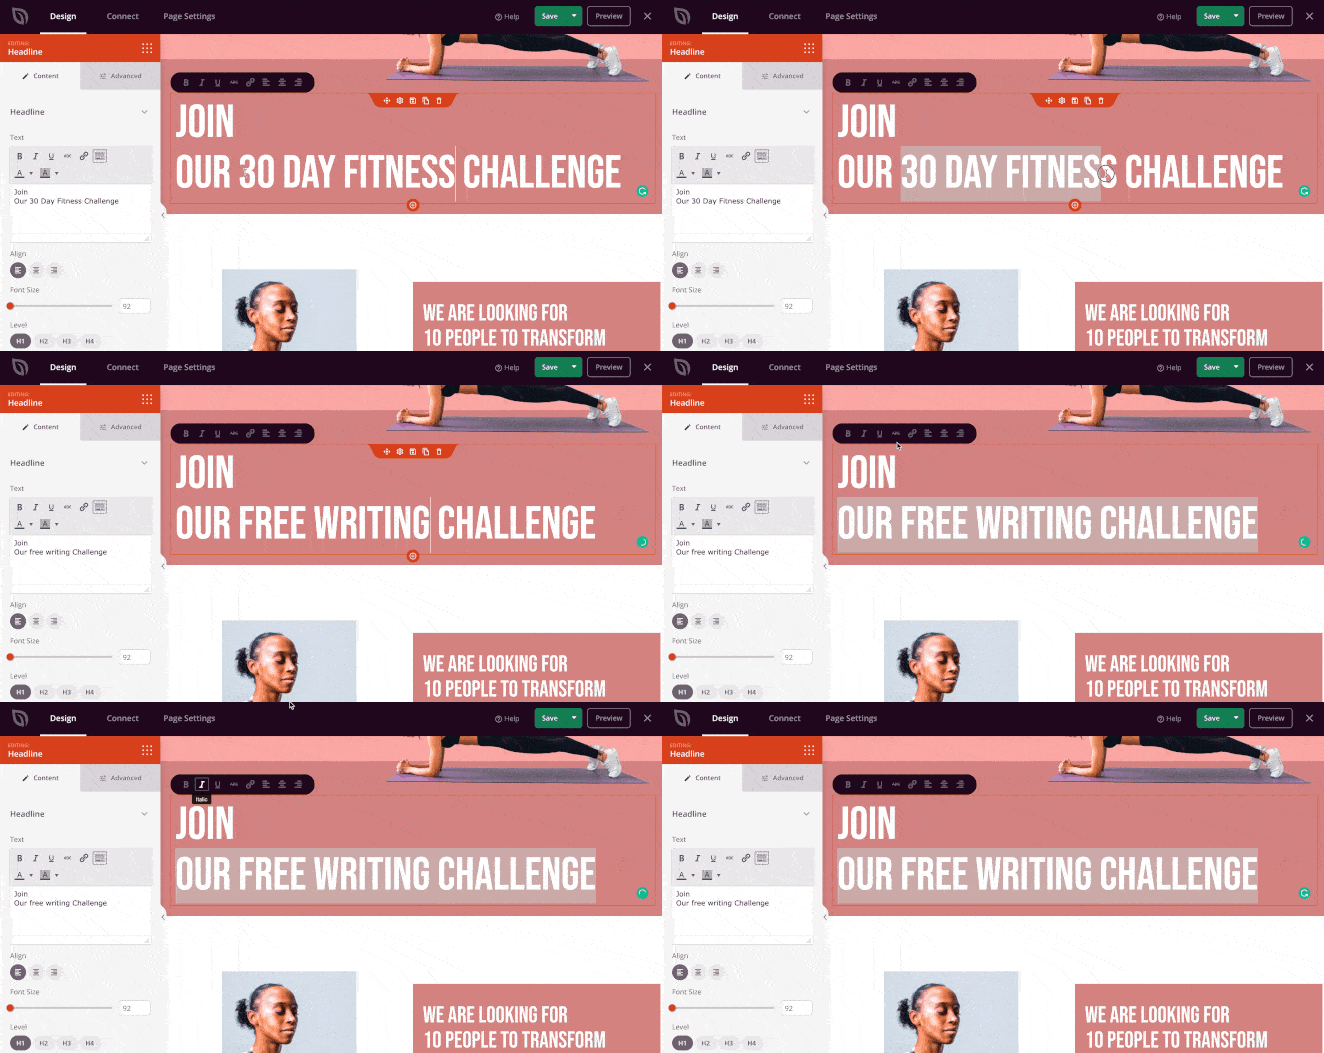
Alternatively, you can edit the content directly on your preview with SeedProd’s inline text editing feature.
Replacing the default images is just as easy. Simply click any image on your live preview, and click the trash can icon in the settings panel on the right.
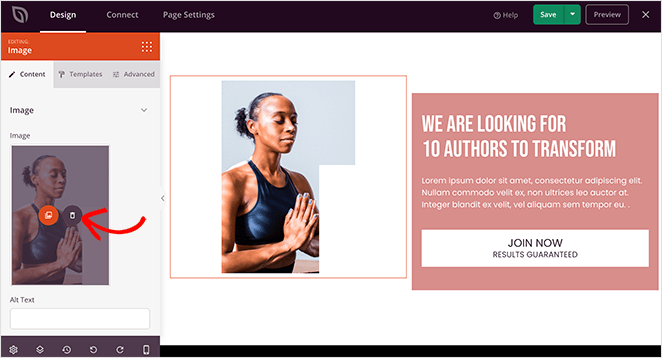
Then click the Use Your Own Image button to upload a photo from your computer or your WordPress media library.
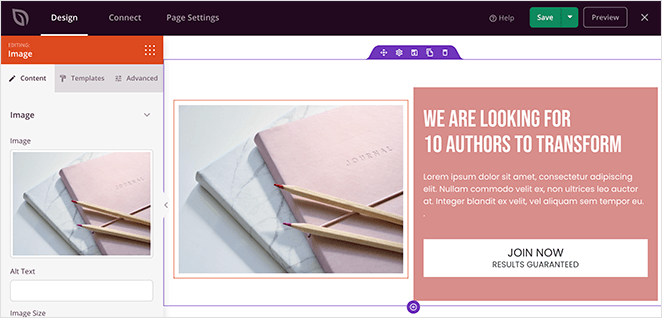
Keep adding content until you’re happy with the overall look. Then click the green Save button in the top-right corner of your screen.
4. Customize Your Landing Page Styles
After adding your unique content to your free landing page, you’ll want to make sure the styling is consistent with your brand.
You can do this easily by clicking the gear icon in the bottom-left corner to view your global page settings.
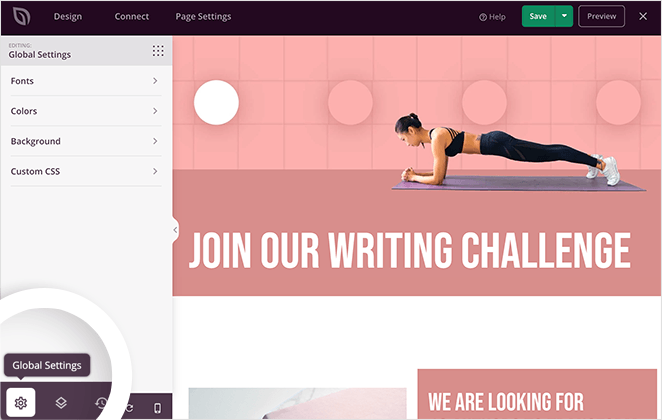
This setting allows you to customize your landing page:
- Background
- Colors
- Fonts
- Custom CSS
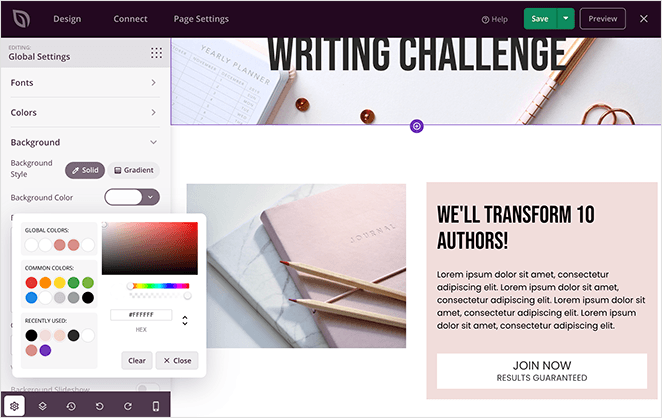
Let’s start by clicking the Background option to customize your landing page background. In this area, you can change the background color, add a color gradient, or upload a custom background image.
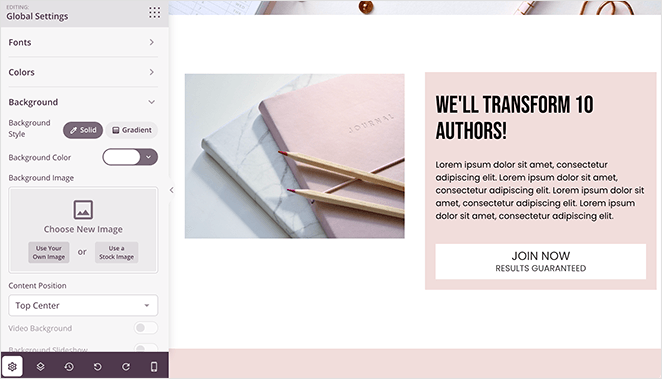
To add a custom background image, just click the Use Your Own Image button.
In the Fonts section, you can choose from a near unlimited number of free Google web fonts for your landing page headings, links, and body text.
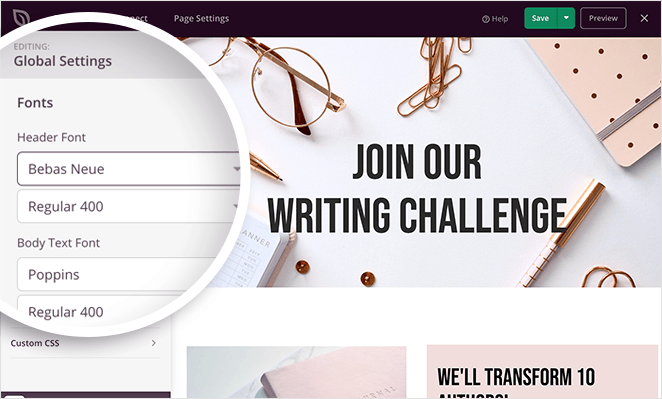
Just click any of the drop-down menus to pick your preferred fonts.
The Colors section has similar point-and-click settings where you can select custom colors for headers, text, links, buttons, and more.
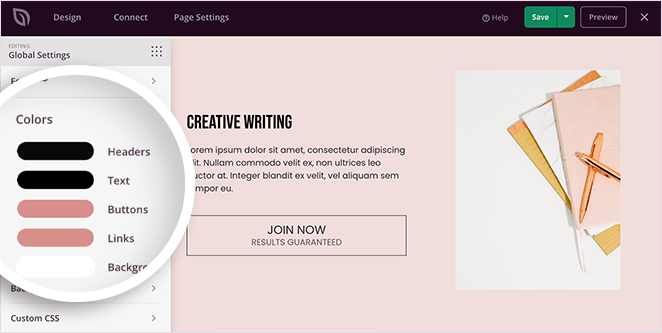
Just click any option and use the color picker to select one that matches your branding and overall page design. This will edit those colors for your whole landing page.
When you’re happy with your landing page design, click the Save button to store your settings.
5. Check Your Landing Page Works Correctly
With your free landing page design in place, you’ll want to ensure everything works properly before publishing it on your website. Go through your design and double-check that your CTA button links work, and make sure there are no typos or grammatical errors.
You’ll also need to make sure your landing page looks good on mobile devices. This is super-easy with SeedProd’s mobile preview option.

Just click the mobile icon at the bottom of your screen to preview your landing page on mobile, tablet, and desktop.
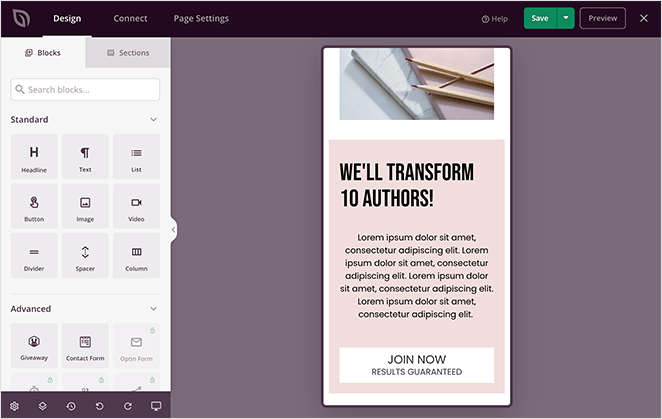
From there, you can move things around until your page looks great on both mobile and desktop screens. Any changes you make are applied to both versions of your page automatically.
6. Configure Your Landing Page Settings
After checking that your landing page works correctly and is easy to view on mobile, it’s time to configure a few settings.
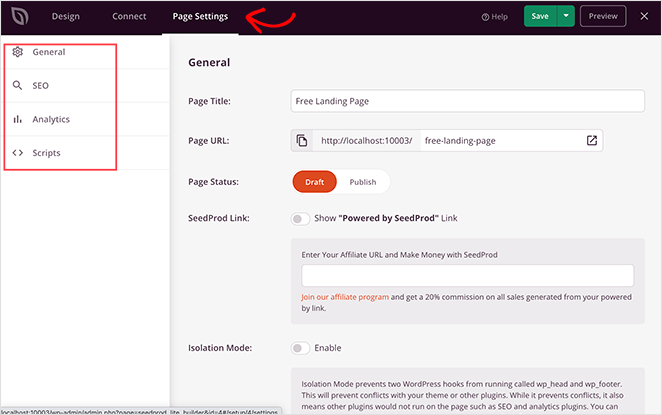
Click the Page Settings tab at the top of your screen to view SeedProd’s various page settings, which include:
- General settings: Change your free landing page’s name and URL, and make the page a draft or published.
- SEO: Set up your page’s SEO title, meta description, and more with the All in One SEO WordPress plugin.
- Analytics: Monitor your landing page performance with MonsterInsights, the best Google Analytics plugin for WordPress.
- Scripts: Add custom tracking scripts to your landing page, such as your Facebook tracking pixel.
When you’ve finished editing your page settings, remember to click the Save button.
7. Publish Your Landing Page with WordPress
After putting the finishing touches on your free landing page, it’s time to publish it on your WordPress website.
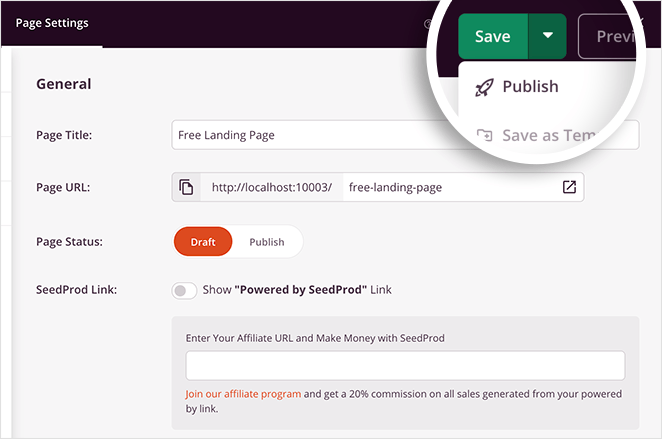
To do that, click the down arrow next to the green Save button in the top-right of your screen, and click Publish.
You’ll then see a popup telling you that your landing page has been published.
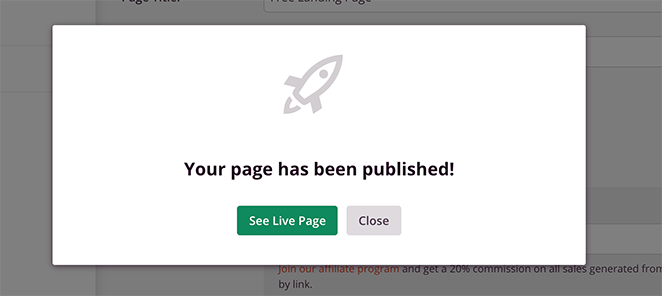
Go ahead and click the See Live Page button to preview your free landing page.

What to Do After Publishing Your Landing Page
Congratulations! You’ve created your free landing page in WordPress. But your work isn’t finished yet. Now it’s time to get people to see it. Here’s what you should do next:
Promote Your Landing Page
Getting traffic to your new landing page is key. Here are a few simple ways to promote it:
- Share it on social media: Tell your friends and followers about your new landing page. Share the link on Facebook, Twitter, Instagram, and any other social media platforms you use.
- Add it to your email signature: Include a link to your landing page in your email signature so everyone you email can easily find it.
- Run a contest or giveaway: A contest can be a fun way to get people excited about your landing page and what you’re offering.
- Use paid advertising: If you have some budget, consider using paid advertising on platforms like Google Ads or social media to reach a wider audience.
Analyze Your Results
Once you start getting traffic, it’s important to track how your landing page is performing.
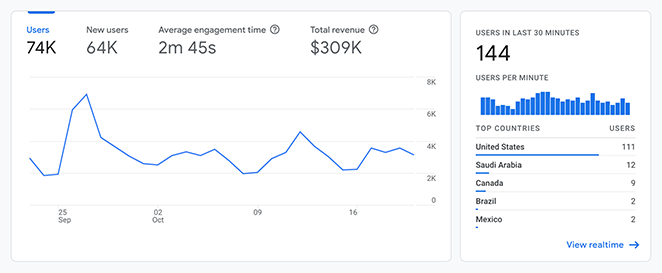
You can use a free tool like Google Analytics to see how many people are visiting your page, how long they’re staying, and what actions they’re taking. This information will help you understand what’s working and what’s not.
For an easy guide on getting this set up, see our tutorial on how to add Google Analytics to WordPress.
A/B Test for Improvement
A/B testing means creating two slightly different versions of your landing page and seeing which one performs better.

For example, you could test different headlines, images, or call-to-action buttons. This helps you fine-tune your landing page for maximum conversions.
See our guide on A/B testing for landing pages to get started.
By following these steps, you can ensure your free landing page is working hard for you and helping you reach your goals.
Bonus: More Landing Pages you Can Build
In this guide, I’ve shown you how to create a simple landing page for free. But, if you want something more specific, see my guides on building different types of landing pages in WordPress:
- Create an Event Landing Page
- Build a Sales Funnel Landing Page
- Create a Survey Landing Page
- Create a Membership Landing Page
- Create a Waitlist Landing Page
- Build an Online Course Landing Page
- Create an Affiliate Marketing Landing Page
- Create a Google Ads Landing Page
- Build A Podcast Landing Page
- Create an Instagram Landing Page
- Create a Facebook Landing Page
- Build an App Landing Page
- Create a Video Landing Page
- Create a Book Landing Page
Next, Learn About Landing Pages
You now know how to create a free landing page in WordPress. And the best thing is it required no technical expertise, or coding, and you didn’t spend a dime!
For a more detailed overview of SeedProd’s premium features in action, check out this tutorial: How to Create a Landing Page in WordPress
Or jump right in and…
If you’re looking to learn more about landing pages, take a look at these landing page resources:
- Landing Page vs Sales Page
- Best Landing Page Headline Formulas
- Landing Page vs Microsite
- Landing Page URL Examples and Best Practices
- Landing Page vs Splash Page
- What Is a Good Landing Page Conversion Rate?
- Anatomy of a Landing Page
Thanks for reading! We’d love to hear your thoughts, so please feel free to leave a comment with any questions and feedback.
You can also follow us on YouTube, X (formerly Twitter), and Facebook for more helpful content to grow your business.

