Do you want to know how to create a blog page on WordPress?
Creating a separate page for your blog makes it easier for visitors to find your latest posts. However, if you’re unfamiliar with blog pages, you might struggle to set one up.
This article will solve that problem. We’ll show you how to create a separate page for blog posts in WordPress step-by-step.
What Is the WordPress Blog Page?
The WordPress blog page is a single page on your WordPress website that shows a list of your latest posts. Unlike your home page, which has lots of different information, a blog page focuses on displaying your posts.
A blog posts page typically includes the following web design elements:
- Navigation menu
- Blog posts list
- Footer
In some cases, the blog page will also include a sidebar for displaying information such as your social media profile icons, post categories, newsletter subscription form, and more.
Why Create a Blog Page on WordPress?
You might be thinking, “Why do I need to create a separate blog page?” The answer is simple.
By default, WordPress displays your most recent posts on your site’s front page.
It’s an excellent solution for bloggers, but you probably want something more engaging if you’re running a small business site. For instance, you may need a home page that educates visitors about your business, products, contact details, and how to make a purchase.
You can still run a successful blog for your business, but you’ll need to move your blog posts to a separate page to keep your homepage engaging.
We’ll show you 2 easy ways to add a blog page to your WordPress site in this post. The first method is the simplest and offers the most customization options, while the second uses the built-in WordPress page settings.
How to Create a Custom Blog Page with a Page Builder
The first method will show you how to create a custom page for blog posts with the SeedProd theme builder plugin.

SeedProd is the best website builder for WordPress. Its drag-and-drop page builder lets you create landing pages and flexible website layouts without code.
SeedProd also includes a theme designer to customize your blog page, sidebar, and more. As a result, you can create a separate page for blog posts and tailor it to your brand without hiring a developer.
Here’s how to create a blog page on WordPress with SeedProd.
Video Tutorial
Step 1. Install the SeedProd Website Builder Plugin
First, install and activate the SeedProd plugin.
Note: You’ll need the SeedProd Pro or Elite plan to use the theme builder.
If you need help, see this guide on how to install a WordPress plugin.
After activating the plugin, go to SeedProd » Settings from your WordPress dashboard and enter your plugin license key. You can find your key under your account information on the SeedProd website.
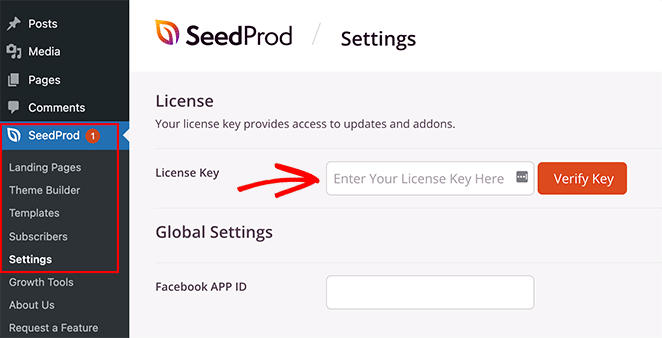
Click the Verify Key button to confirm your license. You can then move on to creating a custom WordPress theme.
Step 2. Choose a WordPress Theme Template
This step might sound complicated, but it’s simpler than you might think.
First, go to SeedProd » Theme Builder and click the Themes button. You can choose a theme to use as a starting point on the following screen.
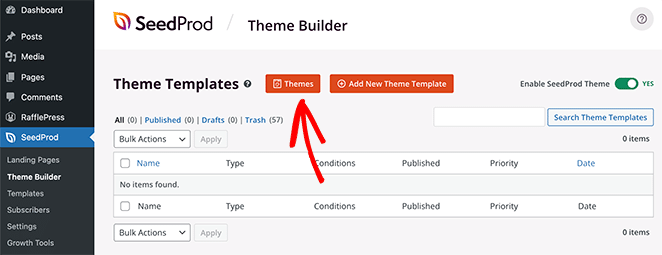
Later, when you activate the theme, it will replace your existing WordPress theme with a new design.
There are many professionally designed themes for different types of websites. For example, you can build a ‘Personal Portfolio,’ ‘Pizza Shop,’ or even a ‘Sportswear Store.’
Find a theme that fits your needs, then hover over it and click the checkmark icon to add it to your site.
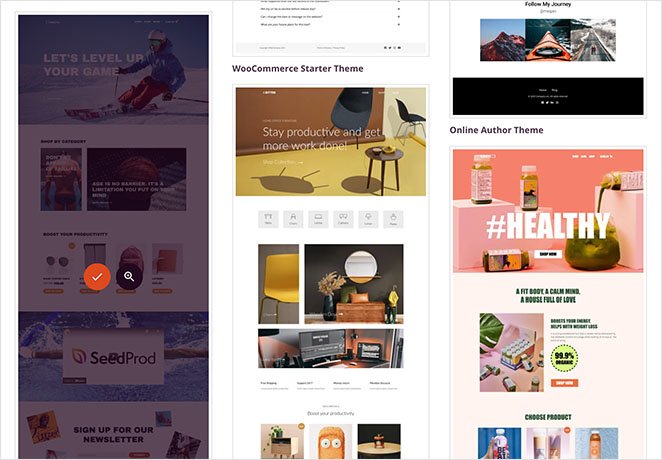
After choosing a theme, SeedProd will generate the theme templates, including one for your blog index and one for your home page. Each page is set up automatically with an attractive layout and placeholder content ready for you to customize.
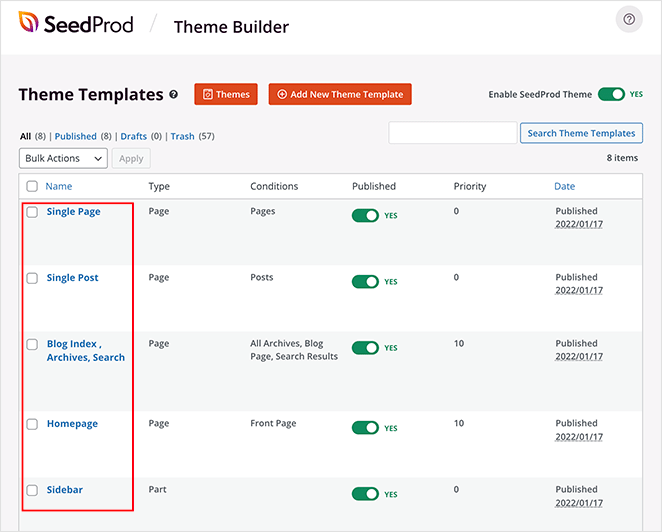
We’ll show you how to customize your blog page and home page in this guide.
Step 3. Customize Your Home Page
After generating your WordPress theme templates, you can edit them with SeedProd’s theme builder. Let’s start with your Homepage template.
Hover your mouse over the Homepage template and click the ‘Edit Design’ link to get started.

Doing that will launch the template file in SeedProd’s theme builder. The drag-and-drop builder will show a live preview on the right and blocks and sections on the left.
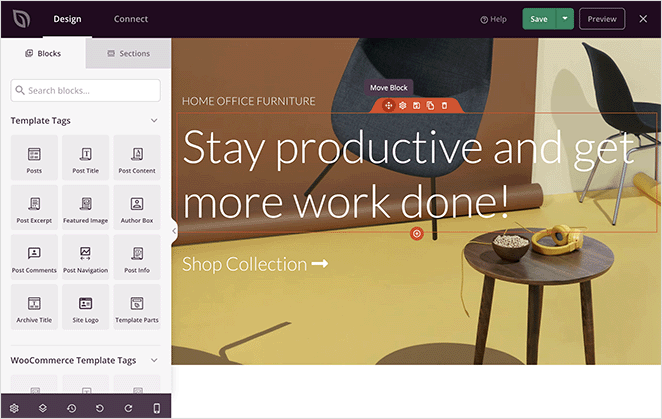
Blocks and sections are the elements that make up your page’s design. You can customize any block by clicking it, drag it anywhere with your mouse, and add new blocks from the left-hand panel.
We’ve written a complete guide on how to edit your WordPress homepage. Simply go to Method #1 and follow the theme builder instructions.
Step 4. Customize Your Blog Page
SeedProd’s theme builder also offers many ways to customize your blog page. Click the ‘Edit Design’ link on the Blog Page template file to get started.
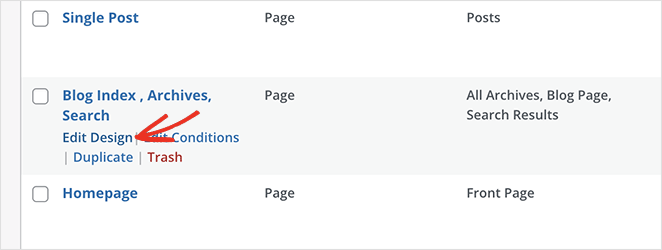
You’ll see the same page builder layout as before on the next screen. You can then customize your blog page the same way you did with your home page.
For example, you can click the headline to change the title, font size, alignment, and more. After, you can click the Blocks icon to go back to the blocks panel.
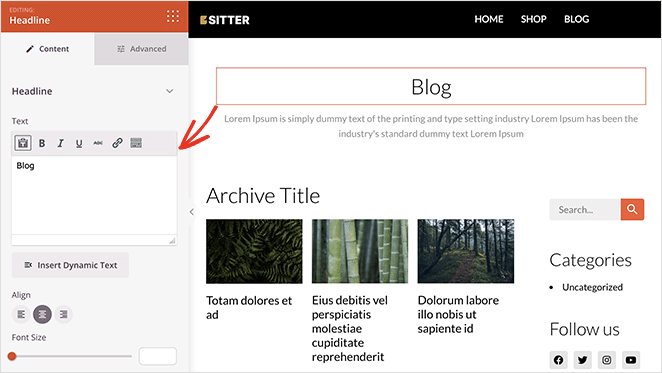
SeedProd offers several blocks you can use on your blog page. The most important is the Posts block which shows a list of recent blog posts.
The Posts block will be in your blog index template automatically. The posts are in a 3-column grid layout in the template we’re using.
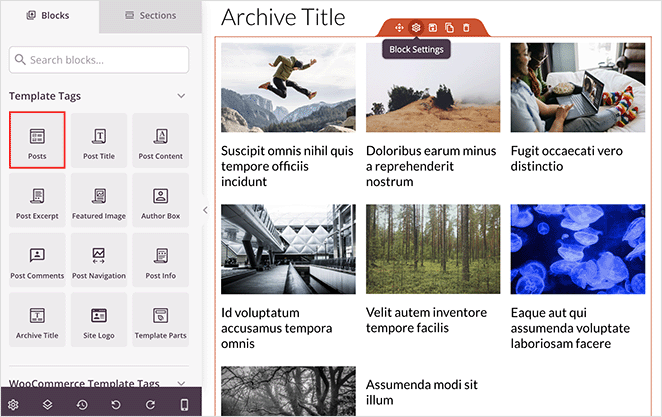
You can change the layout of the Posts block easily by clicking it and choosing different settings in the left-hand panel. For example, you can change the columns to 1 and enable the post excerpt toggle.
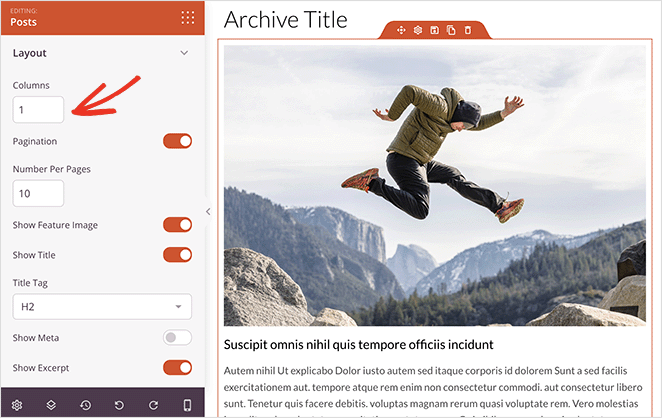
As you scroll through the block settings, you’ll see other toggles to show or hide:
- Featured image
- Read more text
- Pagination
- Meta information
These settings allow you to display your blog posts to best suit your target audience.
For instance, you can choose to show only posts from a specific category, tag, or custom post type. You can also filter posts by author, date, time, and more.
Add a Click to Subscribe Button to Your Blog Page
You can also add a click-to-subscribe button to your blog page to collect push notification subscribers. Push notifications are an excellent way to increase repeat traffic, engagement and boost sales.
Note: To follow this step, you’ll need to be comfortable handling code snippets.
To do this, drag the Custom HTML block onto your blog page design, and enter the following code:
<button onclick="subscribeOnClickButton()" style="border: none; padding-left: 5%; padding-right:5%; text-align: center; display: inline-block; color: blue;">Get Updates via Push Notifications</button>This button has standard styling but you can alter it with your own code.
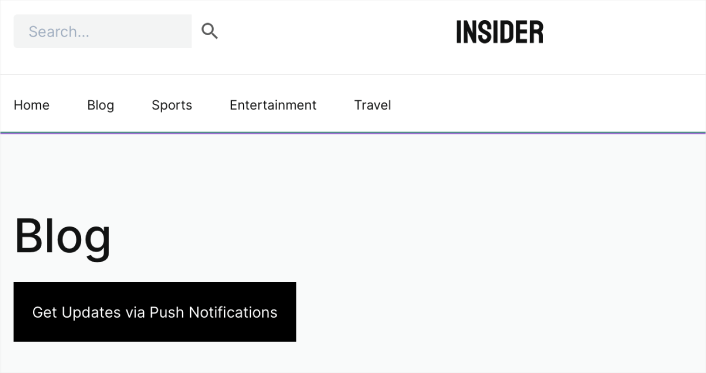
Next, go to the PushEngage website and create an account for the best push notification software.
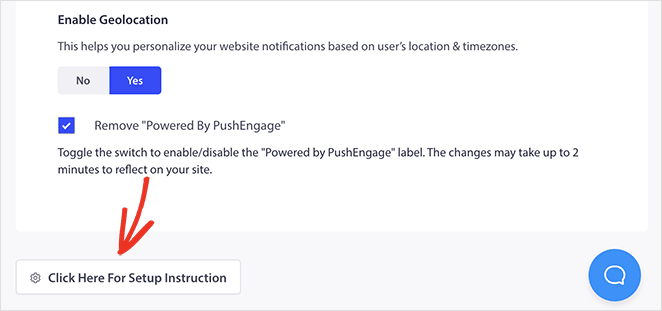
Then, from your PushEngage dashboard, head to Site Settings » Site Details and click the Click Here for Setup Instructions button.
Now, click on the Under Any Site option, and you’ll see your installation code.
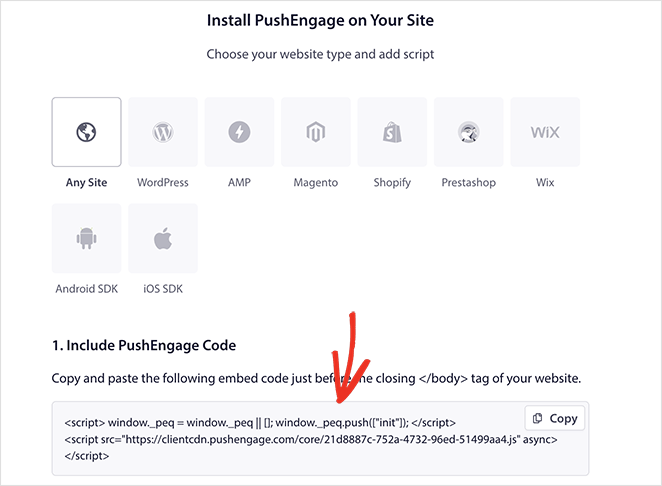
Once you have the code in your PushEngage dashboard, add this snippet to your code:
<script> window._peq = window._peq || [];</script> <script>
function subscribeOnClickButton(){
window._peq.push(['subscribe',{}.pe,function(res){
if(res.statuscode==1)
{
// Code to return response
console.log(res);
}
}]);
}
</script>
You’ll want to add this code to the HTML block in your landing page after the code for the button. It should look something like this:
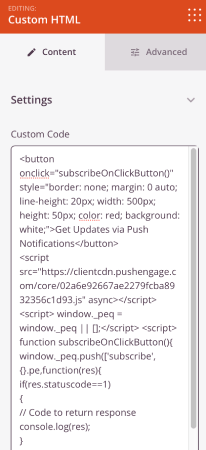
When you publish your blog page, users will be able to click this button to subscribe to your push notifications.
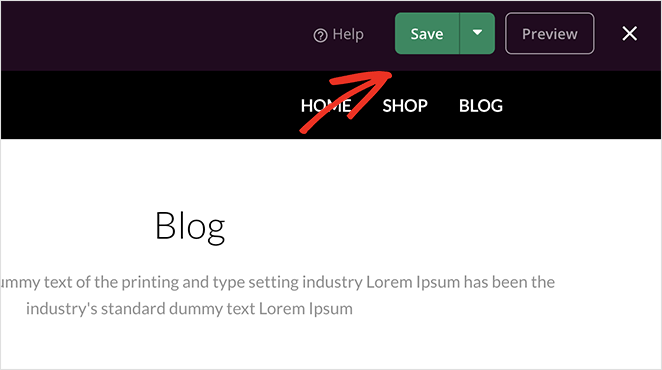
Once you’re happy with your blog page’s look, click the green Save button in the top right corner. Then you can click the ‘X’ icon to go back to your theme templates and continue customizing the rest of your WordPress theme.
Step 5. Enable Your WordPress Theme
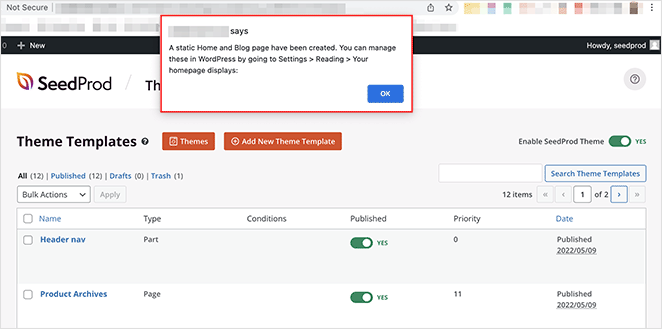
You can publish your new theme when you’re happy with your theme customizations. To do that, toggle the ‘Enable SeedProd Theme’ setting to the ‘YES’ position.

After activating your theme, you’ll see a notice saying that the WordPress Home and Blog page settings need to be changed. Click the ‘OK’ button, and SeedProd will change those settings for you.
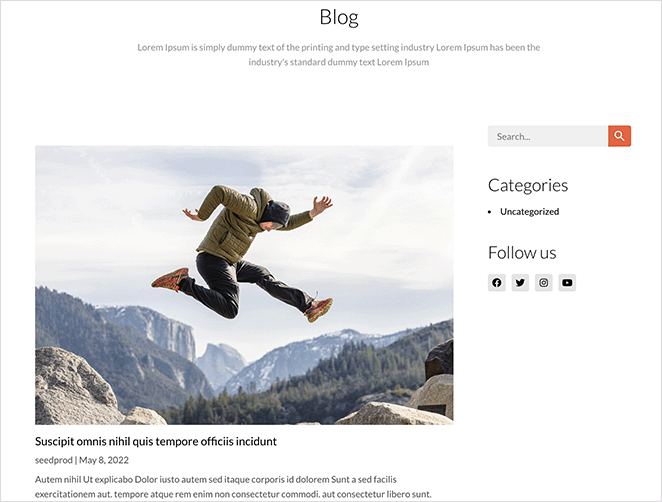
Now you can visit your website to see your new home page and blog page. Here is a preview of our demo blog page:
How to Create a Blog Page on WordPress Without a Plugin
You can also create a separate blog page for your WordPress site without using a WordPress plugin. However, this method involves more work than Method 1 and doesn’t offer as many customization options.
Follow the steps below to create a blog page without a plugin.
Step 1. Create a Separate Home and Blog Page
First, you need to create 2 pages for your homepage and blog page. You can name them anything you like, and you won’t need to add any content.
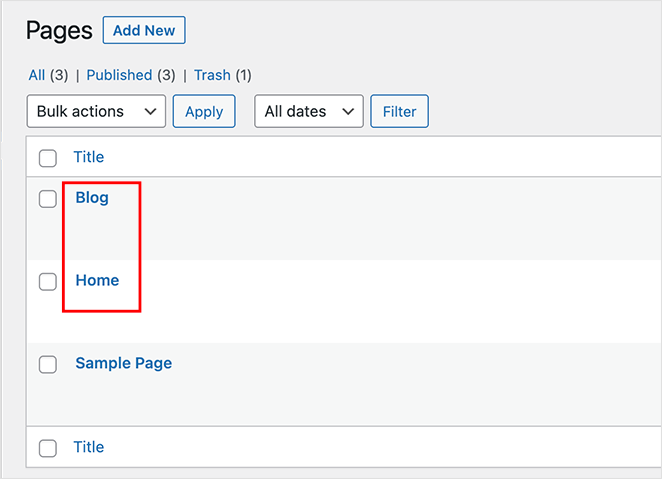
You can name your Homepage something like ‘Home’ or ‘Front page’ and name your blog page ‘News,’ ‘Blog,’ or ‘Posts.’
Step 2. Assign the Home and Blog Page in Reading Settings
After creating both pages, go to Settings » Reading from your WordPress admin area and find the heading ‘Your homepage displays.’ You’ll need to select the pages you made earlier from the drop-down menus.
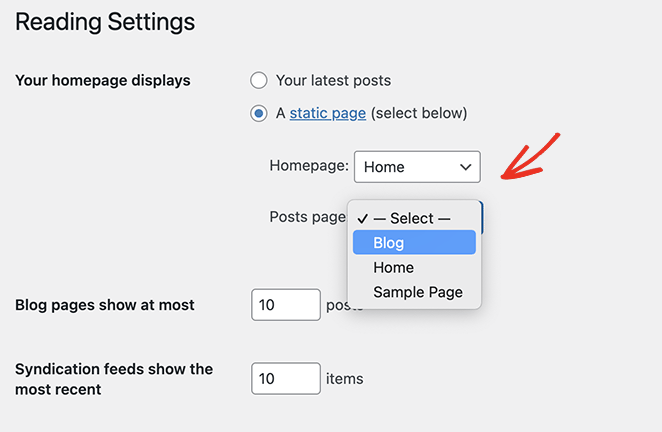
Under the ‘Homepage’ drop-down, choose your newly created home page, and under the ‘Posts page’ dropdown, choose your new blog page.
Now you can click the Save Changes button.
When you navigate to Pages » All Pages, you can see that the Home page has the ‘Front Page’ label and the Blog page has the ‘Posts Page’ label.
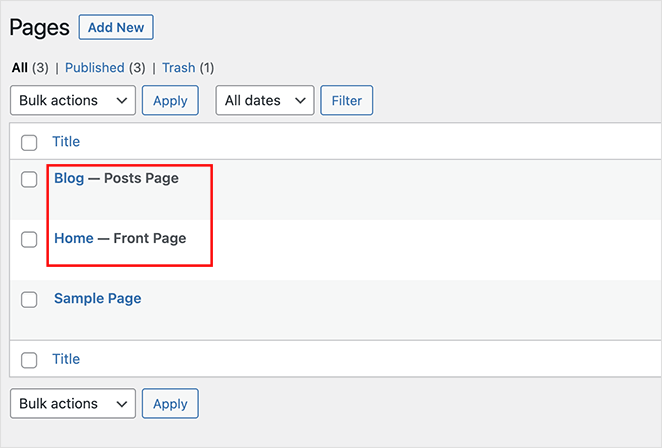
How these pages look will depend on your current WordPress theme, so you may need to adjust your theme settings to change the appearance.
Step 3. Customize Your WordPress Homepage
Your new WordPress homepage will currently have no content. Your next step is to add your information, email address, products, and services so visitors can learn more about your business.
You can learn how to customize your homepage in Method 4 of our guide. This method will show you how to customize your page with the built-in WordPress block editor, including:
- Galleries
- Cover images
- Text
- Tables
You’ll also find many creative customization ideas and tips.
Step 4. Customize Your WordPress Blog Page
If you’re happy with your new blog page, you don’t need to do anything else. Your blog index is ready for visitors to read your content.
However, if you want to customize the appearance of your blog, we suggest using Method 1. That’s because you can’t easily customize your blog page without a WordPress plugin or code.
WordPress Blog Page FAQs
Yes, you can use any name you want for your blog page. The name doesn’t have to be “Blog” specifically. You can choose a name that aligns with the theme or purpose of your blog, such as news, updates, or something fun like field notes.
To display your blog posts on the blog page you created, go to Settings » Reading in the WordPress dashboard. Under the “Your homepage displays” section, select the “A static page” option and choose the page you created as the “Posts page.” Save your changes, and your blog posts will now appear on that page.
Promoting your blog involves various strategies. You can start by sharing your blog posts on social media platforms, engaging with your audience through comments and discussions, optimizing your blog posts for search engines (SEO), guest posting on other relevant blogs, and networking with other bloggers or influencers in your niche.
WordPress provides several plugins and integrations that allow you to track and analyze the performance of your blog. One popular option is Google Analytics, which can provide valuable insights into your website traffic, user behavior, and more. Install the Google Analytics plugin or add the tracking code manually to your WordPress theme to start tracking your blog’s performance.
Next Steps
That’s it for now. We hope this article helped you learn how to create a blog page on WordPress.
Your next step is to dive in and customize your blog page without code. So click the button below to get started.
You might also like the following guides:
- Blog Layout Examples to Revamp Your Site
- How to import and export a WordPress theme
- Best WordPress blog plugins
- How to start a mom blog in WordPress
Thanks for reading! We’d love to hear your thoughts, so please feel free to leave a comment with any questions and feedback.
You can also follow us on YouTube, X (formerly Twitter), and Facebook for more helpful content to grow your business.

