Are you looking for an easy way to change fonts in WordPress?
Typography plays a crucial role in your WordPress site’s design and branding. It can make your content easier to read and improve your site’s aesthetics with a more professional and modern look.
In this article, we’ll show you how to change fonts in WordPress using a theme builder, Customizer, and other tools.
Why Change Fonts in WordPress?
Fonts are an essential part of your site’s design, impacting how it looks and feels.
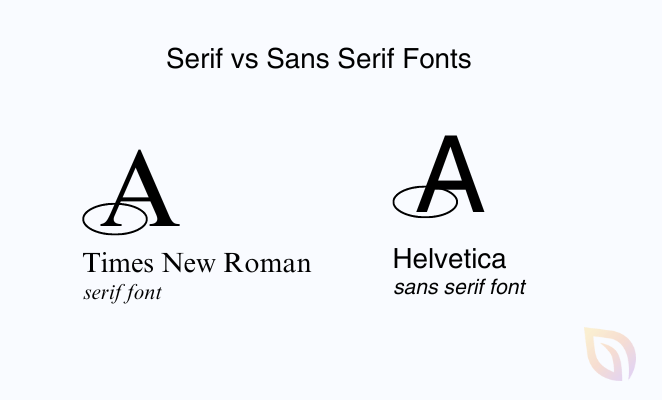
If your website uses hard-to-read font styles, visitors may find it challenging to engage with your content and eventually abandon your site. However, if you select font options based on readability, you can improve the user experience. For example, using a serif font with sans serif typically looks good on any site.
Plus, using legible fonts can improve your page load time and SEO. Simpler font-face options take less time to load, which is a search engine ranking factor.
Similarly, fonts can represent your brand identity. A unique and well-chosen font can help set your WordPress site apart from others and create a consistent, recognizable image for your company.
Many WordPress themes come with default font files that may not suit your branding. Customizing them can add a personal touch to your site that better reflects your business personality.
Then there’s accessibility, which is important for visitors with reading or visual impairments. Choosing a clear and legible font can make your website more accessible to a wider audience.
As mentioned earlier, there are several ways to change fonts in WordPress. Below, we’ll show you the easiest methods, so click any of the links to jump to the one you need:
1. Change WordPress Fonts with a Theme Builder
Many powerful WordPress theme builders let you create custom themes without writing or editing code. You can use these tools to change the font of different site design elements easily.
For this method, we’ll use SeedProd, the best page builder and theme builder plugin for WordPress. It has a drag-and-drop builder allowing you to create custom WordPress themes visually without touching a single line of code.

To begin, you’ll need the SeedProd Pro version because it includes the theme builder feature. After choosing your plan and downloading the plugin, you need to install and activate it on your WordPress website.
If you need help with this, you can follow our step-by-step documentation on installing SeedProd Pro. The guide will also show you where to enter your plugin license key to unlock your premium features.
With the plugin active on your site, head over to SeedProd » Theme Builder from your WordPress dashboard and click the Theme Template Kits button.
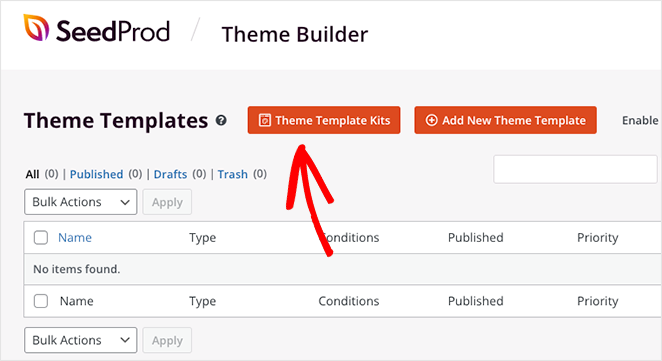
From there, the plugin will show a library of website templates to use as a starting point for your theme.
To choose a theme, hover over one and click the checkmark icon. We’ll use the Nutrition Consultant theme for this guide.

Once you’ve picked one, SeedProd will automatically generate the templates that make up your theme.
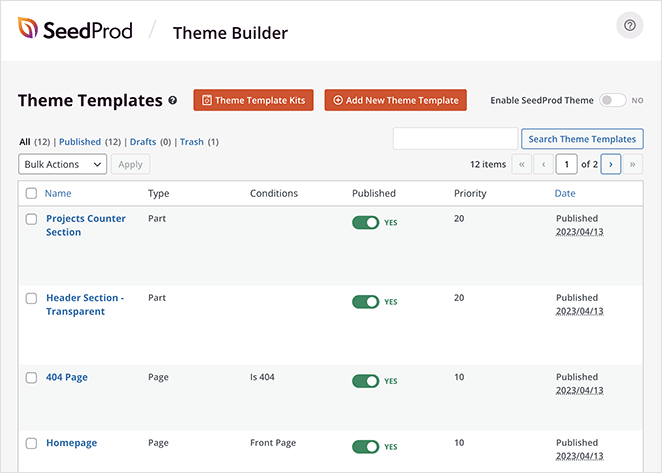
You can edit each template to customize the look of your WordPress theme. There’s also the option to create additional template parts manually.
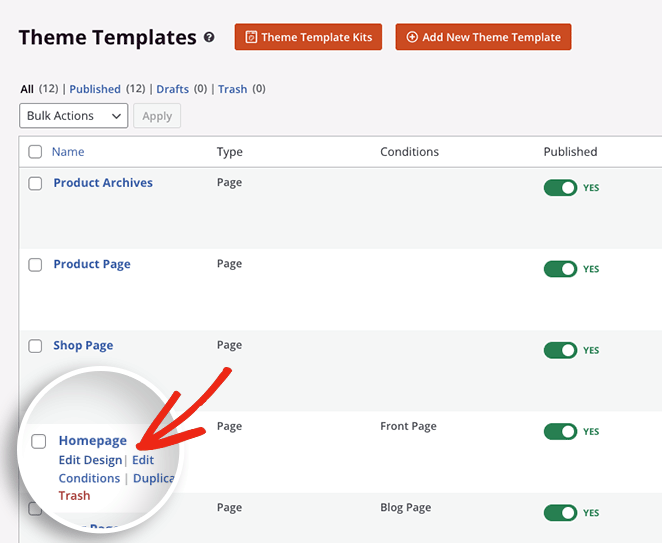
For this guide, we’ll edit the Homepage template and change the fonts for different homepage elements. To do this, click the Edit Design link under the Homepage heading.
Your homepage template will now launch in SeedProd’s drag-and-drop builder. Here you can add new design elements from the left-hand panel and place them anywhere you like on the design preview.

To change the font of any element, all you need to do is click it. For example, we’ll click the text box under the heading, which opens the block settings.
From there, click the Advanced tab and click Edit next to the Typography heading.
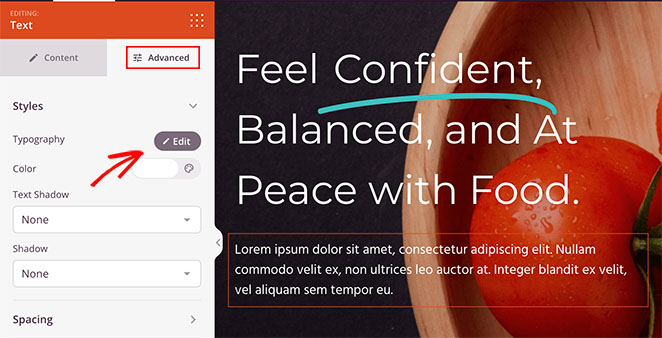
This opens a dropdown panel with multiple options to edit the typography of that specific design element.
For example, clicking the Font Family dropdown menu lets you choose from various Google fonts. There’s also the option to select different font weights and adjust the font size, line height, letter spacing, letter case, alignment, and more.
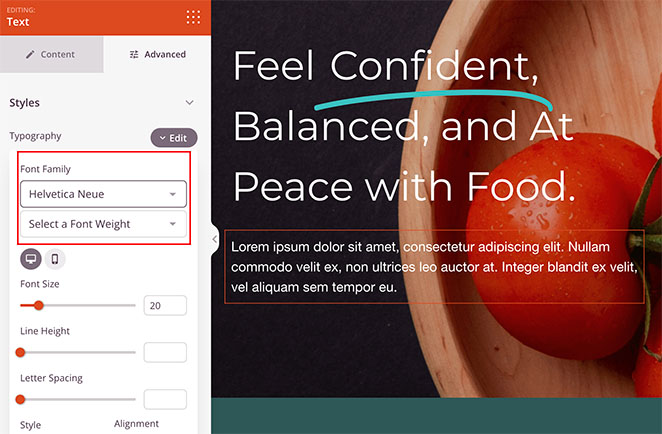
To customize any other element of your WordPress theme with SeedProd, repeat these steps.
When you’re happy with how it looks, click the Save button at the top of the page.
After editing and customizing your WordPress theme fonts, return to SeedProd » Theme Builder and click the toggle switch next to Enable SeedProd Theme to the Yes position.

SeedProd will now make your changes live, and you can see your site’s fonts by visiting your homepage.

2. Changing Fonts Using WordPress Theme Customizer
Another way to change fonts in WordPress is with the WordPress customizer. This method lets you customize your existing WordPress theme depending on your theme settings and shows a live preview.
In this example, we’re using the Astra WordPress theme. However, the settings you see in the Customizer will vary depending on your theme. The options you’ll need to look for should have ‘font’ or ‘typography’ in the heading.
To open the WordPress customizer, go to Appearance » Customize from your WordPress admin.
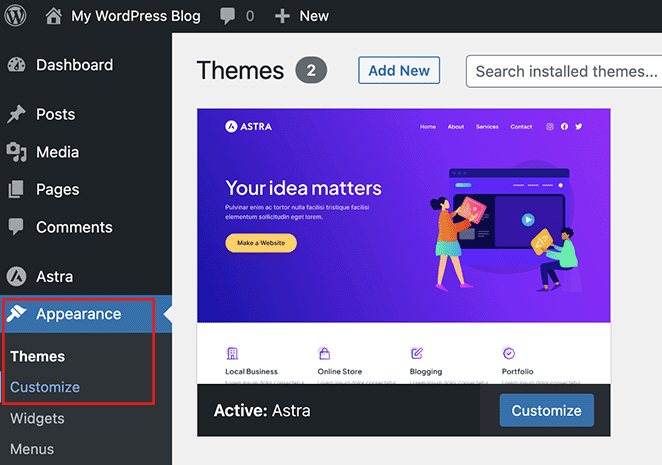
In the Astra theme, a Global settings option lets you make site-wide changes. We’ll click this option to change the fonts on the entire website.
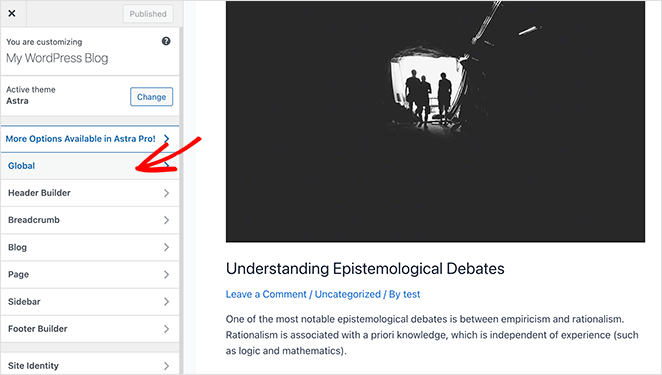
On the following screen, you’ll see several customization options, including Typography, Font Colors, Containers, and more. Click the Typography option to choose from different font presets, which will change fonts on your whole site.
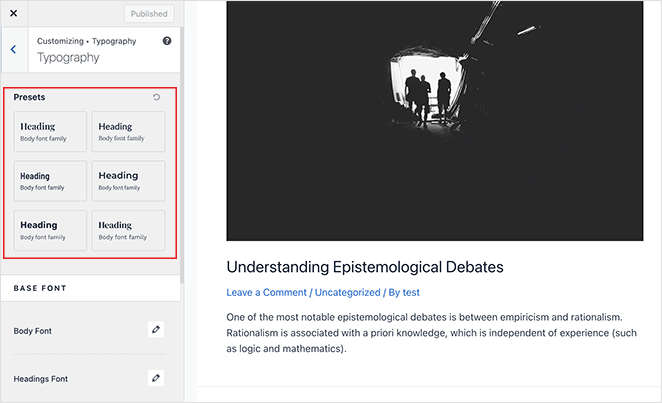
Alternatively, you can change fonts for individual text elements, such as your body and heading fonts. To do this, click the edit icon and select a font from the Font Family dropdown menu.
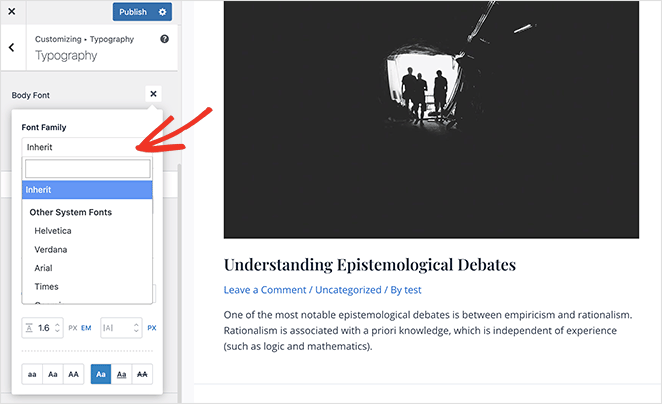
In the same panel, you can adjust the font weights, size, style, and more.
When you’re happy with your font changes, click the Publish button. From there, you can visit your website to see your new font, which in this case, is the Rubik heading font and Karla body font.

Note: Not all themes offer the same features and customization options. If your theme doesn’t offer this, keep reading to the next step.
3. Change Fonts in WordPress Full Site Editor
For block-based WordPress themes like Twenty Twenty-Three, you can use WordPress’s full site editor (FSE) to change fonts. It lets you customize your theme with blocks, similar to editing posts and pages with the block editor.
To get started with this method, navigate to Appearance » Editor from your WordPress admin panel, which will open the FSE for your theme. In this case, we’re using the Twenty Twenty-Three theme.
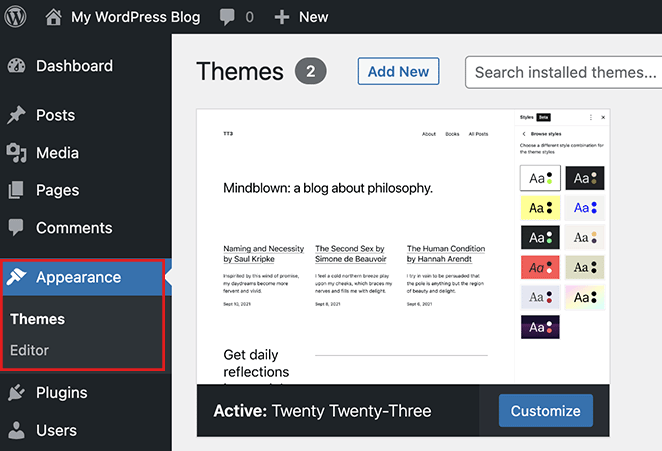
In the site editor, click anywhere on the theme preview to make it full-screen and reveal an additional menu bar.
From there, click the Styles icon in the top-right corner and select the Typography option.
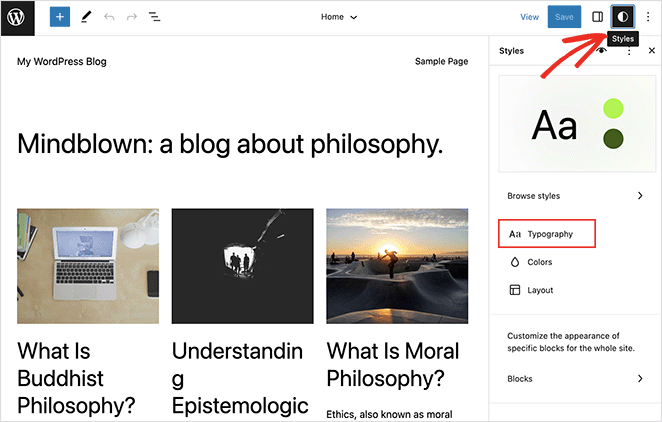
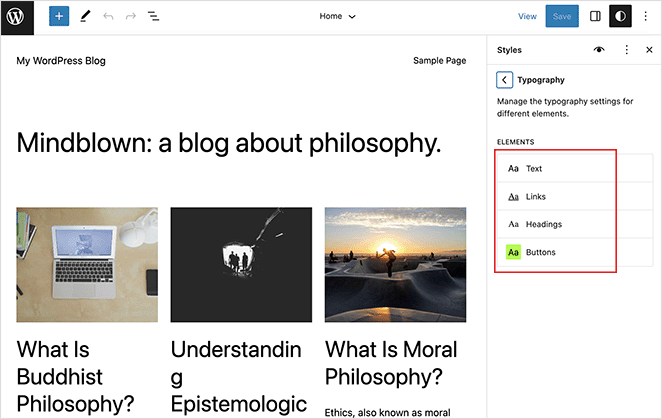
Here you can change fonts in WordPress headings, text, links, buttons, and more.
For this example, we’ll choose the Heading option and select a new font from the Font dropdown menu.
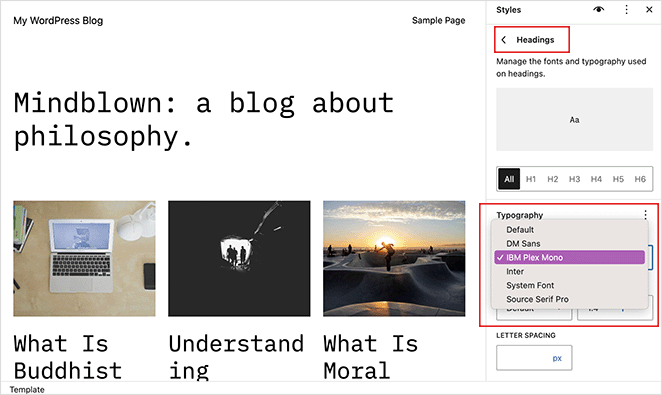
After making your changes, click the Save button. You can see your new font changes by exiting the site editor and visiting your live website.

4. Changing Fonts Using a WordPress Plugin
Besides the methods above, you can use a WordPress Google fonts plugin to change and customize your fonts. Some popular solutions are the Easy Google Fonts and Fonts WordPress plugin.
The Fonts Plugin, for example, lets you choose from 1455 free fonts and use them on your website. It also includes Adobe Fonts (Typekit) integration and has a live customizer preview.
To get started, download the Fonts Plugin and install and activate it on your WordPress site. If you need help, you can follow this guide on how to install a WordPress plugin.
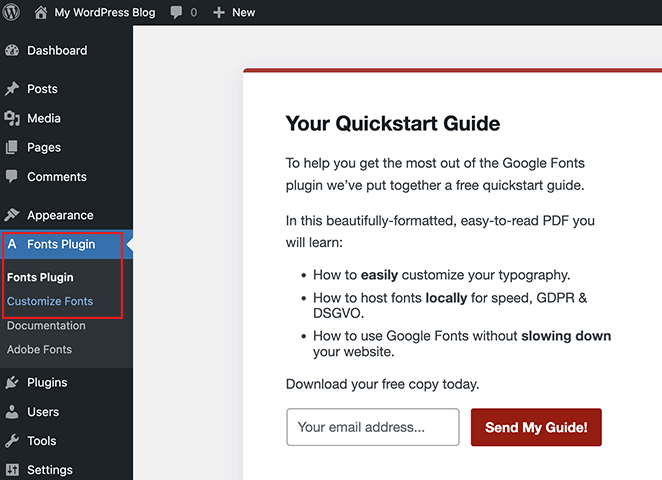
Next, go to Fonts Plugin » Customize Fonts from your dashboard, which will open the live WordPress customizer.
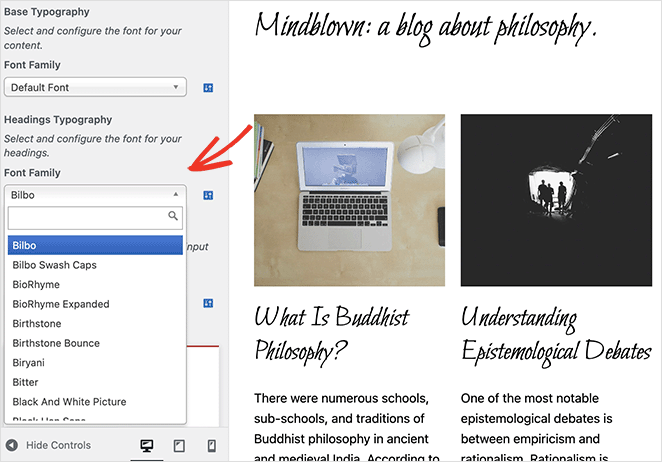
Here you can click the Basic Settings and change web fonts for your base typography, heading, buttons, and inputs.
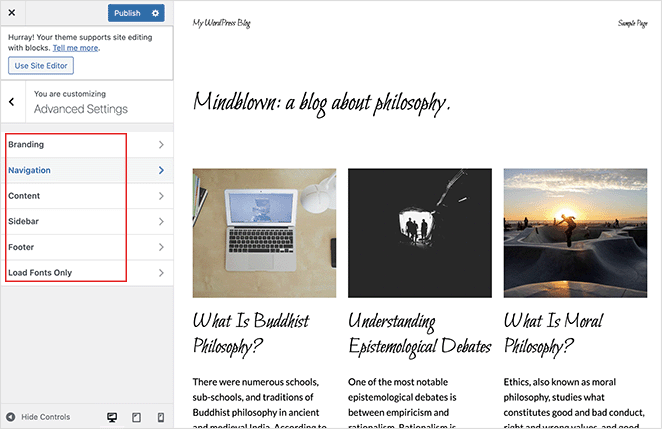
You can also click the Advanced Settings option to change your branding fonts and typography for your navigation links and sidebar.
When you’re happy with those changes, click the Publish button. From there, you can visit your site to see your new fonts in action.

5. Change Font Appearance in WordPress Content Editor
The final method we’ll cover in this guide is using the WordPress content editor to change how fonts look in specific blog posts and pages. While this is a good way to control font appearance post-by-post, you’ll need to repeat this step manually to add similar changes to other posts.
This solution is excellent for customizing individual posts, but if you want site-wide font changes, it’s best to use one of the other methods in this guide.
With that said, here’s how to change fonts for specific WordPress posts.
First, edit any post to see the WordPress content editor, then click the text block or body text you want to change. In the left-hand sidebar, click the three dots next to the Typography heading.
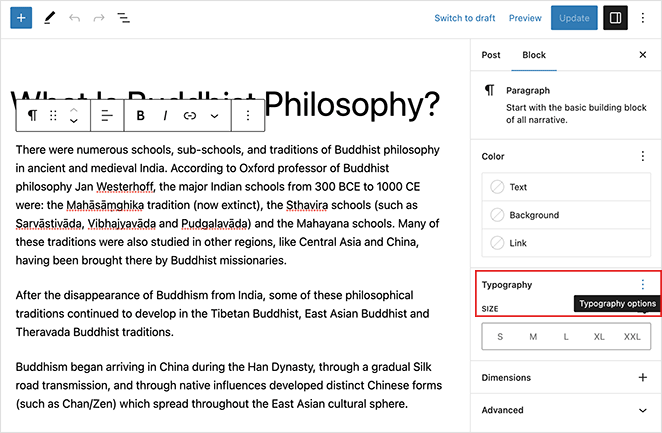
This will open a panel where you can choose various settings such as font family, appearance, line height, letter spacing, and more. Clicking any of these options will add them to your sidebar.
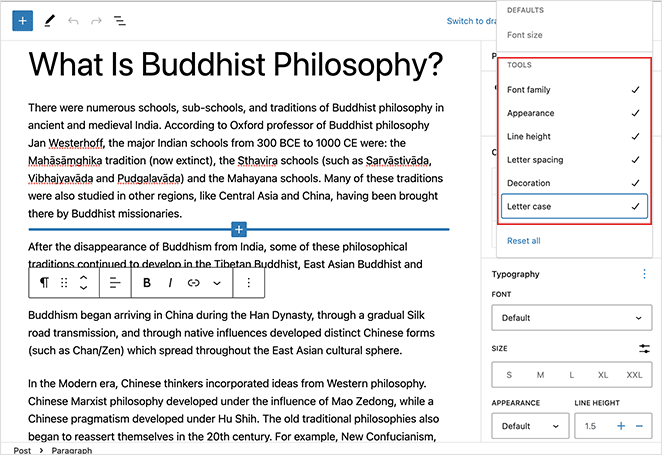
From there, you can edit the settings to make that specific text block look different from the rest of your content.
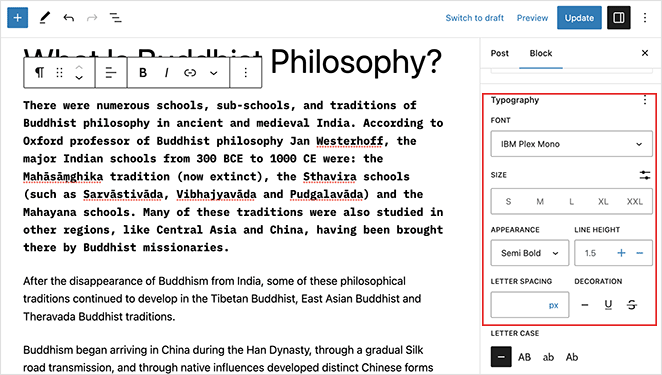
Remember to save your changes, then you can preview the post to see how your new post fonts look.

WordPress Font Frequently Asked Questions
Yes, you can use any font in WordPress by uploading the TTF font files to your website and adding custom CSS code to your stylesheet (style.css). To add custom CSS, navigate to the Customizer’s Additional CSS section and paste the code there.
Be sure to have the proper licensing before using it on your website.
To add font icons to your WordPress site, you can use a plugin like Font Awesome or the built-in icon library in SeedProd. Here’s a step-by-step tutorial on how to add Font Awesome to your WordPress theme.
Yes, you can use multiple fonts on your WordPress site by applying different fonts to different elements, such as headings, paragraphs, and links. Be cautious not to use too many fonts, as it can affect your site’s readability and overall design.
You can use different fonts for different languages on your WordPress site by using a WordPress multilingual plugin. These plugins allow you to customize the font settings for each language separately.
To optimize font performance on your WordPress site, consider using web-safe fonts, serving fonts from your server or a content delivery network (CDN), and using tools like Font-display or Font-loading API to optimize loading times.
Additionally, minimize the number of font variants you use to reduce the overall font file size.
That’s it!
We hope this guide has helped you learn how to change fonts in WordPress without writing HTML, PHP, or CSS code. You may also like this guide on how to add text on an image in WordPress.
Thanks for reading! We’d love to hear your thoughts, so please feel free to leave a comment with any questions and feedback.
You can also follow us on YouTube, X (formerly Twitter), and Facebook for more helpful content to grow your business.

