Some of our readers have asked us how to backup a WordPress site.
Regular WordPress backups offer a safety net for your site. If your site gets hacked or an update goes wrong, you can restore everything quickly.
We’ve made backups of many WordPress and WooCommerce sites over the years, and we’d like to share our process with you. In this guide, you’ll learn how to backup a WordPress website step-by-step.
Table of Contents
What Is a WordPress Backup?
A WordPress backup is a duplicate copy of your website data that you save in a secure location. With a backup, you create an on-demand restore point you can revert to if anything goes wrong.
A comprehensive WordPress backup includes two crucial components:
- The database, which contains your posts, comments, and user information
- The site files, like your themes, plugins, and media
Together, they’re the blueprint of your site, so it’s crucial to keep them protected.
Why Backup WordPress?
Backing up your WordPress site can save you from data loss. If you accidentally delete something through human error, your site crashes, or an update doesn’t go as planned, a backup can restore your site to how it was.
It’s also helpful if your site gets hacked or has issues with malware. A recent backup can help you recover quickly and avoid long-lasting damage and downtime.
According to Astra Security, 30,000 websites are hacked every day. This emphasizes the need for backups to recover from potential security breaches.
So, regular backups help to keep your site running smoothly and safely.
Preparing for Your First Backup
Before making your first WordPress backup, it’s important to have a plan.
First, consider when to perform the backup. Doing it during quieter hours can reduce disruptions, as your site might slow down. Some backup tools have a ‘low resource’ mode, which lets your site function normally while backing up.
Next, think about the size of your website. If you have lots of data, images, or videos, complete backups could take longer.
If this is the case, you may need to set aside extra time or use a backup plugin that does incremental backups. This type of backup only saves new or recently changed information to save time.
Also, keep your WordPress hosting environment in mind. Shared hosting might limit server resources, which could affect your backup process.
Check with your hosting provider for any restrictions before choosing a backup method.
How to Backup a WordPress Site with a Plugin
WordPress backup plugins are a real help for protecting your website’s data. Many offer automatic and real-time backup features to make the process easier and give you peace of mind.
Once you’ve set up the plugin, it’ll backup your site at set times. That means you don’t need to remember to do it yourself. Your site’s data is saved regularly without you thinking about it.
If you’re new to this, it’s important to choose easy-to-use plugins to create backups. Some popular options are UpdraftPlus, BackupBuddy, and Jetpack Backups.
However, for this guide, we’re using Duplicator Pro, one of the best WordPress backup plugins.
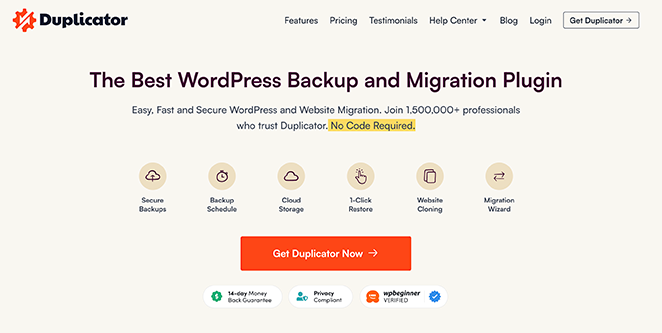
With over 1,500,000 users, it makes backing up, cloning, and duplicating your entire site easy.
Plus, the Pro version we’re using includes these advanced features:
- Scheduled and daily backups
- One-click recovery points
- Migration tool
- Offsite cloud storage integration
- And more.
Set Up Duplicator Pro
The first thing you need to do is install and activate Duplicator Pro. If you need help with this, please see this tutorial on how to install a WordPress plugin.
After activating the plugin, navigate to Duplicator Pro » Settings from your WordPress dashboard and select the ‘Licensing’ tab.
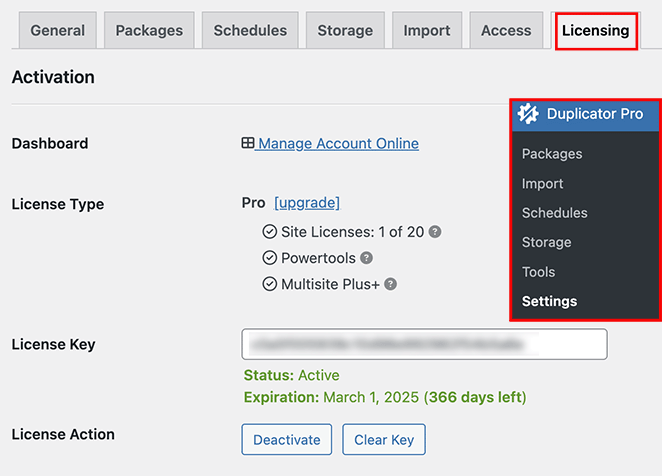
Here, enter your Duplicator Pro license key and click ‘Activate.’
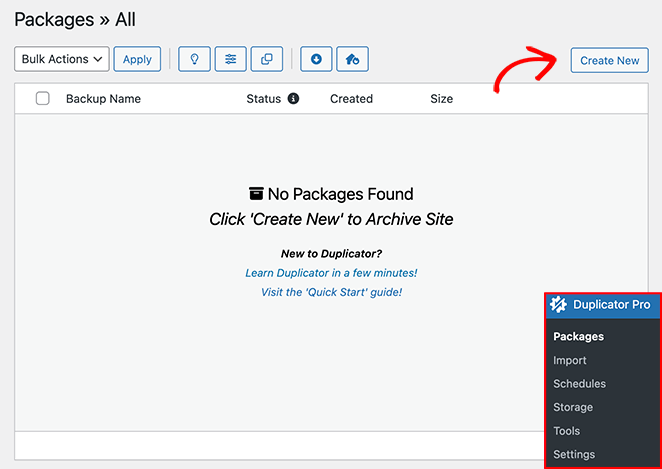
Now, go to Duplicator Pro » Packages. Within this section, you can backup your WordPress website.
Backup Your WordPress Website
Getting your first backup is as easy as clicking ‘Create New’ and following the instructions.
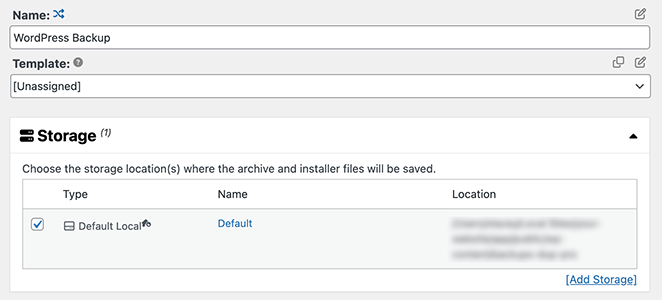
You can name your backup and decide where to store it.
Duplicator initially selects the default storage location, which is local storage in our example. However, you can also click ‘Add Storage’ to add more locations, such as Google Drive or Dropbox.
Now, let’s scroll down to the archive section. This is where you define what parts of your WordPress site you want to backup.
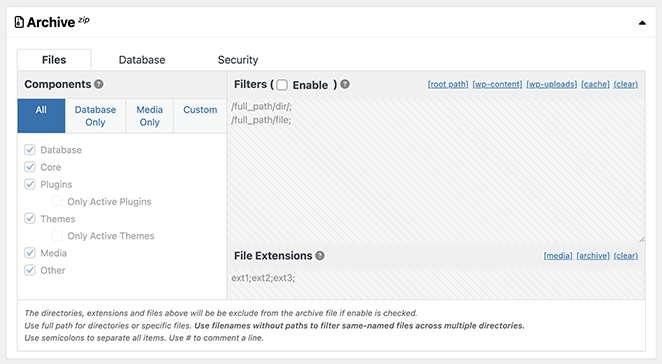
File filters allow you to exclude specific directories from your backup if needed. The database backup section lets you selectively exclude specific tables. This is helpful if you’d like to streamline your backups or exclude irrelevant, bloated segments.
We recommend keeping the default settings if you want to backup your whole WordPress site.
Now, let’s talk about the installer section.
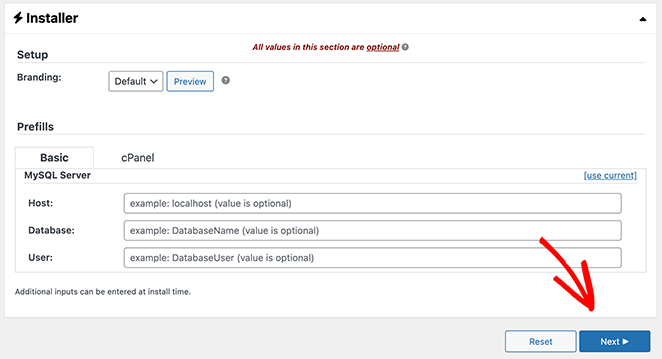
The installer is a script that Duplicator creates along with the backup of your site. When it’s time to restore or migrate your site, you’ll run this installer script, and it will unpack the backup and set everything up for you.
You don’t need to do anything to this section during the setup process. Just click the ‘Next’ button and leave it as it is.
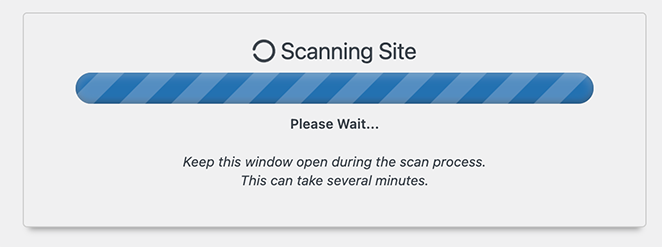
Duplicator will now scan your site. This process takes note of your site’s size and looks for anything that might complicate the backup.
Once this check is completed, you’ll see a status report.
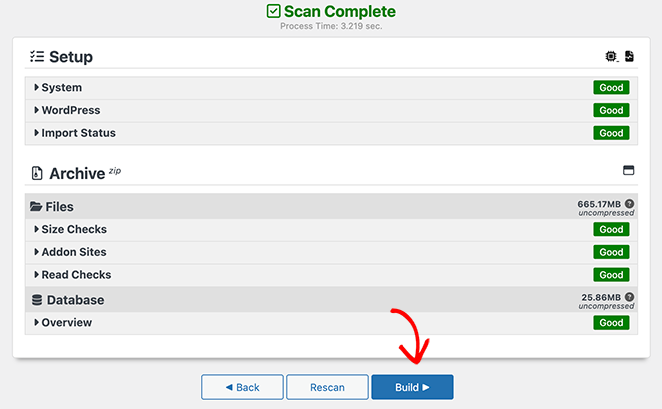
This report has details like the size of your database and files. It also flags potential problems so you can fix them before moving on.
To continue, click the ‘Build’ button.
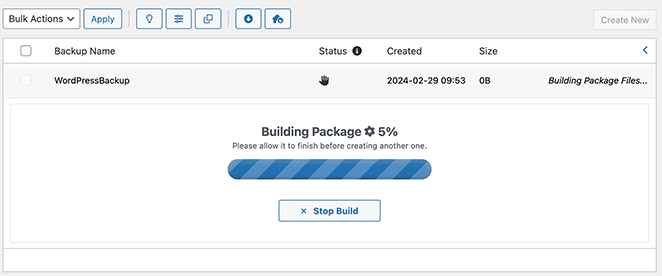
When you click ‘Build,’ Duplicator gets to work backing up your WordPress site. You’ll see a progress bar showing you how it’s getting on. Just remember, the size of your site will affect how long this takes.
Once everything’s wrapped up, go to Duplicator Pro » Packages to see your backup.
Select the Download option, and you’ll see two files.
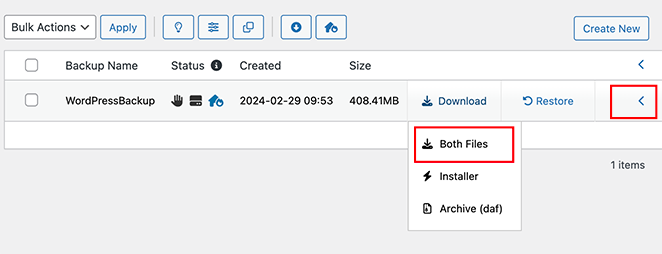
The first is your archive file, which is basically a squashed-down copy of your site. The second is an installer script to help you reinstall your site if needed.
Select the ‘Both Files’ option to save them to your computer. You’ll use this as a backup and to restore your site if you face issues.
Create a Recovery Point to Restore Your Site
Duplicator Pro also lets you create recovery points for your WordPress site. It’s helpful if you face a critical error because you can restore your backup. That way, you can revert your site to the last stable version.
To create one, navigate to Duplicator Pro » Packages and click the Arrow icon on the right-hand side to see the package details.
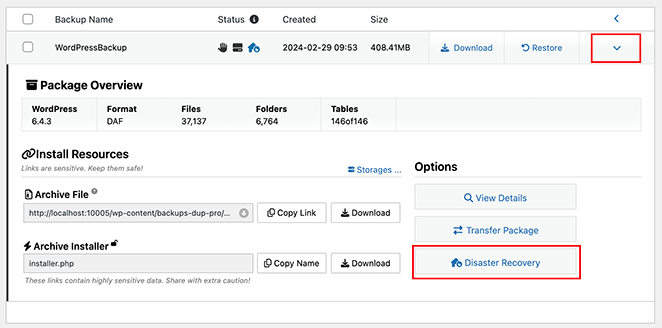
In this panel, click the ‘Disaster Recovery’ button.
This opens a new window showing that Disaster Recovery is available for backup. Go ahead and click the ‘Set Disaster Recovery’ button.
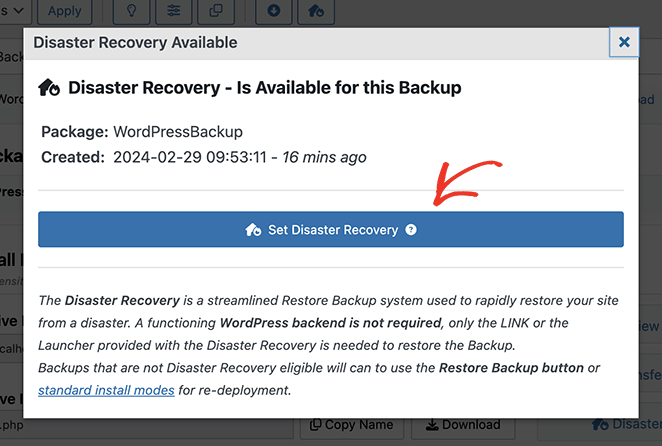
Once the recovery point is set, you’ll see two options.
The first is to download the Recovery Launcher. With this, you can recover your site with a single click of the downloaded file.
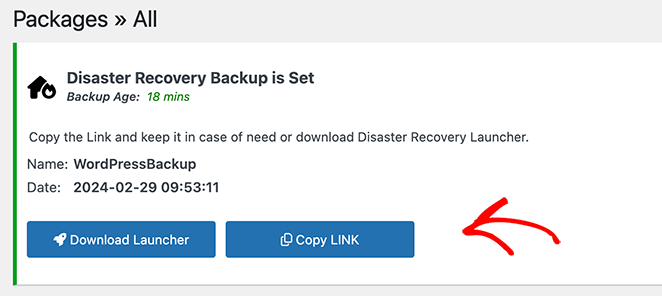
Alternatively, you can copy the recovery URL to your clipboard and save it in a secure location. Then, should you need to recover your site, you just need to click that link.
Schedule Automatic WordPress Backups
Scheduling automatic backups with Duplicator Pro is an easy and smart way to keep your site safe without a lot of work. It also means you’ll always have a recent backup to use, which saves time.
To set this up, click the Duplicator Pro menu and select ‘Schedules.’ From here, click ‘Add New’ to make a new schedule.
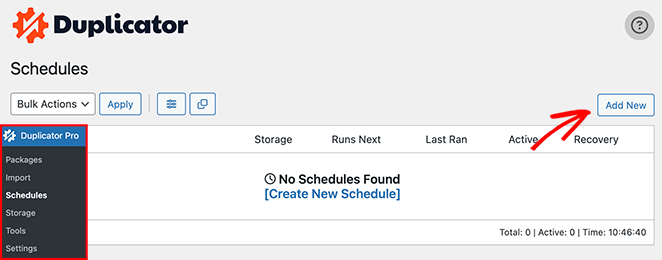
This will take you to a page where you can arrange your automatic backup schedule.
On this page, you can name your schedule, decide if you want a full backup or just the database, and pick how often you want the backups to occur. You can choose daily, weekly, or monthly backups and pick the time of day.
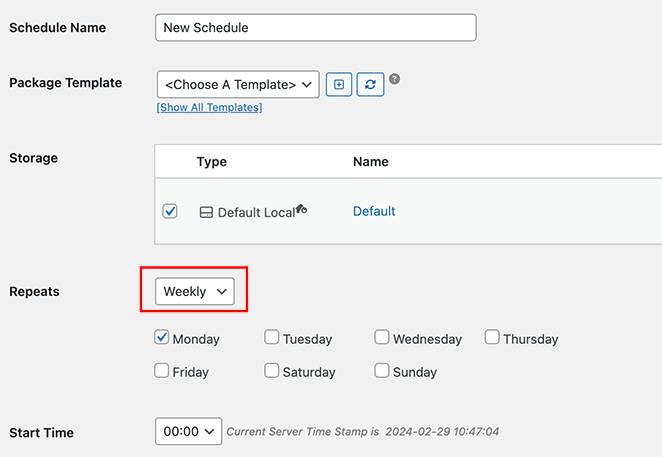
Also, remember to set your storage preferences. This lets you decide where to save your backups.
After you’ve picked your settings, ensure the ‘Enable This Schedule’ option is checked and click ‘Save Schedule.’
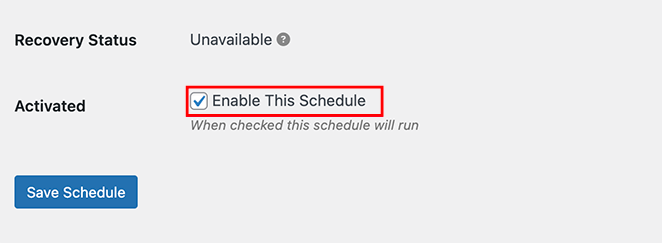
Duplicator Pro is now set to handle your automatic backup schedule. Your site will backup routinely based on your chosen schedule and settings.
How to Backup a WordPress Site Manually
It’s also possible to backup your WordPress site manually. This involves logging into the control panel (cPanel) of your hosting provider.
This method is not as easy as using a WordPress backup plugin. However, it’s a good solution if you’re comfortable working with cPanel.
For this example, we’re using Bluehost. The settings you see may differ depending on your web hosting service. That said, most web hosts offer this option.
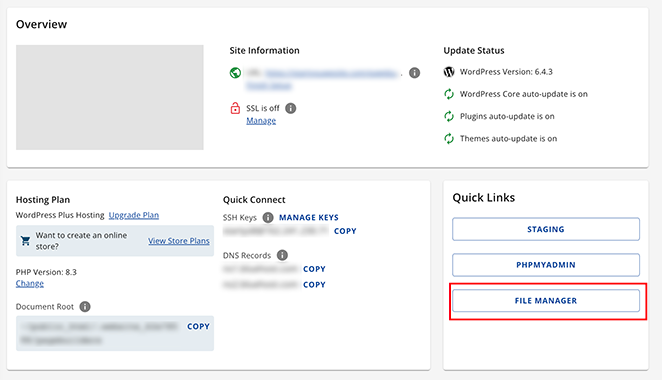
First, log into your cPanel’s hosting account. If you’re using Bluehost, like we are, you can find it by opening your site’s settings and clicking the ‘File Manager’ option.
Inside the File Manager, click the public_html folder in the left-hand menu to open the directory. Then, click the ‘Select All’ checkbox in the right-hand panel.
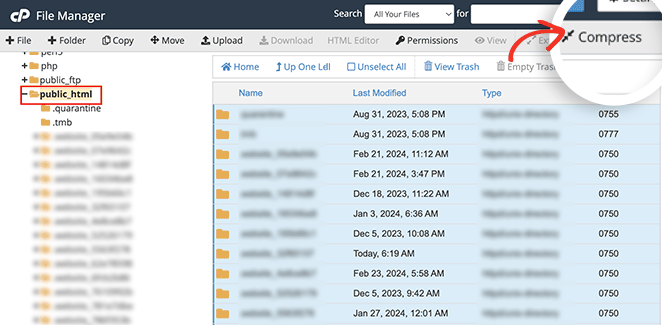
When they’re selected, click the ‘Compress’ option in the top bar.
Click the ‘Zip Archive’ option in the new popup window, then select ‘Compress Files.’
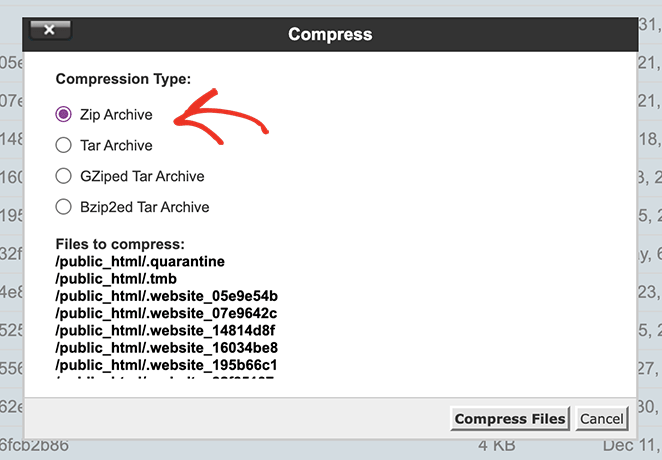
Your host will now compress your website files into a .zip file. It may even display the results when it’s finished. You can safely close this window.
The next step is to select the file you just created, which you’ll find in the public_html folder.
After selecting the file, click the ‘Download’ option at the top.
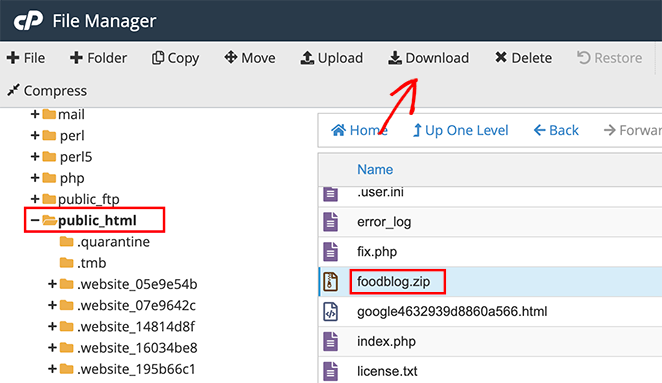
This will download the .zip file to your computer, which you can save in a secure location. Whenever your site goes down, you can use it as a backup to restore your website’s content.
How to Manually Backup a WordPress Database
You can also use your host’s cPanel to backup various WordPress databases. This is often quite time-consuming since you need to import multiple tables manually.
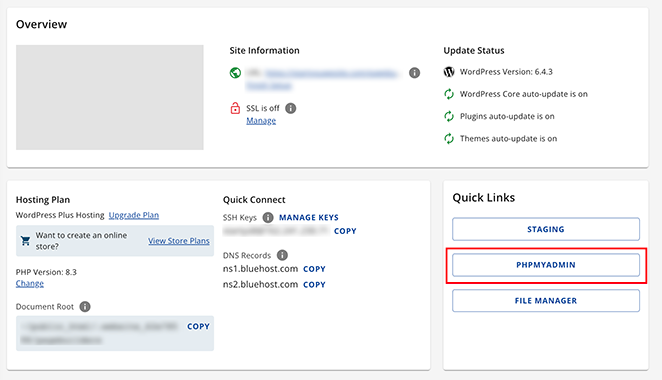
To do this in Bluehost, open your website’s settings and click the ‘phpMyAdmin’ button.
When it opens, choose a database from the left-hand menu, then select all tables in the right-hand panel.
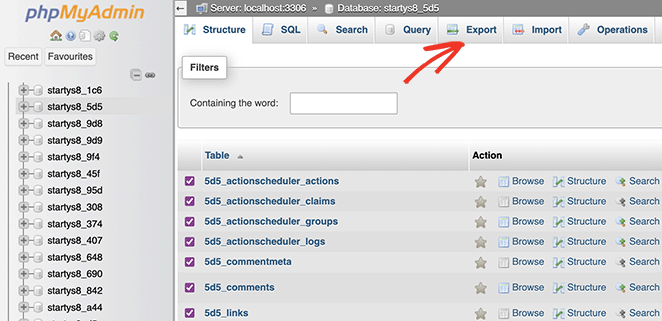
After, click the ‘Export’ tab at the top of the screen.
On the next screen, you’ll see the export method and format. Keep the export method as ‘Quick’ and choose ‘SQL’ as the format.
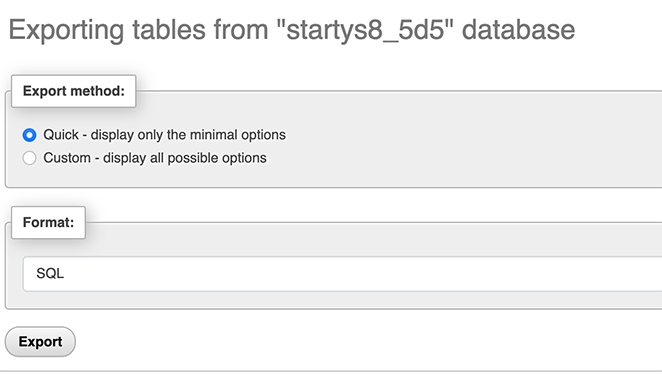
Now, go ahead and click ‘Export.’
The SQL file will now download to your computer as a backup. Simply import the SQL file into the phpMyAdmin area to restore the database.
How to Manually Backup WordPress Using FTP/SFTP
Another way to manually backup your WordPress site is with FTP (File Transfer Protocol). This involves copying essential files from your site’s server and saving them on your computer.
First, you need an FTP client such as FileZilla or Cyberduck. An FTP client is a tool that lets you move files between your computer and the server where your website lives.
After launching your FTP client, type in your FTP login details (these include your username, password, and host). Your web host provides these details.
Next, find the directory where your WordPress site is located. This is often known as the public_html folder. However, its actual name can vary, depending on your web host.
Inside the correct directory, you’ll spot folders like wp-content, wp-includes, wp-config, and wp-admin. There’ll also be some PHP files.
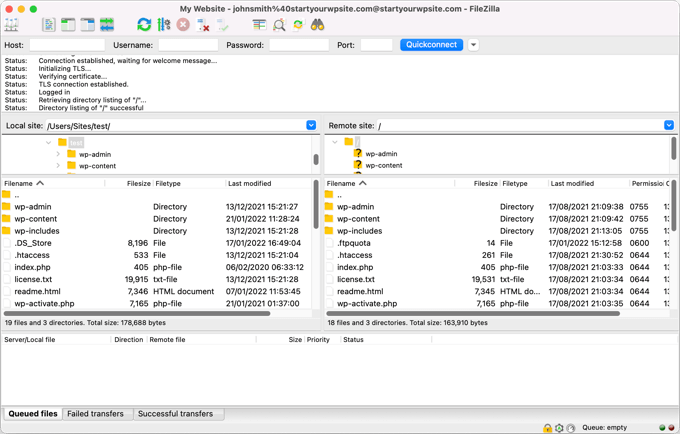
Select all these files and folders (Ctrl+A / Cmd+A). Right-click them and click on ‘Download’. This action will start transferring your site’s data to your computer.
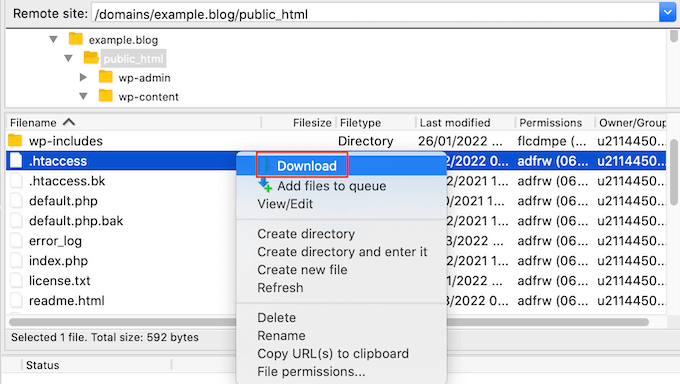
Downloading can take a while, especially if your website is large or your internet connection is slow. Make sure all the files have been downloaded correctly.
Once the download is complete, you’ve successfully backed up your WordPress files using FTP. Keep this data safe on your computer.
We also recommend storing a second backup on an external hard drive or cloud storage.
Remember that the FTP backup method protects the files of your WordPress site. You’ll also need to manually backup your WordPress database (MySQL) for a full backup, as we previously discussed.
How to Restore a WordPress Site from a Backup
If you have an issue with your WordPress site or need to move it to a different server or domain name, you’ll want to restore it from a backup. If you’ve used the Duplicator Pro plugin to backup your site, restoring it is easy.
To start, go to your WordPress dashboard and select Duplicator Pro » Import. Here, upload your backup file to import it.
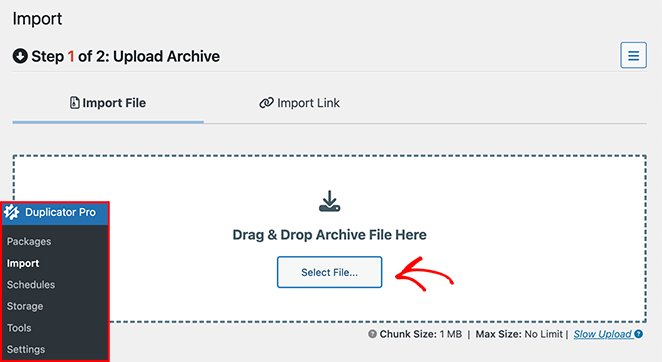
Once the import is complete, you’ll see a success message. You can then follow the instructions in the import wizard to restore your website.
That’s it!
Next, Make Your Website Secure
We hope this guide helped you learn how to backup a WordPress site successfully.
Regular backups are only one way to keep your site and hard work secure. For more suggestions, please see our other WordPress security guides:
- Best WordPress Security Plugins: Top Picks for Site Safety
- How to Password Protect a WordPress Site: The Ultimate Guide
- Best Content Locker WordPress Plugins
Thanks for reading! We’d love to hear your thoughts, so please feel free to leave a comment with any questions and feedback.
You can also follow us on YouTube, X (formerly Twitter), and Facebook for more helpful content to grow your business.


