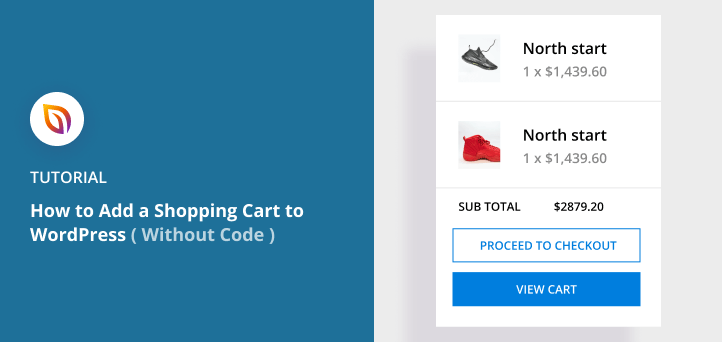
Do you want to add a shopping cart to WordPress?
Creating a shopping cart makes it easier to sell your products or services and accept payments from your WordPress website. But WordPress doesn’t offer this feature by default, which is challenging if you’re setting up an online store.
That’s why in this article, we’ll show you how to add a shopping cart to WordPress without writing a single line of code.
Choosing the Best eCommerce Plugin for WordPress
There are several WordPress shopping cart plugins that can help you add a shopping cart to WordPress. For example, BigCommerce is an excellent platform for large eCommerce stores because of its speed and security.
But in this article, we’ll show you how to create a shopping cart with WooCommerce, the most popular eCommerce plugin for WordPress.

WooCommerce is a free, open-source plugin that allows you to sell physical and digital products on your WordPress site.
You can accept credit card payments with payment gateways, such as Stripe, PayPal, Amazon Pay, Authorize.net, and many other options. In addition, you can offer offline payment options like cash on delivery and check.
When you start receiving orders, you can manage their status in the dashboard area. Plus, you can connect to several shipping options, such as USPS and FedEx.
WooCommerce works with any WordPress theme and offers extensive customization options. And since it’s so popular, there are thousands of add-ons to add more features to your WooCommerce shopping cart.
With that in mind, let’s jump in and learn how to add a shopping cart to WordPress with WooCommerce.
Add Shopping Cart to WordPress Using WooCommerce
To get started, log in to your WordPress dashboard and navigate to Plugins ≫ Add New. Then enter “WooCommerce” in the search field text box.
The WooCommerce plugin should appear as the first result. Click on Install Now and when the installation is complete, click Activate.
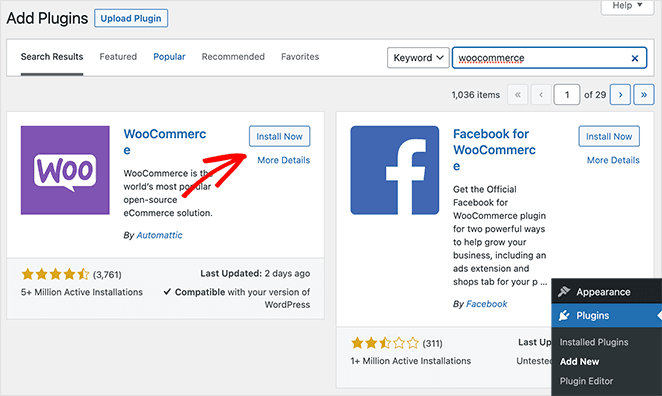
After activating WooCommerce, it takes you to the setup wizard.
Add Your Store Details
On the first page, you can enter your store’s details.
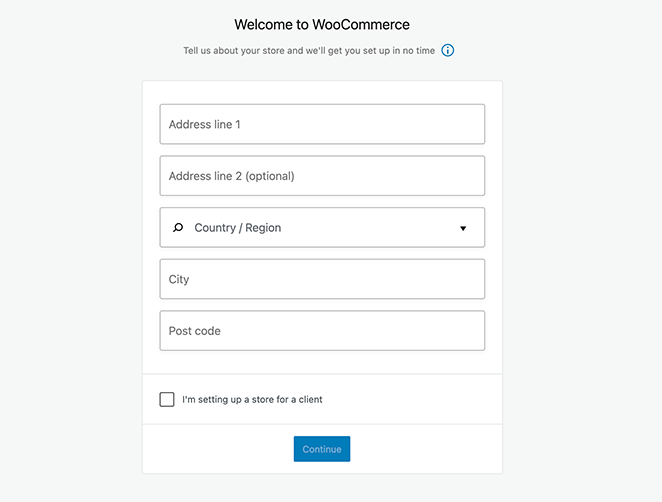
Fill in your address, then check the checkbox if you’re setting the store up for a client. If you’re not, uncheck it and click Continue.
Select Your Industry
On the following screen, you can choose an industry for your online store, such as:
- Fashion, apparel, accessories
- Health and beauty
- Electronics and computers
- Food and drink
- Home, furniture, garden
- Education and learning
- Other
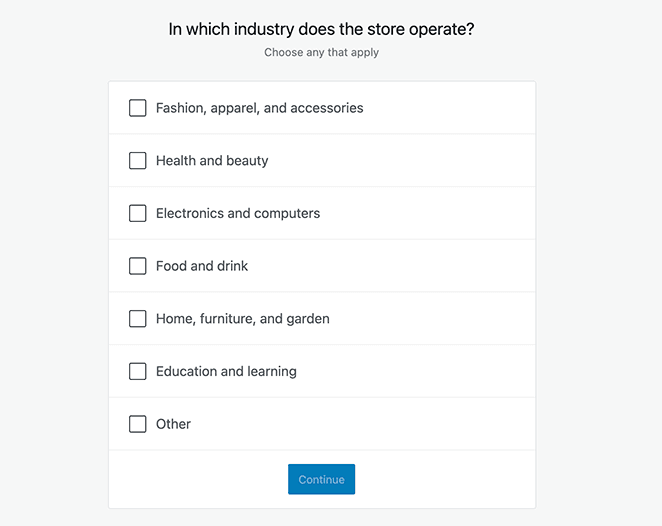
After selecting your industry, click the Continue button.
Choose Your Product Types
The next step is to choose the type of products you’ll sell. With WooCommerce, you can sell both physical products and digital downloads. You can also sell memberships, subscriptions and take bookings for events.
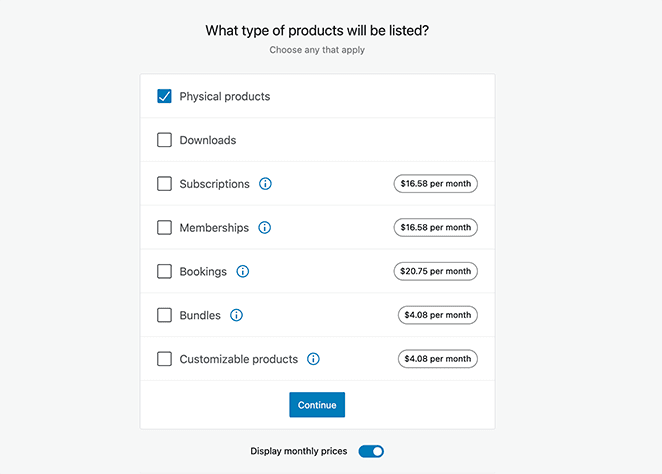
From there, click Continue to move on to the Business Details page.
Related: How to Embed Facebook Events on WordPress
Enter Your Business Details
On this screen, you can select how many products you plan to display on your product pages. You can choose from “I don’t have any products yet” to over 1,000+.
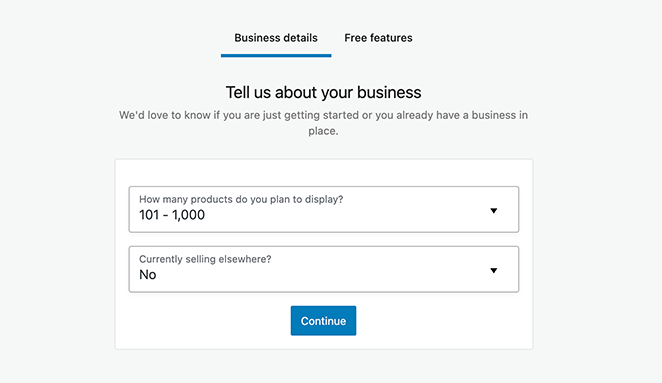
In addition, the dropdown box below lets you tell WooCommerce if you sell your products elsewhere, such as in physical stores. So choose your preferred option, then click Continue.
Next, you can choose to install optional free extras from WooCommerce to enhance your online store. For instance, you can accept credit cards with WooCommerce Payments and use WooCommerce Tax to get automated sales tax and more.
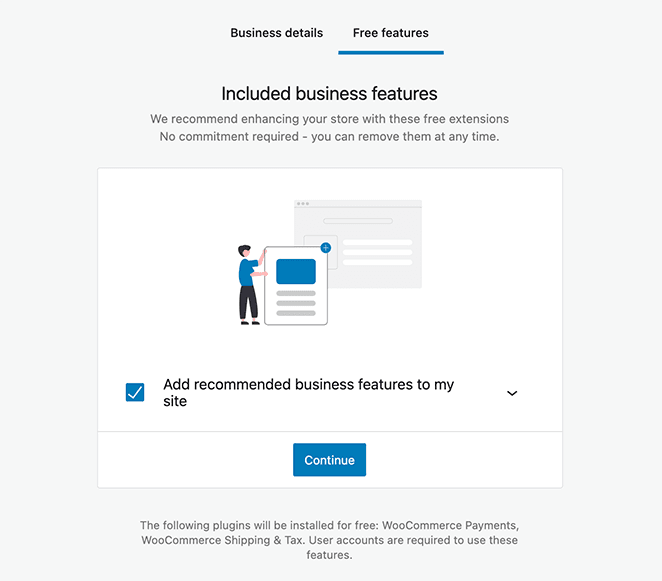
We suggest installing all of these recommended extras. You can easily remove anything you don’t need later.
Select a WordPress Theme
The final step in the setup wizard is to choose a WordPress theme for your online store. You can continue with your existing WordPress theme or choose from several other free and premium themes.
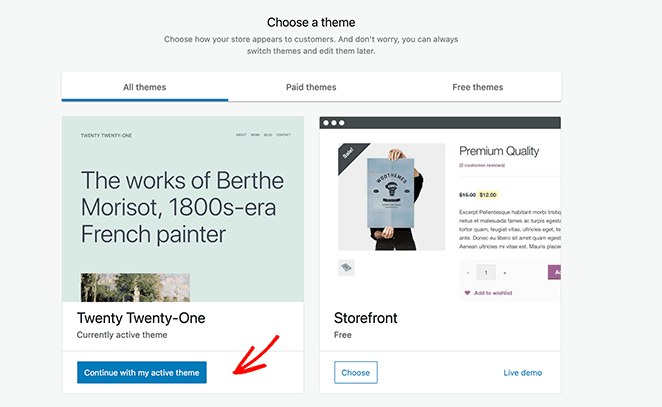
One choice on offer is WooCommerce’s Storefront theme. This free theme is made specifically for WooCommerce, making it easy to get your store up and running quickly.
We’ll choose to continue with our existing theme for this guide, which will finish the store details setup.
Add New Products to Your WooCommerce Store
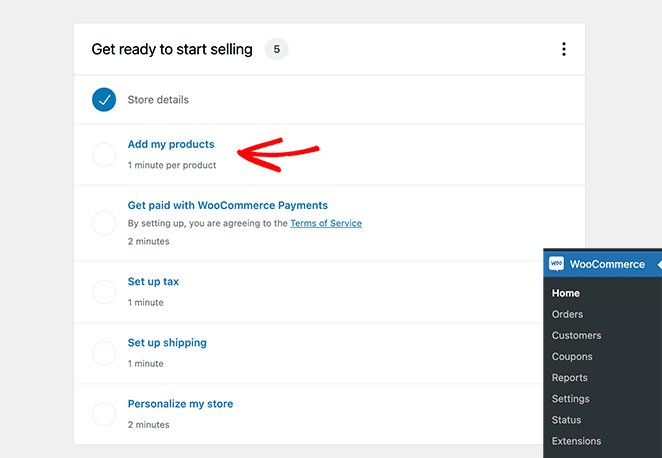
With the basics of your WooCommerce store in place, you can now start adding products to your site. To do this, go to WooCommerce ≫ Home and click the “Add my products” option.
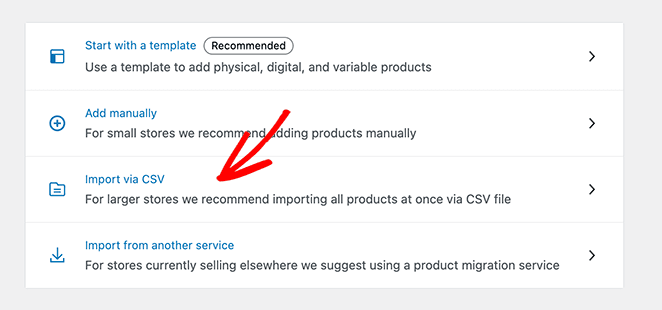
There are several ways to add products to WooCommerce, including:
- Starting with a template
- Manually adding each product
- Importing products via CSV
- Importing products from another service
One of the quickest ways is to import products from a CSV file, so let’s choose this option.
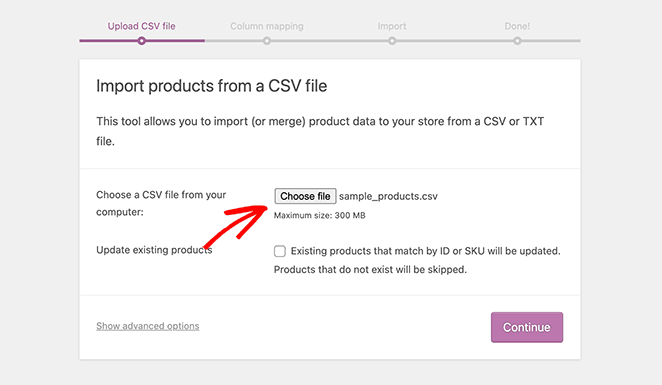
From there, you can choose your product CSV file from your computer and click Continue.
Before completing the import, WooCommerce asks you to select fields from your CSV file to map against product fields, such as your product image, product price, and more. Alternatively, you can choose to ignore these fields and edit your product details manually.
Now you can click the Run the Importer button. Depending on how many products you add, it could take a few minutes for WooCommerce to create products.
Set Up Your Payment Options
Before you can start selling your products, you’ll need to set up your preferred payment methods. To do this, go to WooCommerce ≫ Settings and click the Payments tab.
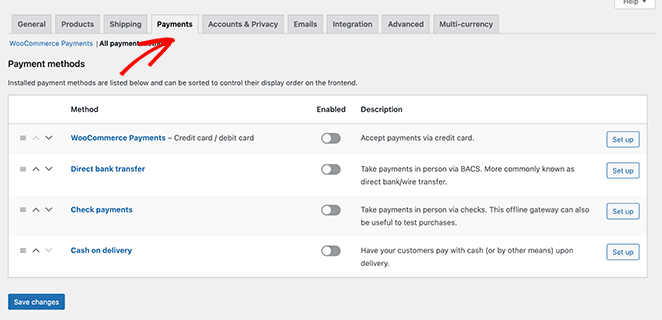
Follow the setup instructions for each payment method. You can also add other popular payment processors such as a simple PayPal shopping cart and Stripe by activating the suggested add-ons.
Don’t forget to click the Save Changes button to store your settings.
Now that your WooCommerce store is set up, you may be wondering about your shopping cart. WooCommerce automatically creates individual pages for the:
- Cart page
- Checkout page
- My account page
So you don’t need to take any further action. However, with a custom WooCommerce cart page, you can significantly increase your sales and conversions.
For instance, studies show that almost 7 out of 10 customers will abandon your shopping cart and never come back. So, by optimizing the default WooCommerce cart page, you can make more sales without increasing your current traffic.
What’s more, when visitors have items in their cart, they are very close to finishing the purchase. Thus, your WooCommerce cart page should do everything possible to make that purchase happen.
With that in mind, we’ll now show you how to create a custom WooCommerce cart page in WordPress with SeedProd.
Add a Custom WordPress Shopping Cart to WordPress

SeedProd is the best drag-and-drop page builder used by over 1 million websites. It lets you easily create a custom WooCommerce cart page to make more sales. And before you launch, you can create a WooCommerce coming soon page to generate excitement from day 1.
You can also use this plugin to create any landing page in WordPress without hiring a developer. And with a wide variety of customization options, it’s easy to get your page looking exactly how you want.
Video Tutorial
Install and Activate SeedProd
To get started, you first need to install and activate the SeedProd plugin. So click here to get started with SeedProd.
If you need help with this step, you can follow this guide on how to install a WordPress plugin.
Note: there is a free version of SeedProd that you can use, but for this tutorial, we’ll use the Pro version because it has the built-in WooCommerce blocks we need.
After activating the plugin, go to SeedProd » Settings and enter your product license key.
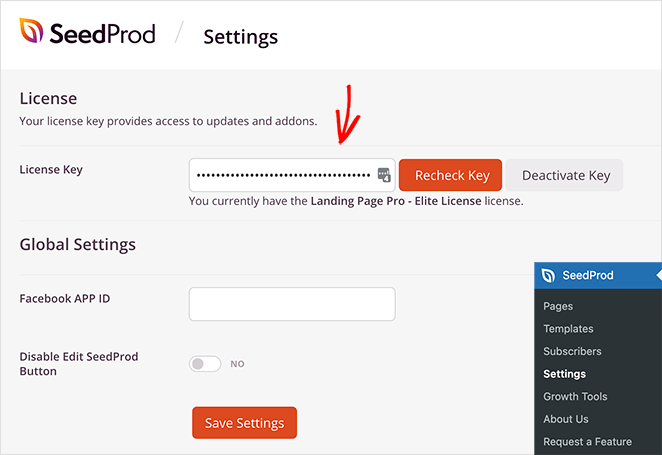
You can find your SeedProd license key in your account dashboard on the SeedProd website.
Create a New Cart Page
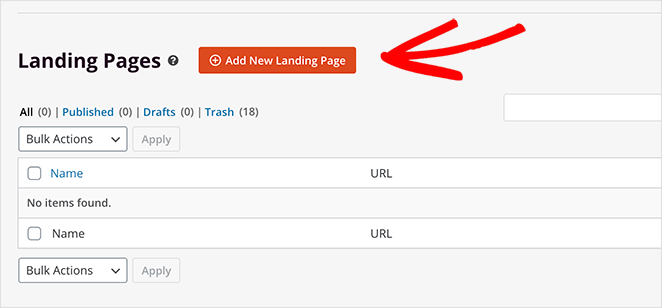
Once you’ve verified your license key, go to SeedProd » Pages and click the ‘Add New Landing Page’ button to create your new shopping cart page.
Next, you’ll see a library of landing pages templates you can use to add a premade page to your site quickly.
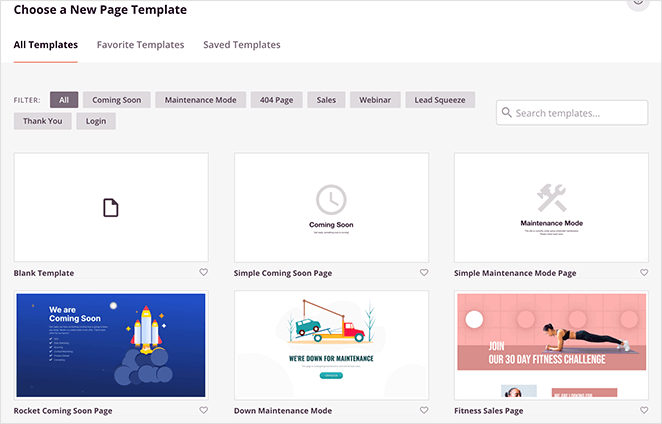
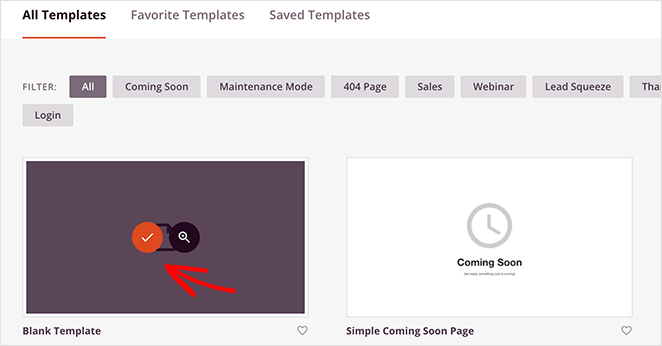
There are dozens of professionally designed templates for almost any business goal. Once you find a template you like, hover over it and click the ‘Checkmark’ icon.
We’ll use the Blank Template for this guide, as we want to add only the essential page elements we need for our cart page.
In the popup box that follows, you can enter a name for your shopping cart. Then click the Save and Start Editing the Page button.
Customize Your WooCommerce Cart Page
After naming your page, it takes you to the drag and drop builder, where you can start building the crucial parts of your cart page.
Add a Logo
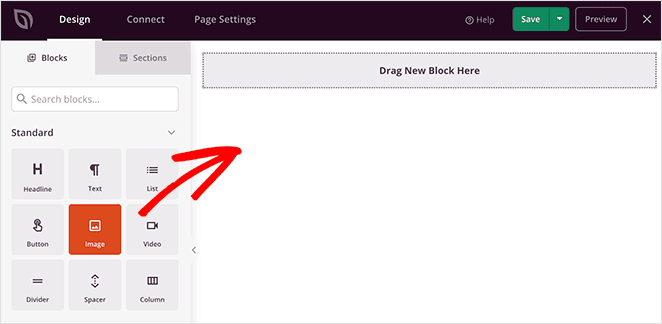
Let’s start by adding an image block so you can upload a logo. You can easily adjust this block to look like your website’s header without making it a clickable picture.
Doing this keeps your branding consistent and gives users fewer places to exit your page, helping you reduce shopping cart abandonment.
First, select the Image Block and drag it over to your page preview on the right. From there, you can upload a logo from your computer or WordPress media library.
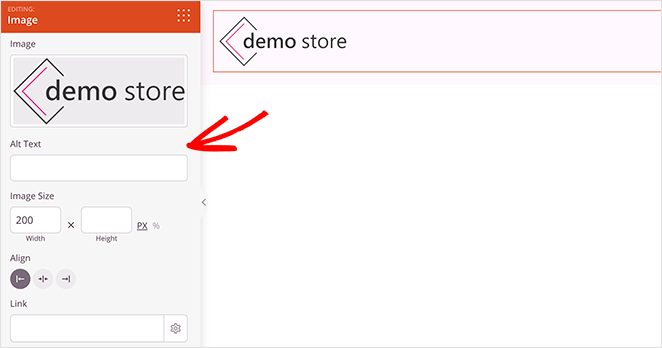
Clicking the block allows you to customize your logo entirely in the left-hand panel.
Add Your Shopping Cart
Now let’s add a new column for the layout of your cart page. For this, we chose the content and sidebar option in the “Choose your layout” section.
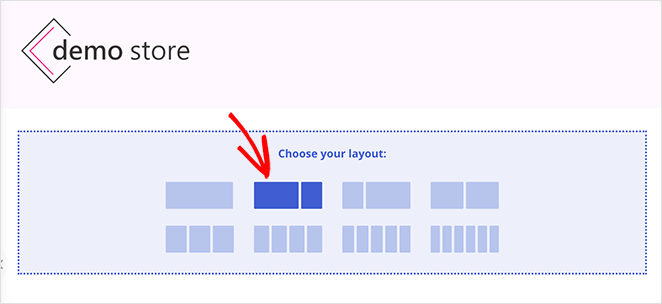
This layout allows you to have a section for your shopping cart and an area to display reviews and testimonials. So let’s start by adding your shopping cart.
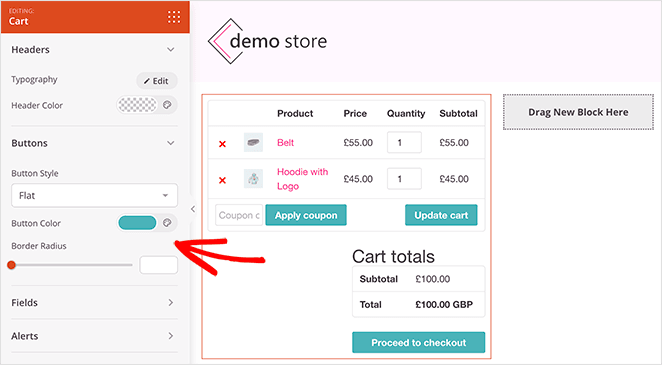
To do this, scroll down to the WooCommerce blocks section. Then drag the Cart block over to the content column. Your WooCommerce cart will then display on your preview automatically.
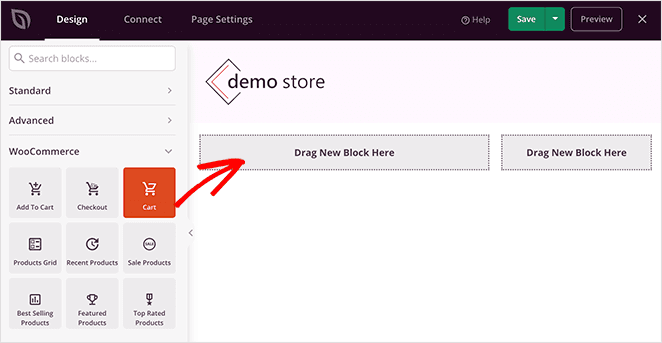
Clicking the block allows you to customize every part of your cart. For example, you can change the button labels and colors, field background colors, and more.
Include Customer Testimonials
You can add the SeedProd Testimonials block to show social proof and convince users to check out in your sidebar column. Find it under the Advanced blocks and drag it over to your page.
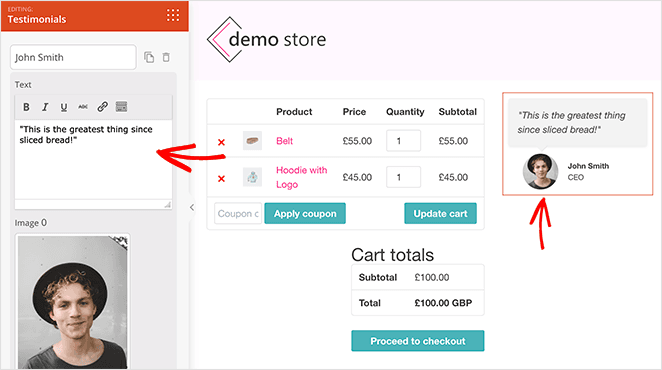
This block gives you full control over how your testimonials look. For example, you can add multiple testimonials, choose custom testimonial photos, and even set it as a sliding testimonial carousel.
To double down on the social proof, you can add a Star Rating block to your page. Simply choose the Star Rating block and drag it under your testimonials.
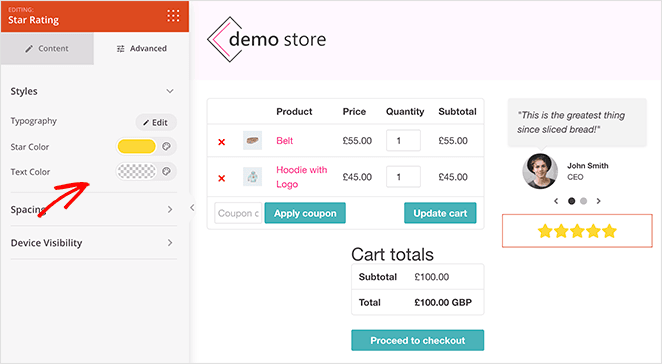
From there, you can customize the rating icon, colors, position, and more.
Add Scarcity to Your Cart Page
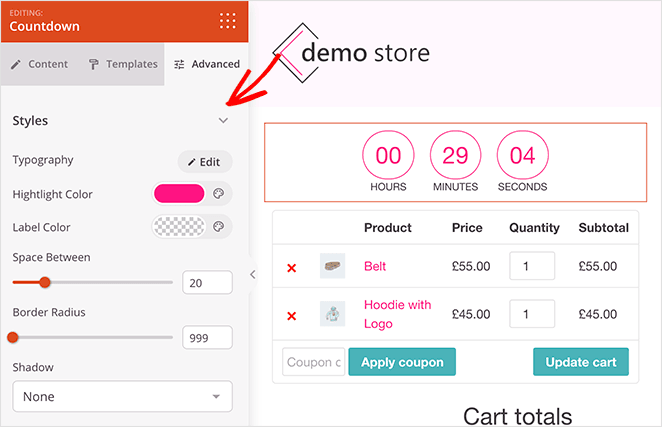
If you really want to encourage shoppers to act, you can add a scarcity timer to your shopping cart. By using SeedProd’s Countdown Timer block, you can add a custom countdown clock to your page with a timer that ticks down.
Just choose the Countdown Timer block and drag it into place above your shopping cart. Then in the settings panel, choose the Visitor Timer option, so the timer refreshes for each visitor.
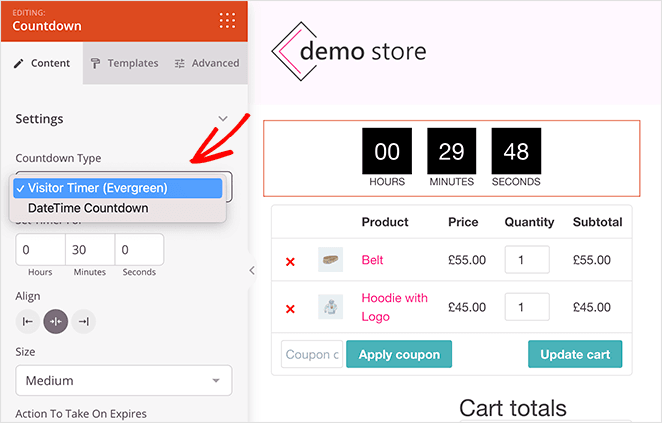
Then in the Advanced settings panel, you can customize the colors to match the rest of your cart.
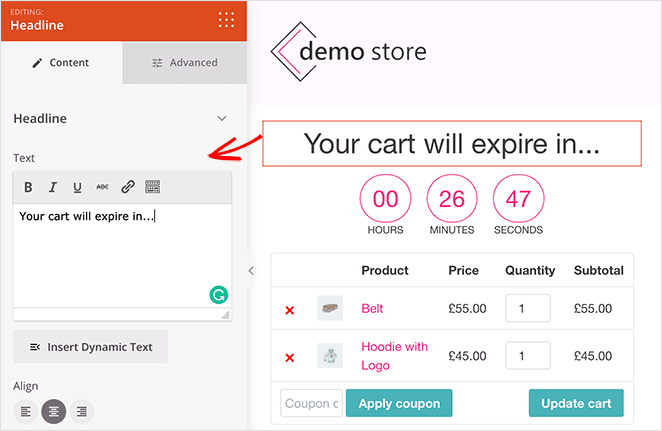
Next, add a heading notifying your shoppers they have a set period until their cart will expire. To do this, simply drag over the ‘Headline’ block and enter your text.
Add Popular Products
Another excellent feature you can add to your shopping cart page is a popular products section. This helps you to improve your sales by recommending other products your customers may like.
To do this, drag over the ‘Best Selling Products’ block from the ‘WooCommerce’ section.
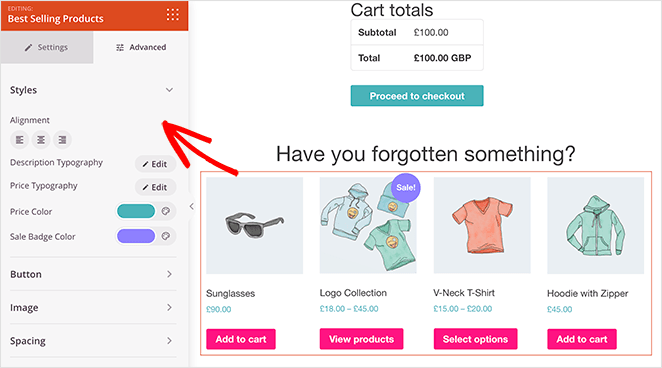
And if you like, you can add any other product blocks to this area, such as:
- Recent Products
- Sale Products
- Featured Products
- Top Rated Products
For more details on configuring these blocks, see our guide on how to display new products in WooCommerce.
Publish Your Custom Cart Page
Now that your custom shopping cart design is finished, it’s time to make it live on your website. You can do this by clicking the dropdown arrow next to the green Save button and clicking Publish.
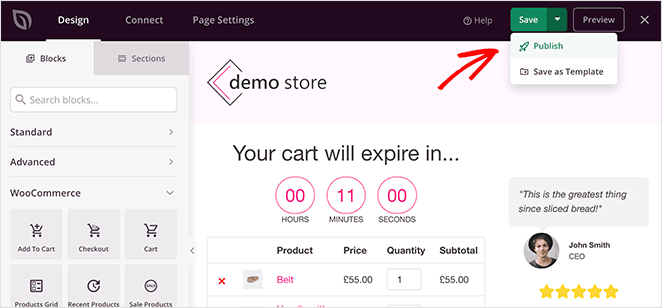
Before making your shopping cart visible to your customers, you’ll need to change your cart URL in the WooCommerce settings.
You can do this by going to WooCommerce » Settings and clicking the ‘Advanced tab.
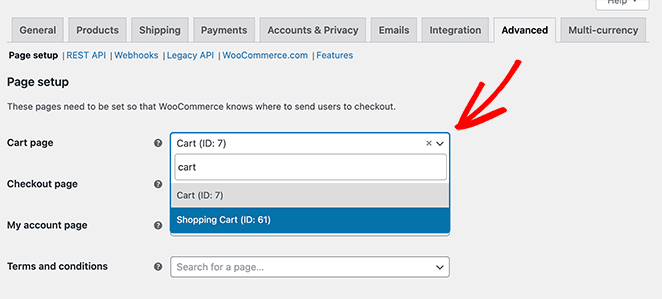
Next, select the new cart page URL you made with SeedProd and click the Save Changes button at the bottom of the screen.
After clicking the Add to Cart button on your product pages, shoppers can click the “View Cart” link and see your new custom shopping cart design.
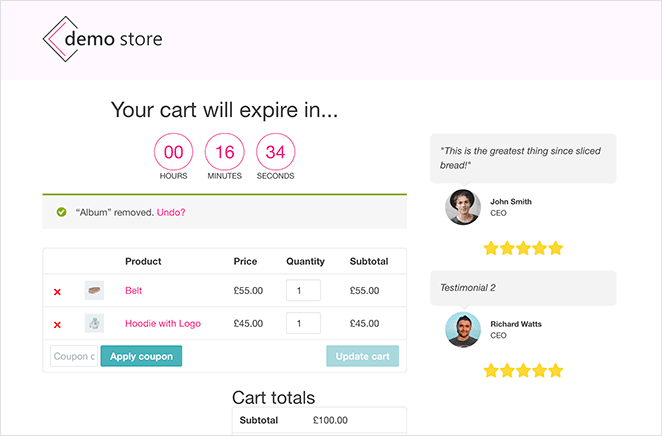
To track your WooCommerce cart conversions, see our WordPress post on how to set up WooCommerce conversion tracking.
Frequently Asked Questions (FAQs)
If you have a Business plan or higher with WordPress.com, you can install plugins such as WooCommerce to add a shopping cart. However, if you’re on the Free, Personal, or Premium plan, this feature is not available.
To ensure transaction security, you should use a shopping cart plugin that supports SSL encryption. Moreover, use trustworthy payment gateways like PayPal, Stripe, or Authorize.net. Always keep your WordPress site, plugins, and themes updated to the latest versions for improved security.
Yes, most WordPress shopping cart plugins, including WooCommerce and Easy Digital Downloads, allow you to sell both physical and digital products.
Most shopping cart plugins offer options for managing shipping and tax settings. You can usually set different rates based on factors like location, product weight, or product type. Check your chosen plugin’s documentation for specific instructions.
And there you have it!
We hoped this article helped you add a shopping cart to WordPress without writing any code. You might also like this step-by-step tutorial on how to enable maintenance mode for WooCommerce shop pages.
And while you’re here, follow us on Facebook and Twitter for more helpful WordPress tips.

