Do you want to learn how to add a sidebar in WordPress?
Sidebars are valuable spaces that can help readers navigate your WordPress site, sign up for your newsletter, follow your social media profiles, and more. But how do you create a sidebar tailored to your content needs?
This article will show you how to add a sidebar in WordPress using 3 different methods.
What Is a WordPress Sidebar?
A WordPress sidebar is a column of vertical space that sits to the left or right of your main content area. It’s a widgetized area that lets you show content outside your primary content area.
Even though your primary content area will change on each page, your sidebar will largely stay the same across your entire website (unless you create multiple sidebars).
Your WordPress theme controls how your sidebar looks by default. So if you use it right out of the box, your theme will control your sidebar placement, how many sidebars you can use at once, and if you actually have a sidebar in the first place.
Your default sidebar may also come with widgets that don’t suit your business needs. If your default sidebar doesn’t meet your requirements, you may need to create a new custom sidebar.
What Can You Use Your WordPress Sidebar For?
You can add almost any content to your sidebar using WordPress widgets. Here are some examples:
- Navigation – You can use navigation menu widgets to help users find relevant pages or a menu to filter your blog posts by category.
- Search – Adding a search box to your sidebar is an excellent way to help users find what they’re looking for fast.
- Email subscription – Add an opt-in email form to your sidebar to collect email addresses and grow your list.
- Featured content – Your sidebar is a great place to showcase single posts that are more valuable to users than others.
- Social media – You can easily add social follow buttons and a social media share widget to boost your followers and increase brand awareness.
- Ads – Your sidebar is an excellent place to display ads if you use them to generate revenue.
- Calls to action (CTA) – If you have a new online course, product, or offer, you can add a CTA to your sidebar to encourage readers to check it out.
By now, you know what a sidebar is and how it’s an easy way to display valuable content to your website visitors. Now let’s look at how to add a sidebar in WordPress.
We share 3 different methods below, using the WordPress customizer, your WordPress widgets screen, and a website builder plugin. Even better, none of these methods require using code.
How to Add a Custom Sidebar in WordPress with SeedProd
Do you want to create a custom sidebar or use multiple sidebars simultaneously on your WordPress site?
For that, you’ll need a WordPress plugin or the knowledge to create a new sidebar from scratch with code. Luckily, you can easily create custom sidebars for WordPress with one powerful and lightweight plugin: SeedProd.

SeedProd is the best drag-and-drop WordPress website builder. You can use it to create custom WordPress themes and page layouts without code.
SeedProd uses individual templates to create all the parts of your theme. One of those templates is the Sidebar, which lets you add a custom sidebar to your site with just a few clicks.
Even better, you can create as many sidebars as you like with SeedProd, and display them on specific pages and posts on your website.
So follow the steps below to add a sidebar to WordPress with SeedProd.
Step 1. Install the SeedProd Website Builder
The first step is to install the SeedProd Website Builder plugin.
Note: You’ll need a SeedProd Pro or Elite license to use the Theme Builder feature.
You can follow this guide on installing a WordPress plugin if you need help with this step.
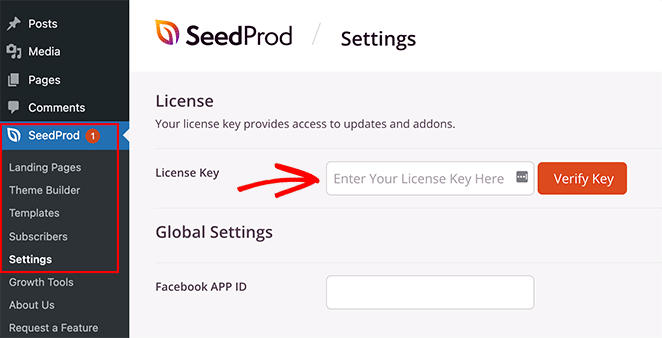
After installing and activating the plugin .zip file, go to the SeedProd ≫ Settings page and enter your license key details. You can find your license key on the SeedProd website in your account dashboard.
Step 2. Create Your WordPress Theme Templates
To create a custom sidebar with SeedProd, you’ll first need to create the different parts of your theme. Don’t worry; it’s super easy to do and won’t require editing any template files directly.
First, go to the SeedProd » Theme Builder page. You’ll see a list of templates for your current SeedProd theme on this page.
Because we haven’t started yet, we only have a Global CSS template.
To get started, you have two options.
- Use one of the ready-made SeedProd themes as a starting point
- Manually create theme templates from scratch
We suggest starting with a premade theme template. It allows SeedProd to automatically generate all the template files, giving you a head start in editing the templates to your requirements.
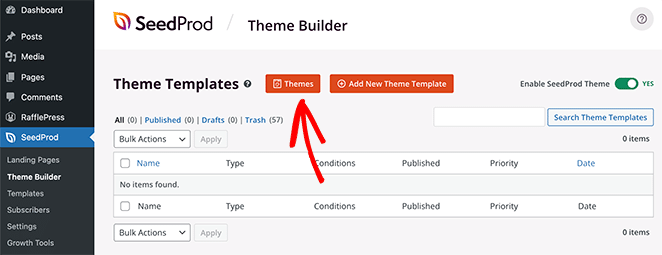
To choose a theme template, click on the Themes button and select one of the available themes. There are different themes for different websites, so choose one that best matches your needs.

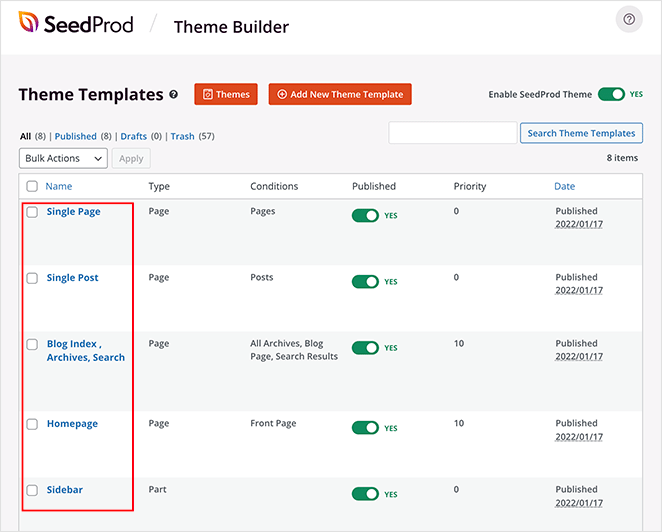
After choosing a theme, SeedProd will automatically create all the theme templates for you. As a result, you can now edit each template individually in the visual drag-and-drop editor.
Step 3. Customize Your WordPress Sidebar
To customize your sidebar with SeedProd, find the Sidebar template and click the Edit Design link.

Doing that will launch your sidebar in SeedProd’s drag-and-drop builder. You’ll see a live preview of your sidebar template in the right column with an editing panel in the left column.
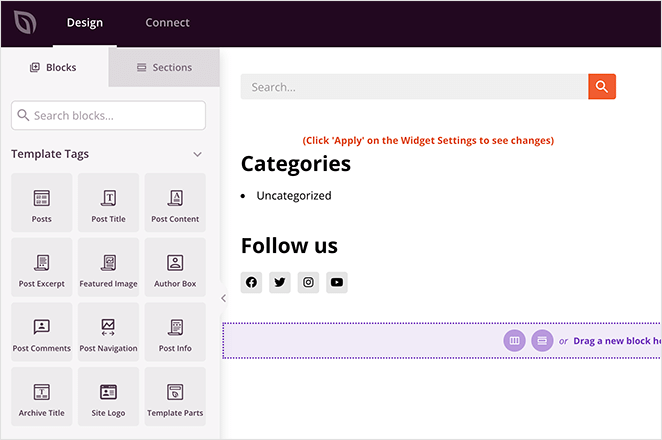
Changing an item in your sidebar is as simple as pointing and clicking. For example, you can click the trashcan icon to delete blocks.
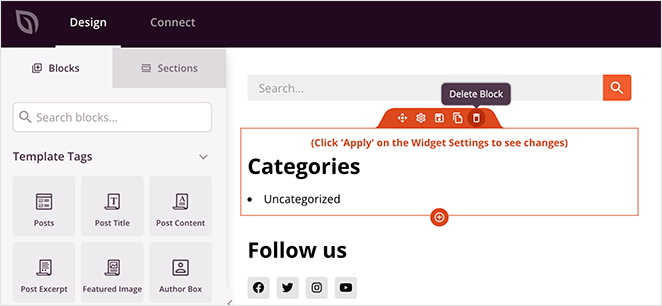
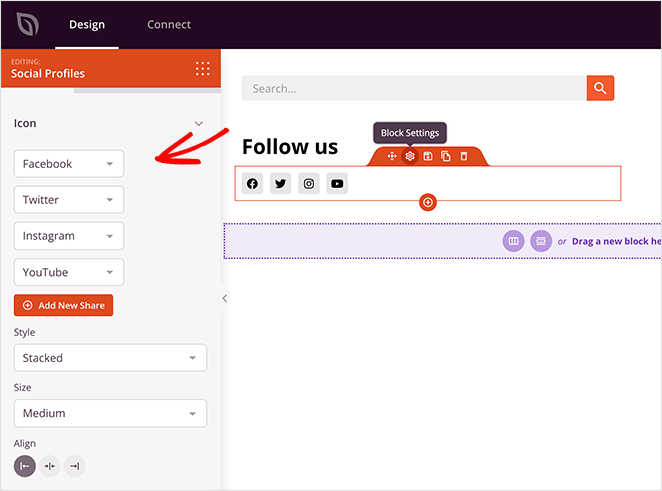
Or you can click any block to see its settings in the left panel.
You can add a wide variety of content to your sidebar using SeedProd’s theme blocks. Just drag a block from the left and drop it into place on your sidebar.
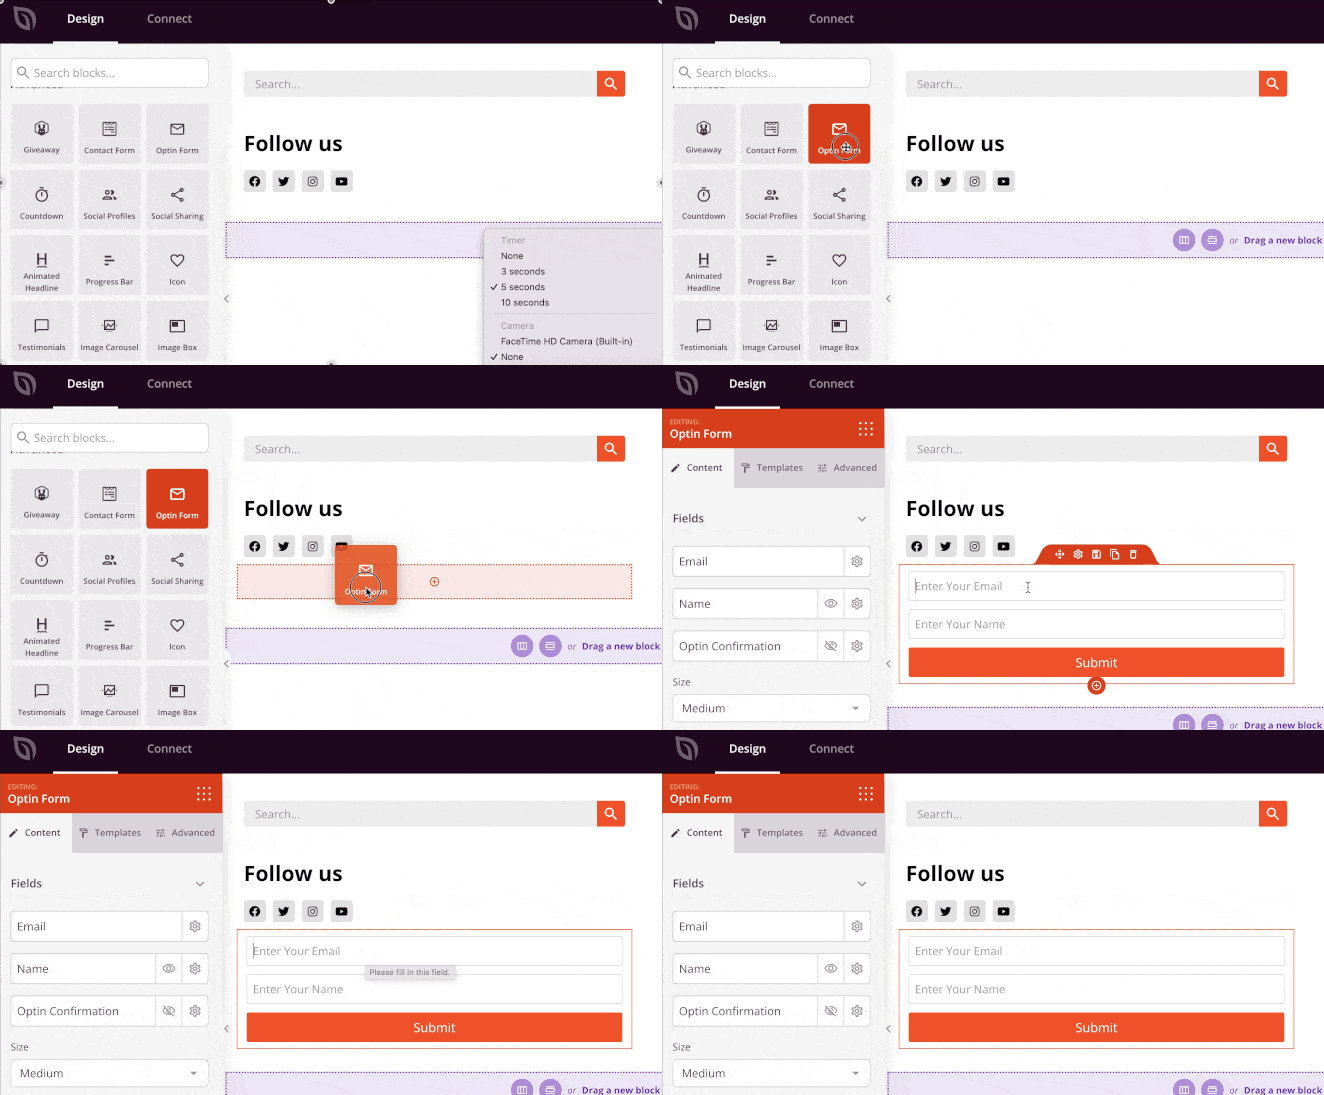
Some of the blocks you can choose from include:
- Template Tags – Blocks that let you add dynamic content from WordPress, such as blog posts, comments, featured images, etc. This is a great way to create a dynamic sidebar.
- Standard Blocks – These are popular web design elements that most websites use, like images, buttons, text, and videos.
- Advanced Blocks – Advanced lead generating features such as contact forms, social profiles, sharing buttons, optin forms, Google Maps, and more.
- WooCommerce – If you run an online store, you can use WooCommerce blocks to display popular products, shopping carts, and other store features in your sidebar.
Besides adding content to your sidebar, SeedProd also lets you customize its colors, fonts, spacing, borders, and much more.
For example, if you click on a section’s settings icon, you can see options to change the background color, upload a background image, and change the width. Then there are more settings in the Advanced tab that allow you to control the borders, spacing, and more.
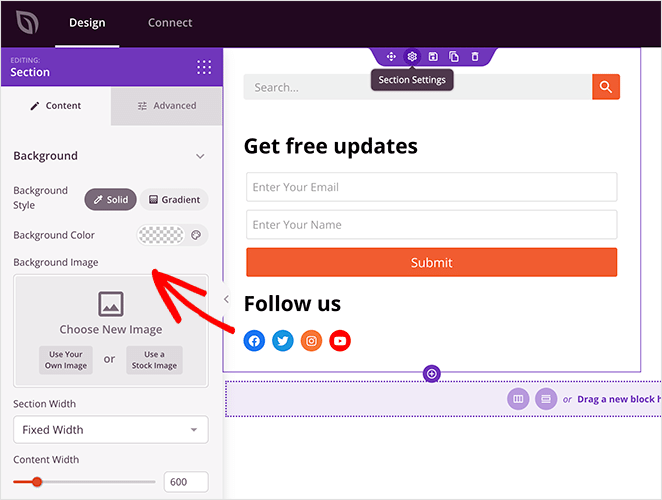
When you’re happy with your new sidebar, click the green Save button in the top-right corner of your screen.
Now repeat this process for the other templates in your theme, including:
- Single Page
- Single Post
- Blog Index/Archives
- Homepage
- Header
- Footer
As a result, you can create a custom WordPress theme that fits all your business needs.
Step 4. Publish Your Custom Sidebar in WordPress
When you’re happy with your custom WordPress sidebar, the final step is to activate it on your WordPress site.
In SeedProd, you can apply your custom WordPress sidebar with a simple switch.
Simply go to the SeedProd » Theme Builder page and toggle the switch next to the ‘Enable SeedProd Theme’ option to ‘Yes’.

SeedProd will now replace your existing design with the new WordPress theme and sidebar.
Now you can visit your website to see your custom WordPress sidebar in action.
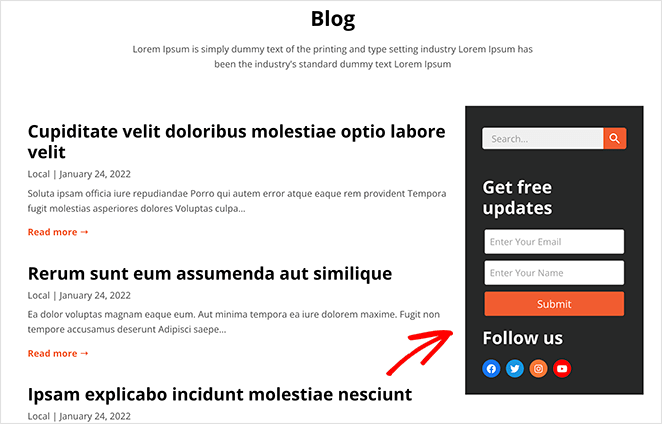
How to Add Multiple Sidebars in WordPress with SeedProd
Now that you have a custom sidebar, you can edit the design any time you like. But what if you want more than one sidebar and want to show it on different sections of your website?
For instance, you may want to create a sidebar for pages different from your blog sidebar. You can do that by using SeedProd’s Global Template parts.
Here’s part 13 of our theme builder tutorial that shows you how global parts work:
Alternatively, you can follow the written instructions below.
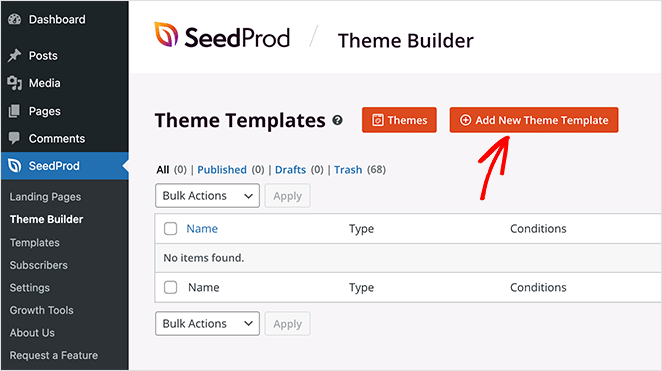
First, go to the SeedProd » Theme Builder page and click the Add New Theme Template button.
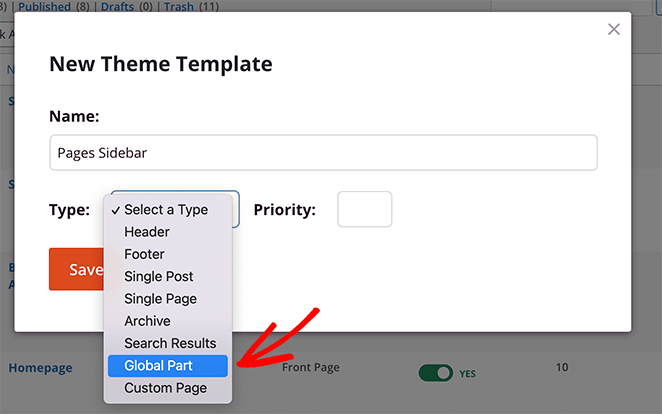
From there, choose the Global Part option and click Save.
Now you can build your custom sidebar as you did in the previous step.
After creating your new sidebar, open the Single Page template in SeedProd’s drag-and-drop editor.
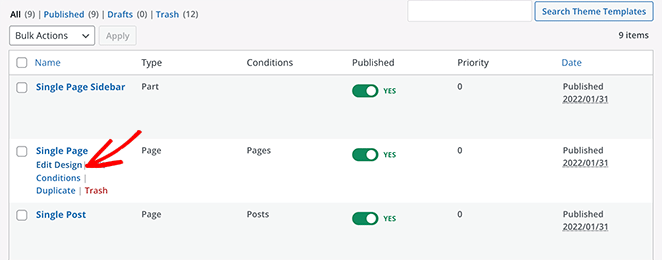
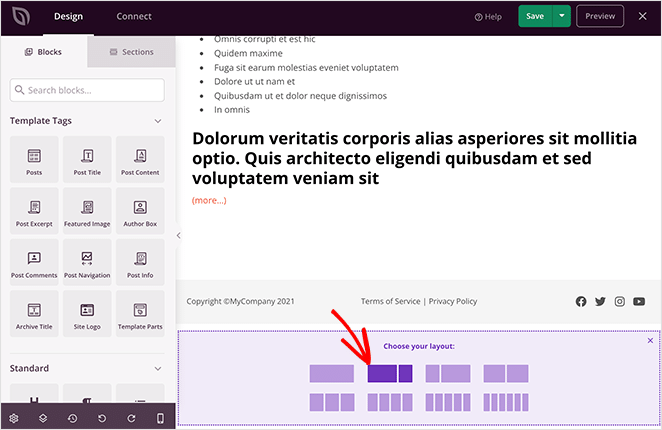
To make room for your sidebar, you’ll need to replace the existing layout with a 2 column section.
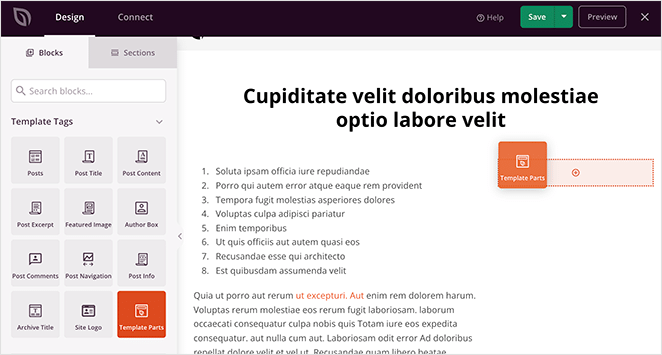
Next, drag the Template Part block into the second column of your new section.
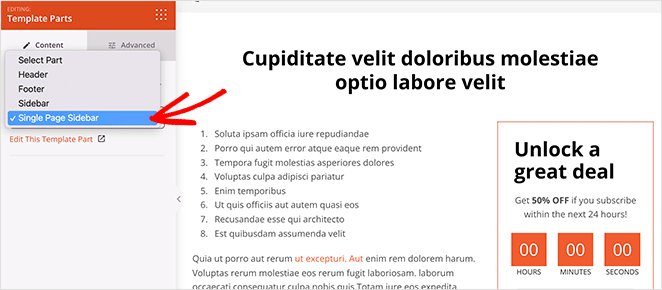
From there, you can choose the new sidebar you made from the dropdown menu.
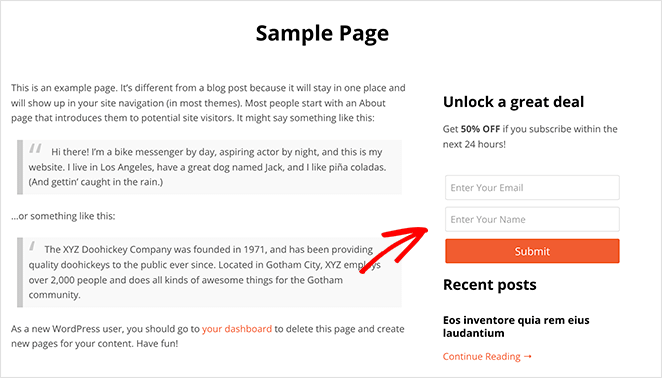
Click Save to store your changes, then when you navigate to a page, it will display your new custom sidebar automatically, while your blog posts will display your first sidebar.
How to Add a Sidebar in WordPress with Customizer
The built-in WordPress customizer makes adding a custom sidebar to your WordPress site easy. The customizer uses your default WordPress theme settings to control your sidebar layout, content, and placement.
To use this method, you’ll need a WordPress theme that includes sidebar widget areas. If you don’t have a theme yet, here are the most popular WordPress themes for small businesses.
For this guide, we’re using the Astra WordPress Theme.
Step 1: Add Your WordPress Sidebar Layout
After installing your theme, go to Appearance ≫ Themes and click the blue Customize button.
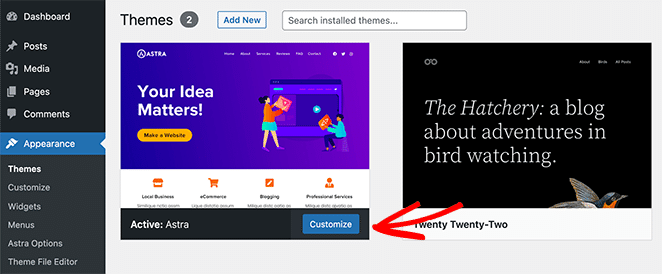
This will take you to the WordPress Customizer page, where you can edit your theme’s layout and design. The settings you see on this page will vary for different themes, but we’ll show you how to add a sidebar using the Astra theme, so you have an idea of what to do.
Look at the left-hand panel inside the customizer and find the ‘Sidebar’ heading. Click that heading to open the customization options for your sidebar.
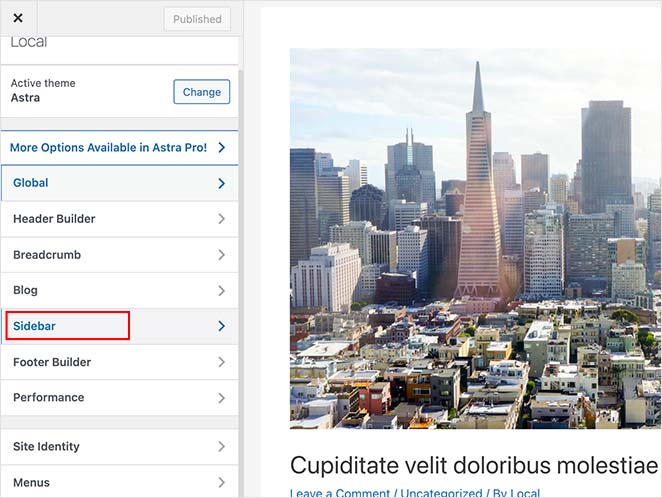
On the next screen, you can choose from the following sidebar options:
- Default Layout – No sidebar, right sidebar, or left sidebar.
- Pages – Where to display the sidebar on single pages.
- Posts – Where to show your sidebar on single posts.
- Archives – How your sidebar looks on archive pages like your blog page.
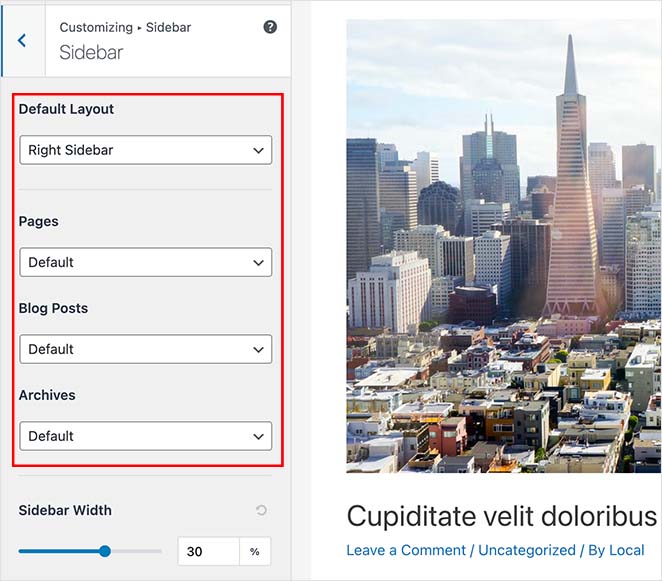
You can also choose your sidebar width on the same page. When you’re happy with your sidebar’s layout, click the Publish button.
Step 2. Add Widgets to Your Sidebar with Customizer
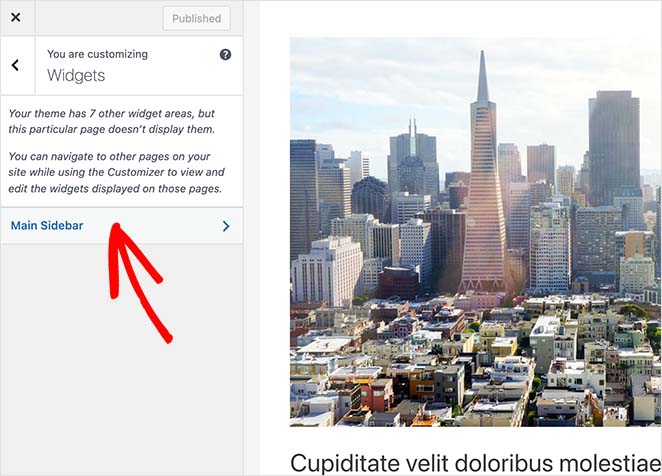
After choosing your sidebar layout, you can start adding widgets to it. To do that, find the ‘Widgets’ heading in the WordPress Customizer menu and click to open the settings.
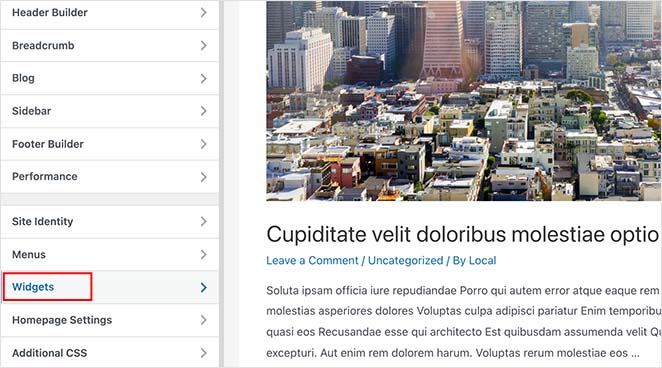
On the next screen is a list of sidebars currently available for that particular page, so click the sidebar you wish to customize.
Now you’ll see a sidebar builder, ready to display the widgets you choose. Click the plus (+) icon to search for a block or widget you wish to show in your sidebar.
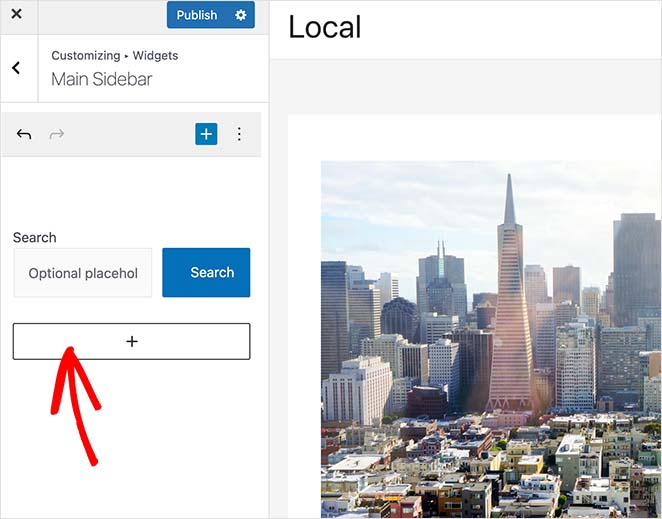
Clicking a block will add it to your sidebar automatically.
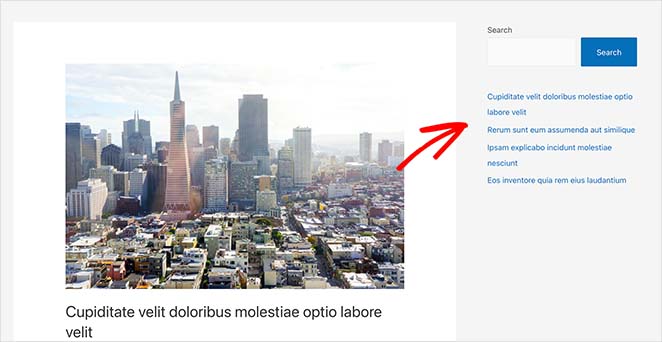
Keep adding widgets to your sidebar until it looks the way you want. Then click the Publish button to save your changes.
Now, when you visit your page, you’ll see your custom WordPress sidebar.
How to Add a Sidebar in WordPress using Widgets Screen
The following method uses the WordPress widgets screen to add a sidebar to WordPress. It’s similar to the previous method, but it only allows you to add widgets to your sidebar instead of letting you change your sidebar placement.
Go to Appearance ≫ Widgets from your WordPress dashboard to use this method. You can see all of the sidebars that your theme currently supports on this screen.
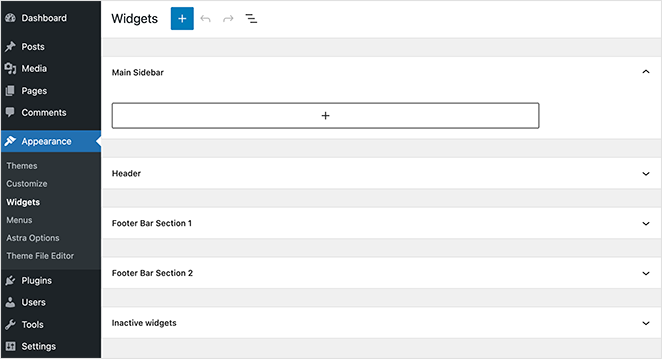
In our case, the theme includes 4 customizable sidebar areas:
- Main Sidebar
- Header
- Footer Bar Section 1
- Footer Baar Section 2
Adding widgets to your sidebar is similar to the previous step. Simply click the plus icon and search for the widgets you wish to add to your sidebar.
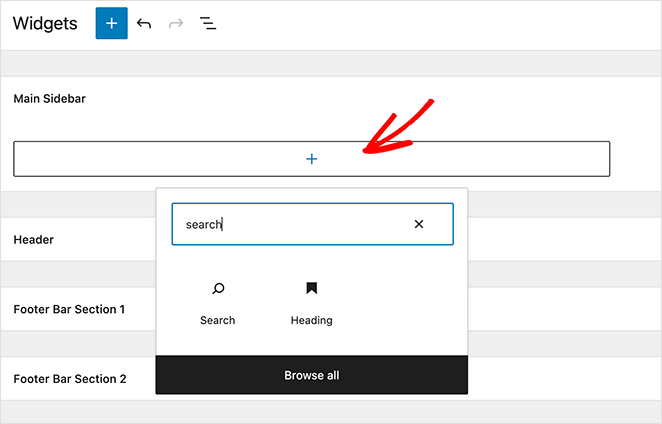
When you’ve finished creating your sidebar, click the Update button. Now you can visit your site and see your new sidebar.
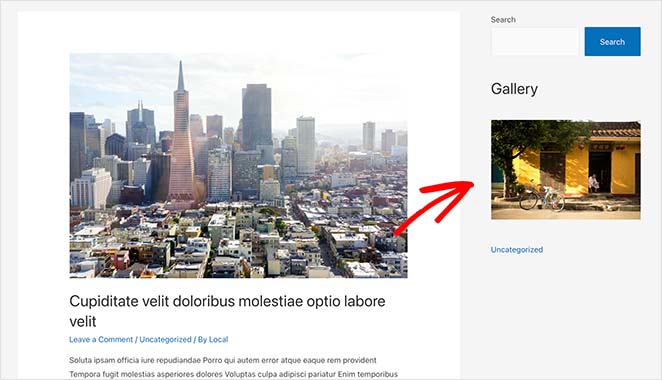
That’s it for now!
We hope this article helped you learn how to add a sidebar in WordPress easily.
The easiest way to get complete control over your sidebar is with SeedProd. It offers a visual, drag-and-drop builder, you don’t need to edit any code or theme files directly, and you can customize your sidebar from right inside the WordPress dashboard.
You might also like this post on the best lead magnet examples to grow your list.
Thanks for reading! We’d love to hear your thoughts, so please feel free to leave a comment with any questions and feedback.
You can also follow us on YouTube, X (formerly Twitter), and Facebook for more helpful content to grow your business.

