Want to make your website elements pop and grab your visitors’ attention? Adding a simple box shadow can instantly improve your design, making images, buttons, or content sections stand out.
In this guide, I’ll share 4 easy ways to add a box shadow in WordPress so you can highlight the content that matters most.
Why Should You Add a Box Shadow in WordPress?
A box shadow creates a subtle illusion of depth by mimicking the shadow that an object would cast, making it appear slightly raised from the background. This simple effect can dramatically change how visitors perceive your content.
Our brains are naturally drawn to contrast and separation, principles rooted in Gestalt psychology. Adding a box shadow creates a visual separation between elements, instantly guiding your visitors’ eyes to the most important areas of your website.
This means box shadows can actually help your website perform better:
- Boost Conversions: Highlight calls-to-action like buttons or forms to encourage clicks and conversions.
- Emphasize Images: Make images pop from the background, drawing attention and enhancing their impact.
- Improve User Experience: Create a more visually appealing and organized layout, making your website easier and more enjoyable to navigate.
Below, you’ll find 4 easy ways to add these effects to your WordPress site.
Method 1: Add a Box Shadow in WordPress Using a Page Builder (Easiest)
Now that you understand the power of box shadows, let’s create one. This method is perfect for visual learners and anyone who wants a code-free solution. I’ll use SeedProd to add a stylish box shadow in just a few clicks.

SeedProd is the best WordPress website builder, with over 1 million users. With its drag-and-drop page builder, you can create high-converting landing pages and websites and customize every inch of your design without writing code.
You can also add box shadows to any design element by pointing and clicking.
To begin, install and activate SeedProd on your WordPress website. For more details, see our guide on how to install SeedProd.
After activating the plugin, navigate to SeedProd » Landing Pages from your WordPress dashboard. Then, click the Add New Landing Page button.
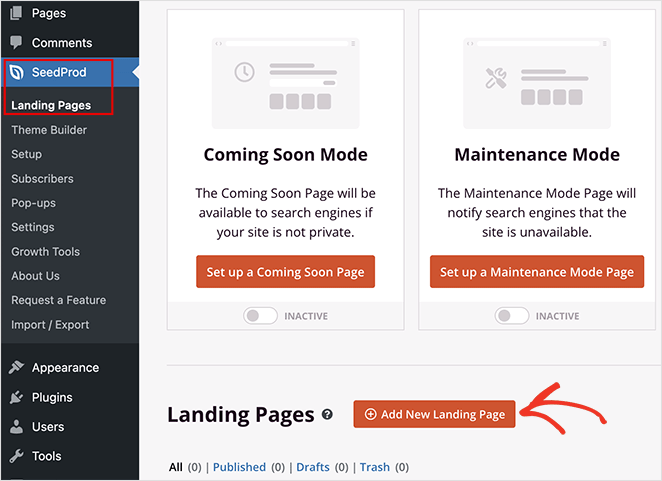
Here, choose a pre-made, fully customizable design for your page. SeedProd’s templates make it easy to find a look that fits your brand, and you can tweak every detail to make it your own.

Click the filters at the top to browse, then hover over a template and click the checkmark icon to select it.

Now, you can enter a name for your page, and SeedProd will automatically set the URL. Including keywords relevant to the page in the URL is a good idea, as this can improve your WordPress search engine optimization.
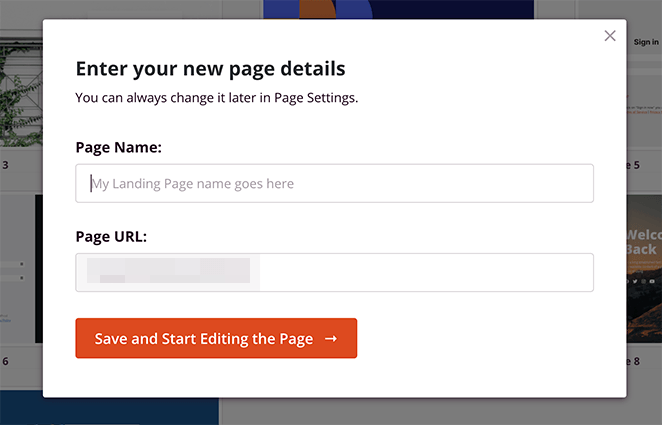
If you don’t want to keep the generated URL, click inside the ‘Page URL’ field and type in your own.
You can now click the Save and Start Editing the Page button to launch your design in the page builder interface.
SeedProd’s drag-and-drop builder shows a live preview of your design on the right. On the left-hand side, there is a panel with blocks you can drag onto the page.

When you find a block you want to add, click, drag, and drop it onto the live preview. Then, you can select the block to customize its appearance and settings.
For example, clicking the Headline block lets you enter your own text and change the font size, color, and alignment.

You can also move blocks around the page by dragging and dropping them. For detailed instructions, please see our guide on how to create a landing page in WordPress.
If you want to add a box shadow to a block, you’ll need to click the Advanced tab in that block’s settings.
In this example, I want to add a box shadow to each feature box. So, I’ll click the column settings and select the Advanced tab.

Next, click the ‘Shadow’ dropdown menu and select an option, such as Hairline, Small, Medium, Large, X Large, and so on.
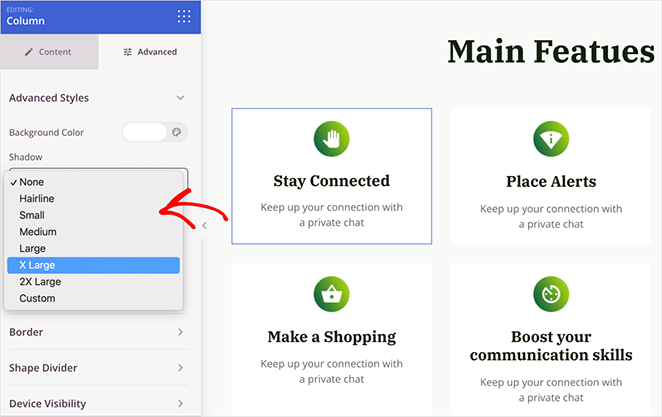
Upon choosing a shadow, the preview will update automatically. You can experiment with different styles until you find one that works.
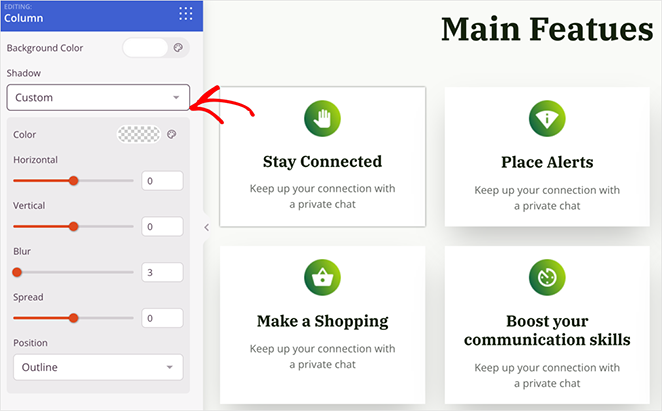
If the pre-made styles don’t work for you, choose the ‘Custom’ option. This option opens new customizations to change the blur, spread, color, shadow position, and more.
In the end, I chose the 2X Large option and repeated the process for each block in the grid.
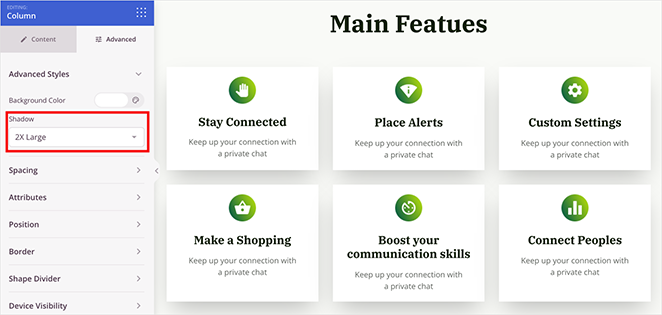
After adding the box shadow, you can continue customizing your page by adding more blocks and shadows.
When you’re happy with how everything looks, click Save in the top-right corner and select Publish to make your page live.

Here is an example of how my final page looks, complete with the new box shadows:

Method 2: Add a Box Shadow in WordPress with CSS Code (More Control)
Adding a box shadow to every element on your website can make it look cluttered. Instead, it’s best to use them to highlight important content and keep your design consistent.
The easiest way to do this is by setting your box shadow style with CSS, and I’ll use WPCode to make it super simple.

WPCode is a popular code snippet plugin that lets you add custom code to your WordPress site without editing your theme files directly. This keeps things organized and helps you avoid accidental errors.
The first thing you’ll need to do is install and activate the free WPCode plugin. For a full walkthrough, see this guide on how to install a WordPress plugin.
After activating the plugin, go to Code Snippets » +Add Snippets from your WordPress admin.
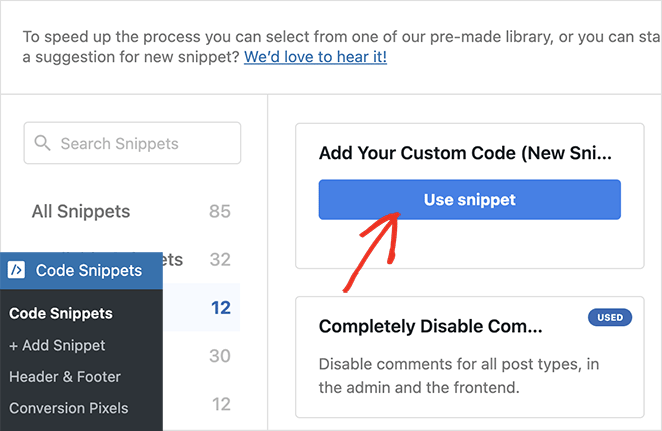
On this page, you’ll see pre-made custom code snippets to add to your website. To add your own, hover your cursor over the ‘Add Your Custom Code’ option and click Add Custom Snippet.
After the page loads, type a name for your snippet to help you identify it. Then, select the ‘CSS Snippet’ option in the ‘Code Type’ dropdown menu.
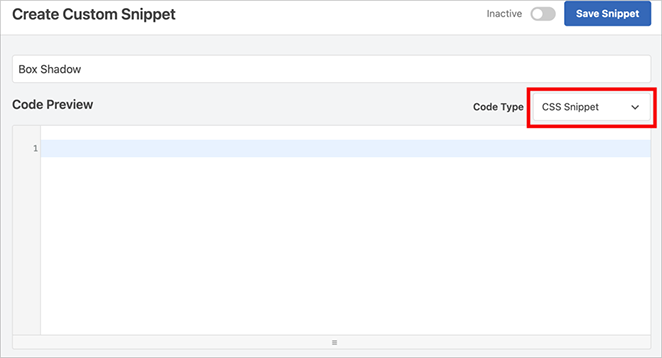
Now add the following code snippet into the code editor:
.custom-box-shadow {
  box-shadow: 5px 5px 10px rgba(0, 0, 0, 0.2);
}
You can replace the px values in the snippet to customize the shadow you want to make.
Let’s break down those numbers so you know exactly what’s happening:
- .custom-box-shadow: This is the name of the CSS class we’re creating. We’ll use this to apply the box shadow to specific elements.
- Box-shadow: This tells the browser we’re about to define a box shadow.
- 5px 5px: These first two values are the horizontal and vertical offset of the shadow. The first value moves it right, the second moves it down. Play around with these to adjust the shadow’s position.
- 10px: This is the blur radius. Higher numbers create a softer, fuzzier shadow. Lower numbers keep it sharp.
- rgba(0, 0, 0, 0.2): This sets the shadow’s color. We’re using a semi-transparent black here. The last number (alpha) controls transparency—0 is completely transparent, and 1 is fully opaque.
Once you’re happy with the snippet, scroll down to the Insertion section to define where WPCode should add it. To use it across your website, choose the ‘Auto Insert’ option and set the location as Site Wide Header.
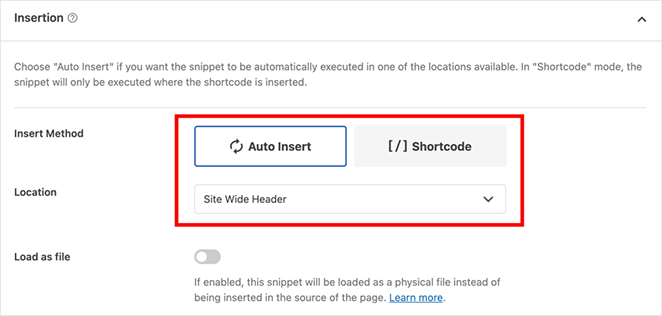
Now, scroll back to the top of the page and switch the ‘Inactive’ toggle to the ‘Active’ position. Then, go ahead and click the Save Snippet button.
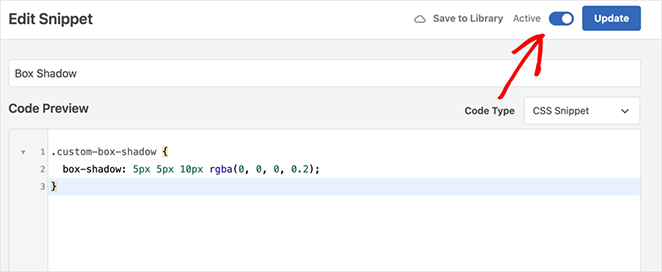
The next step is to add the custom CSS class to any WordPress block. To do this, select any block in the WordPress block editor and click ‘Advanced’ in the left-hand menu.

In the ‘Additional CSS Classes’ field, type ‘custom-box-shadow.’

Then, when you’re happy with the post, you can click ‘Update’ or ‘Publish.’ You can then visit the post and see your box shadow in action.

Method 3: Add a Box Shadow Using a Free Plugin (Quick Alternative)
If you’re uncomfortable working with code snippets, you might prefer to create shadows using Drop Shadow Boxes. This free WordPress plugin lets you add box shadows to any block using the built-in WordPress block editor.
First, install and activate the plugin on your website. Since there are no configurable settings, you can use the plugin immediately.
Next, create or edit a WordPress post or page. Inside the editor, click the plus (+) icon to add a new block and search for ‘drop shadow.’

When it appears, click it to add it to your page. You’ll see a drop shadow on an empty block, so let’s add some content.
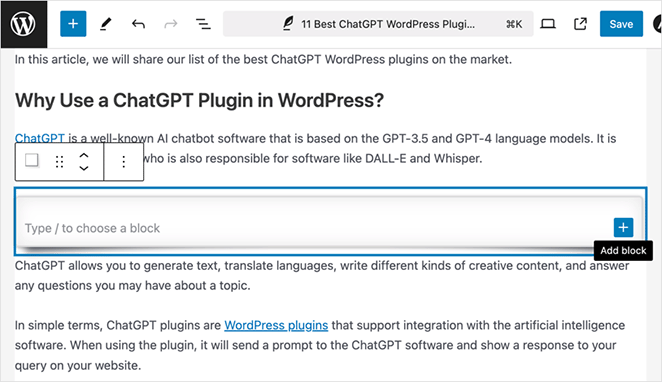
Inside the drop shadow block, click the plus icon, add a block, and set it up as usual. For example, I’ve added an image block and picked an image from the WordPress media library.
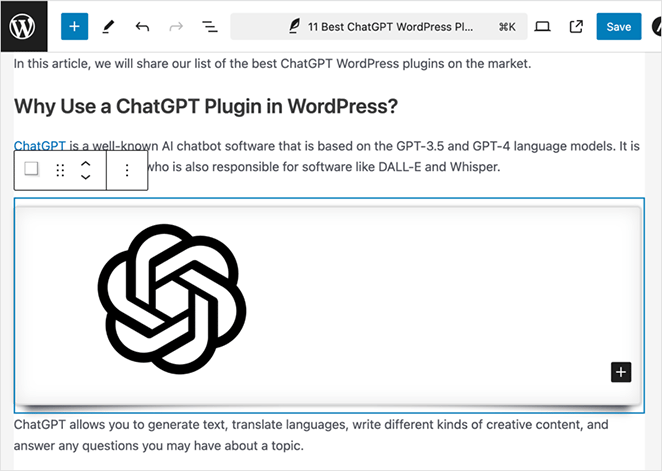
Next, click the block to see the box shadow settings on the left-hand sidebar.
The shadow width is set automatically by WordPress but you can change it by choosing ‘pixels’ or ‘%’ from the ‘Width’ drop-down box. Then, you can use the slider to adjust it.
You’ll also notice otter effects like curved edges and a ‘Perspective’ effect. To preview them, open the ‘Effect’ dropdown and choose one from the list.
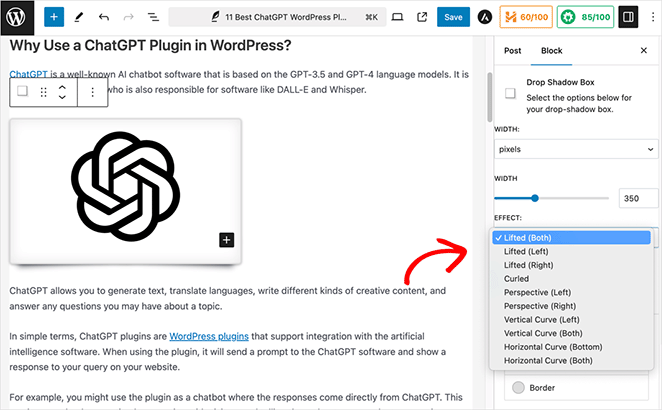
Other options you can experiment with include inside and outside shadows, border colors, border pixels, and rounded corners.
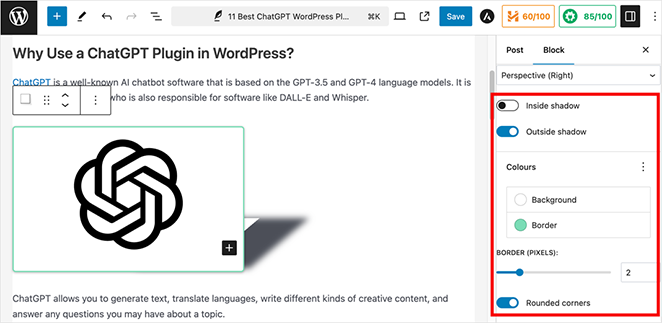
Once you’re happy with the box shadow, repeat these steps for other blocks, or click ‘Update’ or ‘Publish’ to make your changes live.
Here is how my box shadows look using this method:

Method 4: Add a Box Shadow Using CSS Hero (Advanced)
If you’re not comfortable working with code but still want to create advanced box shadows, then CSS Hero is a great option.
This premium plugin lets you fine-tune every part of your WordPress theme without writing a single line of code. You can also create unique shadows for each block, making it ideal for experimenting with different shadow effects across your site.
To begin, install and activate the CSS Hero plugin. Then, follow the product activation instructions to link your CSS Hero account with your WordPress site.
Now, click the ‘Customize with CSS Hero’ option in your admin toolbar to open the CSS Hero editor.

By default, the CSS Hero editor shows a live preview of your website and a panel where you can edit each element of your web design.

If you’re not on the page where you want to add the box shadow, use the icons at the top of the screen to switch from ‘Select’ to ‘Navigate’ mode.

Now, you can go to the page you want and switch back to Select mode.
Next, click any element in the preview where you want to add a box shadow, such as an image, button, paragraph, or other content.
When you’ve done that, click ‘Extra’ in the left-hand panel.
By default, the box shadow option shows ‘None,’ so click the Make Shadow button.
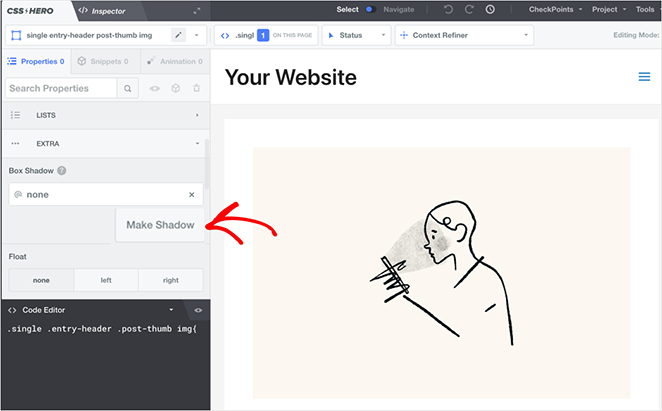
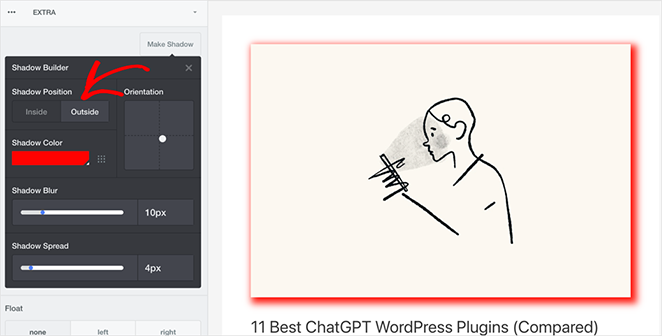
First, change where the shadow appears. In the Shadow Position settings, you can choose ‘Inside’ or ‘Outside’.
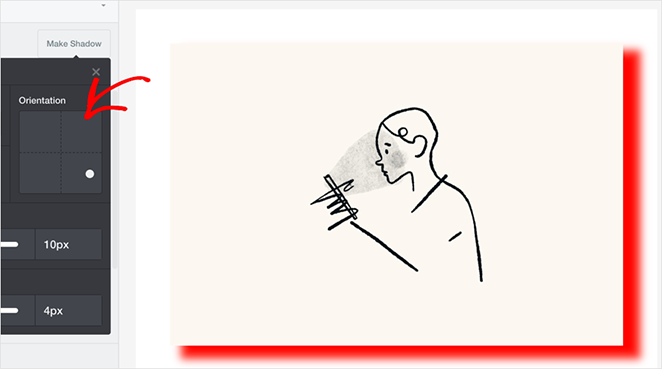
Next, work on the shadow’s angle in the Orientation section. Simply drag the circle until the box shadow angle is in the position you want.
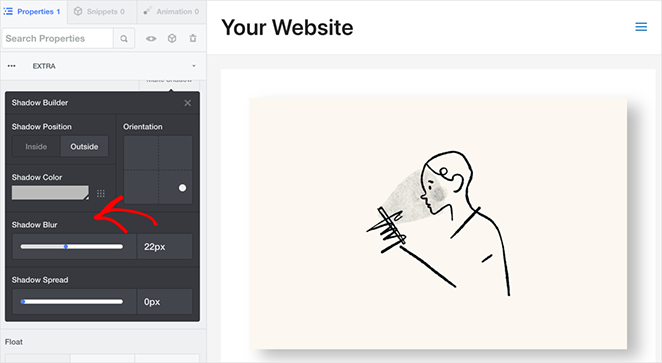
Finally, change the shadow color using the dropper tool and use the sliders to control the shadow blur and spread.
Use the same approach to add a box shadow to other areas of your website. Then, when you’re happy with how everything looks, click the Save & Publish button.
Now, visit your changes to see how they look live on your website.

More Ways to Customize Your WordPress Website
The methods I’ve covered in this guide are ideal for adding box shadow effects in WordPress. But if you want to add more creative effects, you’ll find the following guides helpful:
- How to Change Margins in WordPress – Customize the spacing around your content for a polished, professional look.
- How to Add Text on an Image in WordPress – Create striking graphics and calls to action directly on your images.
- How to Create Animated Particle.js Backgrounds in WordPress – Add a touch of dynamic flair with eye-catching animated backgrounds.
- How to Make a Page Full Width in WordPress – Break free from sidebars and create immersive, full-width page layouts.
- How to Dim a Background Image in WordPress – Make your text easier to read and create a sense of depth with a dimmed background image.
- How to Create Text Animations in WordPress – Grab your visitors’ attention with eye-catching animated text effects.
- How to Create Fancy Section Dividers for WordPress – Visually separate your content with stylish shape dividers.
I hope this guide has helped you learn how to add a box shadow in WordPress. Now, you can instantly improve your website’s design and highlight your most important content.
Ready to take your WordPress skills further? Get started with SeedProd and create stunning, high-converting landing pages and websites without coding.
Thanks for reading! We’d love to hear your thoughts, so please feel free to leave a comment with any questions and feedback.
You can also follow us on YouTube, X (formerly Twitter), and Facebook for more helpful content to grow your business.

