Want to know how to create an online order form for your WordPress website? Learning how to create an online order form might be just the thing you need.
Order forms make it easy for customers to order products and services from your site. And the best order forms accept online payments too, which makes things much more efficient. But it can be scary putting this type of form together if you haven’t done it before.
Don’t worry! We’re making it super simple by showing you how to create an online order form for WordPress in just a few easy steps.
Here’s a quick look at the steps we’ll be taking in this guide:
Are you ready to get started? Let’s get going!
What Is an Order Form?
Before you go about building an online order form in WordPress, it’s important to understand what one is and what it can do for your site.
An online order form is a payment form used to request products, services, or merchandise from an online business or eCommerce retailer. The form itself has contact information and all the information about the customer’s order so that the goods and products are delivered to the customer in a timely manner.
Order forms generally include the following information:
- The customer’s full name.
- Phone number.
- Shipping information and delivery address.
- Billing and payment processing details like credit card info.
- A list of items being purchased.
- Item details such as quantity, size, style, etc.
- Term and conditions.
- Shipping costs.
- Order total.
The customer then submits the form online for processing by the business or company.
Often an order form will integrate with multiple apps, CRM, and services, like Authorize.net, Google Sheets, Salesforce, Zapier, and Social Media. Additionally, some may offer the ability to grow your subscribers and display HTML form popups.
Now that you understand an order form’s functionality, how do you go about making one? We’ll cover that next.
How to Create an Online Order Form in WordPress
Creating your own online order form isn’t as tricky as it sounds. In this tutorial, we’ll show you how easy it is to put one together yourself with the help of a WordPress plugin that does most of the work for you.
We’ll be using WPForms, the best drag-and-drop online form builder for WordPress. This order form builder lets you create almost any type of online form, including:
And with WPForms smart form technology and easy payment gateway integrations, you can have your online order form up and running in minutes.
Why not check out this in-depth WPForms review for the full details?
To get started with WPForms’ order form creator, you’ll need to grab the Pro version. WPForms Pro integrates with payment processors to accept payments from your customers. Then you’ll need to install and activate the WPForms plugin on your WordPress site.
If you’re not sure how to install a plugin in WordPress, this step-by-step guide will help.
With everything installed and activated, you’re ready to move on to the next step and start building your new form.
1. Choose the Order Form Template
The first thing to do when creating an online order form is to head to your WordPress dashboard and click WPForms » Add New.
This brings up a number of pre-built templates to choose from.
For this tutorial, we’ll be using the free Order Form template. So give your form a name and click that option.
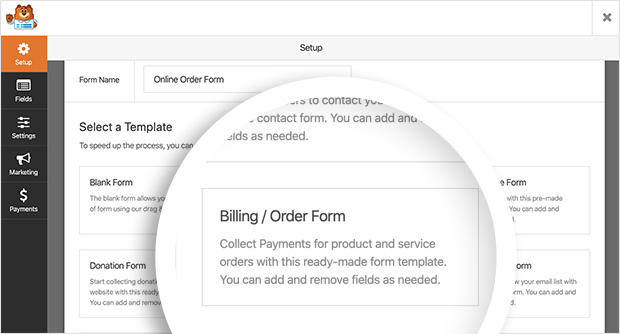
The next screen you’ll see will be the form editor. Here you can customize your order form’s look, content, and settings.
The Billing/Order Form template automatically populates your form with the default settings needed for a simple order form.
Clicking any of the form fields opens up the field options on the left-hand side of your screen. Here you can edit the labels of each field, add or remove items, and make certain data collection fields a requirement.
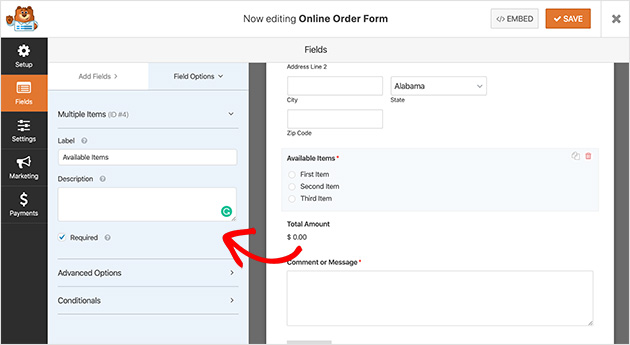
Expanding the advanced options tab for the Available Items field, for example, lets you choose a different column layout. You can even add conditional logic to your form so that some fields only display based on the information in the form submissions.
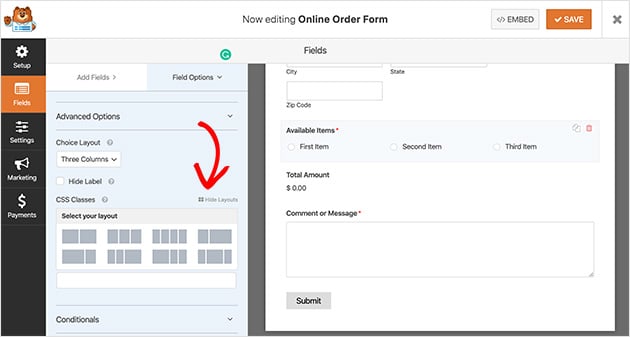
To rearrange the layout of your form, you can drag and drop any field. Plus, adding in extra fields is just as easy. Simply drag them from the left-hand side of your screen, such as the payment methods, to the right.
When you’re happy with your order form layout click the Save button to avoid losing any changes.
2. Setup Online Order Form Notifications
Now we’ll move on to configuring the settings of your online order form, beginning with the form notifications workflow. Notifications send an email whenever your form is completed.
To set these up, go to Settings » Notifications, and you’ll see the options available to you.
By default, WPForms automatically sends you an email notification when a customer fills in your form. But if you’d rather not have this option you can turn it off by selecting Off from the dropdown box.
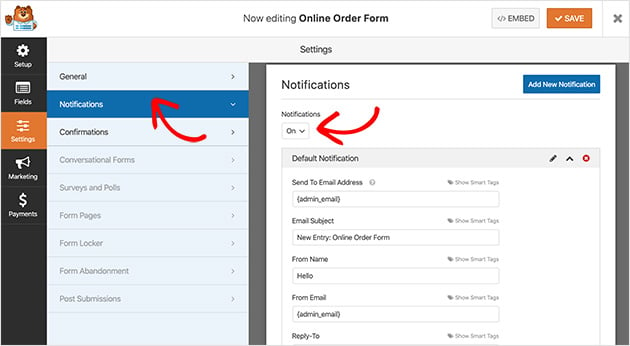
You can also have notifications go to other people in your business by adding their email addresses in the Send To Email Address field.
Alongside this, it’s easy to send notifications to customers too whenever they fill in a form. You’ll want to do this to reassure your customers that their order has been received and you’re processing it.
You can use smart tags in WPForms to set this up.
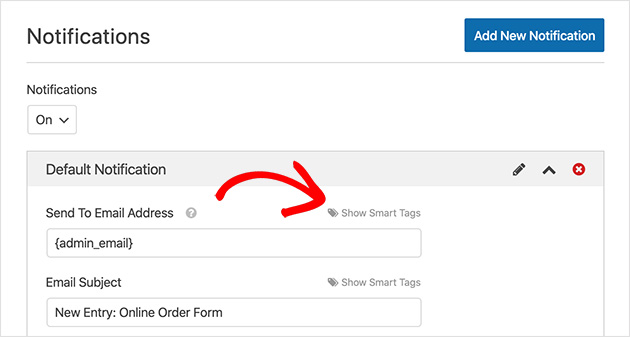
Next to the Send To Email Address field, you’ll see an option called Show Smart Tags. This shows the available tags for that particular field.
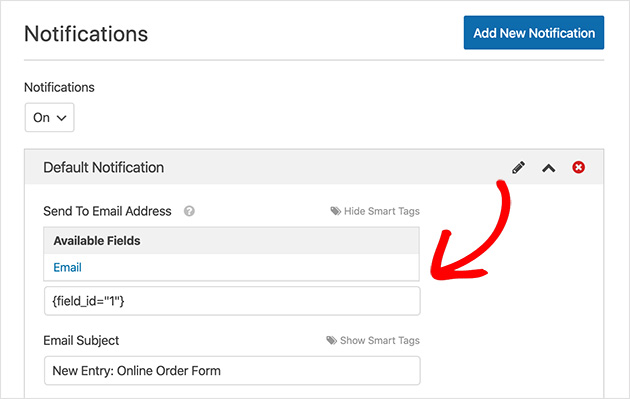
Click Email, and the tag will be automatically entered into the field. This tag directly relates to the email address customers enter when they fill in your form.
Now edit the rest of the form, including the following fields:
- Email Subject. This is one of the first things people will see in their inbox. You can describe the forms’ purpose by writing “Your order has been received,” for example.
- From Name. Where is the email from? Your brand or company name is a good choice for this field, so customers know it’s not spam.
- From Email. Again, your company email or sales department email address should go here so customers know where the email is from and who they can contact.
- Reply-To. Offer your customers a way to contact you if they have any problems by adding your contact email here.
- Message. Include a personalized message explaining why customers are getting this email and the next steps they should take. You can also add in the details of their order by inserting the {all_fields} tag.
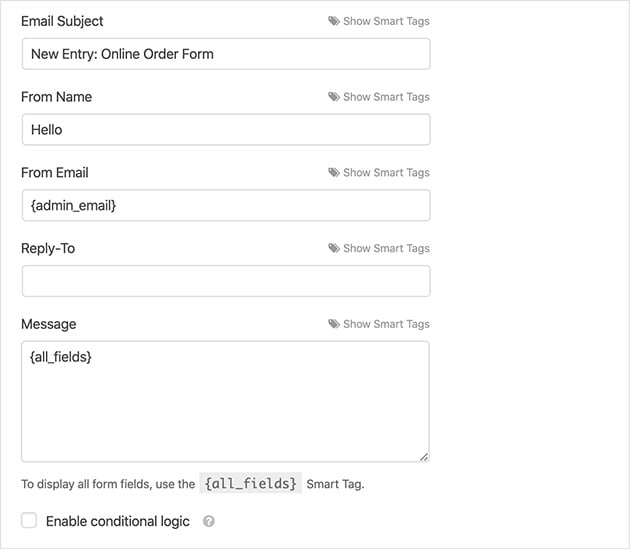
If you’d prefer to automatically send out an online order from email receipt, this step-by-step tutorial will show you how.
Save your changes, and let’s move on to the confirmation message section.
3. Customize Form Confirmation Messages
The confirmation section offers you 3 types of messages you can show customers after they’ve successfully submitted your form.
Here are the 3 confirmation message types you can choose:
- Message. This is WPForm’s default confirmation type. This displays a simple success message telling customers their form was submitted.
- Show Page. The Show Page option sends visitors to a specific page on your website after completing your form. You can learn how to redirect customers to a thank you page here.
- Go To URL (Redirect). This confirmation type is usually used to send customers to a different website after the form has been sent.
To customize these settings from your form editor, click Settings » Confirmation. Then choose your confirmation type from the dropdown list provided and edit your message.
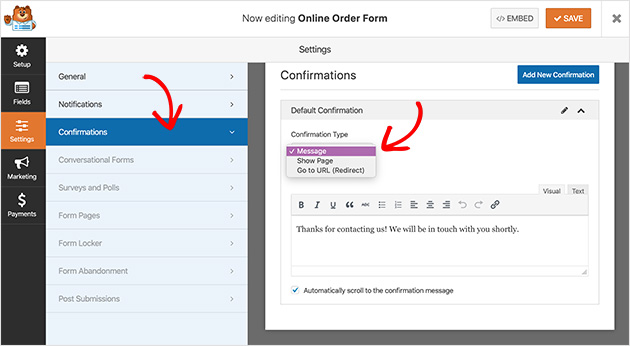
For help with setting up your confirmation message, see the WPForms documentation. And make sure you save your changes before moving on.
4. Select Your Payment Settings
Before publishing your online order form you’ll need to offer a way for your customers to pay for their products.
WPForms offers 2 popular payment options for accepting online payments. These are the PayPal and Stripe app integrations. You’ll need to install the PayPal and Stripe add-ons to activate these options.
To do this, go to WPForms » Addons. Then click your preferred payment addon to install and activate it.
If you’re not sure which one to use, this post about Stripe vs PayPal should help you decide.
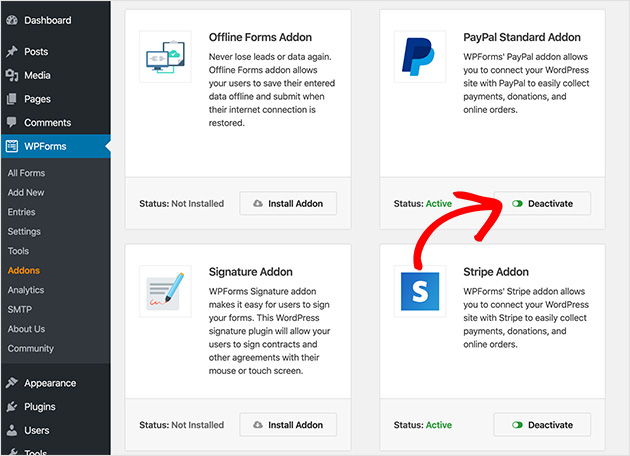
With the addon installed, go back into your online order form editor and click Settings » Payments and choose your desired payment option.
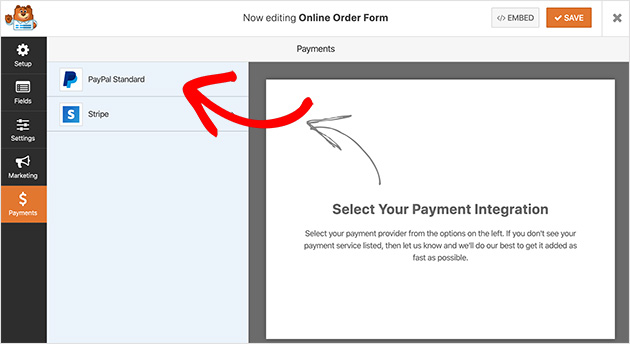
For this example, we’ll be using PayPal to integrate with our form.
To configure the PayPal payment settings you need to first Enable Paypal Standard payments by clicking the checkbox.
Then enter your business’s PayPal email address and set the Mode to Production to receive real payments.
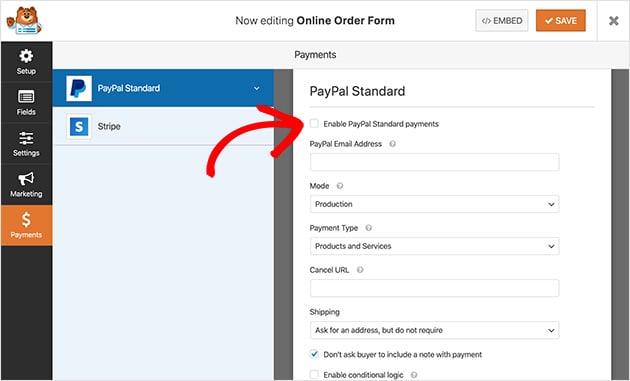
When you’ve finished setting up your payment details, click Save to store your changes.
We’ll be publishing your form next!
5. Publish Your Online Order Form to WordPress
It’s time to publish your online order form, which is pretty exciting, right? What’s even more exciting is that WPForms lets you embed your forms in loads of places on your website.
This means you can display your form in posts, pages, sidebars, and any other widget-ready areas on your WordPress site.
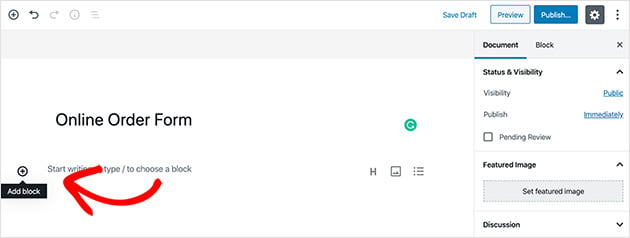
To publish your form on a page, first, create a new page by heading to Pages » Add New from your dashboard and give it a title
After that, click the plus icon to add a new content block to the page.
Now type WPForms into the search box to bring up the WPForms content block.
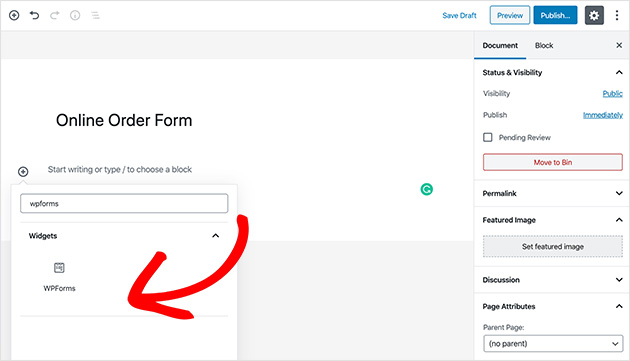
Then click the block to add it to your page.
Next, you’ll need to choose your online order form from the provided dropdown box.
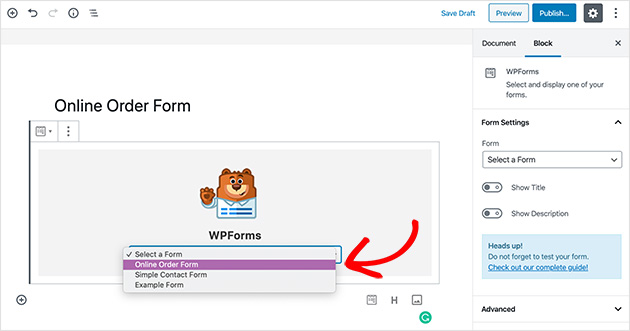
And when you’re ready to publish your page, click Publish to make it live.
Now your online order form will be live on your website. Simply head to that specific page at the front-end of your site, and you’ll see it.
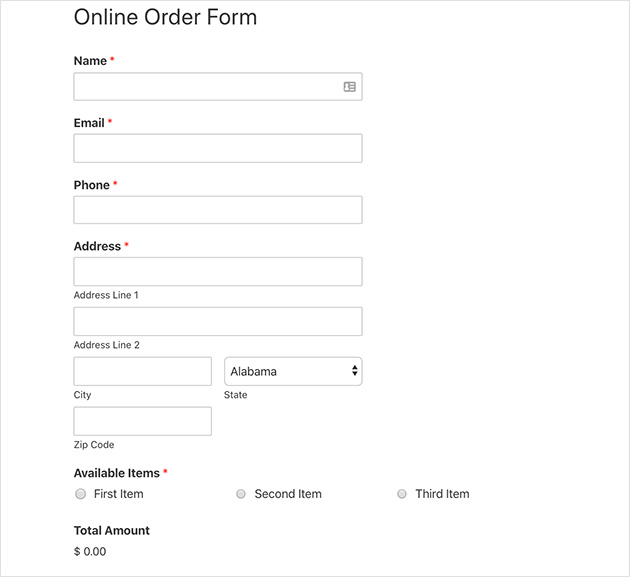
But you’re not done yet. No good order form is complete without a way to track and measure submissions. We’ll figure that out next.
6. Track Form Analytics
It’s all well and good having a great-looking online order form, but if no one’s filling it in and buying your products it’s a bit of a wasted effort.
You might not realize this, but form abandonment is one of the biggest challenges facing website owners.
In fact, the average abandonment rate is around 68%. That translates to a whole heap of people filling in your form and then leaving it right before they click Submit.
But there are ways to tackle form abandonment, and it starts with tracking your order form’s analytics properly.
Most site owners use Google Analytics. But tracking form abandonment in Google Analytics isn’t a walk in the park. It’s pretty confusing! That’s why our favorite way to track this type of data is to use MonsterInsights.
With MonsterInsights, you can quickly set up Google Analytics for your WordPress site in minutes and actually start to make sense of the data you collect. It’s also an excellent companion to WPForms.

MonsterInsights makes tracking form abandonment much simpler. You can set form tracking under event categories as well as actions.
What’s more, MonsterInsight reports are displayed right within your WordPress dashboard. So there’s no more clicking between windows and tabs to get the information you need.
You can learn all about how to track form abandonment in WordPress with MonsterInsights in this easy step-by-step guide.
And there you have it!
In this article, you’ve learned how to create an online order form for your WordPress site, as well as the best way to track your results.
Now all that’s left to do is for you to turn those abandoning visitors into paying customers. Our solutions for fixing cart abandonment will show you how.
We hope you found this article helpful. If you did, do follow us on Twitter and Facebook for more content like this.

