Do you want to create a custom page on your WordPress website?
Custom pages give your website a unique touch. You can give them different layouts from the rest of your site and make them stand out from your competitors.
In this guide, we’ll show you how to add pages in WordPress step-by-step and customize them without code.
Why Create a Custom Page in WordPress?
Whenever you create a new page in WordPress, your WordPress theme will control its layout and design with the page.php template file. While it’s handy to make your pages look uniform, you may not want to use the same design every time.
For example, you may want a page to:
- Showcase your latest artwork
- Highlight your key team members
- Promote a new product launch
- Thank visitors for subscribing
That’s where a custom page template can help. Instead of using your theme’s default page design, you can customize it to suit any purpose you like.
But here’s the kicker.
Creating a custom page using your default template can take time. You’re also stuck with a page.php file that may not have the layout you really want. This can make it challenging to get a good design, especially if your coding knowledge is lacking.
However, in the following guides, we’ll show you how to make a custom page with your desired layout and design. And the best part? You won’t need to write a single line of code.
Click any of the links below to find the guide you need:
How to Create a Custom Page in WordPress with SeedProd
Creating and editing a custom page used to require adding custom CSS, HTML, and PHP to your theme files. It wasn’t beginner-friendly, and if you made a mistake, it could break your WordPress site.
That’s why our favorite way to build custom pages is with a WordPress page builder like SeedProd. Instead of editing your theme files directly, you can customize any part of your website with drag-and-drop.

With hundreds of pre-made templates, it lets you create custom pages without writing any code. This includes everything from about and contact pages to high-converting landing pages and blog pages.
You can even use SeedProd to create a WordPress theme with custom headers, footers, sidebars, and more.
On top of that, SeedProd works with popular third-party tools, including email marketing services, WooCoomerce, Easy Digital Downloads, and Google Analytics. So you can create a fully functional website and drive leads and sales using a single WordPress plugin.
To create your first custom WordPress page with SeedProd, follow the easy steps below.
Step 1. Install and Activate SeedProd
First, install and activate the SeedProd plugin.
There are several versions of SeedProd available, including a limited free version. For this guide, we’ll use SeedProd Pro because it has more templates, blocks, and integrations.
For help with this step, please see our documentation on installing SeedProd. It will also show you how to activate your license key.
Step 2. Create a New Page in WordPress
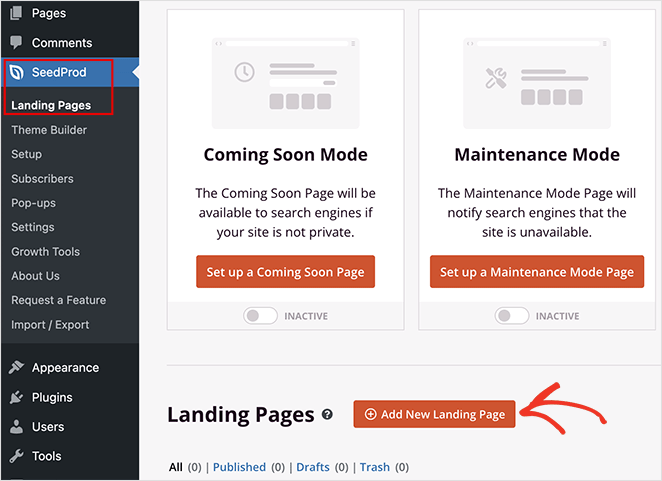
SeedProd lets you create a new page in 2 different ways.
You can navigate to SeedProd » Landing Pages and make a standalone landing page.
Or, you can go to Pages » Add New Page from your WordPress admin and click the “Edit with SeedProd” button.
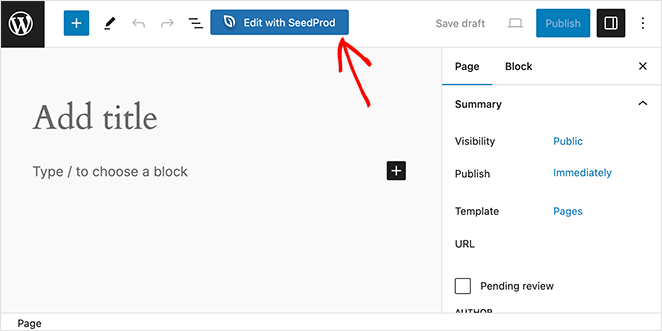
The method you choose doesn’t make any difference to the final page, so select the most comfortable option.
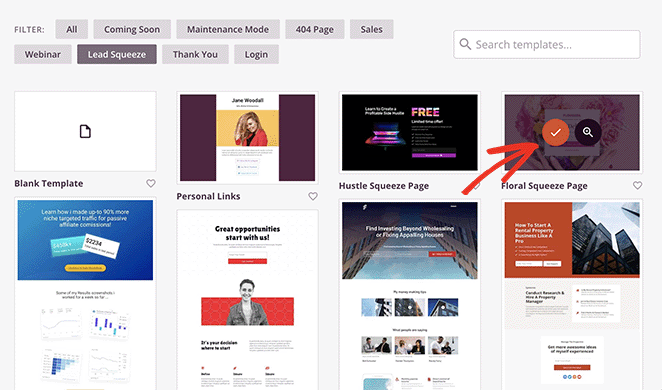
After creating a new page, you can choose a template to use as a starting point. The template library is organized by campaign type, such as “Sales,” “Webinar’, and “Coming Soon.”
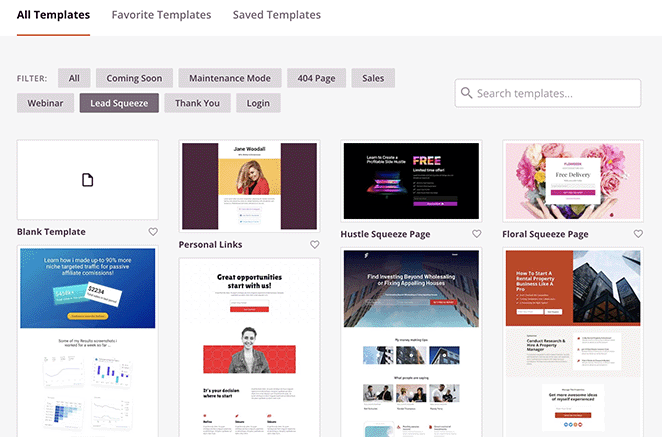
Click any of the tabs along the top to filter the templates. It’s also possible to start from scratch using the “Blank Template.”
Scroll through the designs until you find one matching your desired layout. Then click the checkmark icon to select it.
Now, enter a name for your custom page. SeedProd will automatically generate the page URL based on its title, but you can change it if necessary.
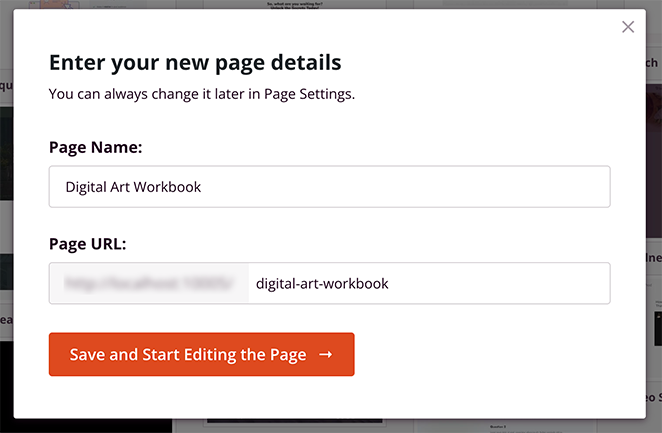
From there, click the Save and Start Editing the Page button.
Step 3. Customize Your WordPress Page
SeedProd will now open your template in its visual page editor. You’ll see a live preview on the right-hand side and various block settings on the left.
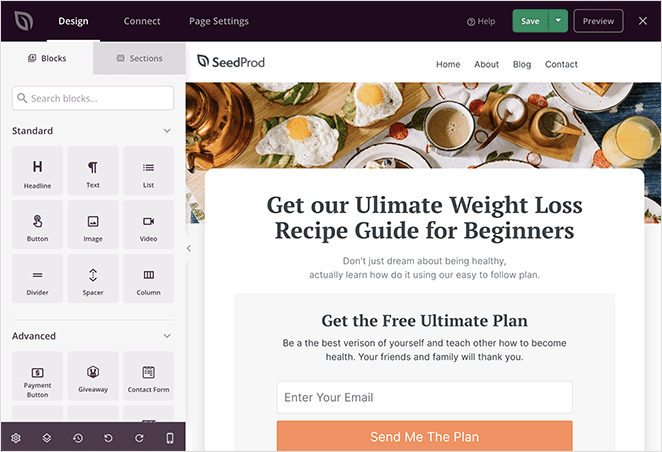
Your chosen template comprises these blocks, columns, and sections. To customize them, click to select a block in the editor. The block settings will then open in the left-hand sidebar.
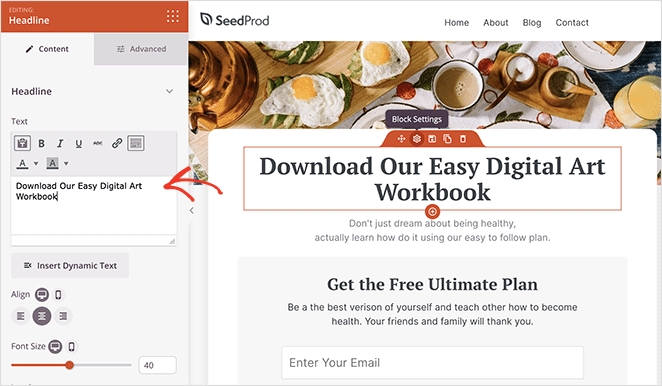
In this example, we’re editing the text inside the “Headline” block. You can also adjust the heading alignment, font size, heading level, and link in the same panel.
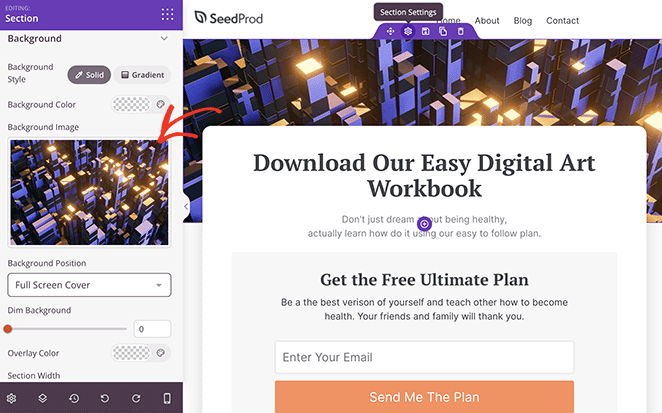
Changing and adding new images to your custom page is just as easy. Simply click any image, then add a new one from your computer or WordPress media library.
You can add more elements to the template by dragging a block from the left-hand sidebar and dropping it onto your page.
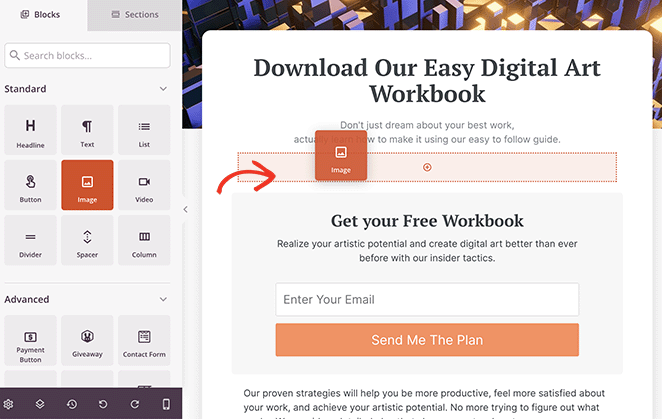
These design elements can include:
- Signup forms
- Testimonials
- Social sharing icons
- Countdown timers
- Image galleries
- Pricing tables
For a complete list, see the WordPress Blocks page.
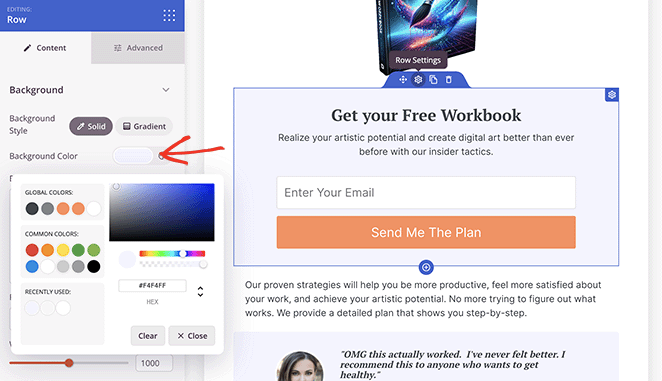
If the template’s color scheme isn’t to your liking, changing it takes just a few clicks. Select a block, column, or section and click the color options in the settings panel.
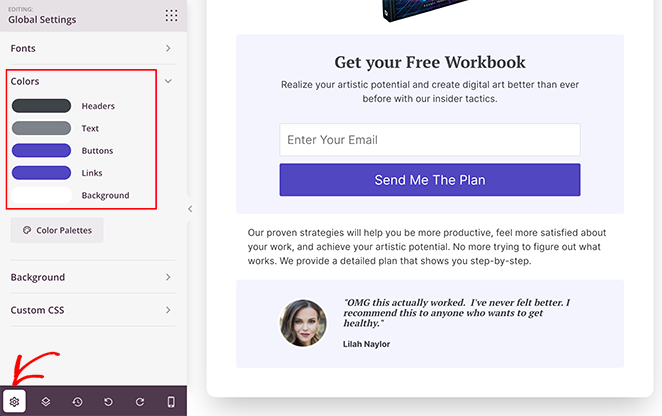
Alternatively, click the cog icon in the bottom-left corner and set your custom colors there. This method changes the colors automatically for every block on the page, saving you from customizing each block individually.
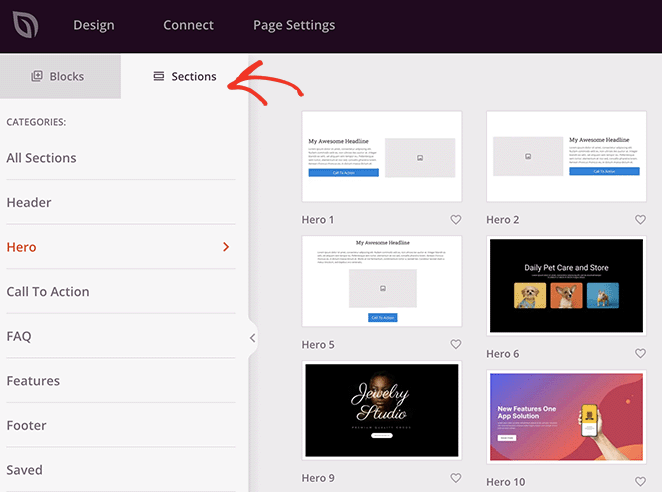
SeedProd also comes with pre-made Sections. These collections of blocks, rows, and columns make creating a custom page easier.
For example, if you’re creating a sales page, you can use the pre-made Hero sections to make it eye-catching and engaging.
To find them, click the Sections tab in the left-hand panel, then scroll through the templates until you find one you like. Then, hover over a Section and click the plus icon to add it to your page.
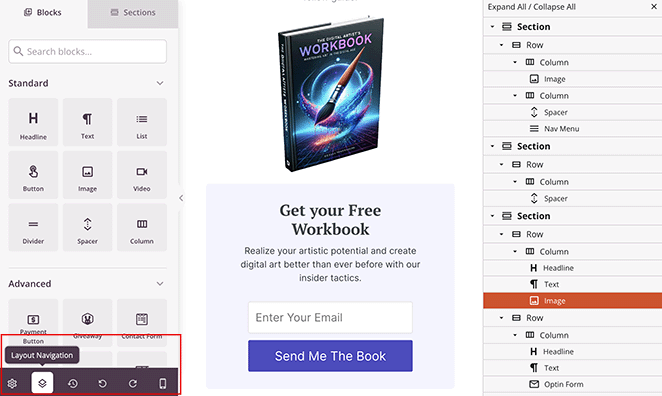
At the bottom of the page editor, you’ll also see a toolbar with various icons, including Layout Navigation, Revision History, and Undo and Redo. These options make it easier to find different elements on your page and reverse changes you make by mistake.
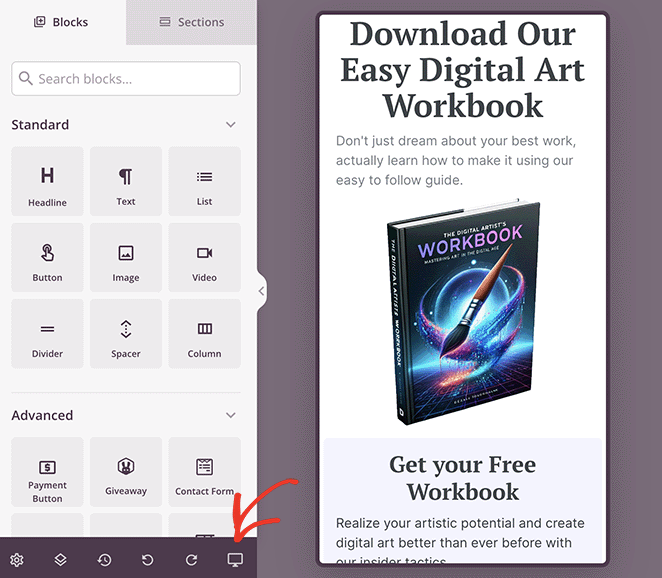
You can also click the mobile phone icon to see a live preview of your page on mobile devices. That way, you can ensure your page is mobile responsive and easy to navigate on smartphones and tablets.
When you’re happy with your custom page, click the Save button in the top-right corner.
Step 4. Publish Your Custom Page in WordPress
To publish your custom WordPress page with SeedProd, click the dropdown menu next to the “Save” button and select Publish.

Now, you can visit your custom page to see how it looks live on your website.

Alternative Ways to Create Custom WordPress Pages
If you’re using a block-based WordPress theme, such as Twenty Twenty-Four, you can use the WordPress block editor to build custom pages. This is useful if you want to reuse the same design across multiple pages because you can apply the same template.
You also use the WordPress site editor to create a unique page layout without installing additional plugins.
However, please note that the following 2 methods require block-based WordPress themes. If you’re not using a block theme, we recommend using a page builder instead.
Creating a WordPress Custom Page Template with Block Editor
For this method, start by opening a page and clicking Pages in the right-hand menu next to the “Template” heading.
In the popup that appears, click the “Add Template” icon.
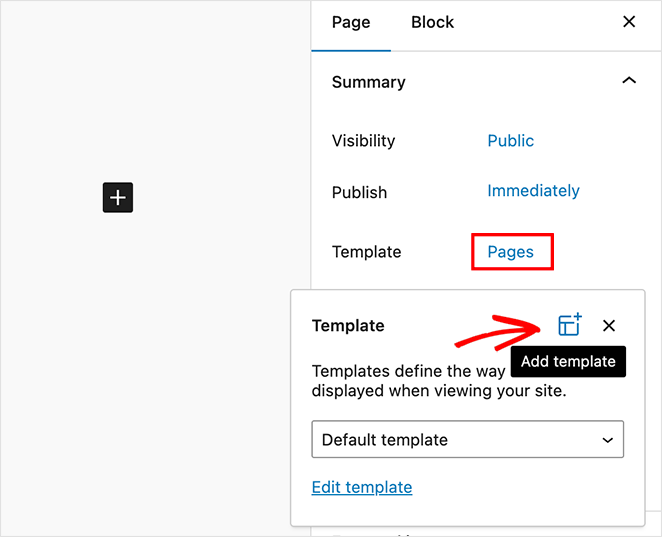
From there, enter a template name and click the Create button.
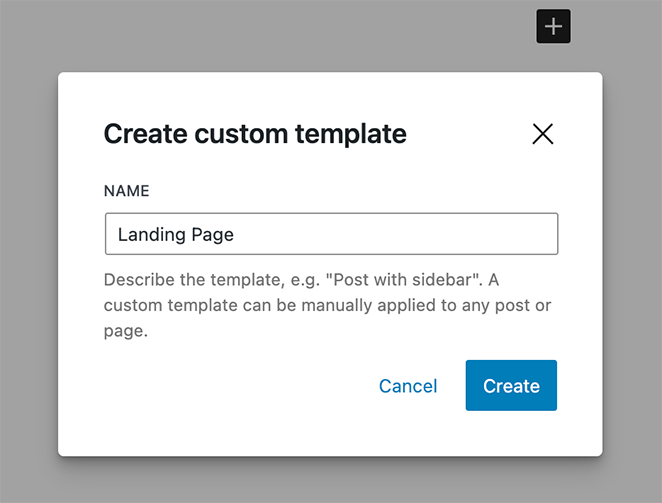
Now, you’ll see the Template Editor, which works the same as the content editor. Here, you can design your new template by adding blocks, such as headings, images, and content, and formatting the text styling.
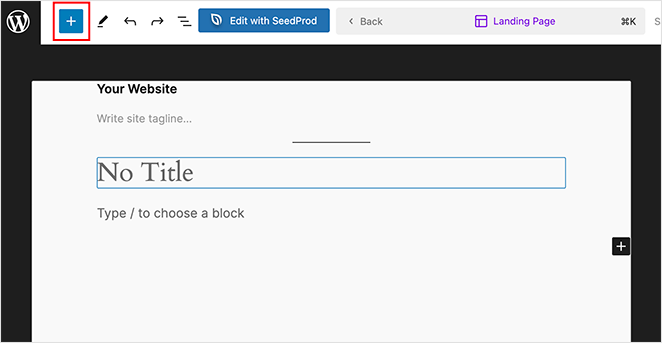
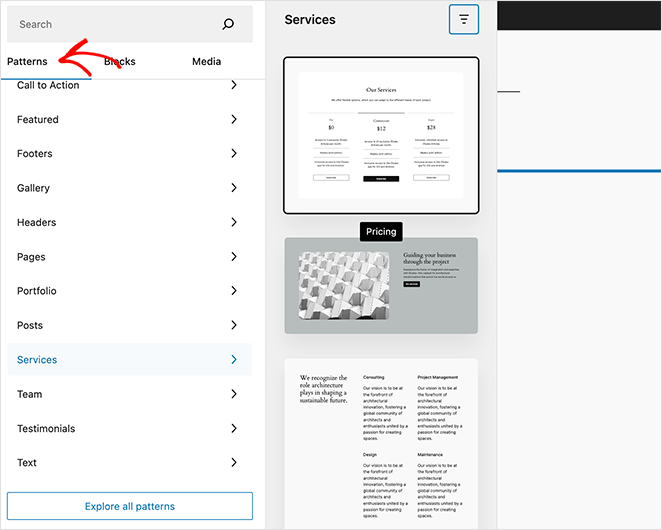
You can also use patterns, which are collections of blocks often used together, like pricing tables and calls-to-action.
You’ll find these by clicking the plus icon and selecting the patterns tab. Then, simply click one to add it to your page template.
When you’re satisfied with your template, click the Save button.
Now, you can apply that template to any existing page. All you need to do is open a page, click the text next to “Template,” and choose the template you just created.
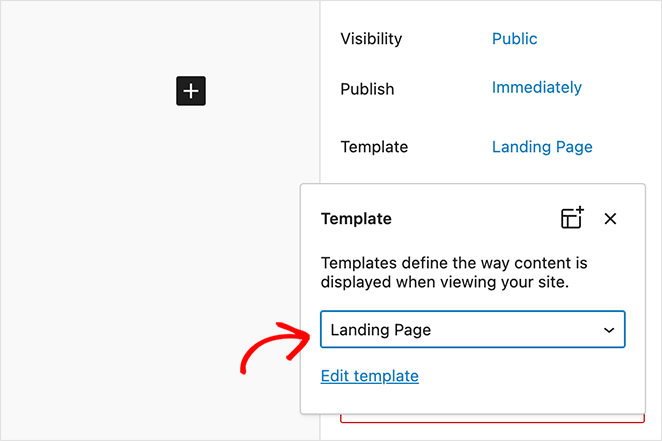
After applying the template, you can add content as you would with any other WordPress page.
Creating a Custom Page with WordPress Site Editor
If creating a custom template feels like too much work, you can use the WordPress site editor to create a custom page. This allows you to change the entire design of the page and make it completely unique.
First, create a new WordPress page like you usually would by going to Pages » Add New from your WordPress dashboard. Here, add your single page attributes, such as tags, categories, and featured images.
When you’ve saved your changes, navigate to Appearance » Editor and click the Pages menu item on the left-hand side.
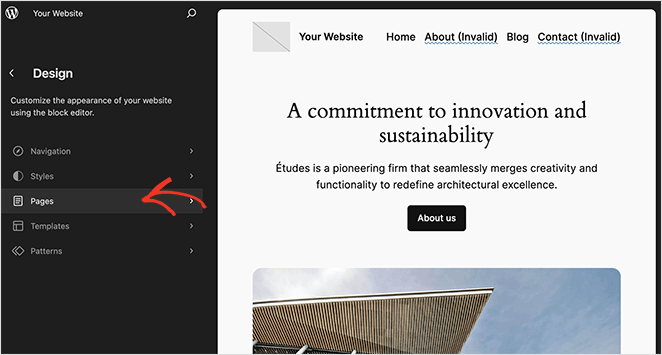
You’ll now see a list of pages you’ve created on your site. So, find the page you just made and click it.
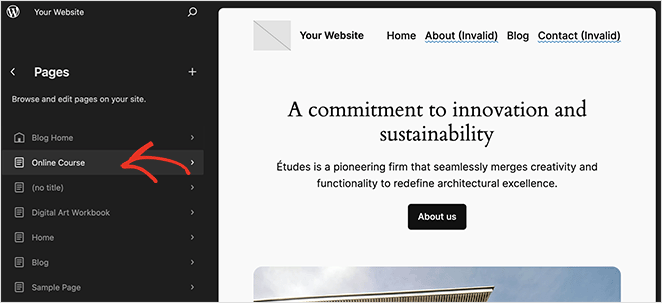
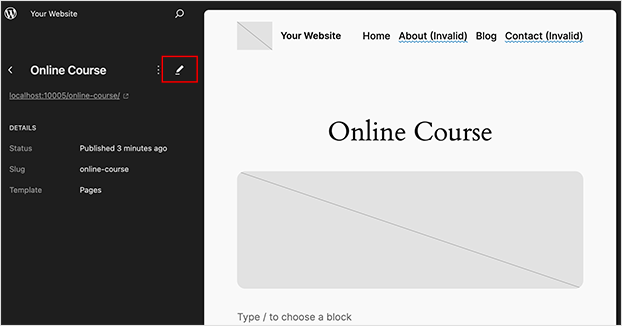
WordPress will now show a preview of your page. To change its design, click the pencil icon next to the page title.
Now, you can edit the page’s layout using the editor tools. For instance, clicking the blue plus icon lets you add new blocks, or you can click to customize any block or page content.
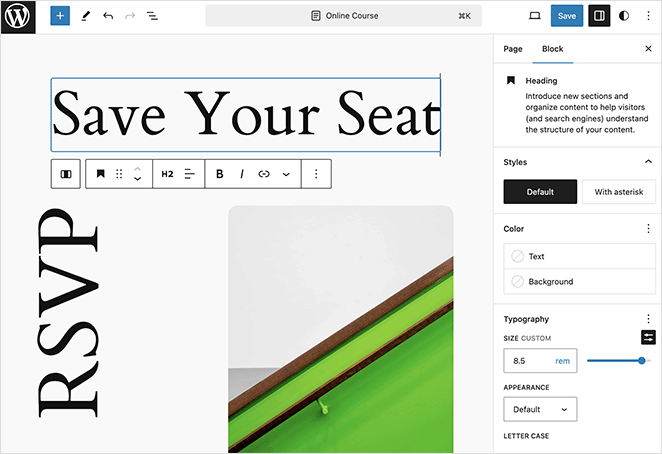
When you’re happy with the changes, click the Save button, then visit the page to see your new design.
And there you have it!
You’ve now learned how to create a custom page in WordPress. All of the methods we’ve covered are straightforward and won’t require help from a developer.
So, go forth and create the perfect WordPress page for your next project.
You might also find the following WordPress guides helpful:
- How to Make a Page Full Width in WordPress
- How to Edit Your WordPress Home Page (Easy Way)
- How to Create a Custom WordPress Author Page
- How to Create a Service Page Design in WordPress
Thanks for reading! We’d love to hear your thoughts, so please feel free to leave a comment with any questions and feedback.
You can also follow us on YouTube, X (formerly Twitter), and Facebook for more helpful content to grow your business.

