Looking for an easy way to make a product image gallery for your WooCommerce website?
Product image galleries can drive sales and improve your online store’s customer experience. Fortunately, adding them to your WooCommerce site is relatively easy and requires only a few simple steps.
In this article, we’ll walk you through setting up a WooCommerce product image gallery, from uploading your product images to customizing your gallery display step-by-step.
Why Create a WooCommerce Product Image Gallery?
Creating product image galleries in WooCommerce can help show your products in the best possible way. This gives potential customers a better idea of what they’re buying and helps them make informed purchasing decisions.
Additionally, a visually appealing image gallery can enhance the overall user experience of your online store, making it more engaging and easier to navigate. This can lead to higher customer satisfaction and increased sales.
By giving customers clear and detailed images of your products, you can build trust and credibility with your brand, leading to higher conversion rates and more sales. Even better, they can set your online store apart from competitors, giving you an edge in a crowded marketplace.
Why Use SeedProd to Make a Product Image Gallery?
When considering ways to build a product gallery for your WordPress site, you might immediately reach for a WooCommerce product gallery plugin. After all, they make customizing the default WooCommerce features easy.
However, not all image gallery slider plugins have the key features you need for an online store. As a result, you may install more WordPress plugins than intended, which can add unnecessary bloat to your site.
That’s why our favorite choice for adding a product image gallery to WooCommerce is SeedProd.

It’s the best website and landing page builder for WordPress, allowing you to customize every part of your WooCommerce site without code easily.
Whether you want to create an entire WooCommerce site from scratch or customize individual product pages, you can do it all with SeedProd’s drag-and-drop builder.
Here’s a taster of some of SeedProd’s WooCommerce customization options:
- Website Kits: Premade WooCommerce theme templates you can install with a single click.
- Drag-and-drop Builder: Build custom pages for your store, including checkout, shopping cart, shop page, and more without code.
- WooCommerce Template Tags: Product Gallery, Product Featured Image, Product Data Tabs, Product Meta, Product Content, and more.
- WooCommerce Blocks: Add to Cart button, Menu Cart icon, Product Grid, Top Rated Products, Recent Products, Featured Products, and more.
- Page Modes: Create a WooCommerce coming soon page, or put your eCommerce store in maintenance mode.
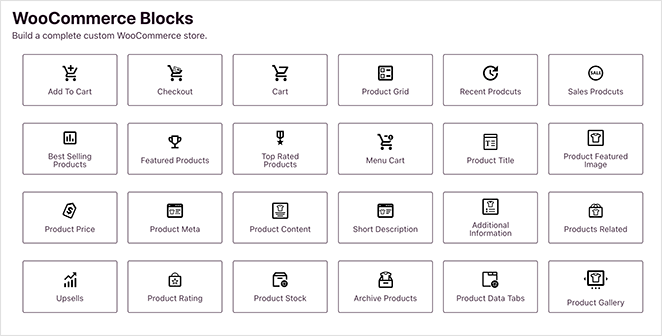
Additionally, you can use any of SeedProd’s other blocks and features, such as the carousel slider, opt-in forms, countdown timers, reviews, testimonials, and more.
Given its ease of use and endless customization options, it makes sense to manage your online store’s design and layout with SeedProd.
Creating a WooCommerce Product Image Gallery with SeedProd
Before we dive into this step-by-step guide, you’ll first need to ensure you have WooCommerce installed on your WordPress website. If you’re still setting up your store, you can follow this guide on creating an online store first.
Once you’ve done that, follow these steps to add a stunning image gallery to WooCommerce.
- Step 1. Install and Activate SeedProd
- Step 2. Choose a WooCommerce Theme Template
- Step 3. Add WooCommerce Product Image Gallery
- Step 4. Customize Your WooCommerce Product Page Template
- Step 5. Publish Changes to Your WooCommerce Store
- Bonus: Add Product Videos to WooCommerce
- More Ways to Customize WooCommerce
Step 1. Install and Activate SeedProd
First, you’ll need to download SeedProd Elite and install and activate it on your WordPress website. The Elite plan gives you access to all the best WooCommerce features and functionality.
If you need help with the installation, you can see our documentation on installing SeedProd. It walks you through uploading and activating the plugin and enabling your SeedProd license key.
Step 2. Choose a WooCommerce Theme Template
Once the plugin is active on your website, navigate to SeedProd » Theme Builder from your WordPress dashboard. Then click the Theme Template Kits button.
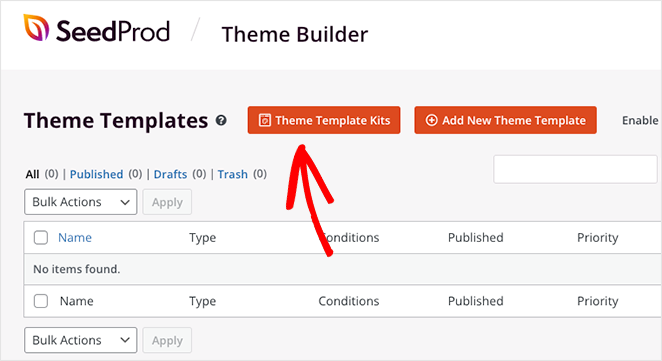
On the following screen, you’ll see a library of templates you can install with 1 click. Each template comes with all the pages you see in the demo. For example, if you preview a template with an ‘About Us’ or ‘Testimonials’ page, SeedProd will automatically make those pages for you.
To see only templates compatible with WooCommerce, click the WooCommerce tab. From there, browse the designs until you find one that matches your needs, then hover over it and click the checkmark icon.
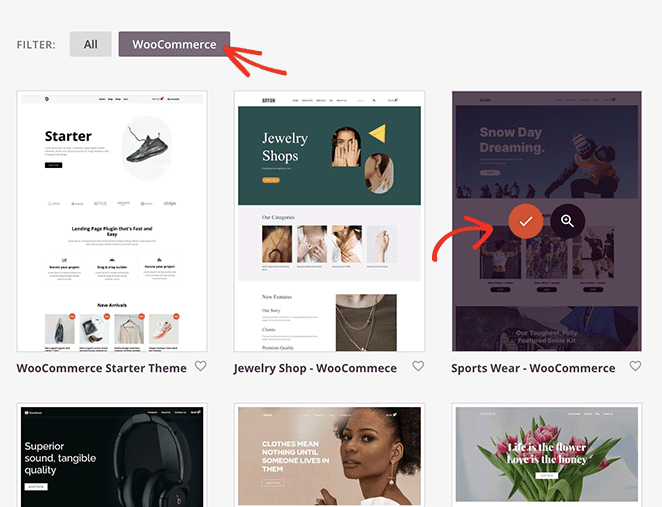
Now SeedProd will import that template, and in a few seconds, you’ll see all the template parts in a list on the theme dashboard:
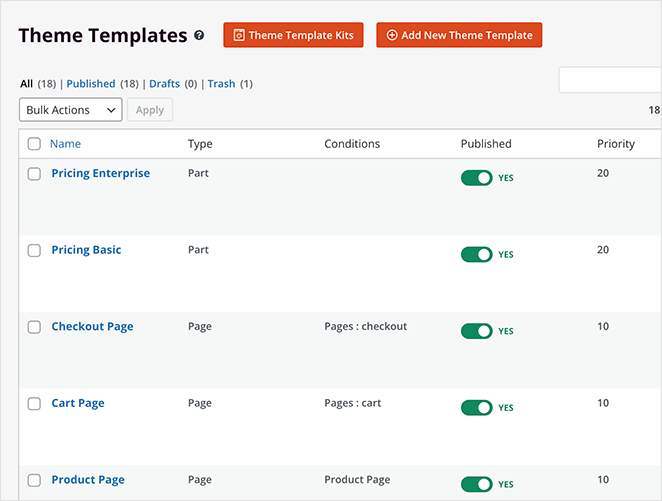
SeedProd’s drag-and-drop page builder allows you to easily customize each template part, including your checkout, cart, shop, and single product pages. That’s how we’ll add a responsive product gallery slider.
But first, you’ll need to add gallery images to your WooCommerce products, which we’ll show you how to do next.
Step 3. Add WooCommerce Product Image Gallery
Adding extra photos to your products is a fantastic way to provide potential customers with more information. For example, you can use a gallery for uploading additional variation images if a product has different color options or product variations.
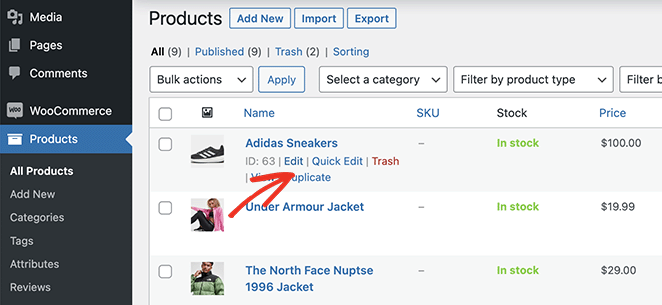
To add more product photos, navigate to Products » All Products from your WordPress admin. Next, find the product you’d like to add a product gallery to and click Edit.
Inside the product editor, you’ll see a panel called ‘Product Gallery’ on the right-hand side. In this panel, click the ‘Add product gallery images’ link to add your gallery thumbnails.
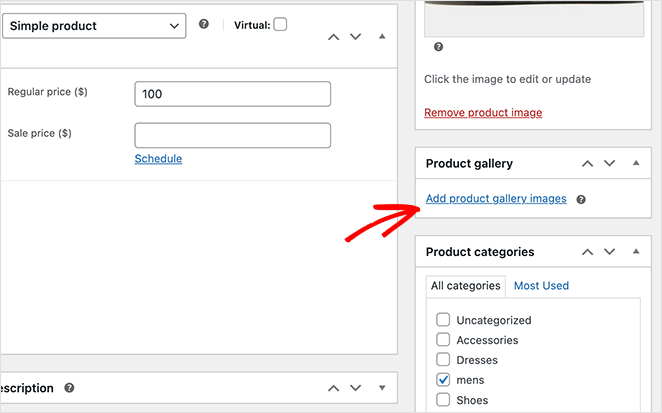
Clicking this link will open the WordPress Media library, where you can either upload images from your computer or directly from the library.
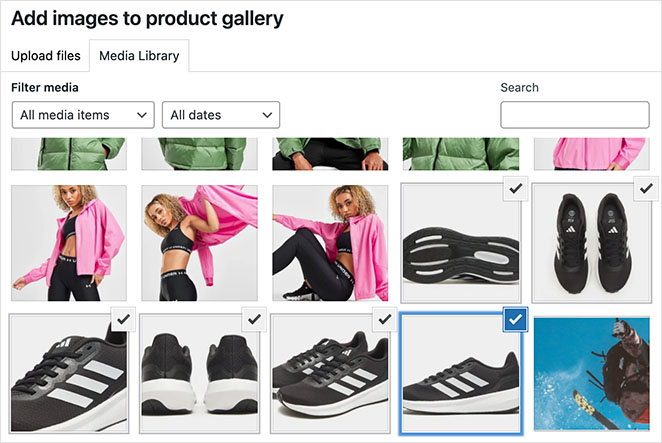
Hold down shift on your keyboard to select multiple images, then click the Add to Gallery button.
WooCommerce will now add new images to your product editor. You should see your main image, then the gallery of extra thumbnail images beneath.
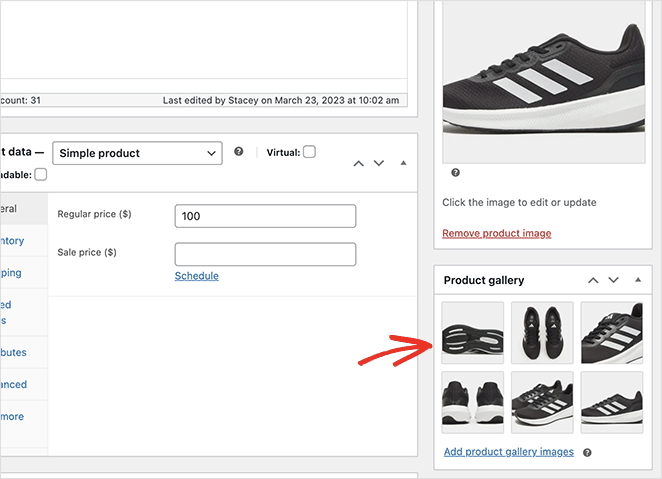
Make sure you click the Update button to save your changes.
Step 4. Customize Your WooCommerce Product Page Template
Now that you’ve added gallery images to your WooCommerce store, you can customize your product pages with SeedProd.
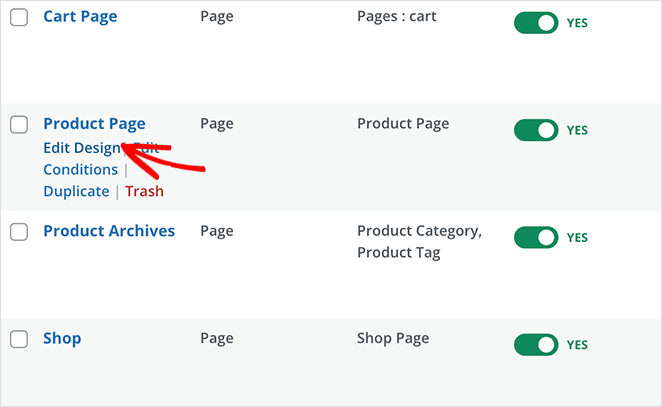
So head once more to SeedProd’s Theme Builder and look for the ‘Product Page’ template. This template determines how all your individual product pages look.
To customize it, simply hover over it and click the Edit Design link.
On the next screen, you’ll see SeedProd’s visual page builder. It’s here that you can drag and drop new design elements onto your page and customize the overall design.
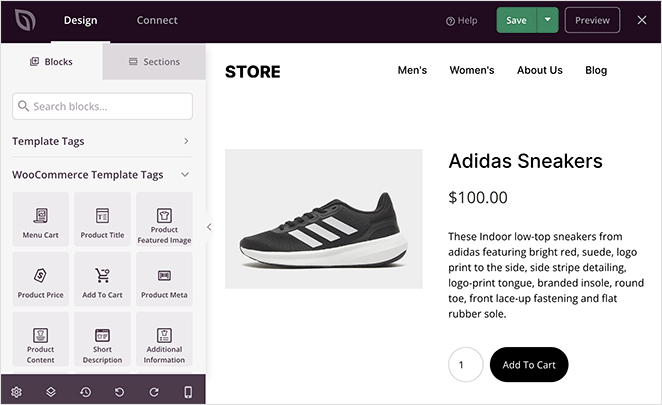
As you can see, this template uses the Product Featured Image as the default product image. This is one of SeedProd’s WooCommerce template tags, which pulls the product information directly from WooCommerce.
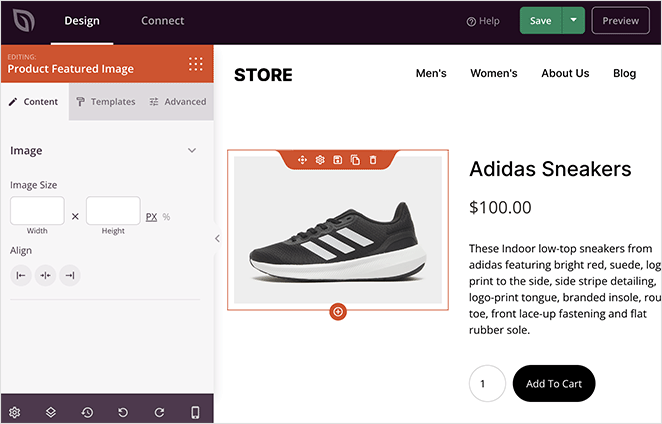
Let’s replace this block with SeedProd’s Product Gallery block.
To do this, hover over the Product Featured Image until you see an orange border, then click the trashcan icon.
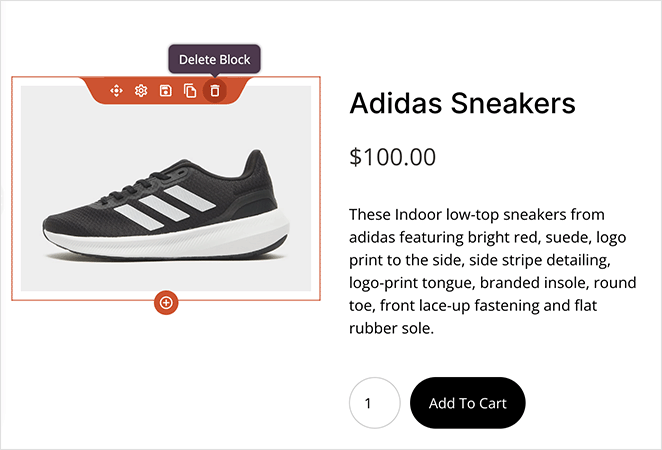
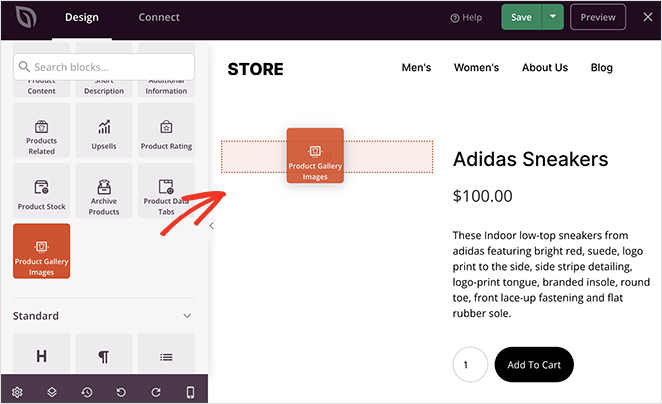
Adding Product Image Gallery Block
Next, click the Product Gallery Images block in the left-hand panel and drag it onto your page preview to embed the gallery layout.
When you click the gallery block, you’ll see several settings you can customize.
First is the image zoom option, which increases an image size whenever you hover over it.
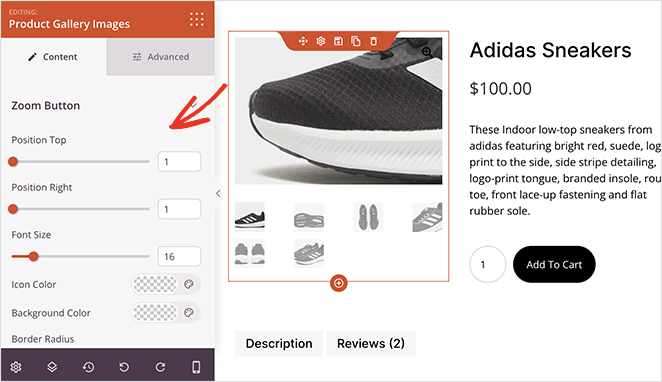
Here you can drag the horizontal sliders to change the zoom button position and font size. You can also edit the icon color, border radius, and background color.
Next are customizations for the main image border. For example, you can add a solid, dotted, or dashed border and change the border radius, color, and width.
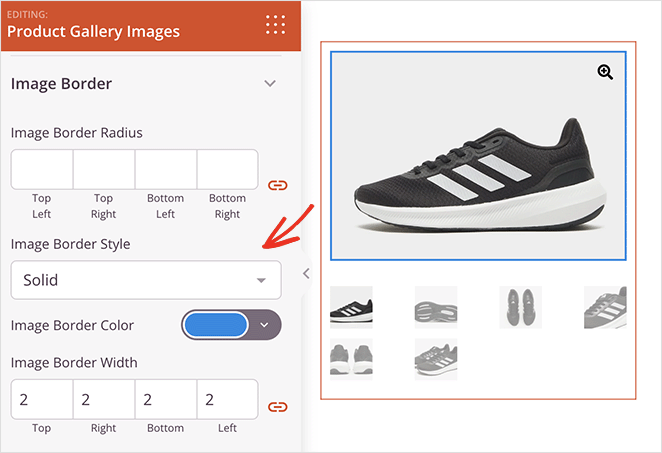
Similar customizations are available for the gallery thumbnails.
When you switch to the Advanced tab, you’ll see further styling options, including:
- Border radius, color, width, and style
- Spacing for the block margins and padding
- CSS class options
- Device visibility toggles for mobile and desktop
- Animation effects
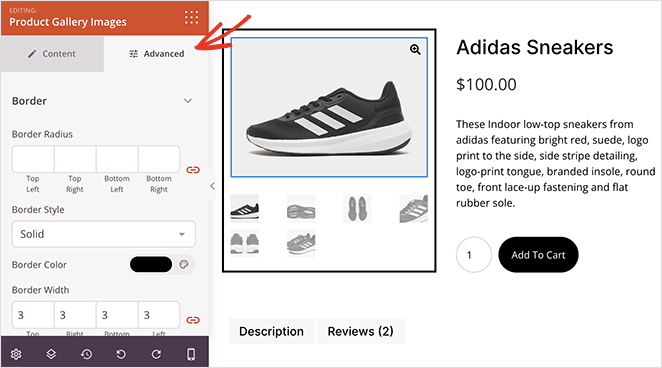
Continue customizing your product page until you’re happy with the design. For instance, you may want to add the related products block to cross-sell other products.
Or, you can embed a Tweet button to encourage users to share your product on social media.
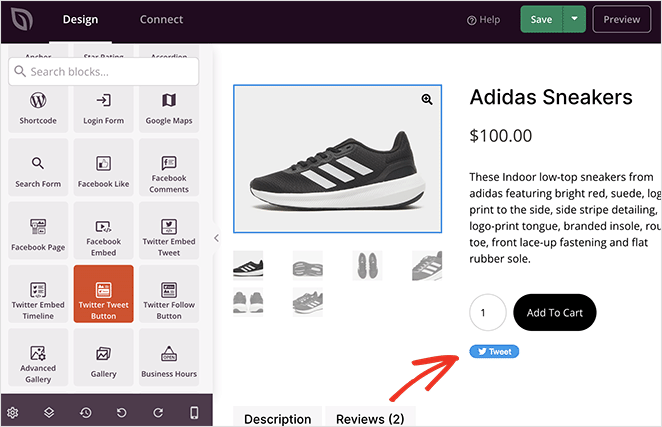
Don’t forget to click the Save button when you’re satisfied with your design.
Step 5. Publish Changes to Your WooCommerce Store
The final step is to make your changes live on your WooCommerce site. To do this, you’ll need to exit the page builder and go back to the Theme Builder screen.
From there, find the ‘Enable SeedProd Theme’ toggle, and switch it to the Yes position.

Now you can visit your product page to see your new product image gallery.
As you can see, you can click through each image and zoom in on various details. Plus, if you click the zoom button, the image will open in a full-screen lightbox popup.

From there, you can click through each image in a slideshow-like format.
Bonus: Add Product Videos to WooCommerce
Product videos are another great way to increase engagement on your online store. According to the research, 88% of people have purchased a product or service after watching a video.
There are several ways to add videos to your WordPress site from platforms like YouTube, Vimeo, and more. But our favorite solution is Smash Balloon’s YouTube Feed plugin.
This plugin has both a free and pro version, allowing you to embed stunning YouTube galleries anywhere on your site. It has several gallery layouts and autoplay options, and you can embed your video feeds with a WordPress block or shortcode.

That way, you can showcase user-generated content like product reviews, unboxing videos, tutorials, and more.
Follow this guide on how to create a video gallery in WordPress for all the steps.
There you have it!
More Ways to Customize WooCommerce
Creating a product image gallery is just one of the many ways to tweak your store. For more WooCommerce customizations, please see the following guides:
- How to Customize the WooCommerce Additional Information Tab
- How to Add View Cart Button in WooCommerce
- How to Change Shop Page Title in WooCommerce
- How to Add Star Rating to WooCommerce Product Pages
- How to Display Related Products in WooCommerce
- How to Display Product Categories and Tags in WooCommerce
- How to Get and Display Product Descriptions in WooCommerce
- How to Display Featured Products in WooCommerce
- How to Fix WooCommerce View Cart Not Working
- How to Hide Out of Stock Products in WooCommerce
We hope this guide has helped you learn to create a stunning product image gallery in WooCommerce.
Thanks for reading! We’d love to hear your thoughts, so please feel free to leave a comment with any questions and feedback.
You can also follow us on YouTube, X (formerly Twitter), and Facebook for more helpful content to grow your business.

