Trying to figure out how to resize an image in WordPress without breaking your layout or slowing down your site?
I’ve run into this problem more times than I can count. Whether I was adding blog images, product shots, or logos, oversized images always slowed down the page and looked off. That’s when I started using the built-in WordPress image editor — it’s quicker than most plugins, and it does the job well.
In this guide, I’ll show you exactly how to resize, crop, flip, and rotate images in WordPress — and how to undo those changes if needed. You won’t need extra tools or code. Just a few clicks inside your dashboard.
Let’s start with a quick summary of what you can do inside the WordPress Media Library.
Quick Summary: WordPress lets you resize, crop, rotate, flip, and restore images right inside the Media Library — no extra tools needed. These built-in features can help you speed up your site, improve user experience, and reduce hosting space.
- Resize: Use ‘Scale Image’ to shrink large images without cropping.
- Crop: Click and drag to trim images visually.
- Rotate: Turn images 90° left or right.
- Flip: Mirror images horizontally or vertically.
- Restore: Reset to the original image with one click.
Table of Contents
- Why Should I Resize Images in WordPress?
- How Do I Resize an Image in WordPress?
- How Can I Crop an Image in WordPress?
- How Do I Rotate an Image in WordPress?
- How Do I Flip an Image in WordPress?
- Can I Undo Image Edits in WordPress?
Shall we get started?
Why Should I Resize Images in WordPress?
Resizing the images you add to WordPress is important for 2 reasons:
- To make sure your site doesn’t slow down from the pressure of loading large images.
- To save space on your site’s hosting server.
If you haven’t already taken steps to improve the performance of your website, then image compression is a good place to start.
If you use high-quality stock photos or work with images taken from your camera, chances are your images have pretty big file sizes. While these large image files may be great for print, smaller image sizes work better on the web because it takes less time for browsers to load.
Most WordPress themes are optimized for a specific set of image sizes which are usually:
- Large
- Medium
- Small
- Thumbnail
Deciding which image sizes are called for in your theme and resizing your uploaded images to match is a great way to ensure your images load quickly.
Not sure what size your images should be?
First, find out the width of your content area in WordPress. Your content area is where any text or images you add to your site is displayed.
You can check this using Chrome’s Inspect Tool. Right-click anywhere on your site and select Inspect. Then hover over your content area to see its width in pixels — no need to touch the code.
A window with code will appear. Don’t worry about how scary this looks, you won’t need to do anything to the code.

Move your cursor over the code until you see a highlighted column, usually in blue. You’ll notice a tooltip at the top of the highlighted area. The first number is the width of your theme’s content.
In our case, the width is 695 pixels. This means that any image we upload should be no more than 695 pixels wide.
Now you have the starting point for your image size, you can create a featured image or resize your existing images in WordPress.
Let’s take a closer look at how you can use WordPress to resize images.
How Do I Resize an Image in WordPress?
Using WordPress to resize images is pretty simple.
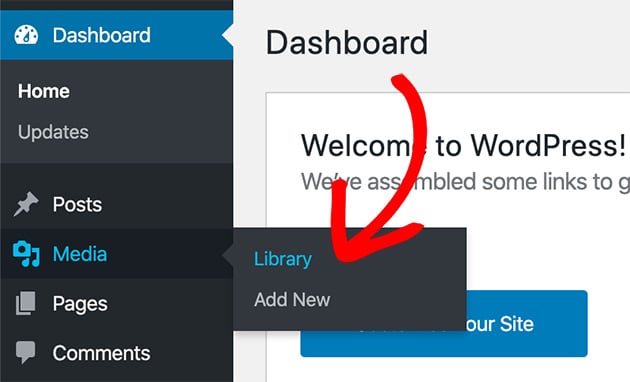
To get started, head to Media » Library from your WordPress admin panel.
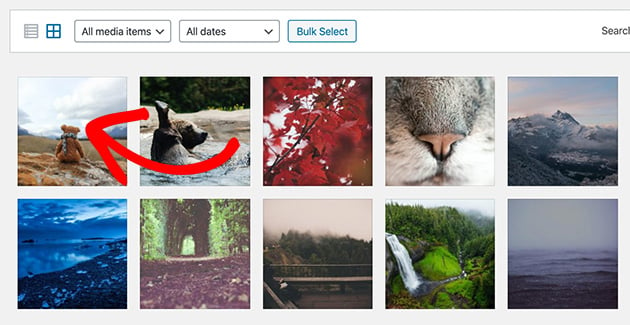
Now, upload or click on the image you’d like to resize in WordPress.
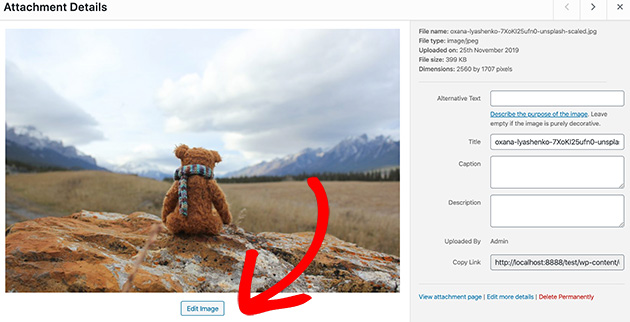
From here, click Edit Image.
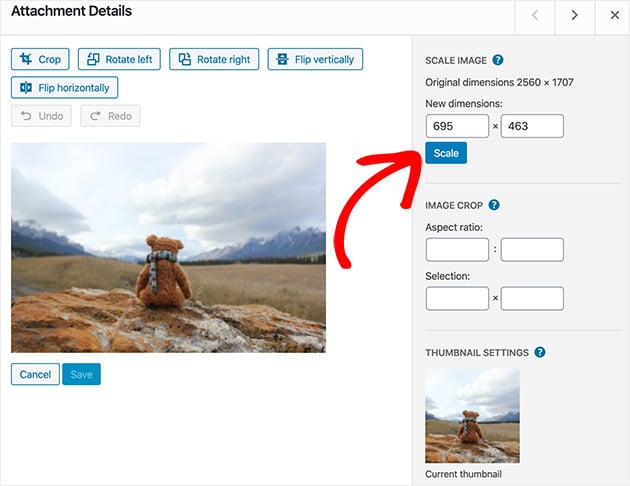
Under the Scale Image heading, you can resize the image by entering new dimensions. This tool shrinks the image without cropping anything out, and WordPress automatically keeps the correct aspect ratio.
If you just enter a width, the height will automatically be calculated based on the image ratio or vice versa.
In the first box, enter the width of your content area. In our case, this was 695 pixels.
When you’re done, click Scale to resize the image.
To use the resized image, go back to the image details page, and copy the URL as shown in the screenshot below.
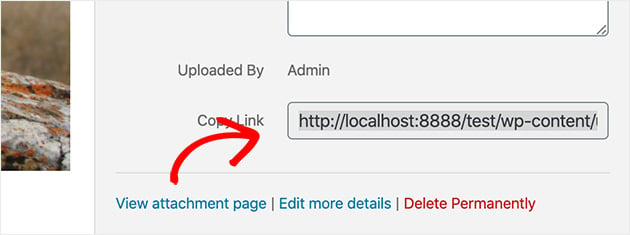
That’s it! You’ve now used WordPress to resize an image, and you can use it wherever you like.
To give you an idea of how resizing an image can impact your page speeds, let’s take a look at the original image’s page speed compared to the resized image.
We used Blog Tyrant’s website speed test tool for this example.
Here’s the test result of the original image size when added to a standard blog post.
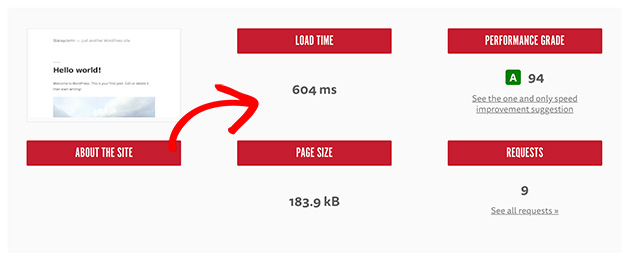
And, here are the results for the resized image.
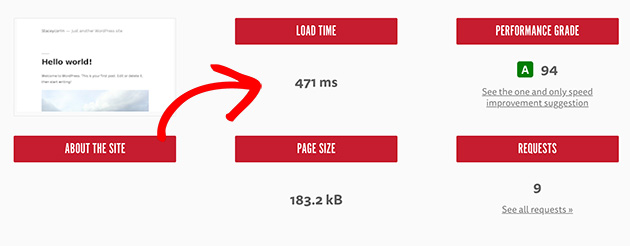
Even small differences in image size can add up fast. For example, our original image was 2.5MB — after resizing, it dropped to 280KB. That’s a 90% reduction. On a site with dozens of images, these savings can make your pages load faster and keep visitors from bouncing.
But imagine a website with hundreds of images. Even the smallest difference in loading times can have a huge impact on how likely visitors are to stay on your page.
Still, WordPress offers more than simple image resizing. You can use it to crop, rotate and flip images too. Shall we find out how?
How Can I Crop an Image in WordPress?
To crop an image in WordPress, we’ll follow the same first steps as we did with resizing an image.
Head to Media » Library, click the image you’d like to crop and click Edit Image.
Next, click and drag your mouse on the image to start cropping. Cropping means cutting out unwanted edges to focus on a specific part of the image.
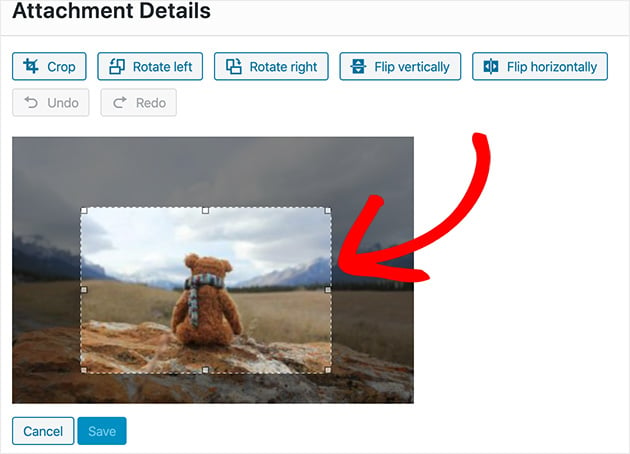
You can click on any of the little squares to adjust the cropped area or move the area around the image. Once you are satisfied, click the Crop icon as shown below.
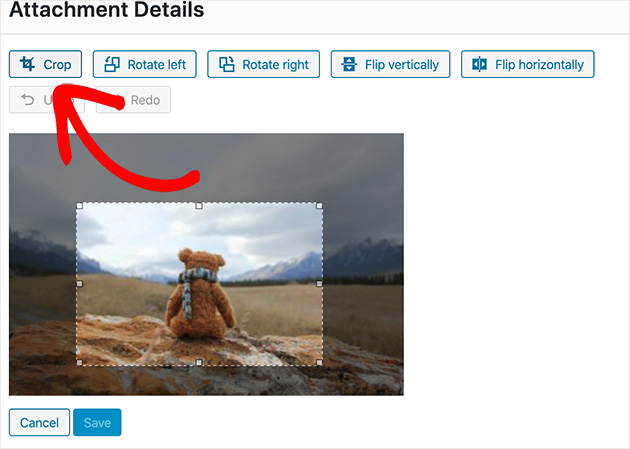
Now click Save.
Simple as that, you’ve cropped your image!
Again select the URL on the image details page to use the cropped image.
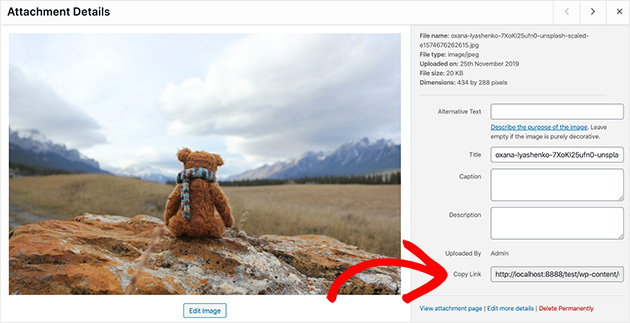
But what if you want to rotate your image in a different direction? Don’t worry, WordPress can handle that too. We’ll show you how next.
How Do I Rotate an Image in WordPress?
To learn how to rotate an image in WordPress, follow these instructions.
First, go to Media » Library, choose your image, and click Edit Image.
Now click the Rotate Left or Rotate Right buttons to rotate your image 90 degrees at a time.
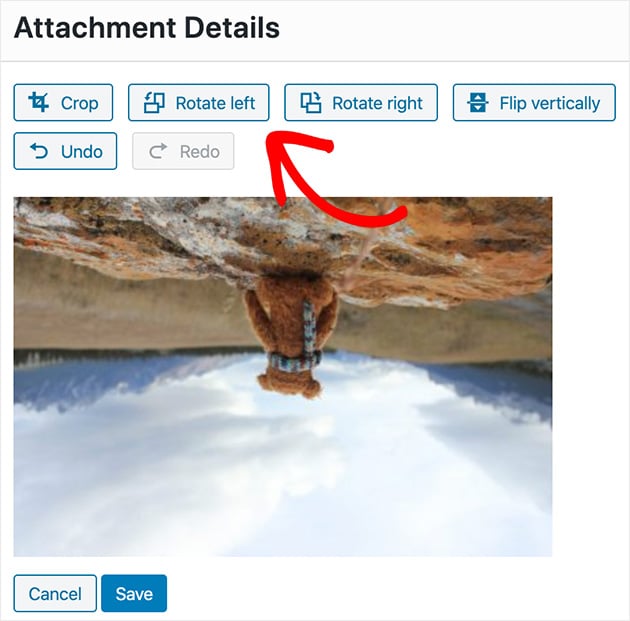
If you mess up, don’t panic. Clicking the Undo button will reset the image to the last step.
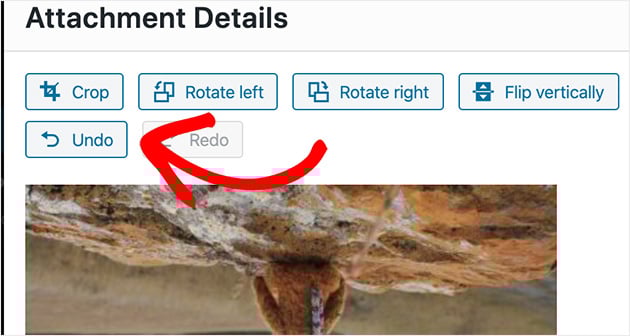
Click Save when you’re happy.
Great work! Rotating an image in WordPress is pretty easy, isn’t it? Now let’s look at how to flip an image.
How Do I Flip an Image in WordPress?
Flipping an image in WordPress follows the same basic steps as rotating an image.
First, go to Media » Library from your WordPress dashboard, select your image, and then click Edit Image.
To flip your image, click the Flip Vertically or Flip Horizontally button. Flipping mirrors the image — vertically means upside-down, horizontally means left-to-right.
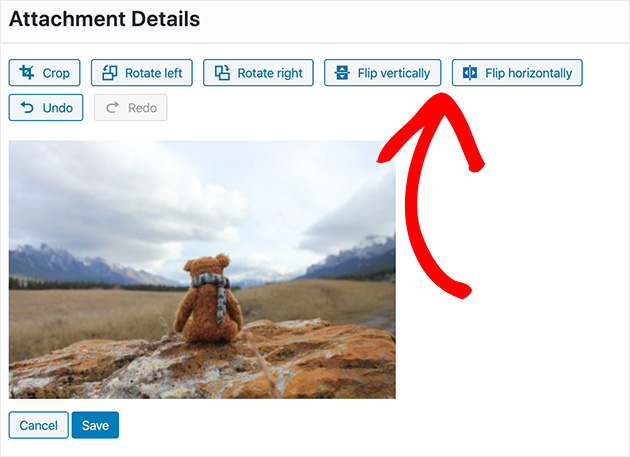
Click Save when you’re done.
With all the changes you’ve made to your image, what if you want to go back to the original image and start over? Keep reading to find out how you can do this.
Can I Undo Image Edits in WordPress?
We all screw up from time to time. We’re human, right?
If you screw up using WordPress to resize your images, we’ve totally got your back. There’s an easy way to get back to the original image.
In the image below, we’ve clearly cropped the image in the wrong place, and we’ve scaled the image to dimensions that are too small.
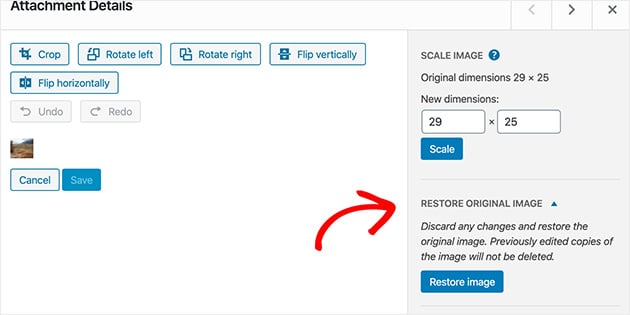
Look to the right-hand side of the image edit screen, and you’ll see a heading labeled Restore Original Image.
Clicking this reveals a button that lets you restore the image to its original size.
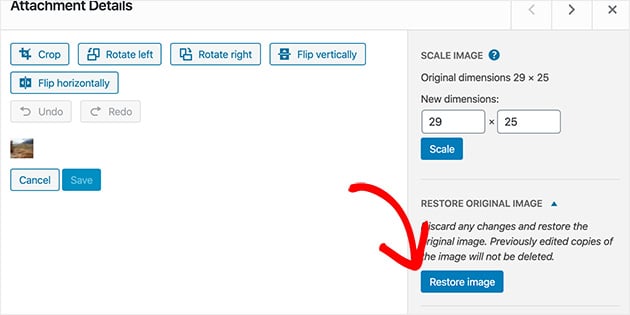
Click Restore Image to reset all of your changes. This brings back the image exactly as it was when you first uploaded it — removing any crops, flips, rotations, or size changes you made.
Now, your image is exactly the way it was when you first uploaded it. Pretty handy, right?
There you have it!
Today you’ve learned how to use WordPress to resize images. Plus, how to flip, crop, rotate, and reset them too.
You’ve also discovered how to find the ideal image size based on your WordPress theme’s content area. Now, when visitors head to your website, their browsers will load your images quicker without losing quality.
We hope you enjoyed learning how to resize images in WordPress. If you’re looking for more help, please see the following guides:
- How to Add a Gallery to WordPress Pages
- How to Change Blog Layout in WordPress
- How to Create a Custom Page in WordPress
- How to Embed Video in WordPress
- How to Change Fonts in WordPress Themes
Thanks for reading! We’d love to hear your thoughts, so please feel free to join the conversation on YouTube, X and Facebook for more helpful advice and content to grow your business.



Hi, I am trying to resize an image and I tried using the Edit image option as you show above. Unfortunately, WordPress say ‘Unable to create new image’. Could you help me with that?
Hello,
The most likely reason is not having mod-gd installed.
If you are working online with a hosting company and have Cpanel as your hosting platform you can enable this module in Cpanel through
PHP Selector—> extensions—> gd.
Let me know should you have any more questions.
Best Regards,
Re-sizing did nothing. Unless I missed a step, I followed your instructions and the image stayed the same size it was before.
Yeah, tried again. This isn’t changing the size for me.
Hello Travis,
For us to further assist, would you mind telling us if you receive an error when editing/saving an image?
Thanks,
This no longer works on wp.com. When I click on the image, “edit image” is on the top. When I click that, it only allows me to rotate, crop or flip. I’ve been using wp for years and have always found a way to get around this. Now, it looks like the only method is to edit it off-line before uploading.
Am I missing something?
Hi Scott,
First, can I confirm if you’re using the free WordPress.com or self-hosted WordPress.org version? This guide is aimed at self-hosted versions of WordPress. It’s also a good idea to check that your WordPress installation is up-to-date for any issues.
Hi, I am trying to add images through a widget on the bottem of my webpage, but on the webpage they appear larger than the original imported image what causes the image to be less sharp. I resized the images approximatly 190/50 and 90/90 (for round logo’s) before adding them to my media. How can I adjust the image on the webpage to appear like the original imported image size? Do I adjust this in the theme of the webpage? What am I missing here?
Hello Dann,
If you upload an image you can edit it here: https://a.supportally.com/oCDtrF
The option to upload an image using sizes like thumbnail/medium/large, etc. is not anymore present using Gutenberg blocks. You can install the classic editor for this option to show up: https://a.supportally.com/OZ9Pyz
Best Regards,
Hello. I’ve been using the free version of WordPress for over 10 years and you can guess I’ve been very unhappy with their new interface lately. So, a quick question: did they get rid of the option to set image sizes as Large, Medium, Small and Thumbnail??? I swear I can’t find it anywhere on the usual menu anymore or by fiddling with the image/gallery “blocks”.
Hello Emerson,
If I understand your question correctly. The blocks that you are referring are the Gutenberg image/gallery blocks of WordPress and not about the SeedProd plugin, correct? If so, yes the option is not available using Gutenberg blocks. You can resize the image using the Edit link. See here: https://a.supportally.com/oCDtrF
Or you can install the Classic Editor plugin. The option to upload images using different sizes is still available.
Best Regards,
I tried to resize a jpg that is currently 850 x369. When I try to scale down it says file restricted to 800 width. Image appears way to large at 850 and 800. What can I do?
Hi Brenna, you could try editing the image in an online image editor or image editing software to reduce the file size and then re-upload it to your website.
I know I should have started my blog with smaller images but not the page loads so small. Is there a way to upload new images (that are smaller) without needing to reformat each post?
Hi Adam. You can try one of these image compression plugins. Many automatically optimize images without you needing to re-upload them.
May 8, 2023
There is no “scale image” in the edit image function, nor is there anything that can be adjusted regarding image sicze. Nor can I seem to edit the image size in a post editor using html. It seems there is simply no visible way do do so at all…..BUT I know there must be a way or many would dessert wp. Can you help me figure this out? Your post may be out-of-date because wp does not want to allow users to resize or scale images. But how is THAT a good business plan? Frustrated in Massachusetts
Hi Michael, the settings that you see within the image editor may look different if you’re using WordPress.com, the hosted version, in comparison to WordPress.org, the self-hosted version. You can learn the difference between the two here. If you’re still facing issues, we suggest reaching out to the support forums on the relevant WordPress platform.
This hits the nail on the head….exactly what I needed & will switch to .org using your tremendous guidance. Thanks!
I’m so glad this helped you! If you need anything else you’re more than welcome to ask.
Hey Stacey, is there a step after you scale and “copy” the link. I follow these steps but my images are not scaled in my post.
Cheers
Hi Laura,
Make sure after scaling your image, you exit the post you’re working on and refresh your page, then edit post again and add your image. Sometimes it needs a little refresh to show up with the new scaled version. I hope this helps!