Want to know how to make a calendar in WordPress?
Adding a calendar to your WordPress website is a fantastic way to display in-person and virtual events to your visitors. That way, you can promote upcoming events to improve brand awareness and encourage more people to attend.
In this article, we’ll explain step-by-step how to make a calendar to display events in WordPress.
Why Add An Events Calendar to Your WordPress Site?
When you add a calendar to your WordPress site, you can tell visitors about one-off and recurring events, like webinars, conferences, coaching calls, virtual retreats, and more. With the help of an events calendar, you can promote the event details and persuade more people to register and attend.
Even better, if you run a membership website, you can let users submit their own events. As such, you can build an active community, attract more people and keep your calendar updated with the latest events. It also saves you from manually searching for and adding new events personally.
How to Create an Events Calendar in WordPress with Sugar Calendar
There are several ways to add an events calendar to your WordPress site. For this tutorial, we’ll use a WordPress plugin called Sugar Calendar.
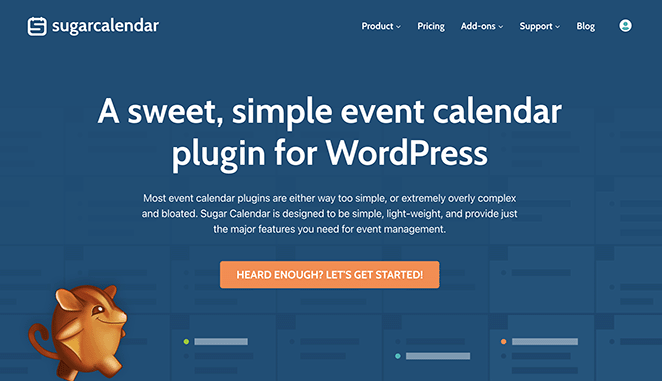
Sugar Calendar is the best WordPress events calendar plugin. It’s the easiest way to add new calendars to your site and has everything you need to customize your calendars, set custom event start and end times, sync with Google Calendar, and more.
This WordPress calendar plugin has a simple, minimal interface, is lightweight, fast, and won’t impact your website’s performance. You can learn about more features on the Sugar Calendar website.
How about we dive into the tutorial? Just follow the steps below to get started.
Step 1. Install the Sugar Calendar Plugin
The first step is to install the Sugar Calendar plugin on your WordPress website.
For this guide, we’ll use the Pro version of Sugar Calendar because it provides access to all the Pro add-ons. However, you can always try the free version to understand how it works.
After signing up for the plugin, download it to your computer, then upload it to your WordPress site. If you’ve never done this before, you can follow this guide on installing and activating a WordPress plugin.
Once the plugin is active on your website, navigate to the Calendar » Settings page from your WordPress dashboard, and paste your plugin license key.
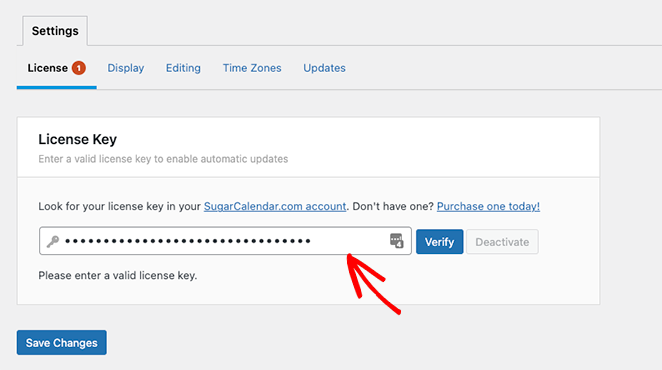
Now click the Verify Key button and select Save Changes. Sugar Calendar is now active on your website.
Step 2. Create a New Calendar
To create your first events calendar, go to Calendar » Calendar from your WordPress admin. Make sure you select the Calendar tab, then click the Add Calendar button.
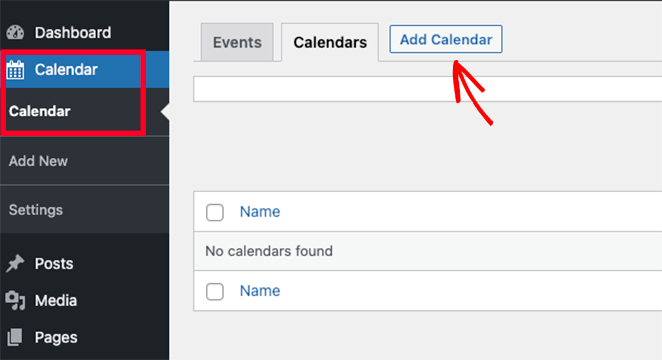
After clicking the Add Calendar button, you should see a popup with several fields to complete.
Sugar Calendar lets you have multiple calendars on your website, but you can only display a single calendar view to visitors at a time. Instead, users can switch between calendars on the front end of your site by choosing one from a drop-down menu.
With this in mind, give your calendar a name that will help users recognize it.
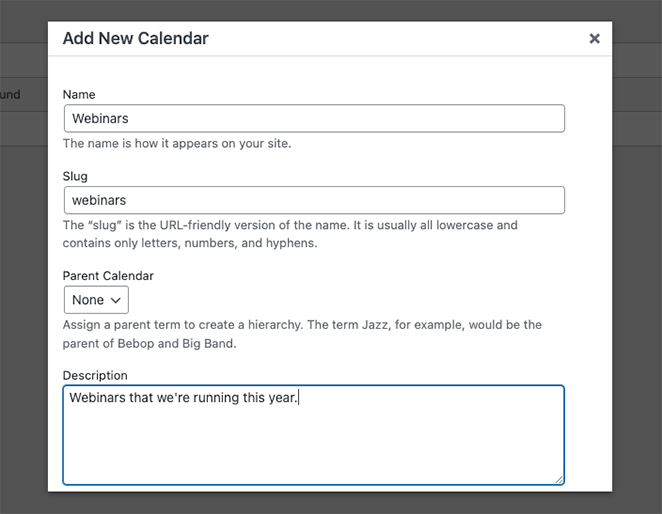
From there, enter your calendar URL slug, and if you need to, you can choose a parent calendar.
This works like pages in WordPress where the child appears beneath the parent in your WordPress dashboard. It’s a great way to organize your calendars, especially if you have many.
Next, you can give your calendar a description. The description may show next to your calendar on your website, but that depends on your WordPress theme.
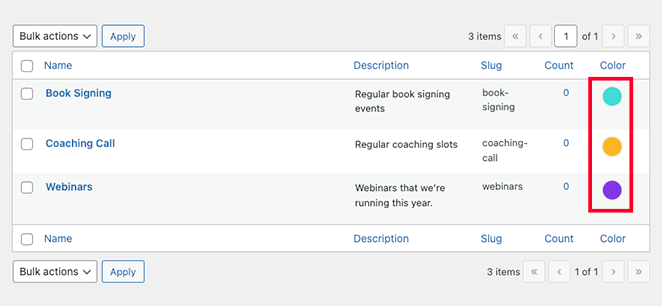
Finally, you can choose a color to represent your calendar in the WordPress dashboard. This is another good way to tell your calendars apart.
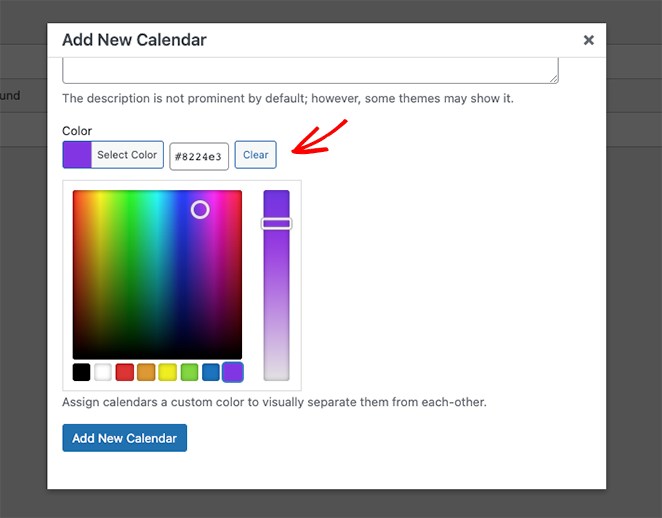
When you’re happy with your calendar details, click the Add New Calendar button.
You can repeat this step to add as many calendars as you like to your website. Once they’re set up, you can start adding events.
Step 3. Add Events to Your Calendar
To add an event to your calendar, switch to the Events tab, then click the Add Event button.
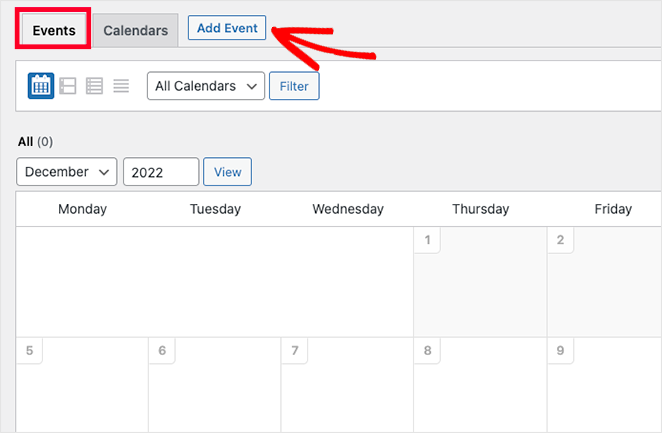
On the next screen, you can enter the information about your event, including its duration and details. First, go ahead and give your event a name.
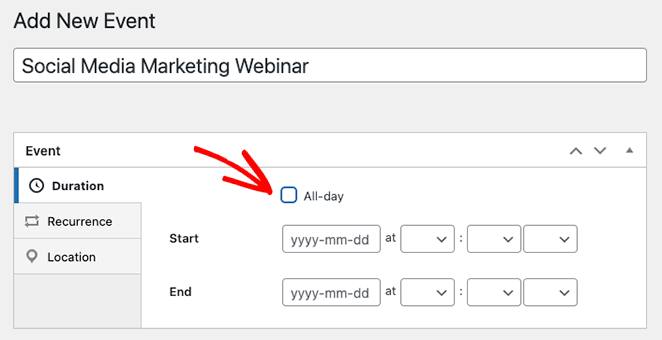
After, enter the start and end times and date. If you’re running an all-day event, you can click the All-day check box.
Sugar Calendar’s default settings create all events as one-time events by default. However, if you have a recurring event, like a monthly webinar, you can change the settings in the Recurrence tab.
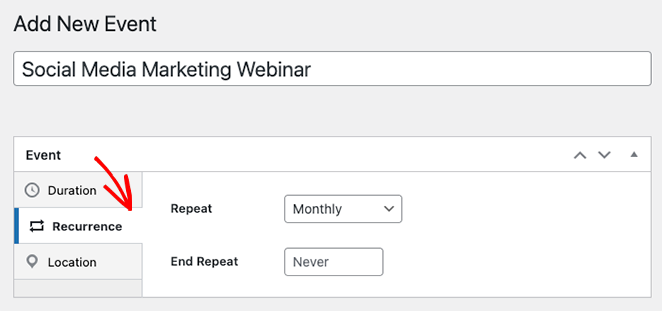
In the same panel, you can select when you’d like the repeating event to end. For example, this is useful if you only plan to run webinars until the end of the year.
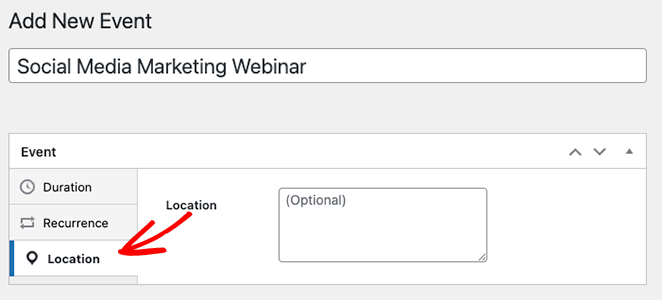
Sugar Calendar also includes functionality for in-person events by letting you set the event location. You can do that by clicking the Locations tab and entering the event location details.
Next, scroll down to the Details section and enter information about the event. The editor looks the same as the classic WordPress editor, so adding images, videos, text, and other content is easy.
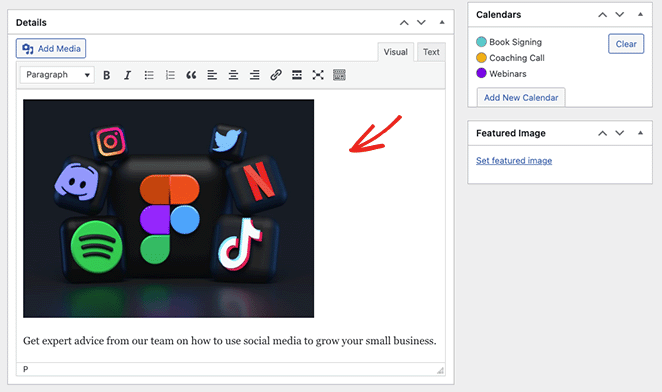
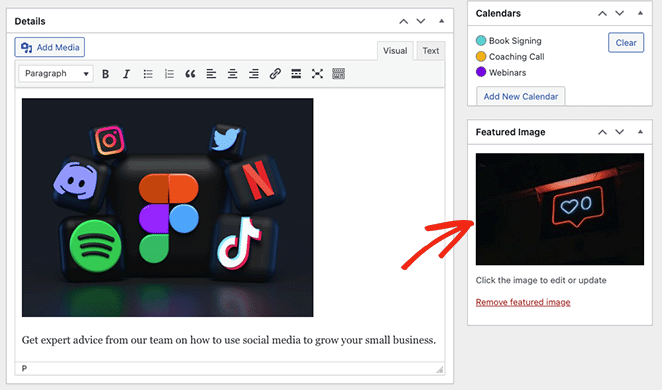
Additionally, you can attach a featured image to the event by clicking the Set Featured Image option and uploading or choosing an image from your media library.
The Calendars section is where you can see a list of the individual calendars you’ve made. Clicking the radio button next to the calendar name will ensure your event shows on that specific calendar.
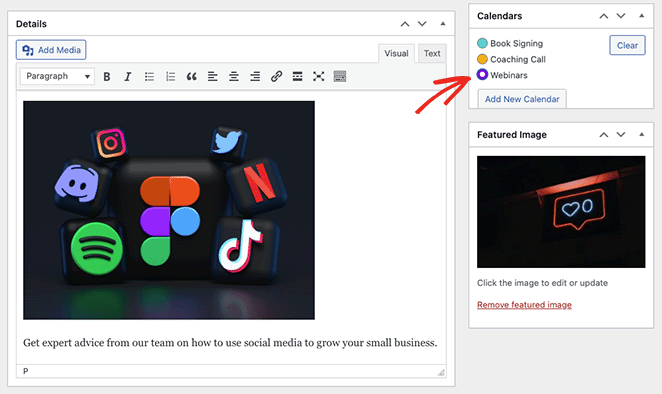
You can even add more calendars from this panel by clicking the Add New Calendar button.
Once you’ve finished adding your event details, click the Publish button. You can now repeat this step to add more events.
Step 4. Display the Calendar on Your Website
You can display your calendar in WordPress by adding its shortcode to a post or page. We’ll show you how to add the events calendar to a page, but the process is similar for any other area.
First, head to Pages » Add New from the WordPress admin panel. If you want to add your calendar to an existing page, click ‘Edit’ under the page name on Pages » All Pages.
Next, give your page a title and select any categories and tags you want to use.
From there, click the ‘+’ icon to create a new block and type in ‘Shortcode.’ When the shortcode block appears, click it to add it to your page.
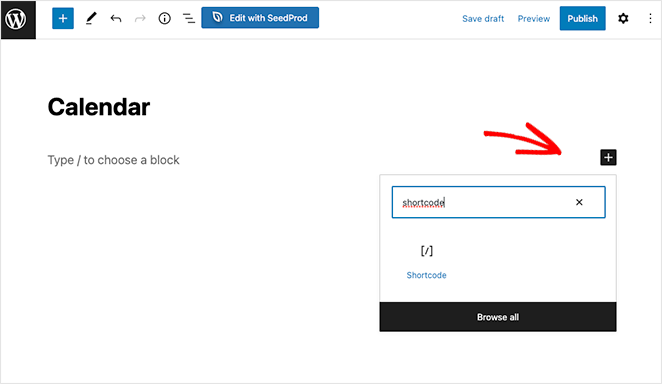
Now, copy the shortcode [sc_events_calendar] into the shortcode block and click the Publish button to make your page live.
When you visit your page on your website, you’ll see your calendar in action.
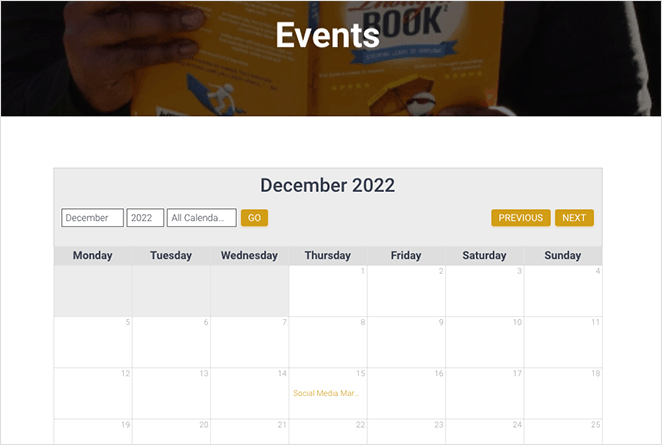
If you want to see more information about an event, click it, and you’ll open the event details page. This will have the information you entered earlier, including the date, time, location, and more.

Besides adding calendars to posts and pages, you can use the Sugar Calendar widget to display calendars in widget-ready areas of your WordPress theme.
The widget lets you set the default calendar, which users can select from the drop-down menu. As such, you have more control over which events visitors see.
To add the widget to your sidebar, go to Appearance » Widgets. From there, click the ‘+’ button and type in Sugar Calendar.
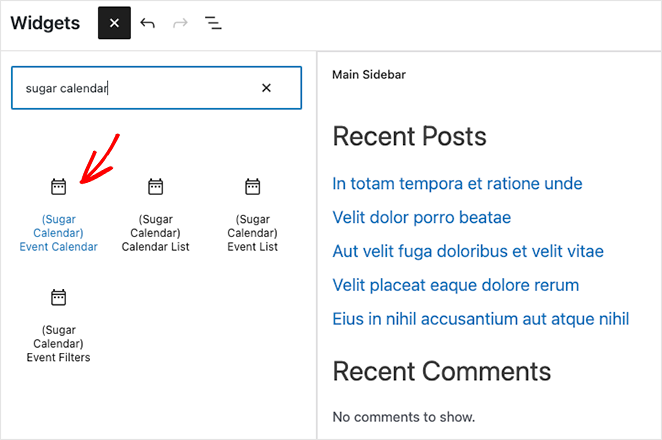
On this screen, choose the Event Calendar widget, then drag and drop it onto your sidebar.
Once the widget is in your sidebar, you can configure the display settings. For example, you can enter a custom widget title, change the calendar size, and choose which calendar to display from the drop-down menu.
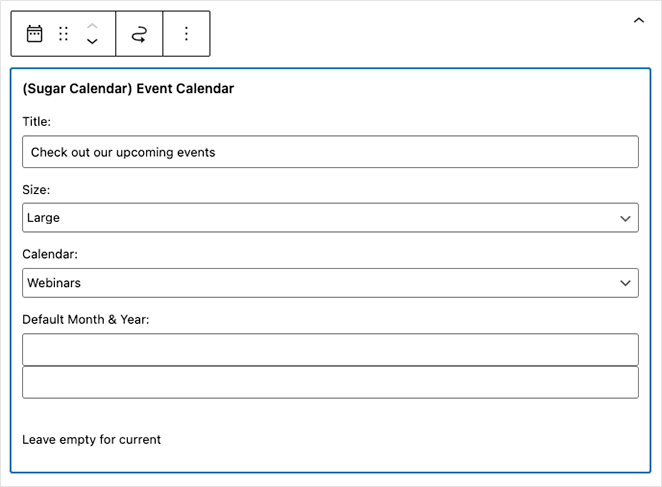
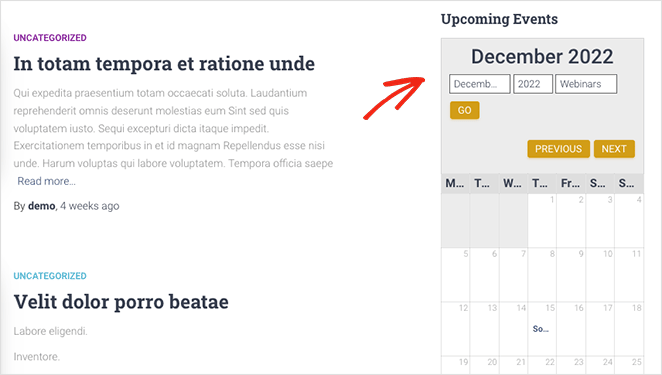
Sugar Calendar will show the current month by default when the page loads, but you can show a different month by typing a new date into the Default Month & Year field.
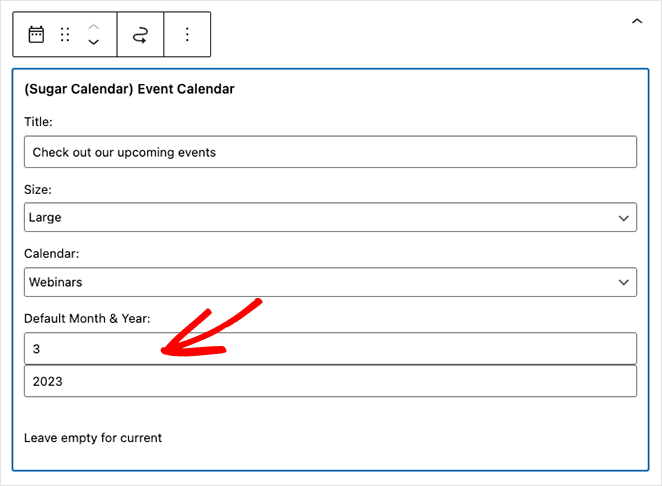
When you’re happy with your settings, click the Update button, and the calendar will appear on your website.
Bonus: Display an Events Calendar in WordPress with SeedProd
So far, you know how to make a calendar in WordPress. But what if you want to pull events from a social media platform like Facebook?
In that case, you can use a page builder plugin to make your event page. Popular WordPress page builders let you customize your WordPress site visually with blocks and modules, like contact forms, interactive Google Maps, and more. Plus, the best ones include specific features for calendar and event management.

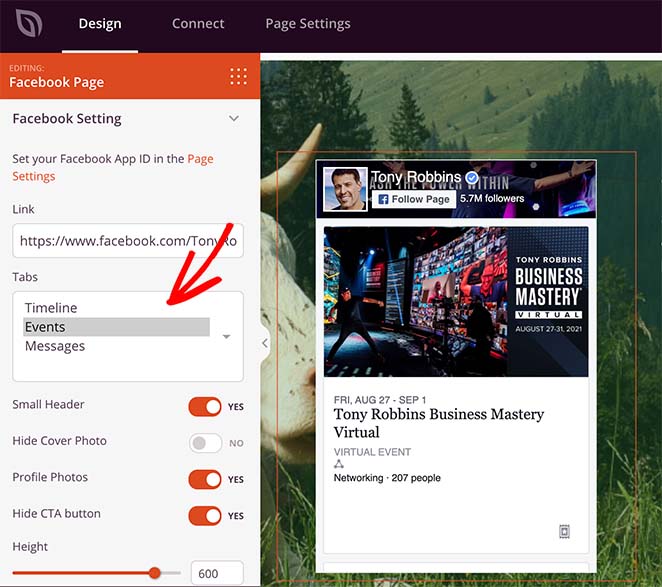
For example, SeedProd, the best website and landing page plugin, offers powerful Facebook embed blocks that let you pull Facebook event data from your business page and display it on your WordPress site.
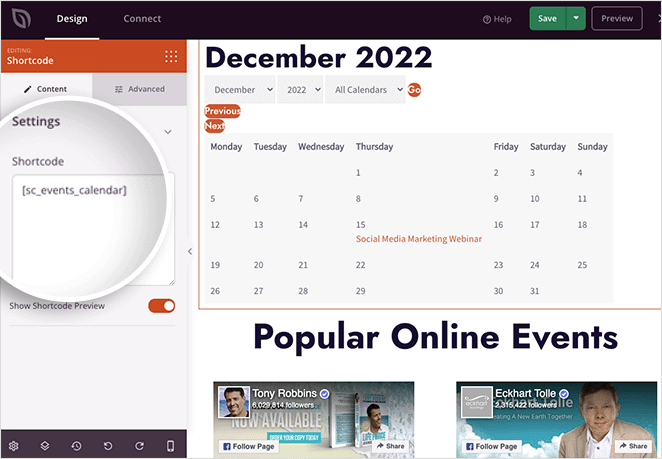
You can also use SeedProd’s shortcode block to add calendars made with Sugar Calendar to custom pages. That way, you can make a fully customizable event landing page with calendars from multiple sources.
For help displaying Facebook events, you can follow this guide on how to embed Facebook events in WordPress.
And if you’re curious about what else SeedProd can do, here’s a quick overview:
- Choose from hundreds of premade templates
- Build custom WordPress themes from scratch without HTML or CSS knowledge
- Create high-converting landing pages for your small business to promote your event
- Make complete eCommerce websites with WooCommerce to sell event tickets
- Add custom icons for 3rd-party platforms like Eventbrite
- Grow your email list with opt-in forms and email marketing integrations
- Create a pre-launch coming soon page
- Put your website in maintenance mode
- And so much more.
SeedProd is super lightweight, so it won’t slow your website down. It also works seamlessly with popular WordPress plugins like All in One SEO, MonsterInsights, and the WPForms contact form plugin.
You can take SeedProd for a spin using the free plugin from WordPress.org. Then, when you’re familiar with how it works, you can upgrade to the premium plugin, where you can take advantage of SeedProd’s Pro blocks, sections, and templates.
There you have it!
After reading this guide, you should know how to make a calendar in WordPress. You might also like this roundup of the best push notification software to remind subscribers about your events.
Thanks for reading! We’d love to hear your thoughts, so please feel free to leave a comment with any questions and feedback.
You can also follow us on YouTube, X (formerly Twitter), and Facebook for more helpful content to grow your business.

