Want to build credibility and trust with your website visitors? Learning how to embed Google reviews in WordPress is an effective way to do so.
Google and Yelp are popular platforms for customers to leave feedback and opinions about businesses. By embedding Google and Yelp reviews on your WordPress website, you can showcase the experiences of satisfied customers and encourage potential clients to choose your business over others.
In this article, we will guide you through embedding Google and Yelp reviews on your WordPress site, step by step.
Let’s get started!
Why Embed Google & Yelp Reviews in WordPress?
Adding Google reviews to your WordPress site offers numerous benefits to your small business.
It enables you to showcase long reviews from satisfied customers, creating trust with potential clients. Displaying positive reviews shows that your business is reliable, credible, and worth investing in, significantly increasing conversions on your business page.
Integrating Google reviews on your website can also improve your search engine rankings. Google and Yelp are highly reputable platforms, and including their reviews and testimonials can provide valuable content, positively impacting your SEO. This can increase online visibility, allowing potential customers to find and choose your business via search engines.
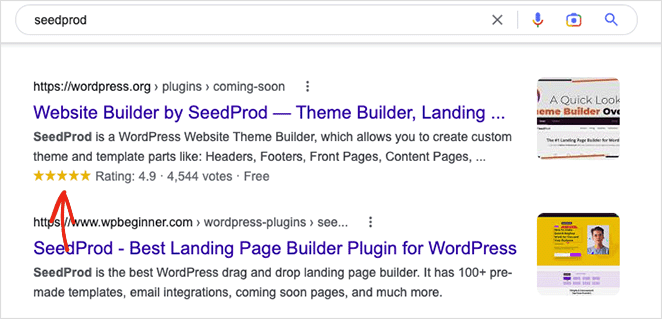
By displaying Google reviews on your WordPress site, you can improve your products and services with social proof. You can respond to customer reviews, thanking them for feedback, addressing any concerns, and demonstrating that you value their opinions.
In the end, embedding Google and Yelp reviews on your WordPress site can enhance your online presence, attract customers, boost conversion rates, and grow your business through social proof.
So, what is the easiest way to connect Google Reviews and Yelp ratings to WordPress?
Let’s find out.
Embed Google and Yelp Reviews in WordPress with SeedProd
To display Google business reviews on your WordPress site, you can typically use a Google reviews plugin. However, a Google reviews WordPress plugin can be difficult to use and add unnecessary bloat to your site.
An alternative solution is to use a WordPress plugin optimized for speed and ease of use.
Step in SeedProd.

SeedProd is the best WordPress page and website builder, with over 1 million users. Its drag-and-drop interface allows you to create any layout for your site without any code.
With SeedProd’s Business Reviews block, you can easily add both Google and Yelp reviews anywhere on your WordPress site.
SeedProd also offers a range of features, including pre-made landing page templates, a WordPress theme builder, user access controls, a subscriber management dashboard, email marketing integrations, and custom domain mapping.
By using SeedProd, you can add Google reviews and Yelp ratings to your WordPress site quickly and easily. Simply follow the tutorial below to get started.
Step 1. Install and Activate SeedProd
To get started, visit the SeedProd website and select your preferred license. While a free version of the plugin is available, we recommend using a premium version for its advanced features.
For this guide, we’ll use SeedProd Pro instead of the free plugin.
Once you have downloaded the plugin, install and activate it on your WordPress website. You can find guidance on this process by following this tutorial on how to install SeedProd.
Next, access SeedProd » Settings from your WordPress dashboard and paste your plugin license key into the empty field.

From there, click the Verify Key button to proceed.
On the same page, you can save time by entering your Google Places API Key and Yelp API Key. These settings will help you display your Google and Yelp reviews later in this tutorial.
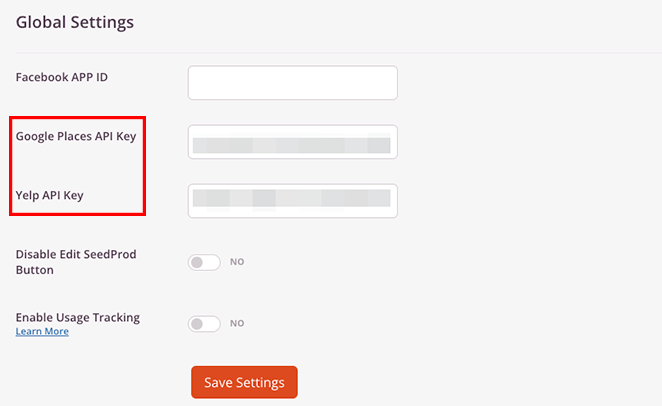
Remember to click the Save Changes button to ensure your settings are saved.
Step 2. Choose a WordPress Template
For the next step, you’ll need to decide how to use SeedProd on your WordPress site. All plans allow you to create landing pages, but the Pro plan lets you create custom WordPress themes without code, while Elite offers WooCommerce support for eCommerce sites.
We’ll use the Theme Builder method because you can add reviews to any part of your site. However, note that it will overwrite your current WordPress theme. If you prefer to keep your current theme, you should create a landing page instead.
But don’t worry; both methods enable you to embed business reviews with the same drag-and-drop builder without code or HTML.
To create a new WordPress theme with SeedProd, go to SeedProd » Theme Builder and click the Theme Template Kits button to choose a website kit from the template library.
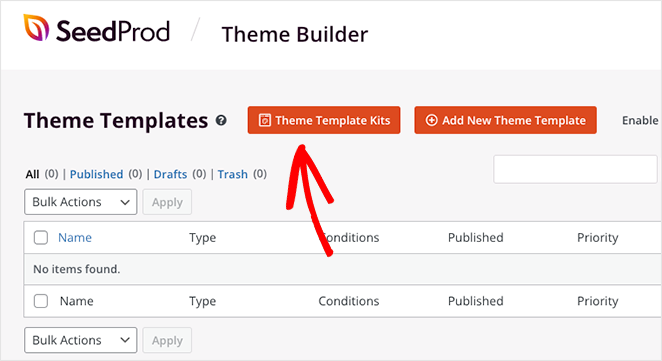
To choose a template, hover over its thumbnail and click the orange checkmark icon.

After selecting a kit, SeedProd will display the templates that make up your theme on the dashboard. You can customize the appearance of any template by clicking the Edit Design link.
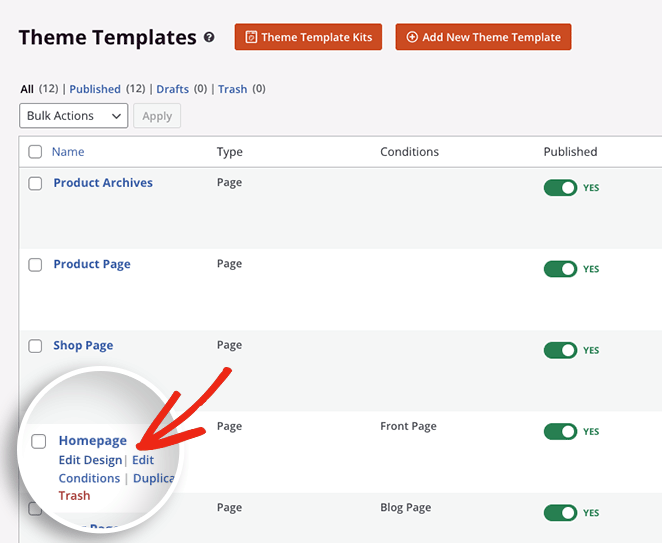
SeedProd will also import content pages from the template demo, such as About, Contact, and Testimonials pages. You can find them by going to Pages » All Pages from your WordPress dashboard.
From there, you can use SeedProd’s drag-and-drop editor to customize each page.
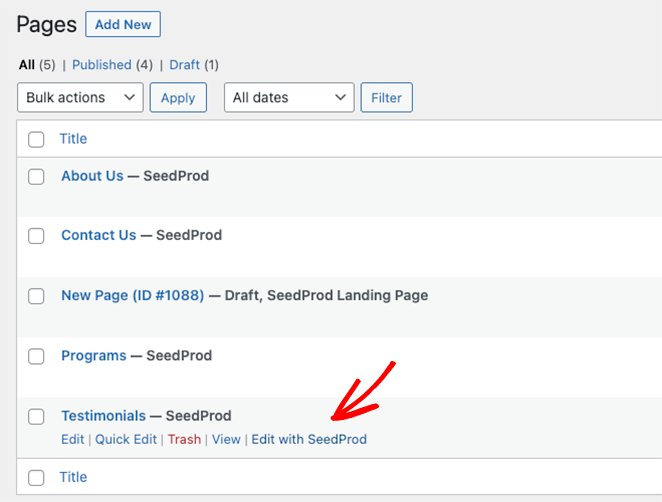
We’ll begin customizing the Testimonials page since the template we’re using includes one. So go ahead and click the Edit with SeedProd link to get started.
Step 3. Customize Your Page with Google and Yelp Reviews
When your page opens, you’ll see the page builder interface where you can customize your template. It will have a live preview of your page on the right and blocks and settings on the left.
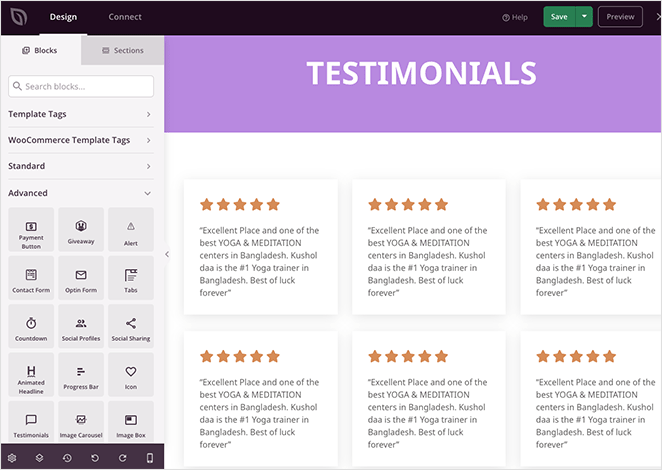
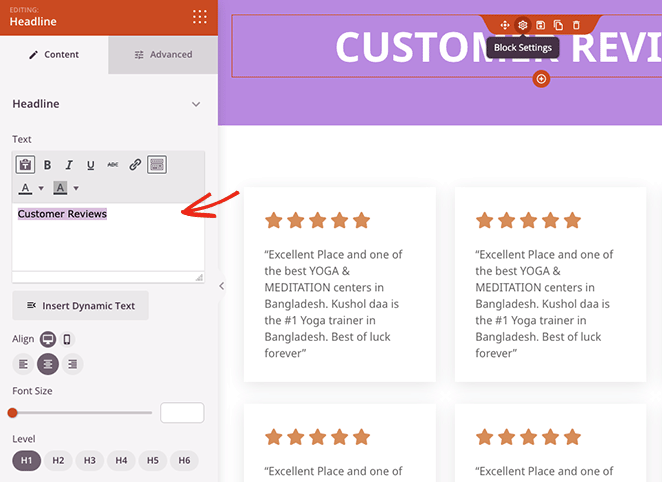
You can click any page element to open its settings panel and customize its content. For example, clicking the Headline will open a panel on the left where you can change the text, alignment, font size, and heading level.
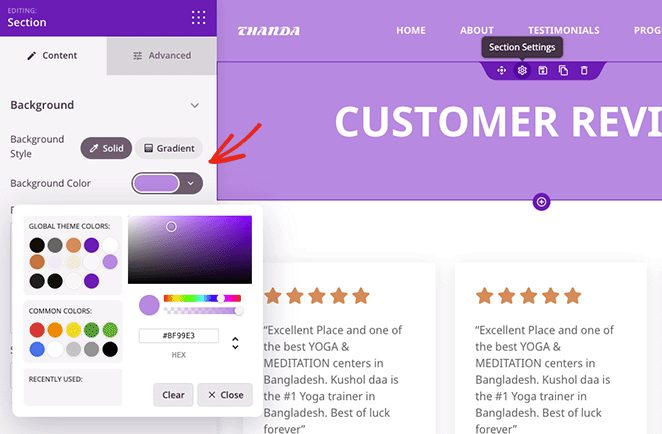
Additionally, you can click individual sections to change the background colors, spacing, styling, and more.
The current template displays customer reviews by using Star Rating and Text blocks. Since we’ll use SeedProd’s Business Reviews block to embed Google and Yelp reviews, we’ll need to delete this section.
To remove blocks and sections from your template, hover over them until they have a colored outline and click the trashcan icon.

When you’ve done that, you can choose a column layout to house your business reviews.
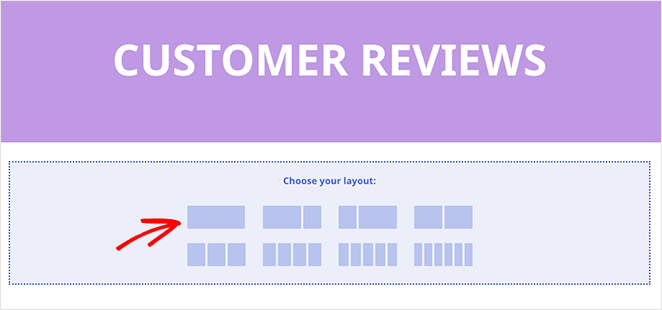
Step 4. Add the Business Reviews Blocks
Now, you can add SeedProd’s Business Reviews block to your page. To do this, find the block in the left-hand panel and drag it onto your preview.
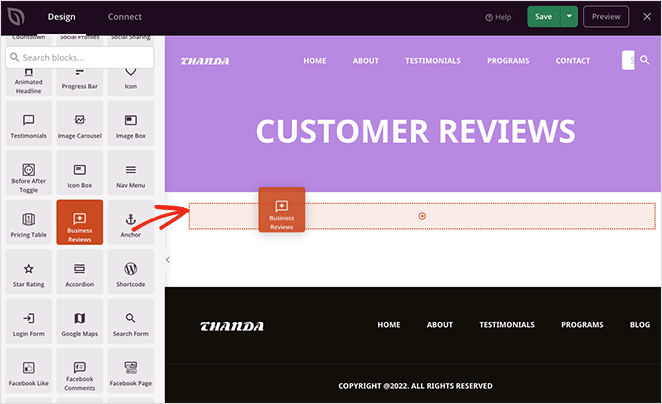
With this block, you can embed Google reviews and Yelp reviews in the same single feed or display them separately by adding the block multiple times.
First, we’ll show you how to embed a feed of reviews from both platforms.
Embedding Google and Yelp Reviews in a Single Feed
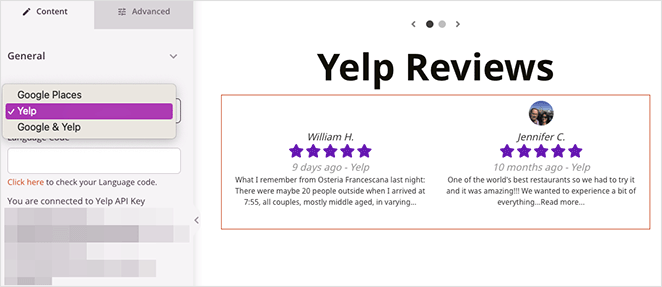
To add Google and Yelp reviews in a single feed, you’ll need to choose the Google & Yelp option from the Review Source dropdown menu.
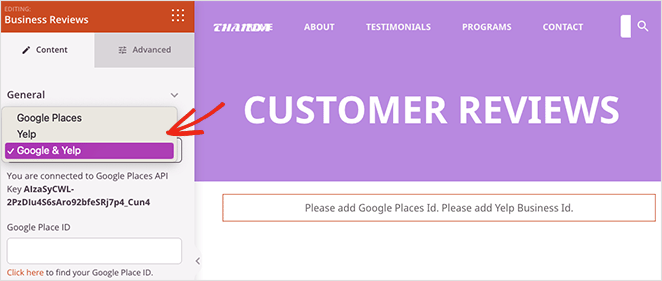
If you didn’t add your Google and Yelp API keys on the SeedProd settings page in the first step, now is the best time to return and do it.

After that, you’ll need to enter your Google Place ID and Yelp Business ID in the block settings for your reviews to appear.
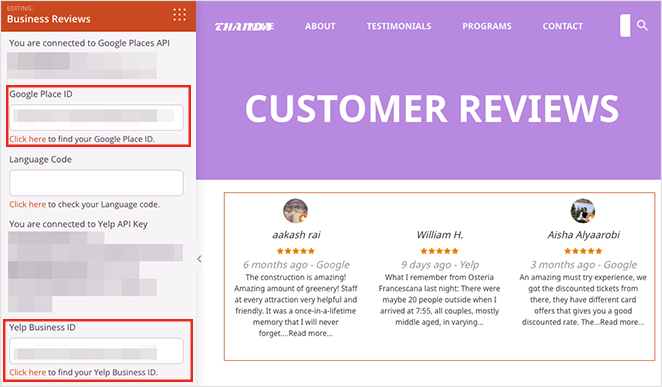
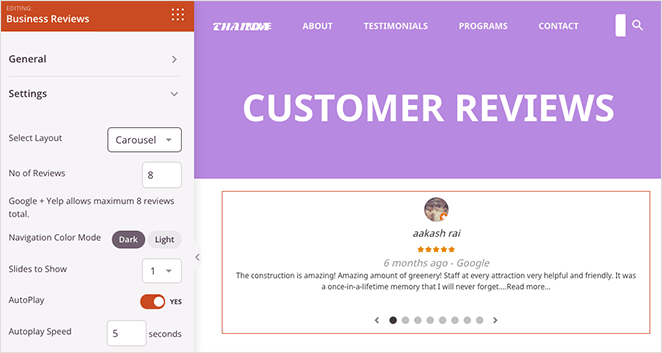
With your API keys and IDs in place, you can start customizing the reviews block. First, open the Settings panel and choose either a Grid or Carousel layout.
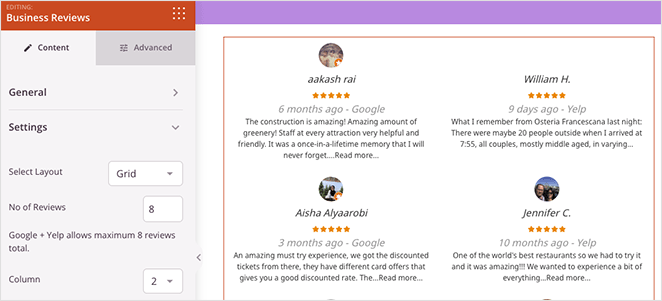
The Grid layout lets you set the number of reviews to display (up to 8) and the number of grid columns.
Alternatively, the Carousel layout has settings for the number of reviews and slides, a dark and light theme, and autoplay options.
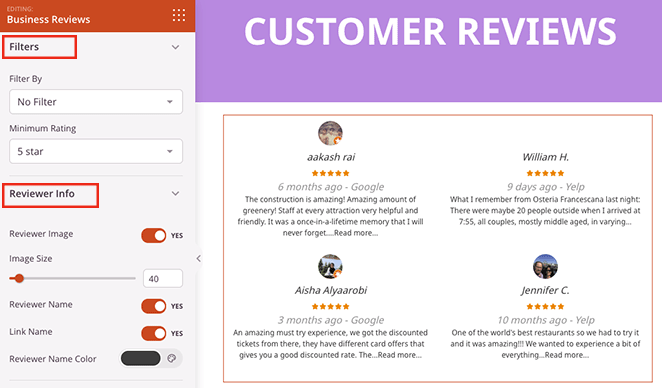
In the Filter panel, you can display reviews by star rating and date, while in the Reviewer Info panel, you can:
- Enable reviewer images
- Choose an image size
- Enable reviewer names
- Link the reviewer’s name
- Choose a reviewer name color
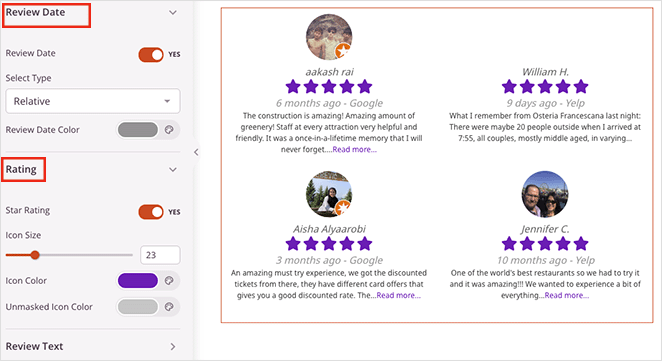
Further customization settings include editing the review date, adjusting the star rating size and color, and customizing the review text.
Embedding Google Reviews Widget
If you want to display Google reviews separately, such as in a Google review slider, choose the Google Places option from the Review Source dropdown menu.

Similarly, you can choose to only embed reviews from Yelp by selecting the setting from the same dropdown menu.
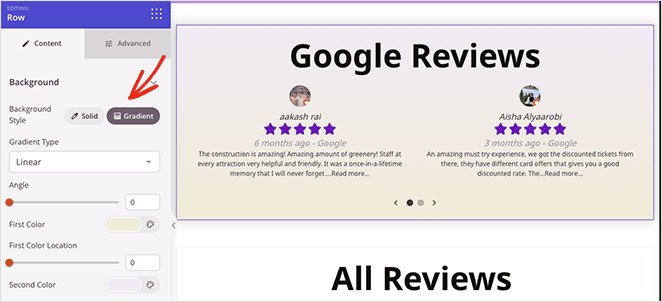
Once you’ve added reviews to your web page, you can make other formatting changes and customizations to help them stand out. In this example, we added a color gradient to the Google Reviews slider by editing the column settings.
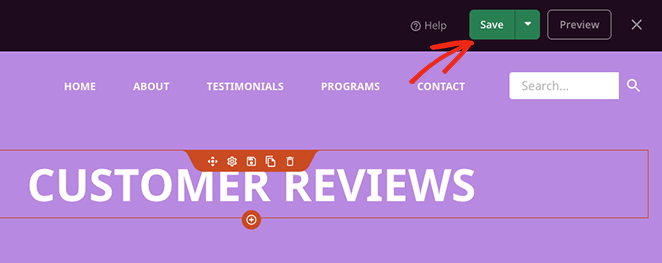
When you’re happy with how your new reviews page looks, click the Save button.
Step 5. Publish Your Changes in WordPress
The final step is to publish your changes on your WordPress site to build trust with your visitors. This is important if you’re customizing your entire WordPress site with SeedProd, including your sidebar, header, and footer; otherwise, your changes won’t be visible.
To do this, head over to SeedProd » Theme Builder and switch the Enable SeedProd Theme toggle to the Yes position.

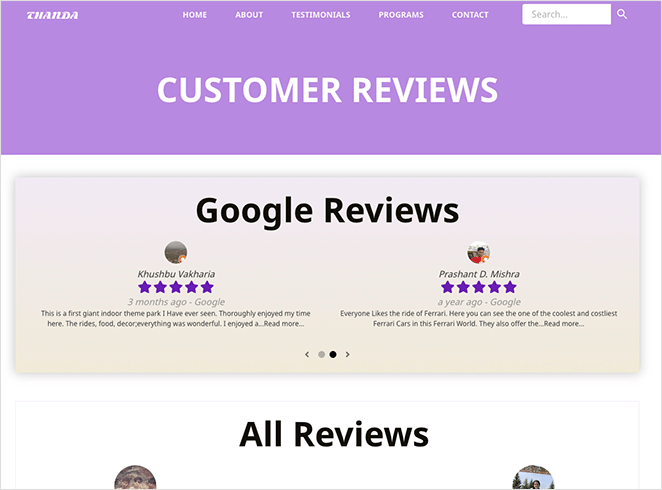
Now you can preview your review page to see how it looks.
Alternative Method: Smash Balloon Reviews Feed
Another excellent way to embed customer reviews on your WordPress site is with Smash Balloon.

Smash Balloon is the best WordPress social media feed suite. It offers several plugins for effortlessly adding social feeds to your site quickly and easily.
With its Reviews Feed feature, you can add reviews from several different platforms, including:
- Yelp reviews
- Google My Business
- TripAdvisor reviews
- Facebook reviews
By using this plugin, the appearance of your reviews will automatically match the design and branding of your website without any extra effort. You can also choose from various feed templates with a single click.

Plus, embedding reviews on your site is super easy. It doesn’t require shortcodes or copying and pasting embed codes or snippets. Instead, you can point and click to display reviews for your small business virtually anywhere you like.
To help you get started with this alternative method, you can follow Smash Balloon’s step-by-step guide on how to Embed Google Reviews in WordPress.
Responding to Negative Reviews: 6 Tips
Even with exceptional customer service, you might occasionally get a negative review. While it’s discouraging, negative reviews are also a valuable learning opportunity.
Here’s how to approach negative reviews professionally:
- Acknowledge the Review Promptly: Respond to negative reviews within a few days of receiving them. This shows you value customer feedback and are committed to resolving any issues.
- Respond with Empathy and Apology: Start your response by acknowledging the customer’s frustration and apologize for their negative experience.
- Avoid Getting Defensive: Don’t try to argue or place blame. Focus on understanding the customer’s concerns and offering solutions.
- Take the Conversation Offline: If the issue requires a more detailed conversation, politely suggest taking it offline via email or phone. This keeps the public forum focused on positive reviews and avoids a back-and-forth exchange.
- Showcase How You’ve Improved: If you’ve made changes based on the feedback, highlight them in your response. This demonstrates that you take customer concerns seriously and strive to improve.
- Use the Feedback to Improve: Negative reviews offer valuable insights into areas for improvement. Analyze the feedback and use it to identify and address any shortcomings in your service or product.
Expert Tip

“Criticism isn’t just from haters. It could be from someone who bought a product from you who had really high expectations that weren’t met. You want to take that as legitimate feedback.
What it really is is an opportunity to learn how you can improve your business.”
Marie Forleo, Founder of B-School
That’s it!
We hope this article has helped you learn how to embed Google Reviews in WordPress.
With SeedProd, you can easily embed Google and Yelp reviews anywhere on your website without coding. By following the step-by-step tutorial above, you can customize your WordPress site’s appearance and include reviews from satisfied customers, thus enhancing your online presence and growing your business through social proof.
Before you leave, you might also like this guide on how to make a FAQ page in WordPress to combat buyer hesitation.
Thanks for reading! We’d love to hear your thoughts, so please feel free to leave a comment with any questions and feedback.
You can also follow us on YouTube, X (formerly Twitter), and Facebook for more helpful content to grow your business.


