Do you want to add a tweet button to your WordPress site?
Click-to-tweet buttons make it easy for website visitors to share your content on Twitter. That way, you can reach your target audience with content designed to generate interest, leads, and potential customers.
In this tutorial, we’ll show you how to add a tweet button to your website step-by-step.
Why Add a Tweet Button to WordPress?
With over 217 million monetizable daily active users, Twitter marketing is one of the most effective ways to bring your target audience to your website. However, when you share your own content on Twitter, you can only reach a limited number of users.
An effective way to reach people who don’t follow you on Twitter is to add a Tweet button to your website.
When users visit your website, a tweet button will encourage them to share your content on their personal Twitter timelines. As a result, their followers will see your content and can then like, comment, and retweet it to their followers.
Because Twitter share buttons broadcast your content to a broader audience, it can also help you grow your Twitter followers. Plus, the exposure can help you build social proof and brand recognition, resulting in more leads and sales.
Now that you know why Twitter buttons can benefit your business let’s look at how to add one to your WordPress site.
How to Add a Tweet Button in WordPress
There are several ways to add a click-to-tweet box or button to your website; however, some are much easier than others.
In this post, we’ll show you how to add a click-to-tweet button easily with a WordPress plugin first. We’ll then show you how to manually add the Twitter Tweet button code.
Video Tutorial
How to Add Tweet Button to WordPress with SeedProd

For the first method, we’ll use SeedProd, the best WordPress website builder, to add a Twitter button to your website. It comes with a visual drag-and-drop editor, allowing you to create and customize any area of your WordPress site without code.
You can use SeedProd to create:
- Custom WordPress themes
- High-converting landing pages
- WooCommerce templates
- Coming soon and maintenance pages
- WordPress login pages
- And more
This plugin also includes powerful content elements and blocks that help with lead generation, brand awareness, and user experience. For example, the block we’ll use in this guide is the Twitter Tweet button.
Follow the steps below to add a tweet button in WordPress with SeedProd.
Step 1. Install the SeedProd Plugin
First, click here to get started with SeedProd and download the plugin to your computer. You can then upload the plugin .zip file to your WordPress website.
If you’ve never installed a plugin before, you can follow this guide on installing and activating a WordPress plugin.
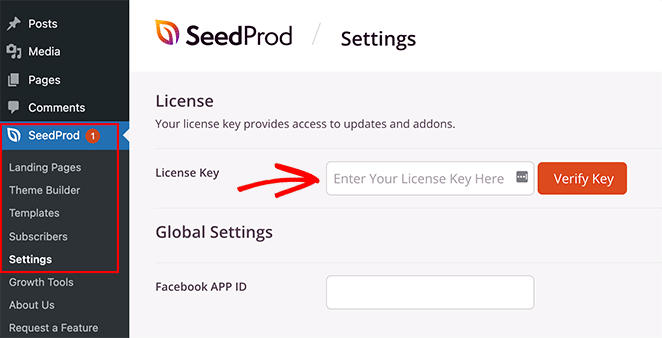
Once SeedProd is active on your website, go to the SeedProd » Settings page from your WordPress dashboard and enter your license key.
You can find your key on the SeedProd website under the “Downloads” section of your account dashboard.
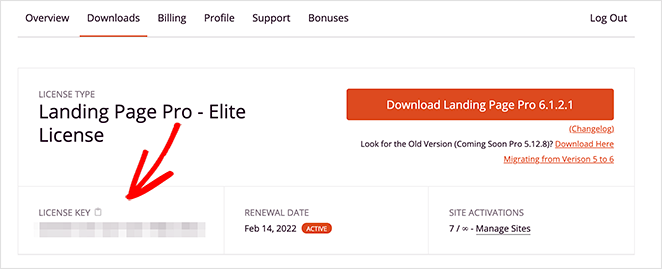
After pasting your license key, click the Verify Key button.
Step 2. Create a Landing Page or WordPress Theme
There are 2 ways to add a Tweet button to your website with SeedProd.
You can replace your current WordPress theme with a custom theme designed with SeedProd’s website kits. Or you can create a landing page with your existing WordPress theme.
For this tutorial, we’ll add a tweet button to blog posts by customizing the single post template with SeedProd’s theme builder. Check out this guide for all the steps on creating a custom WordPress theme with SeedProd.
If you’d prefer to add a tweet button to your landing page instead, you can follow this guide on creating a landing page in WordPress.
Both tutorials will show you how to choose a template and get your theme or landing page ready to customize. When you’re ready to add your tweet button, jump to step 3 of this guide.
Step 3. Add a Tweet Button to WordPress
After creating a theme or landing page with SeedProd, you can customize it easily with the drag-and-drop builder. As mentioned above, we’re going to add a tweet button to our WordPress post page. That way, users can tweet about your blog post after reading it and share it with their audience on social media.
To do this, go to the SeedProd » Theme Builder page from your WordPress admin. This will show the individual parts of your theme, such as your:
- Header
- Footer
- Sidebar
- Homepage
- Blog page
- Single post
- Single page
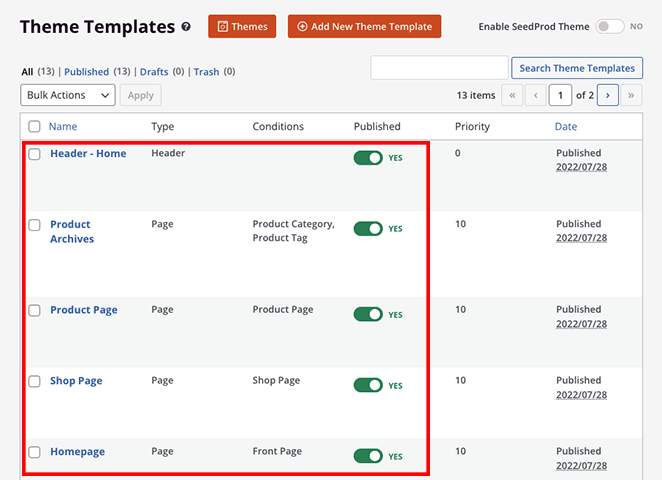
Each theme part is super easy to edit and customize in SeedProd’s visual editor. Simply hover over one and click the Edit Design link.
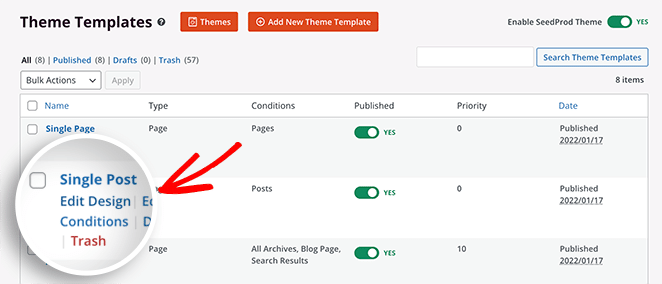
Since we’re adding a tweet button to blog posts, we’ll edit the Single Post template. After clicking the Edit Design link, your template will open in SeedProd’s visual drag-and-drop editor.
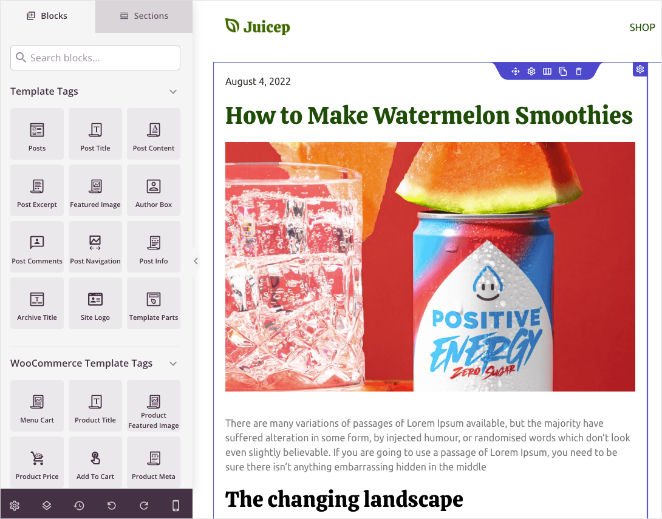
You’ll see the different content blocks and sections on the left and a live preview of your page on the right-hand side.
Clicking any element on your live preview opens its settings in the left-hand panel. This allows you to change the content and customize that element’s styling and appearance.
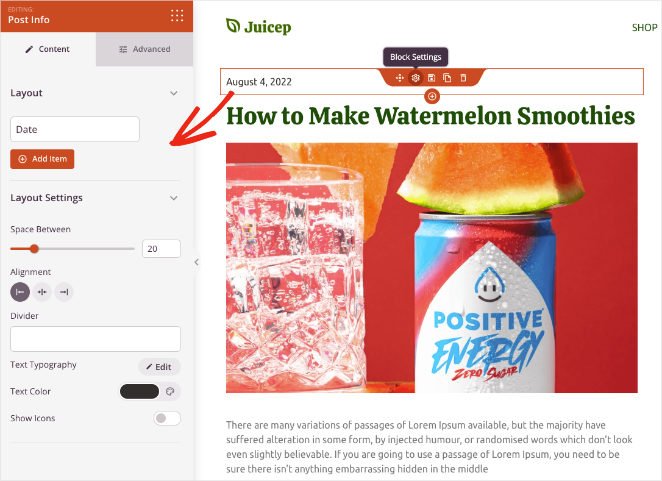
There are 2 ways to add a Tweet button using SeedProd:
- Social Sharing block
- Twitter Tweet button block
We’ll demonstrate both options so you can decide which is best for your website, but first, let’s add a new column to house our Twitter button.
To do that, drag the column block from the left-hand panel and drop it onto your preview. You can then choose a column layout for your content.
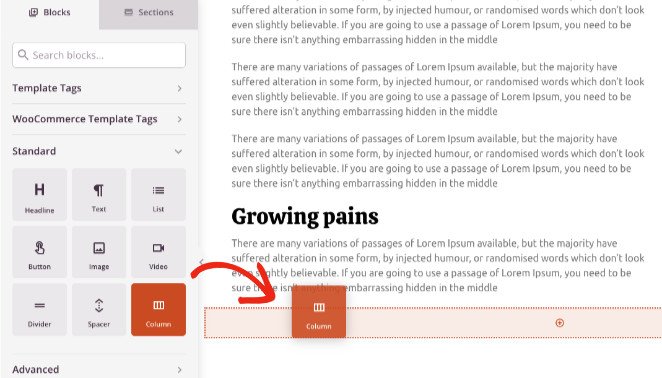
In this example, we have a 2-column layout with one side wider than the other.
Next, drag over the headline block and add it to the first column. In the settings panel, you can change the heading to say something like “Share this.”
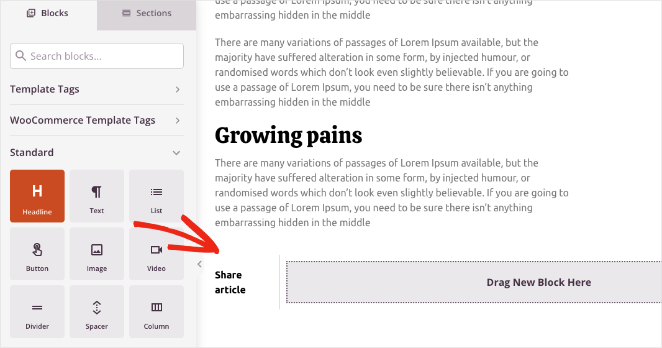
Now you’re ready to add your tweet buttons.
SeedProd Social Sharing Block
First, we’ll use SeedProd’s Social Sharing block to add share buttons for multiple social media networks, including Twitter. Find the block under the Advanced blocks panel, and drop it into the second column on your design.
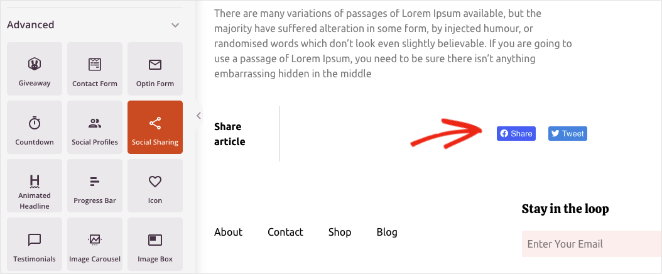
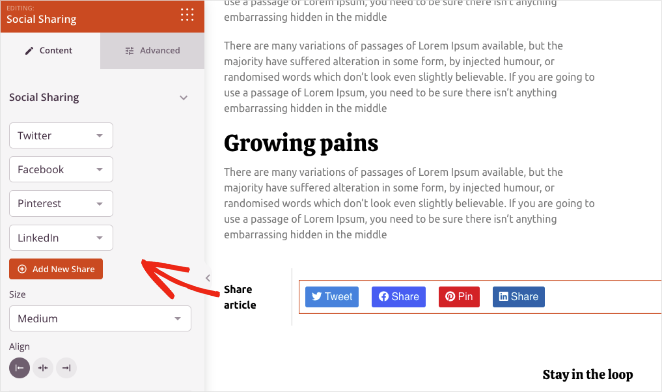
SeedProd will pre-populate it with a tweet button and Facebook share button. Clicking the block allows you to add more social sharing options for Pinterest and LinkedIn and settings to change the button size and alignment.
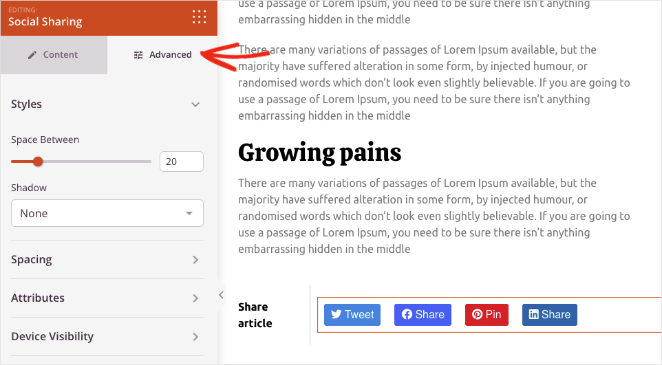
In the Advanced settings tab, you can customize the button styles and spacing and show or hide it on mobile and desktop devices.
Twitter Tweet Button Block
To add a single Tweet button, simply find the Twitter Tweet Button block in the Advanced blocks panel, then drag and drop it onto your page.
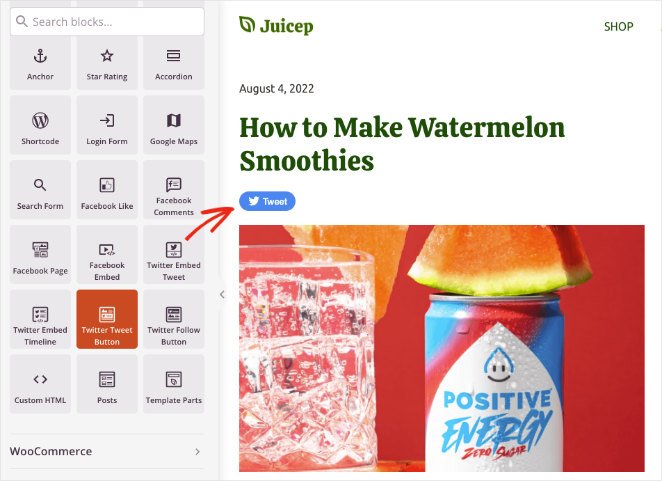
In the tweet button settings panel, you can customize several settings. For instance, you can add the URL you want visitors to share, the tweet content, and hashtags.
You can add @ via mentions and related Twitter accounts and change the button size, alignment, and language.
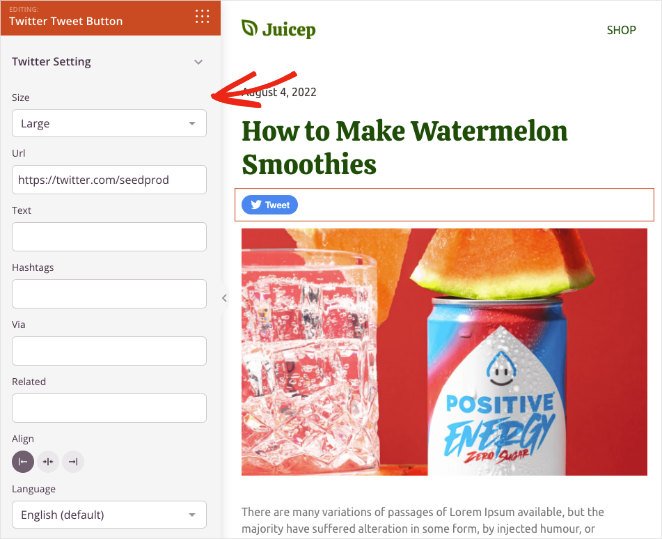
Experiment with SeedProd’s social sharing and tweet button blocks until you find a combination that suits your website. When you’re happy with how everything looks, click the Save button in the top-right corner.

Step 4. Publish Your Tweet Button in WordPress
The next step is to make your tweet button live on your WordPress site. To do that, go to the SeedProd » Theme Builder page and turn the Enable SeedProd Theme toggle to the “On” position.

Great work! Now you can preview your website to see how your Tweet button looks.
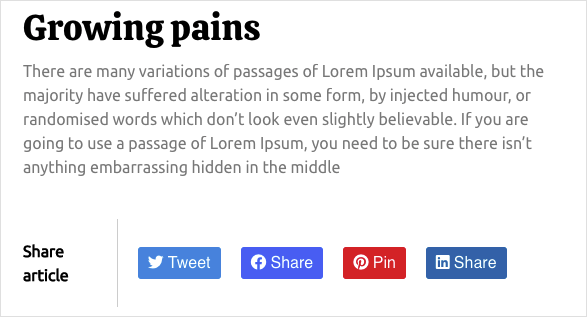
Here is an example of the tweet button:

And here is an example of the share buttons:
How to Add a Tweet Button to WordPress Manually
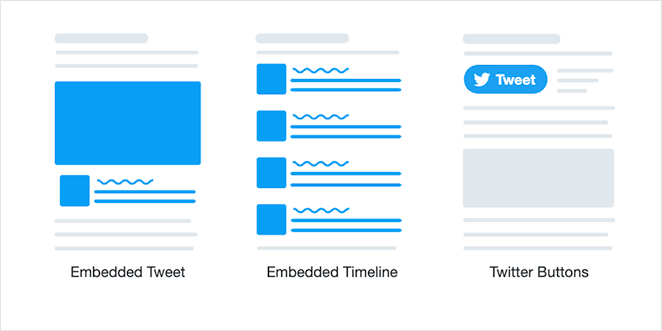
For the next method, we’ll show you how to manually add a tweet button to WordPress without a WordPress plugin. You can do this by using Twitter’s publish tools which allow you to embed a tweet, timeline, or button.
This method doesn’t offer much control over the tweet button. However, it’s a helpful solution for users that don’t wish to add more plugins to their WordPress site.
To get started, go to the Twitter Publish tool website and choose the Twitter Buttons embed type.
Next, a window will pop up asking you to choose a button type:
- Share button: share a link on Twitter.
- Follow button: allow users to follow your Twitter profile.
- Mention button: start a conversation right from your website.
- Hashtag button: tweet about a topic using hashtags.
- Message button: let visitors message you privately on Twitter.
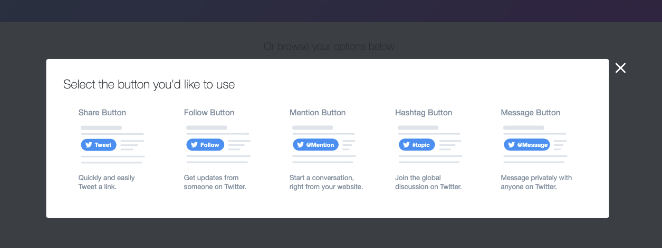
Let’s choose the Share button for this guide. After clicking your button type, you’ll see a page similar to the one below:
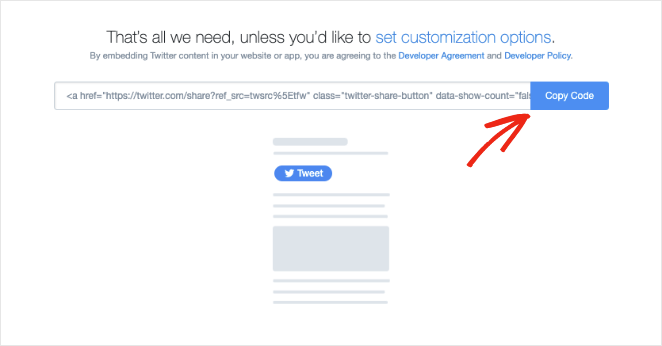
Click the button to copy the embed code, then head back to your WordPress site.
We’ll add this tweet button to our WordPress sidebar, so navigate to Appearance » Widgets from your WordPress dashboard. Then find the Custom HTML block and add it to your primary sidebar area.
Inside the block, paste the tweet button embed code you copied earlier, and click the Update button.
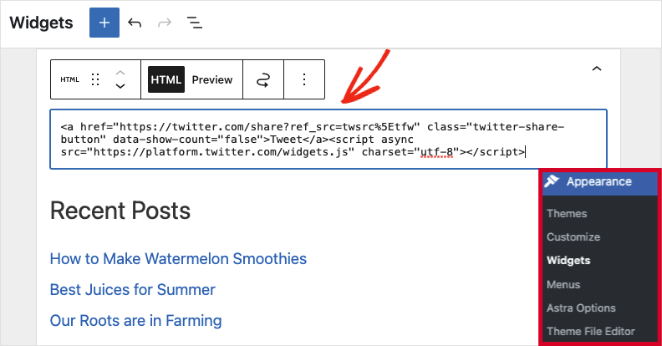
Now when you visit your WordPress site, you’ll see your tweet button in your blog sidebar.

Bonus: Display Twitter Feeds and Tweet Buttons with Smash Balloon
Did you know that you can also add beautiful Twitter feeds to your WordPress site with Smash Balloon’s Twitter Feeds plugin?

The Custom Twitter Feeds plugin is the top-rated Twitter feed plugin for WordPress. You can use it to display stunning Twitter feeds on your website in a few clicks.
You can customize your live Twitter feeds in real-time with the visual feed editor and choose from multiple feed types to suit your business needs. Each feed also includes tweet buttons, allowing website visitors to share your Twitter content with their followers.
Follow Smash Balloon’s step-by-step guide to add a Twitter feed to WordPress.
That’s it!
We hope you enjoyed this tutorial, and it helped you learn to add a tweet button to WordPress easily. You might also like this guide on making your blog look like a website.
Ready to add tweet buttons to your website?
Thanks for reading! We’d love to hear your thoughts, so please feel free to leave a comment with any questions and feedback.
You can also follow us on YouTube, X (formerly Twitter), and Facebook for more helpful content to grow your business.

