Do you want to learn how to set up an online store?
Creating an eCommerce website is an excellent way to sell your products or services without renting a physical store location. It’s also ideal for building your online presence using marketing strategies, such as social media and email marketing.
In this guide, we’ll show you how to set up an online store in WordPress step-by-step to sell both digital and physical products.
Why Use WordPress for Your Online Store?
WordPress is among the most popular website builders online, powering over 43% of websites and online businesses. With its user-friendly interface, extensive plugin, and theme libraries, even beginners can set up an online store without coding.
In fact, WooCommerce, one of the most popular eCommerce platforms, powers more than 30% of all eCommerce stores. While Easy Digital Downloads, the best digital eCommerce plugin for WordPress, supports over 50,000 websites selling digital goods and services for their small business.
With eCommerce website builders like this, you can customize your online store to look and function exactly how you want. It’s also search engine optimization (SEO) friendly, so you can optimize your store for search engines, making it easier for potential customers to find your products.
The best part? WordPress is free, so you only need to pay for your hosting and domain name to get started. It also comes with excellent customer support via its support forums.
Whether your business plan includes creating a dropshipping business, an online marketplace, or you want to sell an app, this guide is exactly what you need.
Note: For this tutorial, we refer to WordPress.org for self-hosted websites rather than WordPress.com, the hosting service. See this comparison of WordPress.org vs. WordPress.com to learn the difference.
Setting Up Your WordPress Website
The first thing you need for your new business website is to buy hosting with a domain name and SSL certificate.
Hosting is where your website files are stored online, and your domain name is what visitors type into their browser’s address bar to visit your site. An SSL (solid state layer) certificate adds a layer of security to your site so you can accept sensitive information like credit card details without compromising the shopper’s security.
A typical hosting provider charges around $7.99 per month. Domain names cost around $14.99 per year, and an SSL certificate costs about $69.99 per year. However, prices can vary depending on the web host and domain registrar you choose.

Luckily Bluehost, an official WordPress and WooCommerce-recommended hosting provider, has an exclusive offer where you can get hosting, a domain name, and SSL at a heavy discount.
Essentially, you can get all the above for only $2.75 per month.
We’ll use Bluehost for this guide. But if you’re looking for an alternative, check out these other best WordPress hosting providers.
After signing up for a Bluehost account, you’ll receive an email with a link to your web hosting dashboard. Bluehost automatically installs WordPress, so you can log into your WordPress site from your dashboard, skipping the confusing setup process.
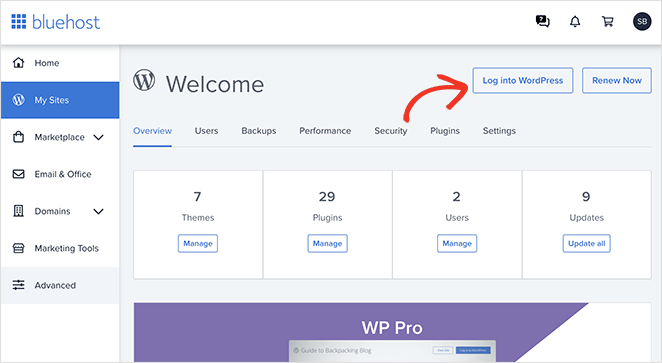
Just click the Log into WordPress button.
If you’ve decided to use a different host, your dashboard may look different. If you need help finding your way around, refer to your host’s documentation for installation instructions.
After logging into your WordPress website, you’ll see a dashboard like in the screenshot below:
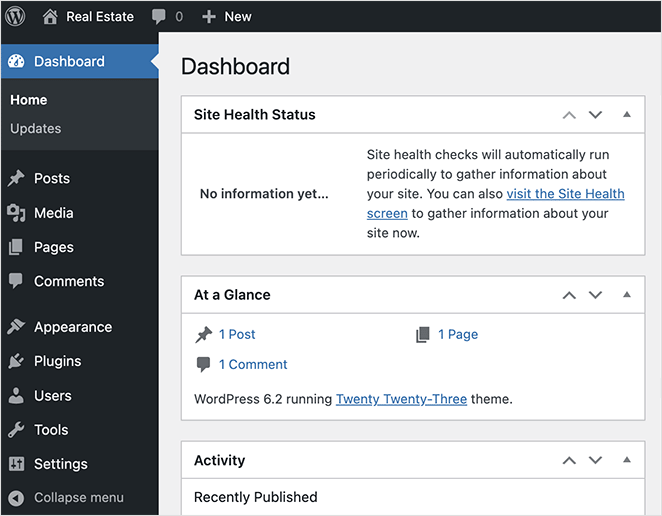
Here, you can install an eCommerce solution, payment processing, and add new product details for your eCommerce business, which we’ll show you how to do next.
Don’t worry. The methods we cover below are easy, and you won’t need technical experience to understand or follow the steps.
How to Set Up an Online Store for Beginners
First, let’s look at how to set up a simple online store to sell a few products. This is a good choice if you’re new to selling online or want to monetize your site by selling a few select products, like ebooks, t-shirts, or branded goods.
Typically, you’d need to start by installing a WordPress theme and finding an eCommerce plugin or online store builder that lets you accept payments. This can be time-consuming if you’re new to WordPress and don’t know what to look for.
However, with SeedProd, the best drag-and-drop website and page builder, you can do both all in one.
SeedProd has everything you need to create your own online store and sell products without installing an eCommerce plugin. You can choose from hundreds of pre-made templates and customize them easily with its visual drag-and-drop builder.
And with the easy Payment Button block, you can accept Stripe payments for any products you want to sell without installing a separate plugin.
Check out the steps below to set up a simple online store using SeedProd.
Step 1. Install and Activate SeedProd
First, install and activate SeedProd on your WordPress website. For this guide, we’re using SeedProd Pro for its WordPress Theme Builder feature.
For help, you can see our documentation on installing the SeedProd Pro plugin, which also explains how to activate your license key.
Step 2. Choose a Template
Next, we’ll use SeedProd to create a custom WordPress theme without coding. So navigate to SeedProd » Theme Builder from your WordPress admin and click the Theme Template Kits button.
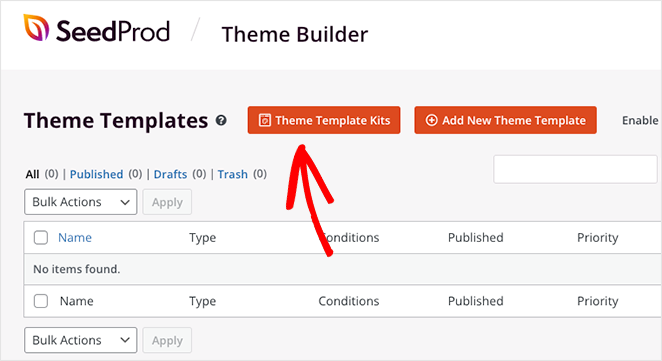
From there, you can browse through SeedProd’s library of site kits. Each kit has several pre-designed pages for different website niches, so finding one to fit your needs is a breeze. Simply click the magnifying glass on any kit to take a closer look.
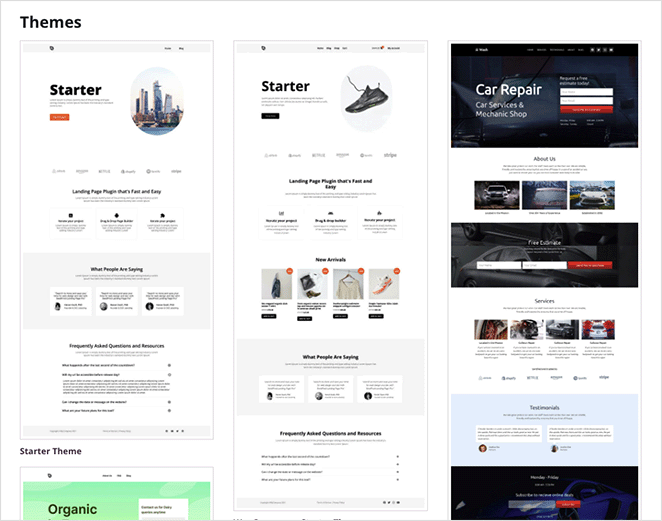
Once you’ve found a site kit you like, click the checkmark icon to import it. We’ve chosen the Danno Music Theme because it comes with a pre-made Tickets page to sell products from.

This should take no more than a few seconds, and once the import is complete, you’ll see the templates that make up your WordPress theme in a list.
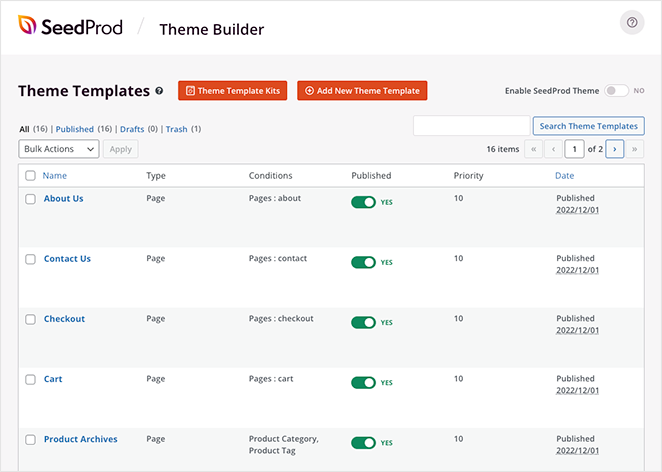
Each item is a different theme component, such as your homepage, blog page, sidebar, and more. You can edit any of these with SeedProd’s drag-and-drop page builder, which lets you customize every inch and see the changes in real time.
For example, if you hover over the Homepage template and click the “Edit Design” link, your homepage will open in the visual editor.

Then you can click anywhere to customize the content or drag blocks from the left-hand panel to add new design elements. Each of SeedProd’s WordPress blocks has easy customization options, so you don’t need to be an expert to get the look you want.
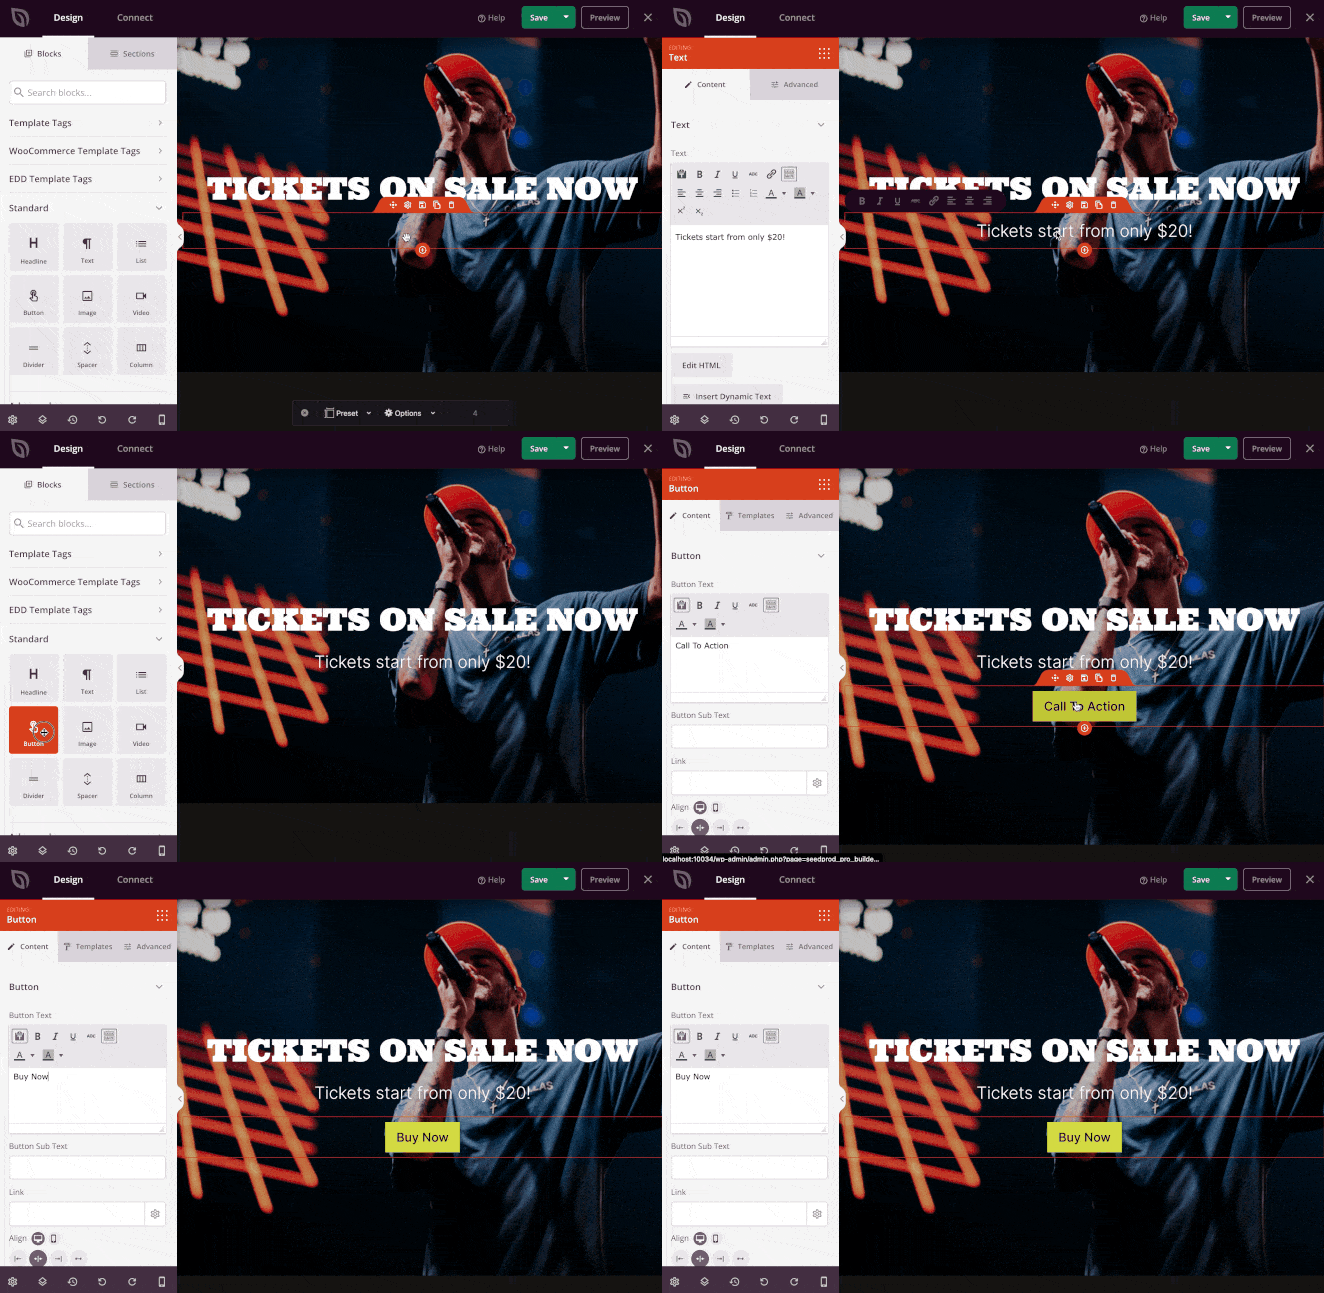
Let’s look at the customization options by customizing the pre-made “Tickets” page to sell a product.
Step 3. Customize Your Product Page.
You can customize any WordPress page using SeedProd’s drag-and-drop builder. If the site kit you chose during setup has custom pages, you can find them by going to Pages » All Pages from your WordPress dashboard.
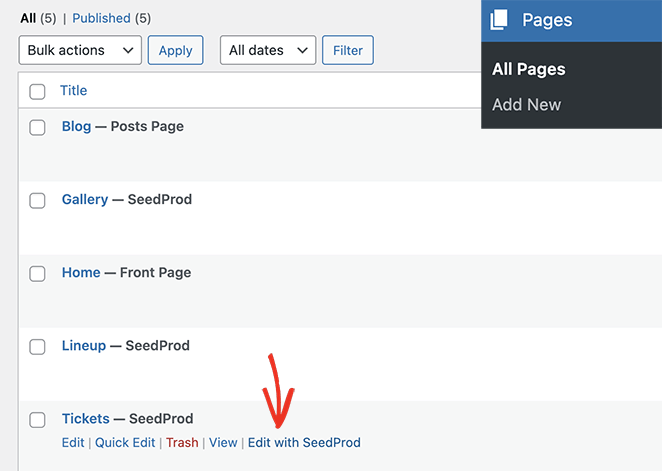
From there, find the page you want to edit and click the “Edit with SeedProd” link. In a few seconds, the page will open in the visual editor, where you can customize it like your theme template parts before.
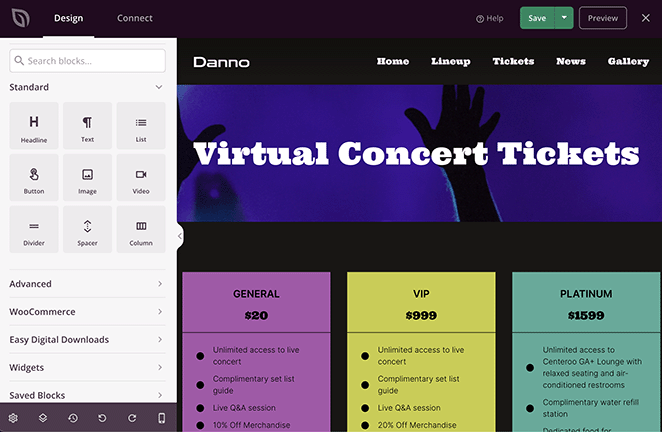
By default, this design has a 3 column section advertising different ticket pricing for a live tour. Let’s say you want to customize it to sell merchandise for your brand, something many live streamers and Youtube Channel creators do to monetize their brand.
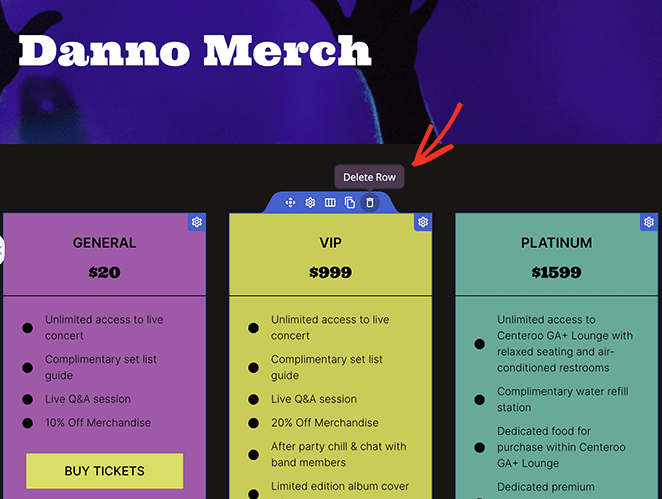
In that case, you can customize every inch of this page to suit your branding. Let’s start by hovering over the pricing table and clicking the trashcan icon to remove it.
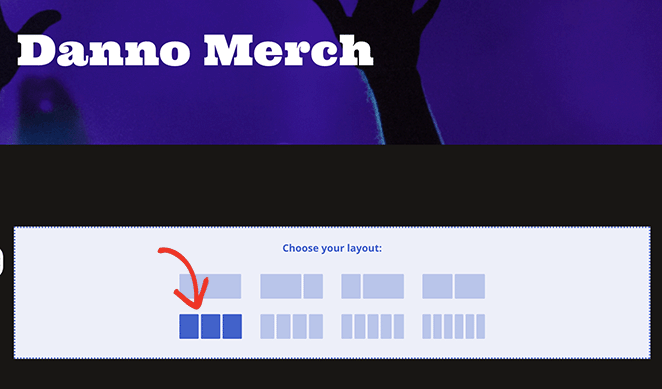
Now choose a layout option to replace it.
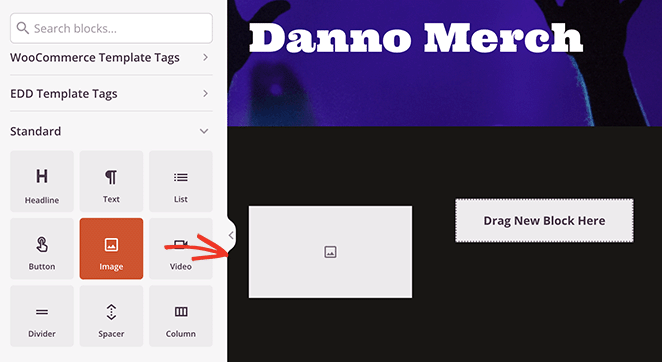
Next, find the Image block in the left-hand sidebar and drag it into the first column.
This is where we’ll add your first product image, so after adding the block to your page, click it and use the options in the block settings to choose an image from your computer or WordPress media library.
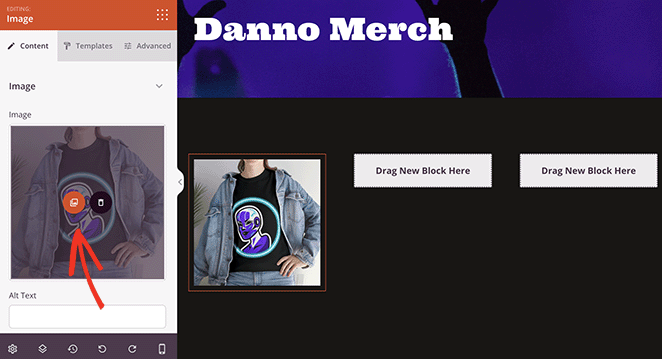
Go ahead and repeat this for the other 2 columns to add your other product images.
Now let’s add a headline to each product. Drag the Headline block to each column and write a title for each product.

In the block settings, you can adjust the headline size, alignment, heading level, and more.
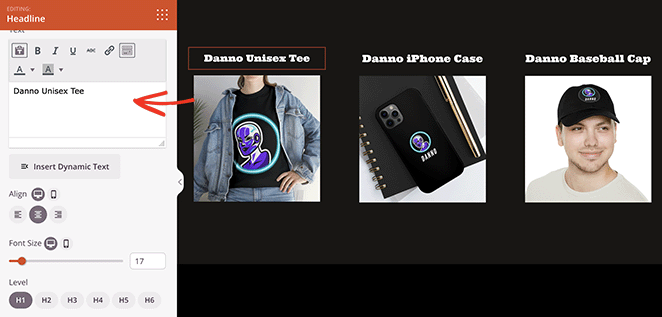
Repeat this step with the Text block to add a product description tailored to your target audience for each item you want to sell.
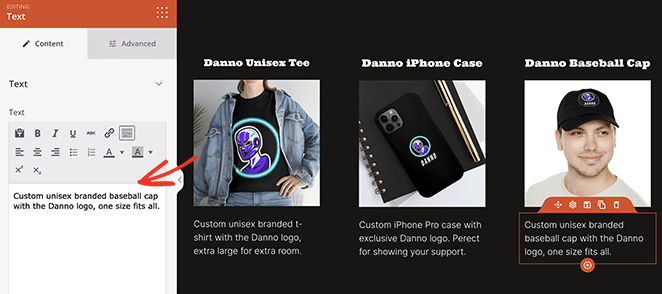
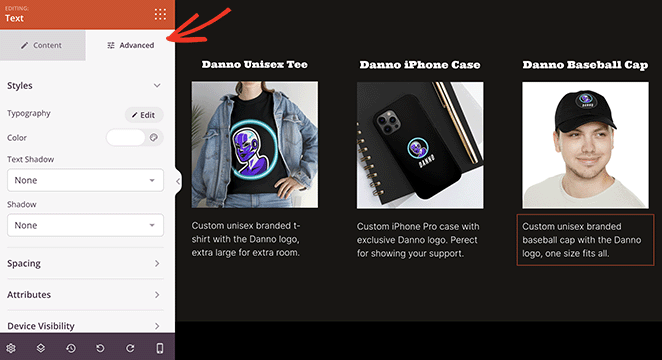
The Text block has similar customization options to the Headline block. In the Advanced tab, you can control further settings, including colors, fonts, styling, and more.
For people to buy your products, they’ll need a way to make payments. With SeedProd’s Payment Button block, you can instantly accept payments for your goods using Stripe, one of the most popular payment gateways.
To do this, drag the Payment Button block onto each product and customize it using the point-and-click settings. You’ll also need to connect the payment button to Stripe, which you can do by clicking the Connect to Stripe button in the block settings.
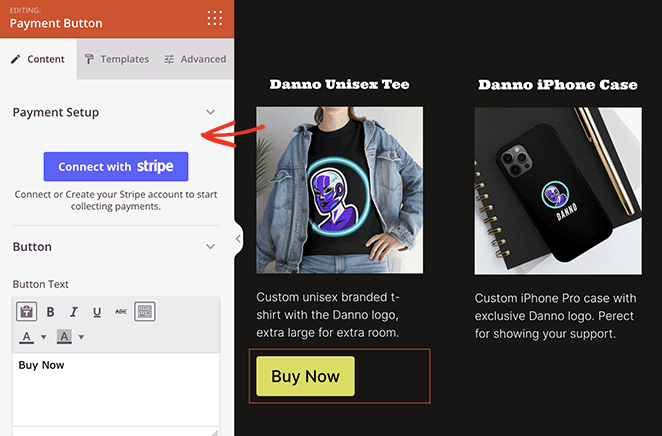
Note: The Payments Button has a 3% transaction fee + Stripe fees.
After connecting your Stripe account, you can enter your product’s price, description, and currency options. You can also add a success URL, which redirects users to a different page, such as your homepage or thank you page, after completing the purchase.
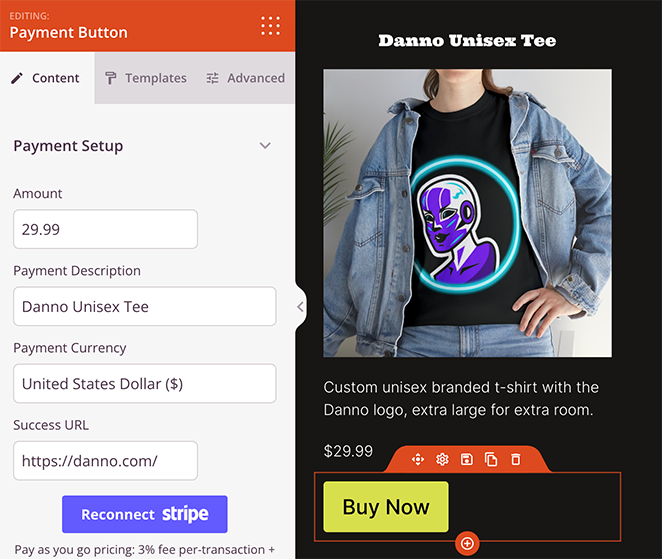
Continue customizing your page until you’re happy with how everything looks, don’t forget to click the Save button in the top-right corner to save your changes.
If you want to change the title of your page, exit the page builder, and head back to Pages » All Pages.
Now find the page you were working on and click the “Edit” link. This will open the default WordPress page editor, and you can change your page name inside.
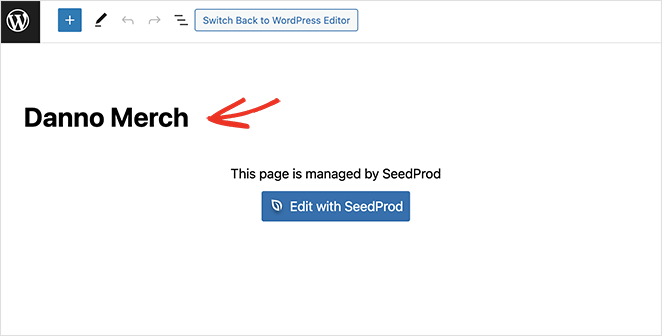
Click Publish when you’re happy with the changes.
Step 4. Publish Your Changes
Before publishing your online store, go through the different templates of your theme and customize them to fit your branding and content needs. For instance, you can customize your sidebar, header and footer, blog page, homepage, and more.
When you’re finished, navigate to SeedProd » Theme Builder and find the toggle labeled “Enable SeedProd Theme.” Switch this toggle to the “Yes” position to make your SeedProd theme live.

That’s it! Now visitors to your website can browse your product page and buy your products with zero fuss.

How to Set Up An Online Store Using Easy Digital Downloads
Some website owners may only want to sell digital products online, such as digital art, ebooks, or music. In this scenario, we recommend using a plugin dedicated to the task.
Our favorite choice is Easy Digital Downloads (EDD), the best WordPress plugin for digital downloads.
It lets you sell online products, including images, videos, PDF files, and even WordPress plugins and themes from your WordPress website.
Not only is this plugin super easy to use, but it also works seamlessly with SeedProd, allowing you to customize every inch of your store to perfection. In fact, SeedProd has dedicated EDD blocks to do this quickly.
First, follow steps 1 and 2 from the previous method to create a WordPress theme with SeedProd, then dive into the steps below to learn how to set up an online store using EDD.
Note: You’ll need a SeedProd Elite license for access to EDD Blocks
Step 1. Install Easy Digital Downloads
After your WordPress theme is installed, you’ll need to install and activate the Easy Digital Downloads plugin. For help, you can see this guide on how to install a WordPress plugin.
Once EDD is active, go to Downloads » Settings from your WordPress admin, enter your license key, and click the Activate button.
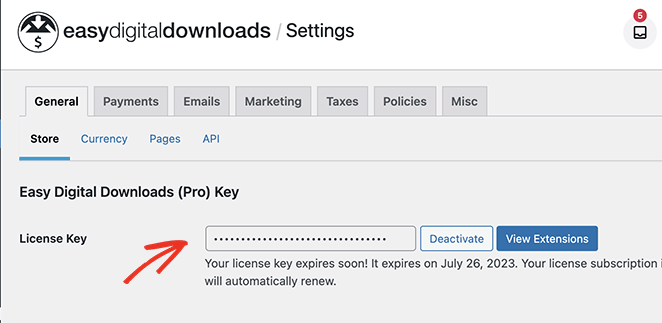
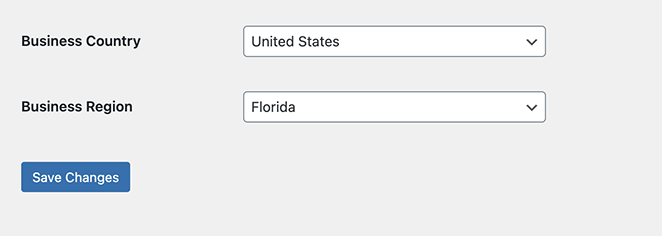
After this, scroll down and enter your business Country and Region using the dropdown menus. This lets EDD calculate tax information for you automatically.
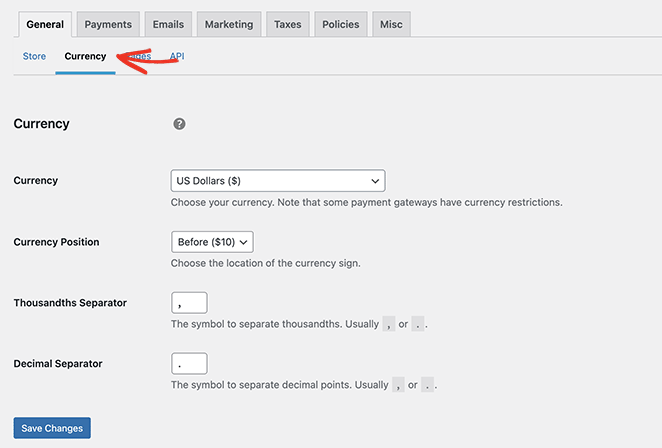
Next, select the Currency tab, enter your online store’s preferred currency, and click the Save Changes button.
Step 2. Set Up Your Payment Methods
Easy Digital Downloads offers various payment gateway integrations, including PayPal, Stripe, Amazon Payments, and more. With its extensions, you can choose from even more payment providers.
Let’s look at setting up the default payment gateways for this guide.
From the Settings page, click the Payments tab and select the payment options you wish to use. If you’re using multiple providers, you can select a default payment option from the dropdown menu.
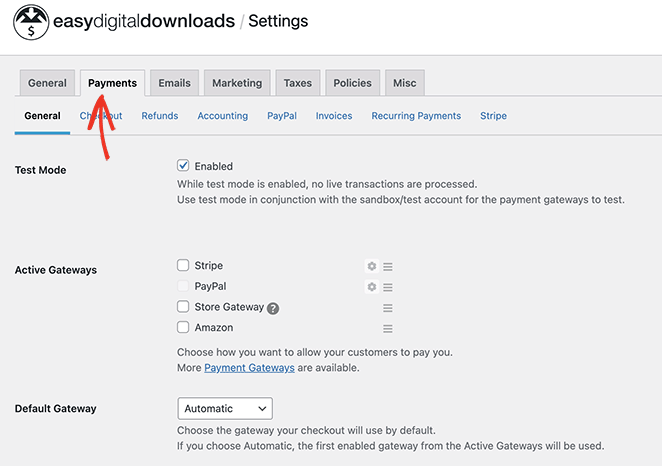
To save your settings, click the Save Changes button.
When the page refreshes, there will be new tabs for each payment method at the top. Clicking them allows you to configure their settings.
For example, by clicking the Stripe tab, you can work through the easy setup wizard to connect your Stripe account to WordPress. You can also do the same for PayPal.
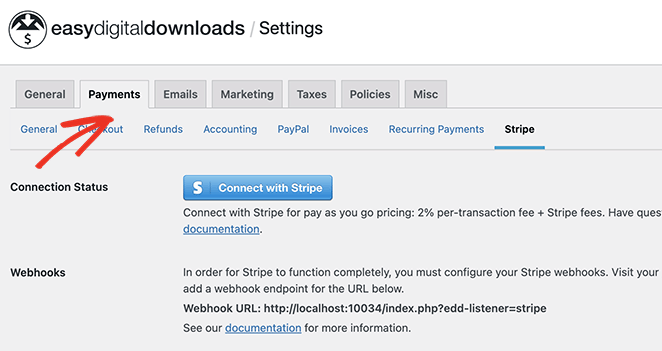
Remember to click Save Changes before going to the next step.
Step 3. Add Your Digital Downloads to WordPress
Once EDD is configured, you can add your products to your WordPress site. First, go to Downloads » Add New from your WordPress dashboard, then add your first product name, description, price, and other information.
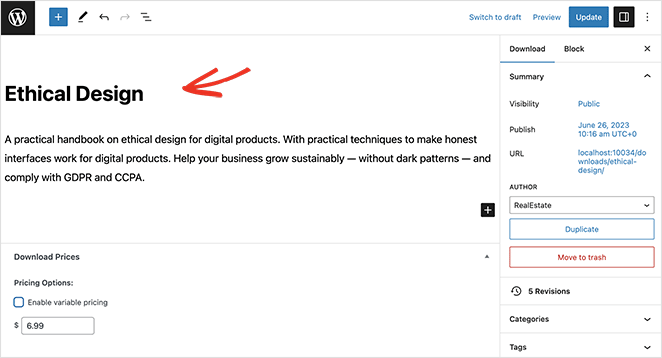
Now scroll down the page and upload a product image to make it more eye-catching.
You can then add the digital file users can download after purchase. To do this, click Add New File and upload your product file to the WordPress Media Library.
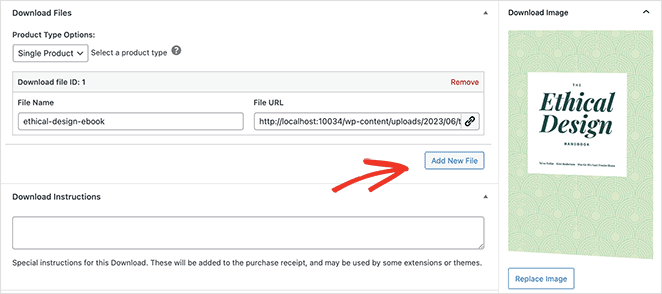
Below, add some instructions for accessing the file download link.
When your product details are complete, click the Publish button. You can follow the same steps to add more digital products to your online store.
Step 4. Create a Custom Digital Product Page
The default product page will have a simple design similar to the screenshot below:

To further customize it, you can create a custom download page with SeedProd’s custom template part. SeedProd developed this template to work specifically with Easy Digital Downloads, giving you full control over your product page design.
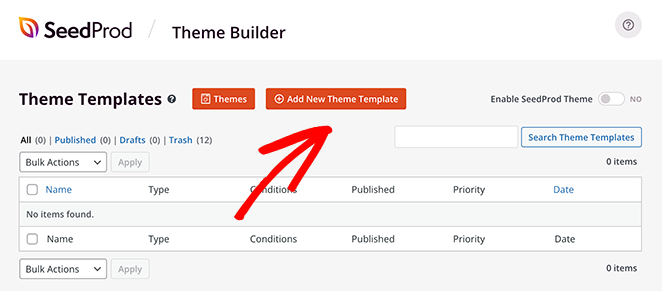
You can make one by going to SeedProd » Theme Builder and clicking the Add New Theme Template button.
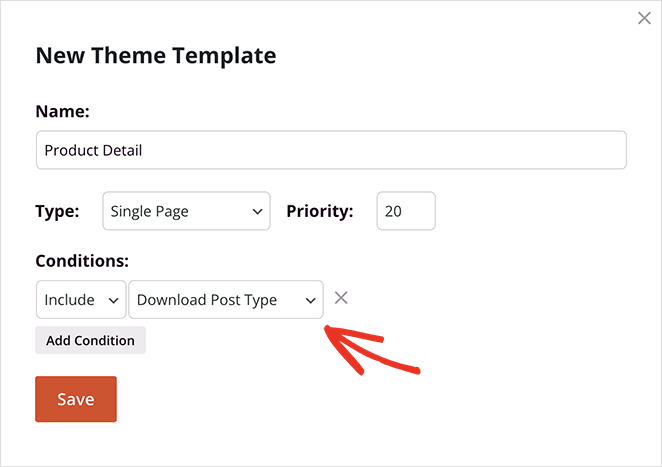
A popup will open where you can give the template a name, such as “Downloads Page.” From there, choose the Single Page dropdown, select the “Download Post Type” option, and click Save.
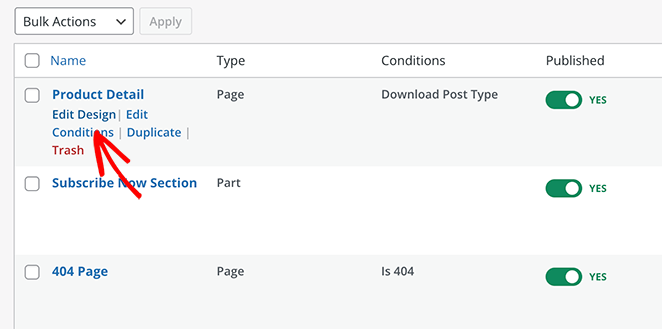
The new template will appear at the top of the templates list, where you can click the “Edit Design” link to customize it.
Now you can build your product page using SeedProd’s Easy Digital Downloads Template Tags. These blocks automatically pull product data from EDD and display them inside the visual editor.
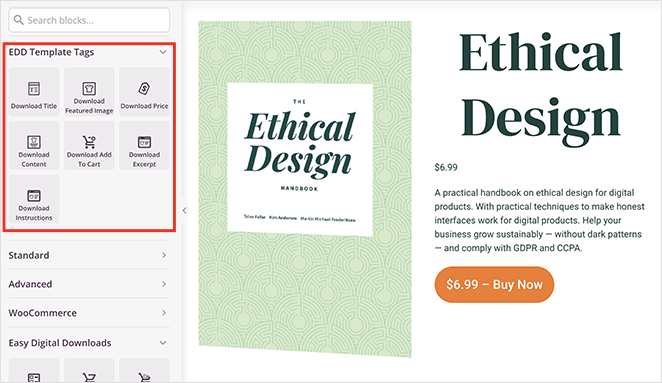
The available EDD Template Tags include:
- Download title
- Download excerpt
- Download price
- Download add to cart
You can combine them any way you like with SeedProd’s other WordPress blocks for a unique product page design. Experiment with different layouts until you’re happy with your products page, then click the Save button to save your changes.
Step 5. Customize Your EDD Checkout Page
Another page you’ll want to create is a checkout page. This is where shoppers can enter their payment details and pay for your products.
With SeedProd’s Easy Digital Downloads blocks, it’s a breeze and only takes a few minutes.
First, create a new WordPress page and click the Edit with SeedProd button.
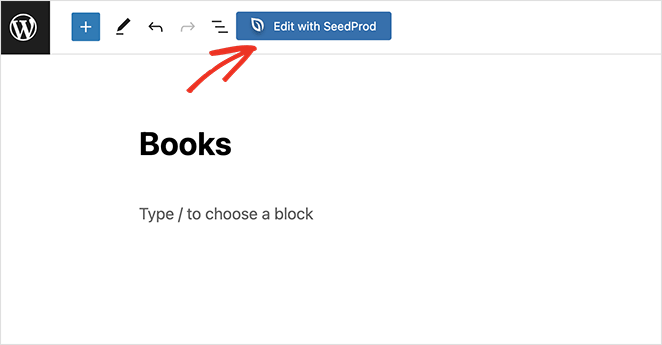
From there, find the Easy Digital Downloads Blocks and drag the Checkout block onto your page.
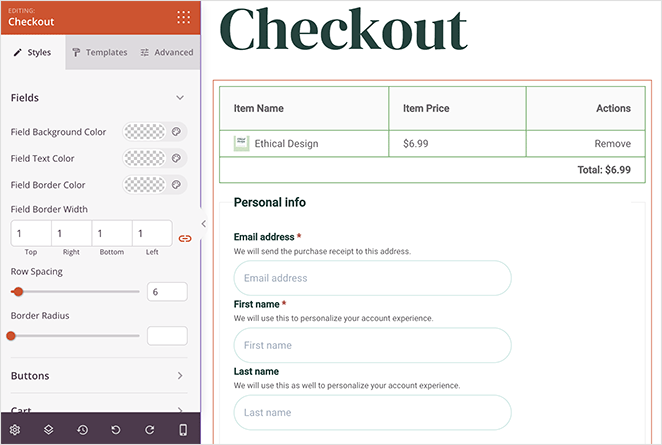
This will show the full EDD checkout, with settings you can customize to suit your website’s branding. For instance, you can change the form field colors and fonts, customize borders, and adjust the look of the payment section.
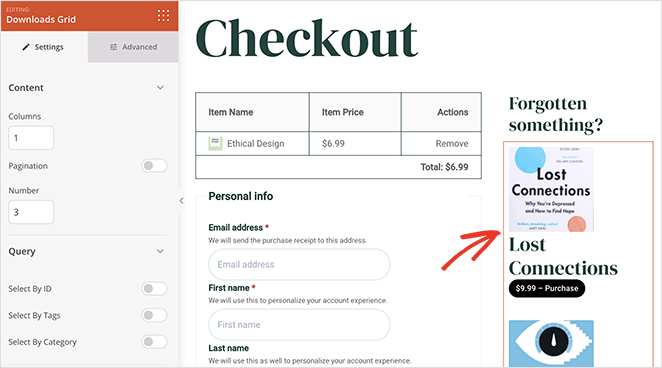
Another block you can add to this page may include the Downloads Gird block. This will add a list of products available for users to buy and download, which can help boost average orders and reduce cart abandonment.
After customizing your checkout page, click the Save button and exit the page builder.
Now go to Downloads » Settings » General from your WordPress dashboard and click the Pages tab.
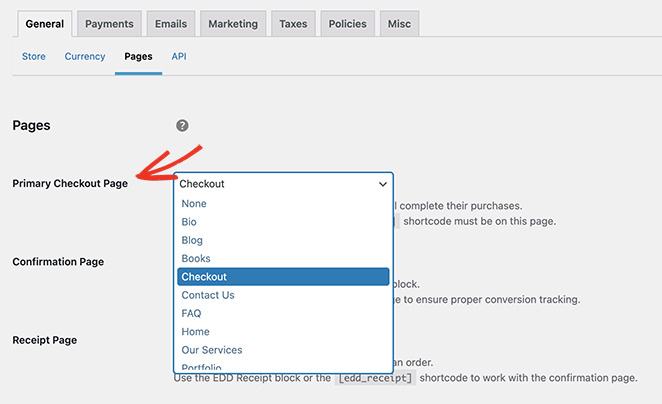
Here you’ll want to find the Primary Checkout Page heading and choose the checkout page you just made with SeedProd from the dropdown menu. This ensures your custom page is shown when users checkout.
Click the Save Changes button before heading to the last step.
Step 6. Publish Your Online Store
Now you’re ready to make your digital downloads store live. So head to SeedProd » Theme Builder and click the Enable SeedProd Theme toggle to make your theme live.

Now you can preview your online store to see how your digital products look.
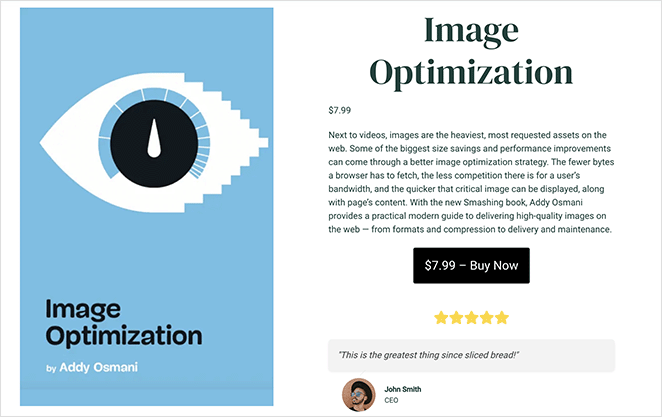
For even more details, see our complete guide on how to sell digital downloads in WordPress.
How to Set Up An Online Store Using WooCommerce
The last method we’ll cover in this guide is best for business owners looking to sell any type of product online. For this, we’ll use WooCommerce, the leading eCommerce plugin for WordPress.
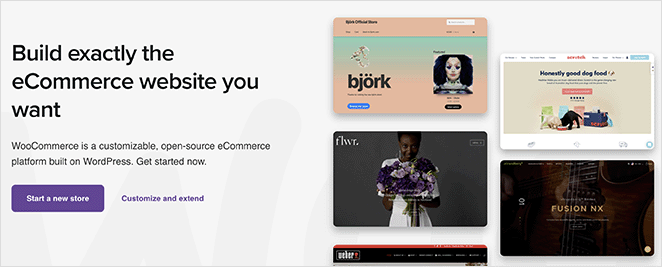
With WooCommerce, you get access to a robust eCommerce solution, complete with inventory management, storefront, and everything else you need to drive conversions for your business model.
Like the previous method, SeedProd has blocks made specifically for WooCommerce. As a result, you can create a full WooCommerce website design without code.
To get started, create a custom WordPress theme with SeedProd, using the instructions from earlier in this guide. You can choose from SeedProd’s dedicated WooCommerce templates to simplify the setup process.
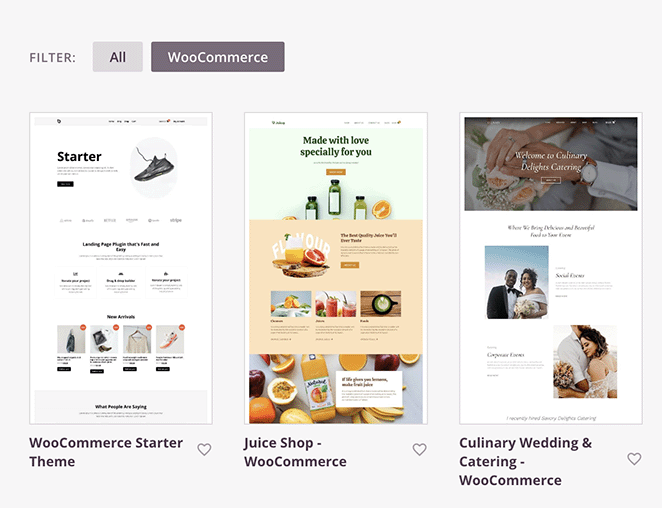
From there, follow the steps below to add products to your store and customize your theme.
Note: You’ll need a SeedProd Elite plan for access to WooCommerce blocks.
Step 1. Install WooCommerce
First, install and activate the WooCommerce plugin on your WordPress site.
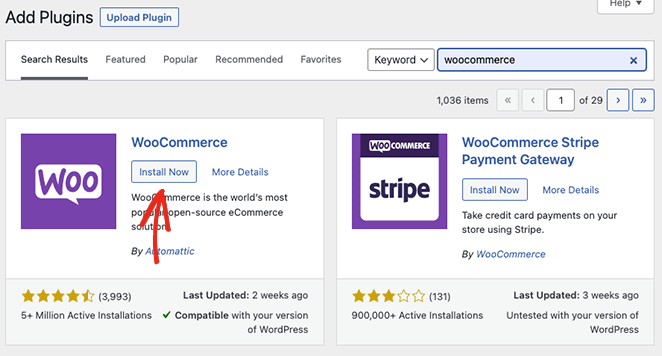
To do this, navigate to Plugins » Add New from your WordPress dashboard and search for WooCommerce. Now click the Install button next to the WooCommerce listing and Activate.
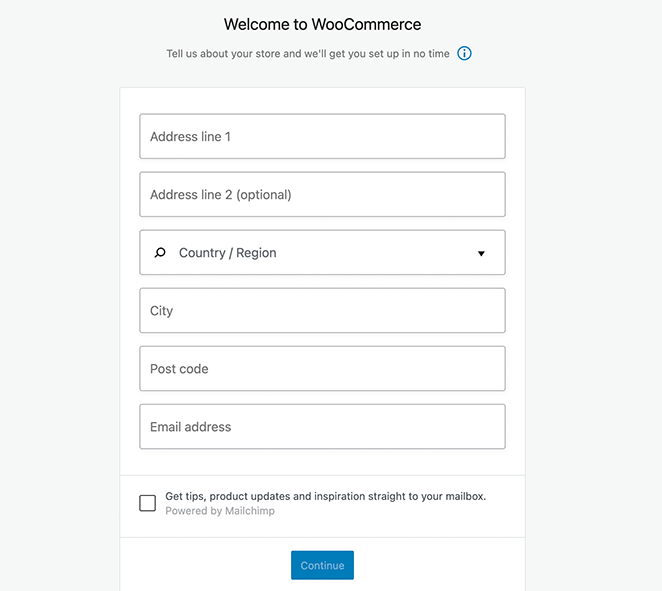
Once WooCommerce is active, launch the setup wizard where you can follow the easy steps to set up an online store.
Step 2. Configure Your Payment and Shipping Settings
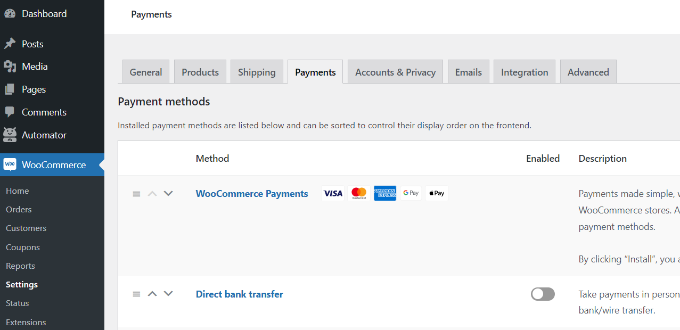
Next, you’ll need to set up payment options for your online store. WooCommerce offers several payment gateways, including PayPal, Stripe, and more.
You can find them by going to WooCommerce » Settings and clicking the Payments tab.
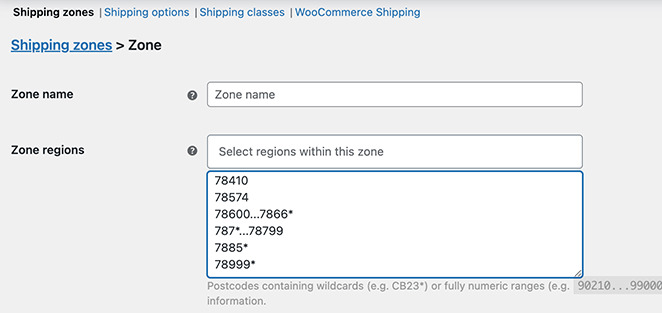
Shipping settings are another crucial part of your online store. WooCommerce allows you to define shipping zones, add shipping rates, and choose different shipping methods for each zone.
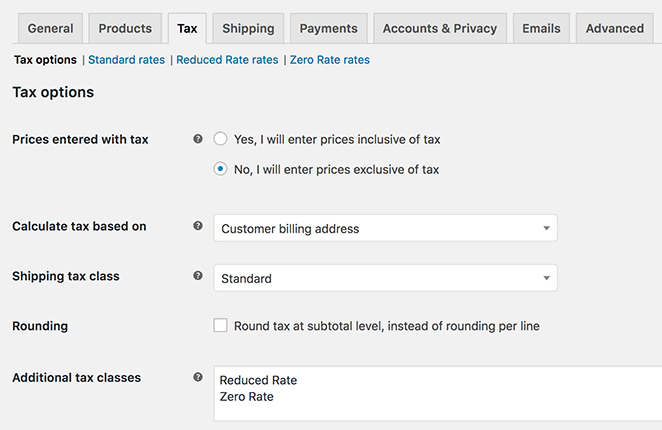
Finally, configure your sales tax settings. Ensure your tax rates are correct to avoid any legal issues down the line.
Step 3. Add Your Product Listings
Adding products in WooCommerce is just as simple. Navigate to Products » Add New from your WordPress admin, then add product information using the WordPress editor.
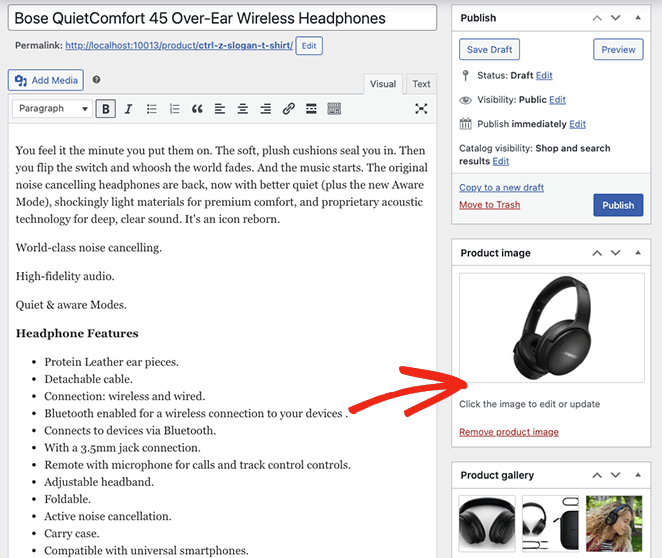
You can include the following information:
- Product name
- Product Description
- Price
- Short description
- Excerpt
- Image
- Tags and Categories
- And more.
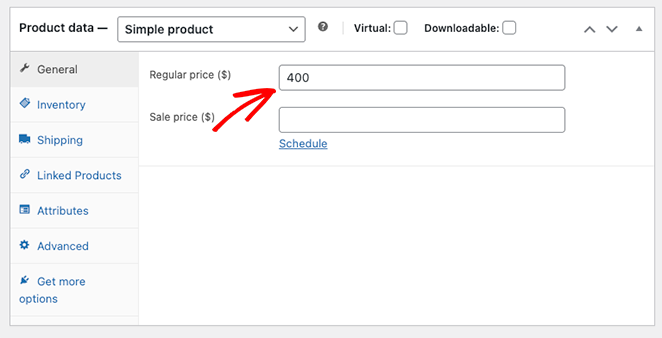
When you’ve added your product, click Publish and repeat this step for all the products you wish to list on your website.
Step 4. Customize Your Product Page
The default WooCommerce product page pulls the styling and layout from the WordPress theme you’re currently using. However, you can customize how that looks easily with SeedProd.
To do this, go to SeedProd » Theme Builder from your WordPress dashboard and find the Product Page template in the list.
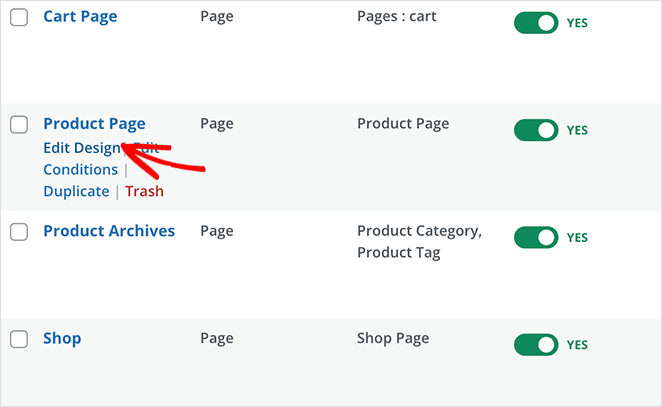
For this template to appear, you’ll need to use one of SeedProd’s WooCommerce site kits. Alternatively, you can create one by following the steps in our product page documentation.
Click the “Edit Design” link to open the template in SeedProd’s visual editor.
Here you can use SeedProd’s WooCommerce Template Tags to customize your product details, including:
- Product Image
- Product Gallery
- Product description and short description
- Product data tabs
- Product stock
- Product rating
- Related products
- Upsell
- Add to Cart
- And more
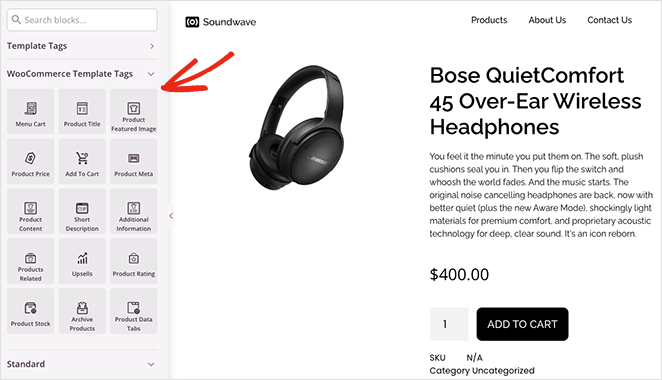
As with the EDD blocks, SeedProd’s WooCommerce blocks automatically pull data from your product listings. This means you won’t need to manually add it for each WooCommerce page you create.
Once your product page design is complete, click Save and exit the page builder.
Step 5. Customize Other WooCommerce Pages
There are many other ways to customize your WooCommerce site with SeedProd. Here are some guides you may find helpful depending on the type of online store you’re creating:
- How to Customize Your WooCommerce Checkout Page
- How to Make a Custom WooCommerce Thank You Page (Easily)
- How to Easily Customize Your WooCommerce Shop Page
- How to Customize Product Category Pages in WooCommerce
- How to Create a Custom WooCommerce Shopping Cart Page (Without Code)
Step 6. Publish Your WooCommerce Store
When you’re ready to make your WooCommerce store live, go to SeedProd » Theme Builder and turn the Enable SeedProd Theme toggle on until it says “Yes.”

From there, you can preview your WooCommerce store to see it in action.

How to Set Up an Online Store FAQs
Which platform is the best to set up an online store?
There isn’t a one-size-fits-all answer to this question. It depends on your needs, budget, technical skill, and the type of products you’re selling.
Our top choices are WooCommerce, Easy Digital Downloads, and BigCommerce. Other popular platforms include Shopify, Wix, Magento, eBay, Etsy, and Squarespace.
How much does it cost to set up an online store?
The upfront cost of setting up an online store varies depending on the platform you choose, the monthly fees of your domain and hosting, any plugins or addons you need, and whether you hire a professional to help with setup and design.
On the low end, you could set up a store for under a hundred dollars, but a more complex store could cost several thousand dollars.
Do I need any technical skills to set up an online store?
While some technical skills can be beneficial, SeedProd can help you set up an online store without technical know-how.
How can I accept payments in my online store?
You can accept payments through payment gateways like PayPal, Stripe, and Square. The specific payment gateways available may depend on your eCommerce platform.
Make sure to check transaction fees and other costs associated with your chosen payment gateway.
How do I handle shipping for my online store?
Most eCommerce platforms have integrations with various shipping carriers. You’ll need to decide whether to offer free shipping, flat rate shipping, or shipping that’s calculated based on the customer’s location and the weight of the products.
Set Up an Online Store Today
In this guide, we’ve covered 3 different ways to set up an online store in WordPress. With SeedProd’s code-free customizations, you’ll have a fully functional online shop in a flash.
Ready to dive in?
You may also find our comparison of WooCommerce vs Easy Digital Downloads helpful for choosing the right method for you.
Thanks for reading! We’d love to hear your thoughts, so please feel free to leave a comment with any questions and feedback.
You can also follow us on YouTube, X (formerly Twitter), and Facebook for more helpful content to grow your business.

