Want to create a professional business email address to boost your credibility and reach more customers? A personalized business email address builds trust with your audience, increases email deliverability, and strengthens your business branding.
But can you really create a business email for free?
In this guide, I’ll show you how to create a business email for free, step-by-step.
In This Guide:
Methods for Getting a Free Business Email Account
There are a few ways to create free business email accounts. Some are easier than others to use. Here’s a quick overview:
1. Use Free Business Email Providers
- Pros: Quick and easy setup, no need to purchase a website or domain name.
- Cons: Email address may not look professional, limited features compared to paid options.
- Best for: Small businesses with basic needs and minimal emailing.
2. Free Email Included With Website Hosting
- Pros: More professional look with your own domain name, and business email accounts matching your website.
- Cons: Requires purchasing a domain name and website hosting plan.
- Best for: Businesses that want a professional email address and plan to have a website.
3. Use Gmail with Your Own Domain
- Pros: Professional email address with your domain, full access to Gmail’s features.
- Cons: Requires some technical setup (adjusting MX records), still need to purchase a domain name.
- Best for: Gmail users who want a custom domain and all the familiar Gmail features.
How to Choose the Best Free Email for Your Business
The “best” free email option depends entirely on your business’s needs and how professional you need your email address to look. Here’s how to decide:
- Small business with basic needs: If you just need a couple of email addresses and don’t do heavy emailing, a free provider like Gmail or Outlook could be perfectly fine.
- Want a professional domain (but are on a budget): Look for promotions from web hosting companies. They often bundle free email in with their hosting plans, giving you that polished email address.
- Love Gmail and want a custom address: Are you already a devoted Gmail user? The hybrid approach (using Gmail with your domain) might be right for you. It takes a tiny bit more setup but is worth it if you love Gmail’s features.

Extra factors to consider:
- Storage Space: Free email providers offer limited storage space. This could be an issue if you deal with large attachments or plan to keep a lot of emails.
- Features: Do you need a calendar, contacts list, and cloud storage seamlessly integrated with your email? Think carefully about the tools included with each provider.
- Security: Prioritize providers with a reputation for protecting user data.
- Customer Support: Free email options often offer minimal or no direct support. If you encounter issues, this could be a problem if you’re not tech-savvy.
How to Create a Free Business Email Address with Web Hosting
Before you can get free email accounts for your business, you’ll need to register a domain (such as www.example.com) and find a web hosting service. This allows you to set up a business email with a professional appearance.
You’ll then need an email hosting provider or email manager to handle your emails. If you already have a custom domain and business website, you may be able to set up a business email with your current web hosting provider.
However, many web hosting providers charge extra to set up an email address with your company name and send emails. These extra costs can add up quickly!
That’s why we recommend Bluehost. It offers some of the best free email hosting, making it one of the best free business email address providers.

They include a free domain name and a free professional email address with their WordPress website hosting packages, saving you a ton of money.
Step 1. Create a Company Email Domain
The first step is to go to the Bluehost website and click on the Get Started button.

You’ll now go to another window where you can choose a hosting plan.
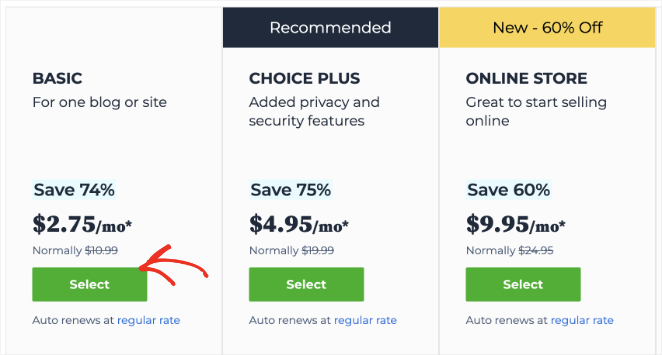
The basic plan lets you create 1 domain name and 5 mail accounts for free. On the other hand, you can make unlimited email addresses if you opt for the other plans with the free email service.
So check out all the plans and select the one that best meets your requirements. Once done, click on the Select button under your preferred plan.
Clicking the button takes you to the next page, where you can set up the domain.
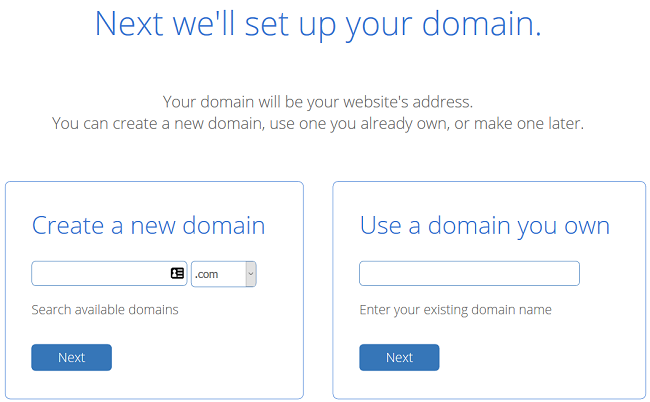
Here you’ll have two options. You can either create a new domain name or use your own if you already have one.
Once you enter your domain, Bluehost will check and confirm if your domain is available. If it’s available, you can proceed and make your payment.
But before that, you need to add your account information.
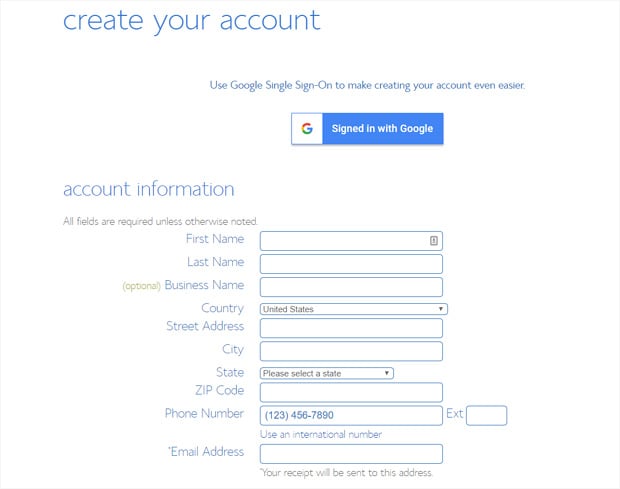
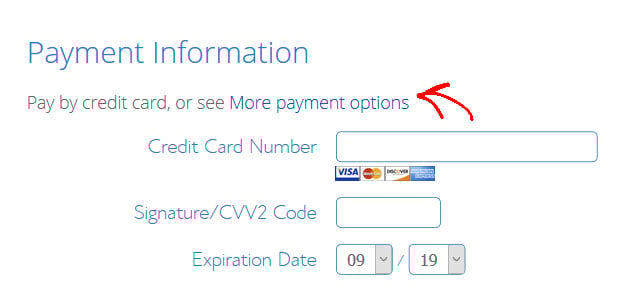
Under the payment option, you’ll see the option to pay via your credit or debit card.
If you want to make your payment via PayPal, click on the More Payment options link. Complete your payment by clicking on the checkbox to accept the terms and conditions, followed by the Submit button.
After making your payment, Bluehost sends you the hosting account login details and your email control panel (cPanel) login credentials.
Step 2. Create Your Free Email Address for Business
Now that your domain name is registered, it’s time to create your business email address. So log into your Bluehost account with the credentials that you just received in your inbox.
Once you’ve logged into your account dashboard, click the cPanel Email menu on the left-hand column. Then click the Email Accounts option in the popup window and click Continue.
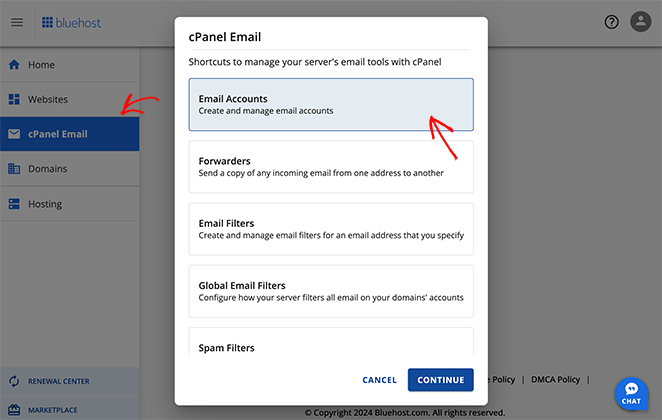
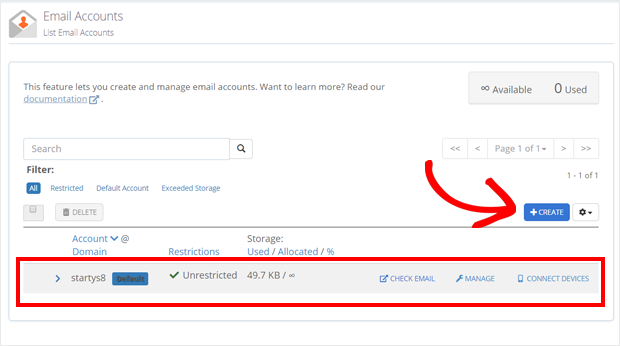
You’ll go to the email account page to create a custom email address and manage your email addresses. Here you’ll have an email address created for you by default.
To create a new one, click on the Create button.
You can then enter your username and password to create your email address.
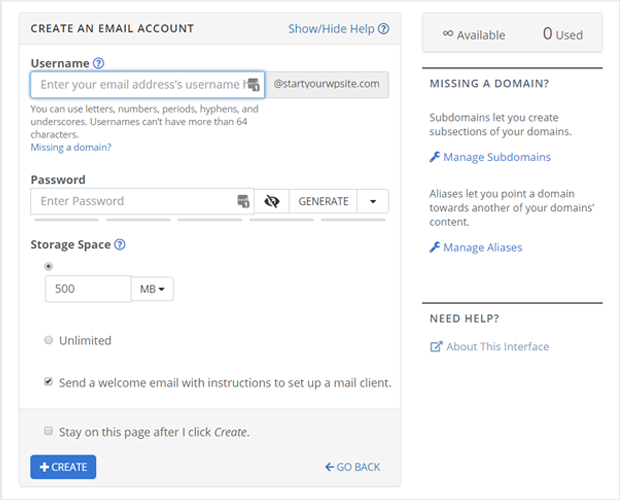
You can also select your storage space here. After adding your information, click on the Create button to complete the process.
And that’s it. Your business email account is now live, and it will appear on the Email Accounts page.
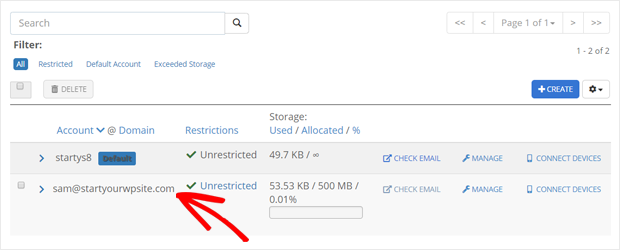
Depending on your hosting plan, you can set up business email addresses for your employees by using the same process. If you have opted for the basic plan, you can create up to 5 email addresses, and for the plus and the choice plus plans, you can create an unlimited number of emails.
Step 3. Access Your Business Email Account
Now that you’ve created your free email account, your business email address is ready to be used.
But first, you have to connect your email address to a webmail application like Gmail or Yahoo Mail or a desktop email client such as Microsoft Outlook.
You’ll need to start by logging in to your Bluehost dashboard just like you did in the previous step. Now click on cPanel Email » Email Accounts.
You’ll now see the email address that you just created. Now click on the Check Email link just next to your email address.
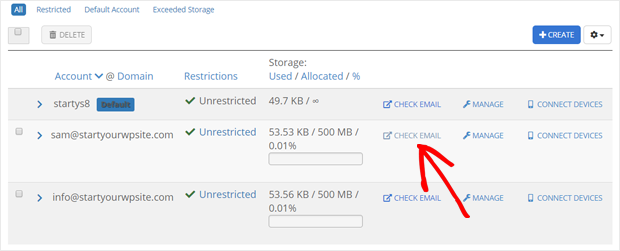
As a result, you’ll see a new window to see the default webmail app options. You can choose one from the given options.
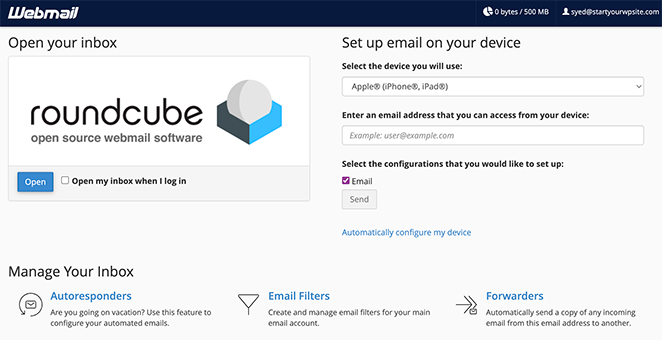
Let’s select roundcube for now. You don’t need to make any other changes here. Your email account interface will now look something like this:
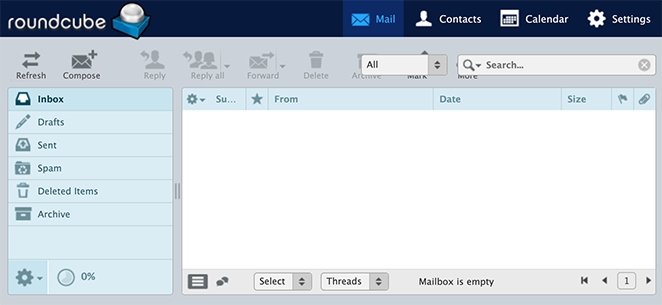
This webmail application generally needs no separate setup. But the only problem is you’ll have to log in to your Bluehost account every time you want to access it.
But don’t worry. You can use a desktop email application as an alternative. By doing that, you can access your email account directly without logging in to your Bluehost account.
Besides, you don’t have to do anything extra. Bluehost will auto-detect your application and offer you the necessary settings. You’ll find these options right below your webmail applications, including MX records, IMAP, and POP3 authentication settings.
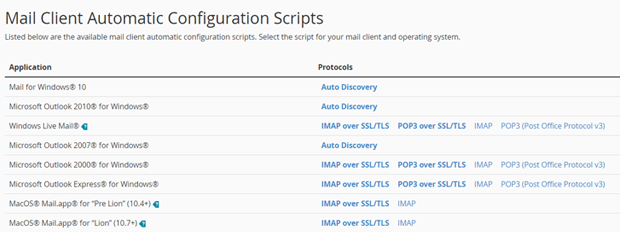
If you want to use Mail for Windows 10, you’ll first have to set up a new email account in Windows 10 using the email address you just created. After that, you can start using your account like any other email account without logging in to your Bluehost account.
If you use Gmail, you can also set up email forwarding to your Gmail account to manage your personal and professional emails in the same place.
Step 4. Manage Your Free Email Address for Business
Bluehost’s business email service makes it easy to manage your email addresses. You can do that by clicking on the Advanced » Email Accounts link in your Bluehost account. That opens the following window on your screen, so click on the Manage link as shown in the screenshot.
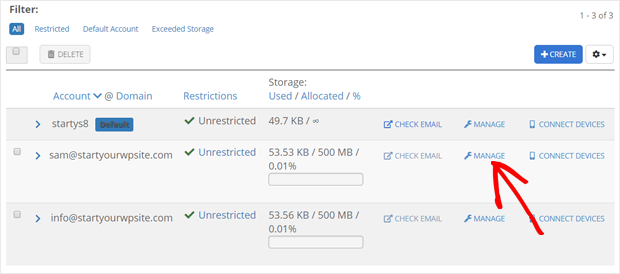
That will display all the options that you can use to manage your company email account. For example, you can use it to manage email filters, send automated responses, change your password, and update your account.
You can also free up your email storage and allocate storage space to your email account under this option.
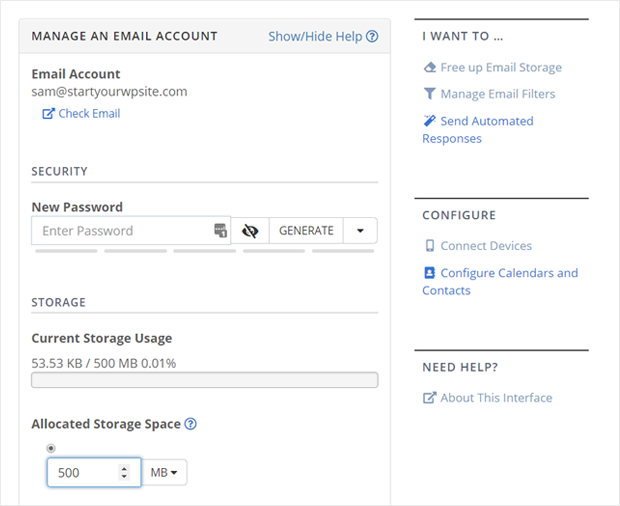
If you want to delete the email account, you’ll find the delete option at the bottom of this page.
So that’s it! Your free professional business email address is set to send messages to your customers and clients.
If you want more advanced features, you can use G Suite – the premium email service of Google.
The pricing plans for G Suite start from $2.92 per user per month. You can start with its 14-day free trial before opting for the premium plan. If you’re satisfied with its features, you can upgrade your plan at any time.
Bluehost vs Other Free Email Options
| Feature | Bluehost | Google Workspace | Zoho Mail (Free) |
|---|---|---|---|
| Price | Starts at $2.95/month | Free | Free |
| Storage | 1GB | 15GB | 5GB per user |
| Number of Email Addresses | Up to 5 | 1 | Up to 5 users |
| Email Client | Webmail, POP3, IMAP | Webmail, Gmail app, POP3, IMAP | Webmail, POP3, IMAP |
| Features | Basic spam protection | Robust spam filtering, Google apps integration | Calendar, Contacts, Tasks integration |
| Additional Benefits | Domain name included, website hosting | None | Mobile apps |
| Limitations | Limited storage, no additional features | Limited storage, ads in webmail | Limited storage, limited users |
When to Upgrade to a Paid Email Solution
While free business email options are a great starting point, there are situations where upgrading to a paid professional email solution might be a better fit.
Here are some signs it might be time to consider an upgrade:
- Need More Storage: If you consistently run out of storage space or deal with large attachments, a paid plan with more storage can be a lifesaver.
- Enhanced Security: Paid solutions often offer advanced security features like better spam filtering, data encryption, and two-factor authentication, which are crucial for protecting your business communications.
- More Professional Features: Paid plans might include features like shared calendars, video conferencing, cloud storage integration, and professional email signatures, enhancing your productivity and collaboration.
- Dedicated Customer Support: If you need reliable and responsive customer support, a paid plan can provide peace of mind with faster response times and dedicated support channels.
- Growing Business: As your business expands and your email needs increase, a paid plan can offer scalability and additional features tailored for larger teams or organizations.
More Email Marketing Tips
Since you’re setting up an email account for your business, you might also find the following guides helpful:
- Effective Email Unsubscribe Page Examples + Easy Tutorial
- Best SMTP Plugins For Successful Email Delivery
- How to Start Building an Email List to Grow Your Business
- How to Collect Email Addresses in WordPress
- Best Email Newsletter Services (Compared)
- How To Write a New Website Announcement Email
Free Business Email Address FAQs
Many of our readers ask some frequently asked questions about business email addresses and how to use them.
Create Your Free Business Email
We hope this article helped you learn how to start creating a professional business email.
Thanks for reading! We’d love to hear your thoughts, so please feel free to leave a comment with any questions and feedback.
You can also follow us on YouTube, X (formerly Twitter), and Facebook for more helpful content to grow your business.

