Want to learn how to make a one product website without getting stuck in endless eCommerce setup? When I first tried, I didn’t need dozens of product categories or a bulky theme — I just needed one clear page that convinced people to buy. That’s exactly what a one product website gives you, and I’ll show you how to build one today in WordPress.
In this step-by-step guide, you’ll see how to set up hosting, add WooCommerce, and design a professional single product store with SeedProd. By the end, you’ll have a simple site that looks great, loads fast, and is focused entirely on selling your product.
Steps to build a one product website:
- Step 1. Set Up Your Website Hosting and Domain
- Step 2. Install WordPress on Your One Product Website
- Step 3. Install the WooCommerce Plugin
- Step 4. Configure Your Payment Settings
- Step 5. Create Your Single Product in WooCommerce
- Step 6. Customize Your One Product Website with SeedProd
- Step 7. Publish Your One Product Website
- Step 8: Optimize Your Site for Search Engines
- Step 9: Promote Your One-Product Store
What Is a One Product Website?
A one product website is an online store built to sell just one main product. Instead of running a large eCommerce site with hundreds of items and categories, everything on the site is designed to showcase, explain, and sell a single product.
This product could be almost anything: a physical item, a digital download, or even a service. The main difference from a typical eCommerce store is focus. While a site like Amazon needs a shop page, multiple categories, and thousands of product listings, a one product website usually has just a few key pages — like a homepage, product page, checkout, and about page.
Because of this streamlined structure, single product stores are faster to build, easier to manage, and more effective at guiding visitors toward a single purchase decision.
Who Is Your Ideal Customer?
Before you design your one product website, you need to know exactly who you’re selling to. A clear customer persona makes it easier to write copy, design pages, and market your product in a way that resonates.
Here’s what to define when building your ideal customer profile:
- Demographics: Age, location, and income level of the people most likely to buy.
- Interests: What they care about, follow online, or aspire to achieve.
- Pain Points: The problems your product solves for them.
- Buying Triggers: What motivates them to take action — urgency, savings, or social proof.
For example, if you sell a premium fitness water bottle, your customer persona might be a 25–40 year old health-conscious professional who goes to the gym, follows wellness influencers, and is willing to pay more for sustainable products.
Once you know this, you can build a one product website that speaks directly to your buyer, from the headline on your homepage to the images and testimonials you feature.
How to Make a One Product Website Step-by-Step
Before you start building your site, you’ll need to set up its foundations by getting:
- A domain name
- Web hosting
- SSL certificate
Your domain name is the address of your online store, and web hosting is like the house your website lives in. You’ll need these for your target audience to find your website via search engines and for potential customers to learn more about your product.
Since you’re making an online store, you’ll also need an SSL certificate to protect consumers’ personal data.
If this sounds like a lot of work, don’t worry. Most modern web hosting companies offer all 3 features in their hosting plans. Here are 3 of the top hosting providers that we recommend:
All of these companies are entirely optimized for WordPress. Plus, when you buy web hosting, they come with a free domain name and SSL certificate.
Below we’ll show you how to set up your one product website with Bluehost.
Step 1. Set Up Your Website Hosting and Domain
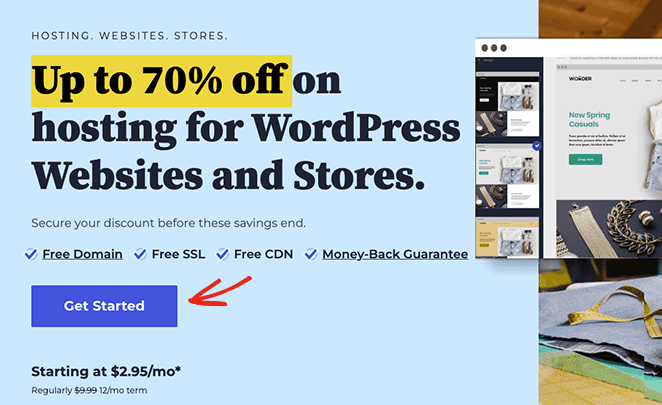
First, go to the Bluehost website and click Get Started.
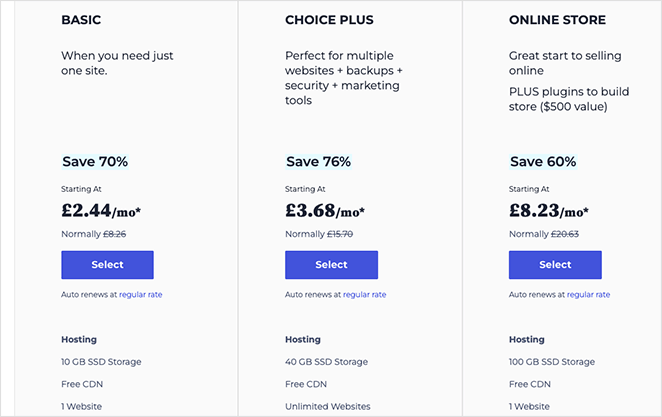
On the next screen, you can choose a pricing plan. We recommend the Choice Plus plan for the added functionality, but if you’re just starting, the basic plan should be fine for now.
Next, choose a domain name for your website. Remember, this will be what people use to find you online, so ensure you’re happy with your domain before committing.
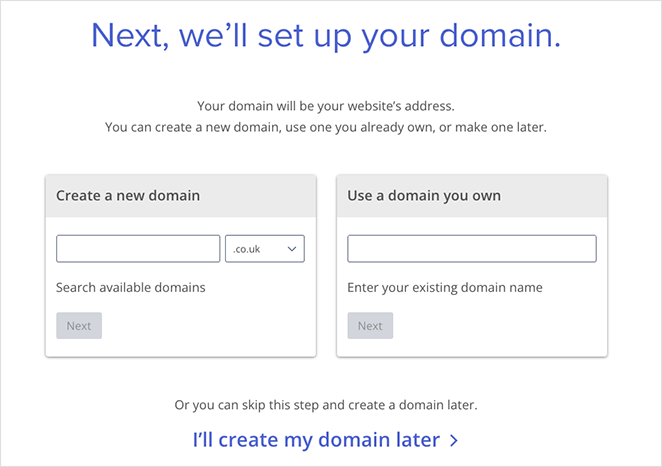
After that, you’ll go to the checkout page, where you can add your payment details and confirm your purchase.
Step 2. Install WordPress on Your One Product Website
When you’ve finished the checkout process, you’ll receive an email from Bluehost with details on logging into your web hosting control panel. The control panel allows you to manage your hosting settings, domain info, email inbox, and log into your WordPress dashboard.
After logging into your control panel, you’ll notice that Bluehost has installed WordPress automatically. To access your dashboard, click the Log into WordPress button.
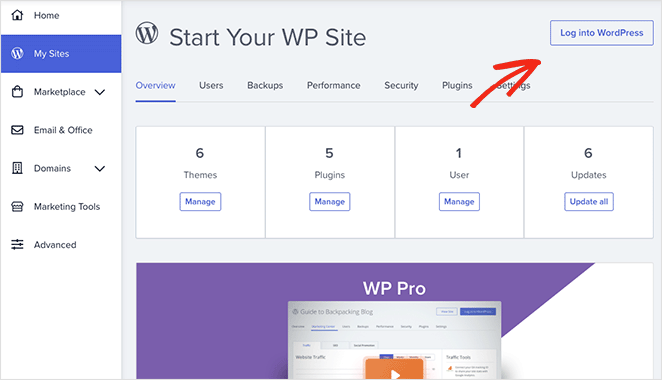
Your WordPress dashboard will look similar to the screenshot below:
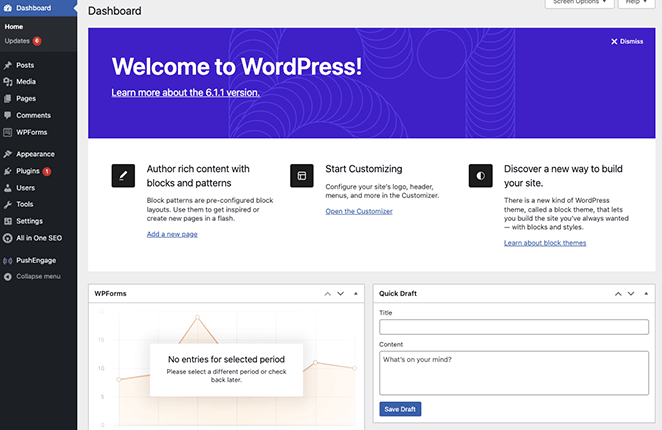
Note: Installing WordPress with other hosting providers may involve different steps.
When you log into your WordPress dashboard for the first time, you’ll need to change a few settings. First, go to Settings » General and enter your website title and tagline.
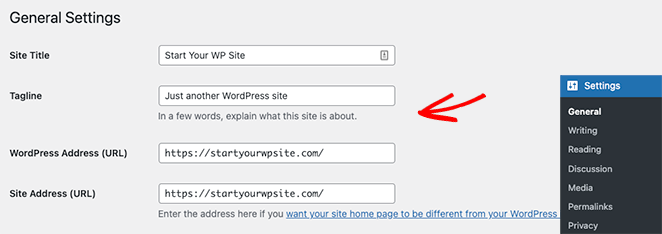
Then ensure you change your WordPress Address and Site Address to the HTTPS version to use SSL on your website.
Now go ahead and click the Save Changes button.
Step 3. Install the WooCommerce Plugin
Once you’ve installed WordPress and configured your settings, you’ll have a basic website for your online business. You can upload images and create content, but it will need more features to sell new products.
To turn this simple website into an online store, we’ll install WooCommerce. It’s a WordPress plugin that turns any website into an online store without having to hire a developer or write custom code.
First, navigate to Plugins » Add New from your WordPress dashboard and search for WooCommerce. Now click the Install button next to the WooCommerce listing in the search results.
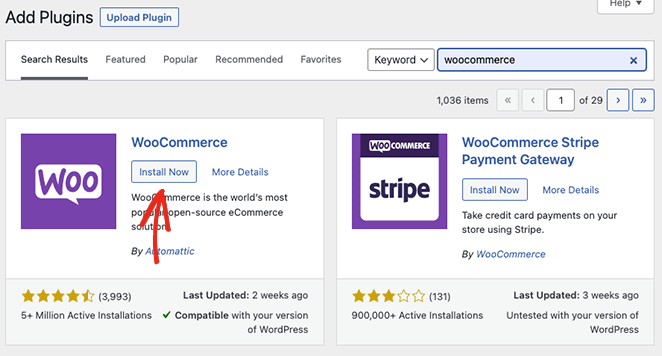
When the plugin has finished installing, click on the Activate button.
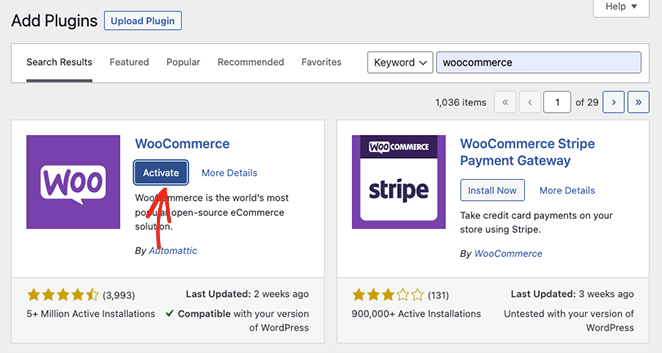
Once WooCommerce is active on your website, it will launch an easy setup wizard. Simply follow the steps until the wizard is complete.
At one point during the setup wizard, WooCommerce may ask you to choose a WordPress theme. You can choose an alternative WordPress theme like Astra or Divi or keep your current free theme.
We’ll stick with our current WordPress theme because we’ll customize it later with SeedProd, a drag-and-drop website builder.
Step 4. Configure Your Payment Settings
The next step is to set up the payment options for your online store. This will allow you to accept payments from users who wish to buy your product.
WooCommerce offers several payment gateways, which are pretty easy to set up. To find them, go to WooCommerce » Settings, then under the Payments tab, find the payment options that best suit your business.
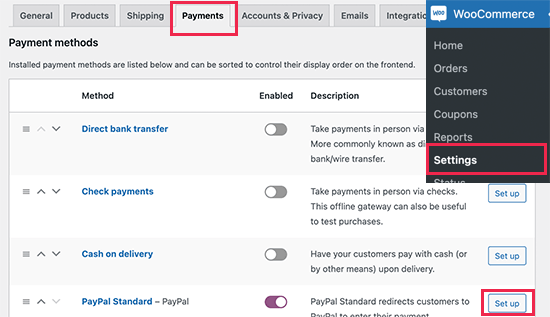
With your Payment processor in place, you’re ready to add your single product to your new online store.
Step 5. Create Your Single Product in WooCommerce
Adding a new product in WooCommerce is super easy. First, go to Products » Add New from your WordPress admin, where you can add your product details.
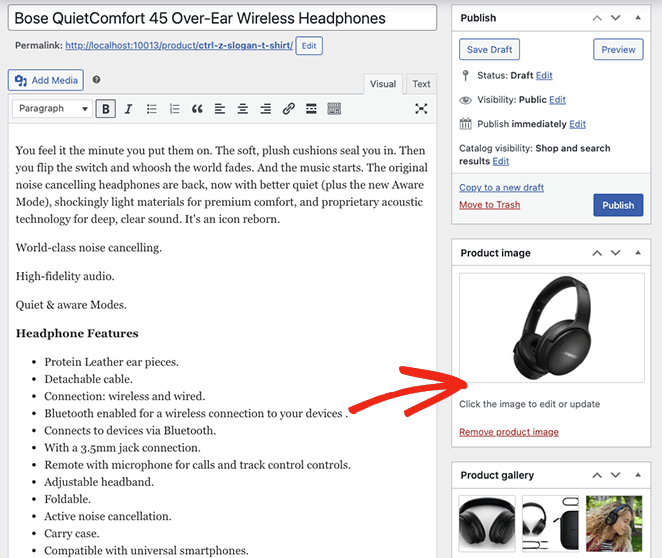
Let’s start by adding a product title and description.
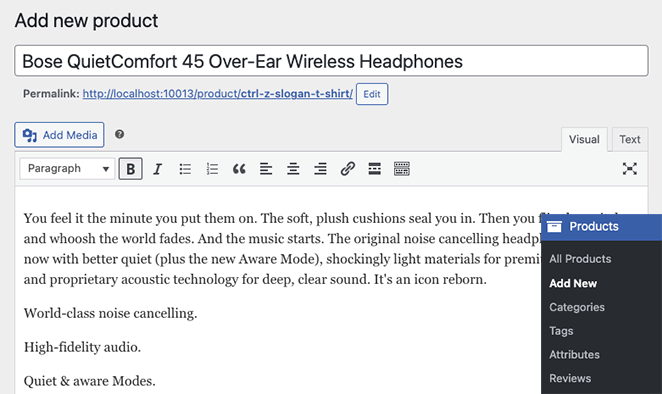
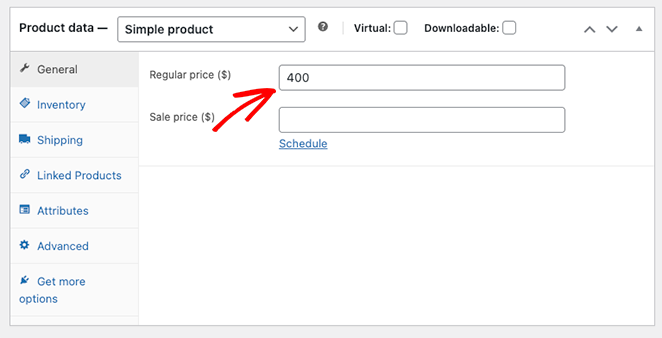
Next, scroll down the page until you see the Product Data box. This is where you can enter the regular price, sale price, and other product attributes.
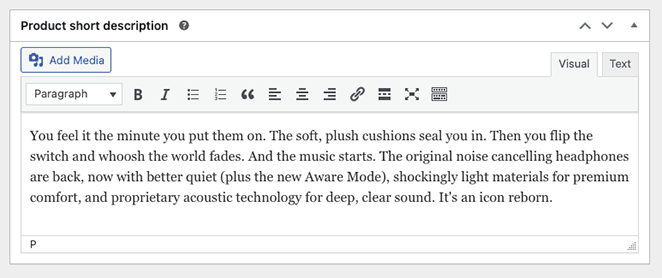
Below that, you may also want to add a short description of your product.
Mastering Your Product Description
Your product description is your key sales pitch. Here’s how to make it compelling:
- Focus on Benefits: Don’t just list specifications. Explain how your product improves your customer’s life. What problems does it solve? What positive outcomes can they expect?
- Speak Your Customer’s Language: Use words and phrases that resonate with your target audience. Avoid technical jargon if it doesn’t match your ideal buyer’s knowledge level.
- Address Objections: Think about common questions or hesitations a customer might have. Preemptively answer these in your description to build trust and reduce uncertainty.
- Keep it Concise: While it needs to be informative, avoid overwhelming potential customers with a wall of text. Clear, concise writing that highlights the most important details is essential.
After adding your product details, you can upload a product photo. We also recommend adding a product photo gallery using the option below to give shoppers as much information as possible.
The Power of Visuals
High-quality images and videos are crucial for showcasing your product effectively. Here’s what to keep in mind:
- Multiple Angles: Capture your product from different perspectives to give a full understanding of its features and design.
- Lifestyle Shots: Consider including images or videos of someone using your product in a real-world context. This helps potential customers visualize how it could fit into their own lives.
- High Resolution: Ensure your visuals are crisp and clear so customers can examine details.
- Optimization: Choose the right file formats and optimize images for fast loading times on your website.
When you’re happy with your product, click Publish.
Your one-product website is now ready to attract your ideal customers.
Depending on the WordPress theme you’re using, your product page will look similar to the example below:

If you’re happy with your single product website’s overall look and feel, you’re all set. But if you want to turn your site into a high-converting one product store, adding your own customizations is a good idea.
We’ll show you how to do that next, and don’t worry; it isn’t hard.
Step 6. Customize Your One Product Website with SeedProd
So you want to customize your one product website. While many WooCommerce plugins can help you achieve the perfect look, the best solution is SeedProd.

SeedProd is a drag-and-drop website builder with full WooCommerce compatibility. You can use it to customize any of your store pages without touching a single line of code.
This powerful page builder also lets you:
- Build custom WordPress themes from scratch
- Hide your site behind a coming soon page before launching
- Put WooCommerce in maintenance mode
- Collect email addresses with optin forms
- Accept payments with its Stripe payment button
- And much more.
Follow the steps below to customize your single product WooCommerce site with SeedProd.
Install the SeedProd Plugin
For full WooCommerce support, you’ll need to get the SeedProd Elite plan and download the plugin to your computer. Then go ahead and install and activate the .zip file on your WordPress site.
If you get stuck with this, try this guide on installing a WordPress plugin.
Next, head to SeedProd » Settings and paste in your SeedProd license key, which you can find in your account dashboard.
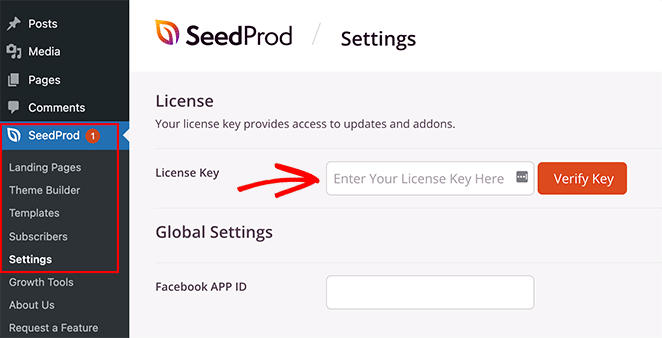
Finally, click the Verify Key button to continue.
Choose a WooCommerce Template Kit
For this step, we will choose a new design for our one-product website. It will overwrite the existing WordPress theme and replace it with one you can customize with SeedProd’s visual editor.
You can do this by going to SeedProd » Theme Builder and clicking the Theme Template Kits button. This will open the library of pre-made designs you can use as a starting point for your new theme.
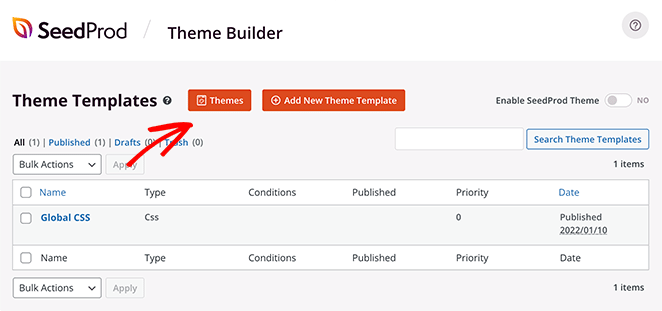
Let’s click the WooCommerce tab to show only the themes relevant to WooCommerce stores.
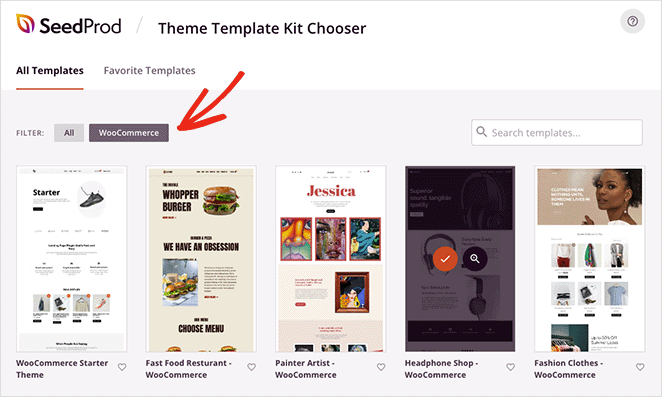
From there, scroll through the designs until you find one you like, then click the orange checkmark icon to make your selection.
It will only take a few seconds for SeedProd to import the template, and after, you’ll see a page like this:
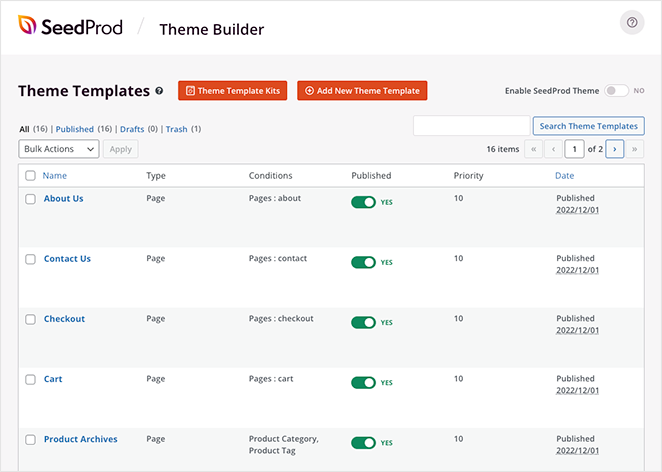
These are all the individual parts that make up your WordPress theme. You can click any of them to customize the design and optimize them for maximum conversion rates.
It’s just as easy to remove any pages you don’t need. For instance, we won’t need a Shop page because we only sell a single product.
Let’s start by editing your homepage.
Customize Your One Product Website Homepage
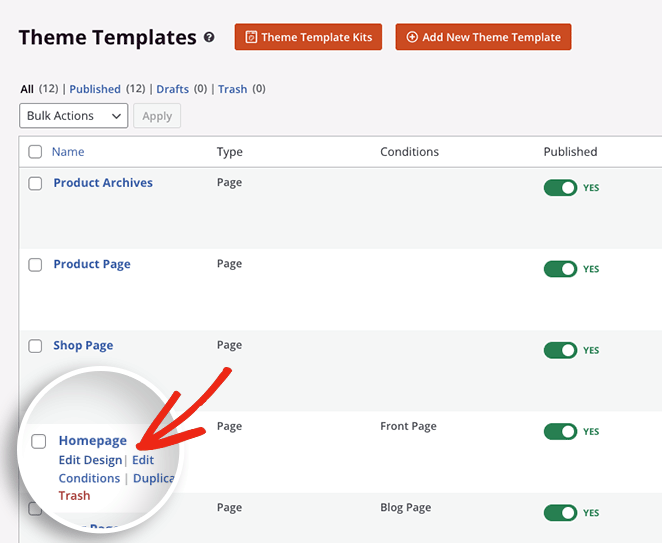
To customize your homepage, scroll down until you see the Homepage heading, and click the Edit Design link.
On the following screen, you’ll see SeedProd’s page builder, where you can customize any part of your design.
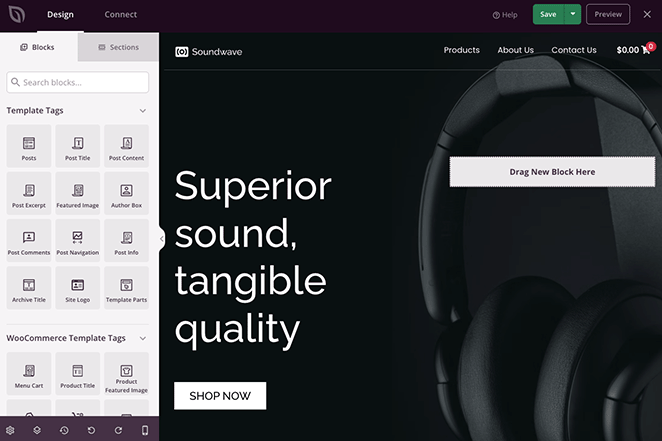
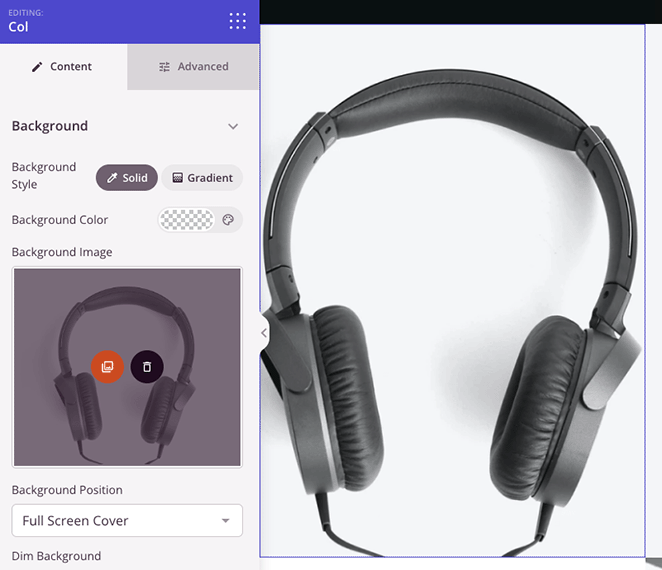
Simply click any block to edit its settings, customize the colors, and add your own content. For example, you can add a high-quality hero image to inspire potential customers.
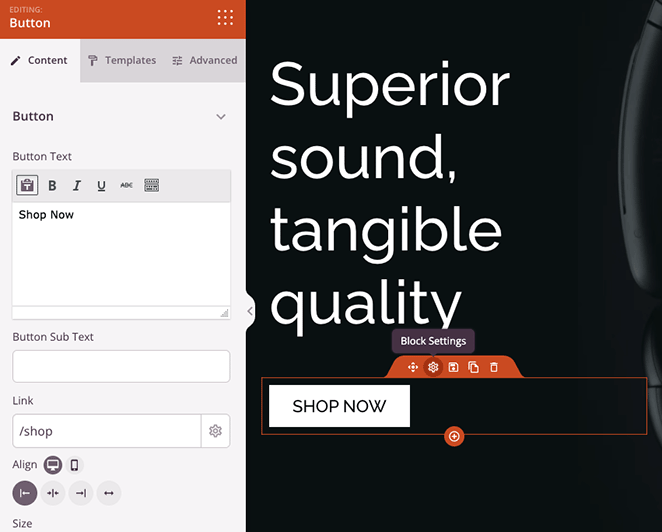
Or you can edit the call-to-action (CTA) buttons to link directly to your product page.
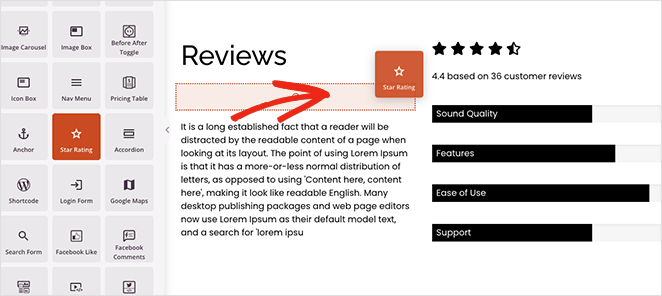
You can even drag over the Star Rating and Testimonials block to add valuable social proof, which is an excellent way to increase trust when you sell online.
When you’re happy with your customizations, click the Save button in the top-right corner of your screen.
Related: How to change shop page title in WooCommerce.
Customize Your Single Product Page
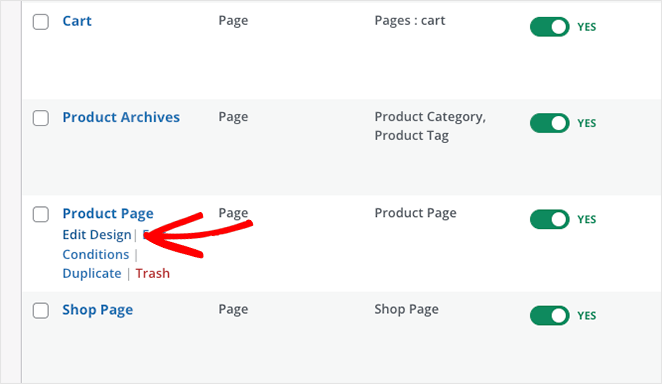
Now let’s make some similar changes to our main product page. Head back to the theme builder, then find the Product Page template and click on the Edit Design link.
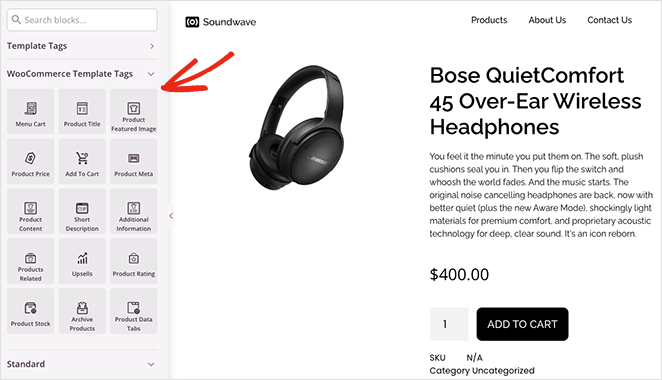
On this screen, you can use SeedProd’s WooCommerce Template Tags to customize your product details.
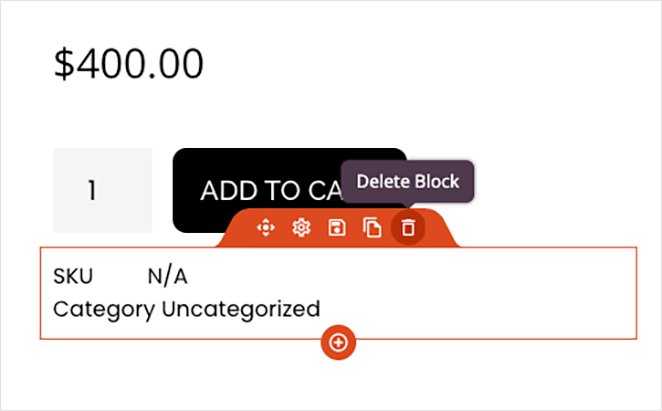
Let’s start by deleting the product category. This feature is only really useful if you’re selling multiple products. Removing it will streamline the page, making it cleaner and easier to browse.
From there, you can add, remove, and customize elements, including:
- Product Images
- Product description and short description
- Product data tabs
- Product Stock
- Product Rating
- And more.
Remember to click the Save button in the top corner to save your changes.
Continue customizing your one product website until you’re happy with its appearance. If you need some help, here are some other pages you should consider editing, with step-by-step tutorials on how to do it:
- Editing your WooCommerce checkout page
- Customizing your WooCommerce shopping cart
- Making a custom WooCommerce thank you page
Step 7. Publish Your One Product Website
Publishing your new WooCommerce theme with SeedProd is a breeze. From your WordPress dashboard, go to SeedProd » Theme Builder and turn the Enable SeedProd Theme toggle on until it says “Yes.”

In a few seconds, you’ll see a success message and can visit your single product store to see it in action.
Here’s an example of our one product website homepage:

This is an example of our single product page:

Step 8: Optimize Your Site for Search Engines
Even with a single product, you’ll need to ensure your website is visible to search engines like Google.
Here’s a basic overview of SEO for your one-product store:
- Keyword Research: Identify the search terms potential customers use when looking for products like yours. Tools like Google Keyword Planner can help with this.
- Optimize Content: Naturally include your target keywords within your website’s content, particularly your product descriptions and any headings.
- Technical SEO: Check that your website loads quickly, is mobile-friendly, and has a clear structure that’s easy for search engines to understand.
For help with this, please see our beginner’s guide on WordPress search engine optimization.
Step 9: Promote Your One-Product Store
Now that your website is ready to impress potential customers, it’s time to spread the word. Consider these marketing strategies tailored to one-product businesses:
- Content Marketing: Create valuable blog posts, videos, or social media content related to your product and its benefits. This attracts potential buyers through helpful information.
- Influencer Marketing: Partner with influencers in your niche who have a relevant audience. Their endorsements can expose your product to a wider group of potential customers.
- Targeted Ads: Use platforms like Facebook Ads or Google Ads to run highly targeted campaigns focused on your ideal customer demographics and interests.
- Email Marketing: Build an email list and stay in touch with your audience by providing valuable content, promotions, and updates on your product.
Tip: With a single product, focus on a few key marketing channels and do them exceptionally well. Don’t try to spread yourself too thin across every possible platform.
FAQs About One Product Websites
You’ve now successfully created and customized a one product website, and it didn’t require any complex coding.
Ready to boost sales with a custom WooCommerce site?
You might also like these WordPress tutorials and tips:
- 11 Best FAQ Pages: Examples & Ideas You Can Copy
- How To Redesign a Website Without Losing SEO
- How to Add Custom WordPress Social Media Icons to Your Website
- Best WooCommerce Affiliate Plugins
Thanks for reading! We’d love to hear your thoughts, so please feel free to join the conversation on YouTube, X and Facebook for more helpful advice and content to grow your business.

