Do you want to learn how to install template kits in WordPress?
Building a custom WordPress website typically involves hiring a developer or learning code. However, template kits let you create fully customizable WordPress sites code-free.
In this article, we’ll show you how to install template kits in WordPress for a professional website in minutes.
Video Tutorial
What Is a WordPress Template Kit?
WordPress template kits are a collection of pre-designed page templates and elements that allow you to build a website without code. They have a modern design that you can customize to suit your business branding visually with drag-and-drop.
Template kits include everything you need to build a fully responsive WordPress site. For instance, they will consist of:
- Blog page
- Homepage
- Header
- Footer
- About page
- Contact page
Depending on the kit features, it may also include other pages for services, portfolio, team, testimonials, and more.
These kits can also have many names. Some companies may call them website kits, or website templates, while others will call them WordPress starter templates. However, they typically do the same thing: build a WordPress website quickly without code.
The question remains; how do you choose a website kit, and where can you find them?
Choosing the Best WordPress Template Kits
Template kits are an essential feature for many WordPress page builder plugins. Besides allowing you to create individual WordPress pages from scratch, they often have the functionality for code-free web design.
Here are some of the best WordPress page builders that offer template kits for multiple business industries.
SeedProd WordPress Website Builder

SeedProd is the best WordPress website builder with over 1 million users. It makes building any WordPress site effortless with its beginner-friendly interface and drag-and-drop editor.
You can use SeedProd to:
- Build complete WordPress sites without code
- Create a custom WordPress theme from scratch
- Make high-converting landing pages
- Create WooCommerce websites
- Put WordPress in maintenance mode
- Create a coming soon page
- Customize your WordPress login page
- And more
This powerful plugin has over 180+ responsive landing page templates and a growing library of professional website kits you can install with 1-click. You can customize each website kit easily by adding optin forms, contact forms, pricing tables, galleries, and more.
SeedProd integrates with popular WordPress plugins like MonsterInsights, WPForms, and All in One SEO to improve your digital marketing efforts. It also helps you collect email addresses by integrating with the best email marketing services.
Get started with SeedProd today.
Elementor Page Builder

Elementor is another WordPress page builder with drag-and-drop functionality. It works similarly to SeedProd, allowing you to use its live visual editor to build websites and landing pages without hiring a developer.
The Elementor template library includes various pre-made landing page templates and layouts for multiple industries. You can also install the Elementor templates kit plugin, which lets you install pre-made website layouts in WordPress.
While many website builders are available, we think SeedProd and Elementor offer the best on the market.
With that said, let’s now look at how to install template kits in WordPress.
How to Install Website Kits in WordPress with SeedProd
For this tutorial, we’ll show you how to install website kits in WordPress using SeedProd. We chose SeedProd because it has the fastest template kit installation and the easiest interface.
Moreover, SeedProd is lightweight and bloat-free, meaning it won’t slow down your WordPress site. Follow the steps below to install a SeedProd site kit.
Because SeedProd’s kits are called Website Kits, we’ll use that terminology from now on.
Step 1. Install and Activate SeedProd
The first step is to download a copy of the SeedProd WordPress plugin. To use SeedProd’s Kits, you’ll need at least a SeedProd Pro plan.
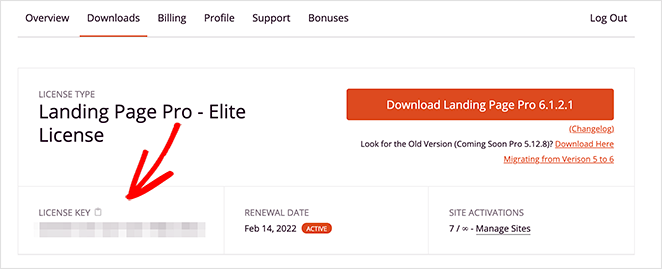
Next, log into your SeedProd account dashboard and click the Downloads tab. On this page, you can download the plugin .zip file and copy your Pro license key.
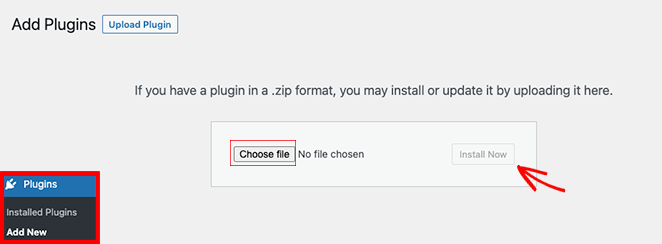
After downloading SeedProd, navigate to Plugins » Add New from your WordPress admin area and click Add New. From there, click the choose file button, select the SeedProd plugin file and click Install Now.
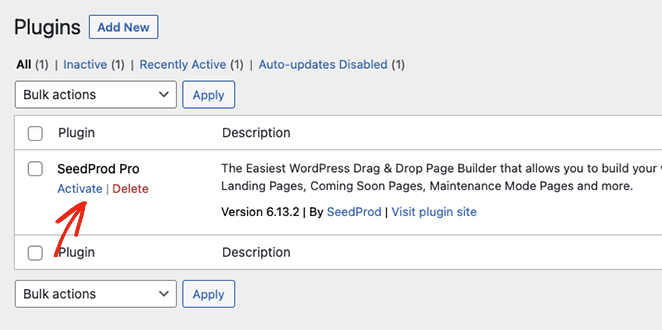
On the following screen, click the Activate link to enable the SeedProd plugin on your WordPress site.
Now that SeedProd is active, you can go to the SeedProd » Settings page and enter the license key you copied earlier. After pasting it into the License Key field, click the Activate Key button.

With your license key active, it’s time to install a website kit.
Step 2. Choose a Website Kit
SeedProd’s site kits work seamlessly with its Theme Builder feature. To choose one for your website, go to SeedProd » Theme Builder and click the Themes button.
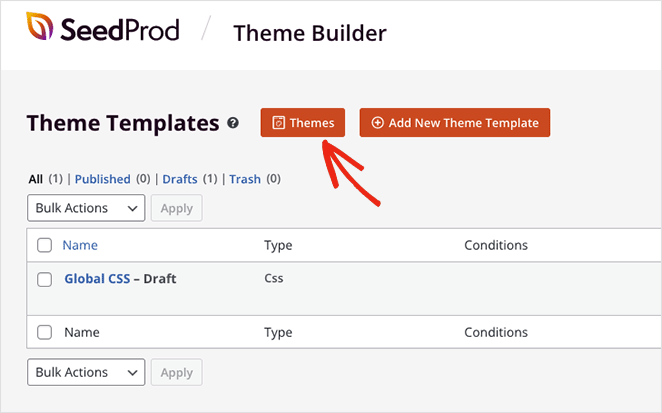
On the following screen, you’ll see SeedProd’s website kit library.
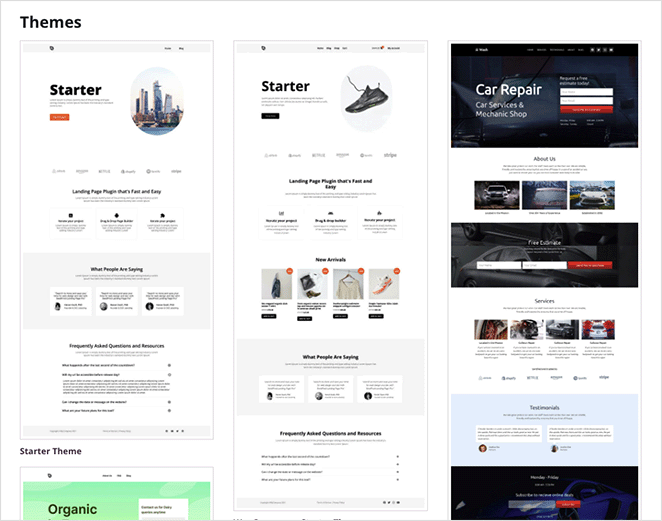
It includes a variety of clean designs for multiple business industries, including:
- Cars and maintenance
- Mobile applications
- eCommerce stores
- Professional services
- Restaurants and cafes
- Blogging and fashion
- Mortgage and real estate
- Events and gaming
- And more.
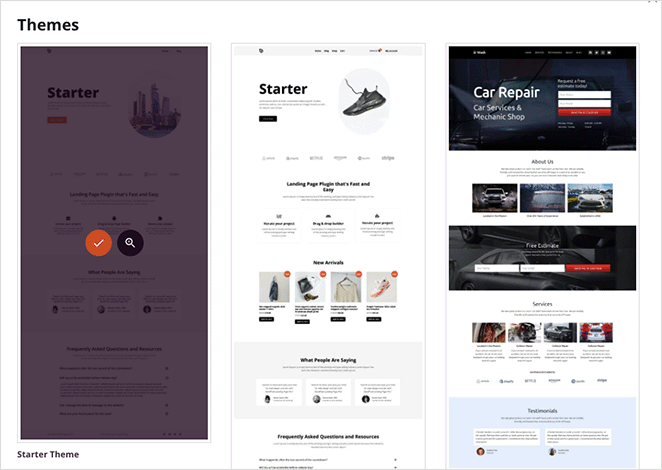
We’ll show you how to customize these later, but for now, hover your cursor over the kit you like and click the orange checkmark icon.
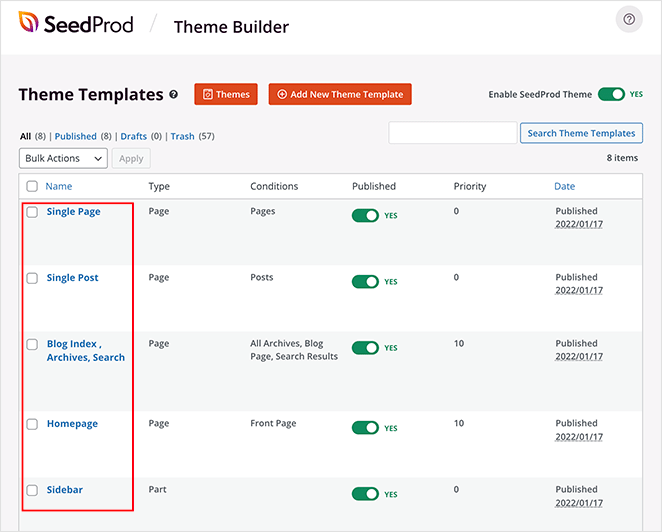
SeedProd will now add the complete kit into your theme builder dashboard as a list of customizable template parts. Depending on the website kit you choose, it will include:
- Header and footer templates
- Homepage and blog templates
- Single page and post templates
- Global CSS template
If you choose a website kit with additional pages, you can find them by going to Pages » All Pages from your WordPress admin. We’ll go into editing those in more detail later.
Note: If you install an eCommerce site kit, you’ll need a SeedProd Elite license and have the WooCommerce plugin active.
Importing a Website Kit .zip File in SeedProd
Because SeedProd lets you create custom WordPress themes, you can easily create your own website kits for future web design projects. This is an excellent way to streamline your workflow without starting from scratch for each project.
Simply build your custom website kit with the theme builder, then export the .zip file as a custom WordPress theme. Here’s a step-by-step guide on exporting a SeedProd WordPress theme.
You can now import the kit to any other site with an active SeedProd installation. Simply head to SeedProd » Import/Export, click Choose File under the Import Theme Files heading, and click the Import Theme Files button.
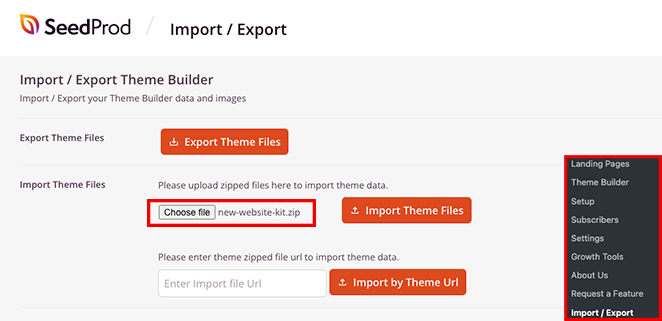
After a few seconds, you’ll see a green notification saying the import was successful.
Step 3. Enable Your SeedProd Website Kit
SeedProd’s templates are disabled by default to ensure it doesn’t overwrite your current theme before you’re ready. Make sure you replace the demo content with your own before completing this step (we’ll show you how later in this post).
To make your website kit live and overwrite your current WordPress theme, go to the SeedProd » Theme Builder page, find the Enable SeedProd Theme toggle, and turn it to the “On” position.

You can now preview your shiny new website kit in WordPress!

Installing website kits in WordPress with SeedProd only takes a few clicks. Now we’ll look at how to edit and customize your design in more detail.
Customizing Your Website Kit
After installing a kit on your WordPress site, you’ll likely want to change a few things. Below we’ll show you how to customize different parts of your kit with SeedProd’s visual drag-and-drop editor.
Adding Your Website Logo
One of the first things you’ll want to change is the default template logo. To do that, go to SeedProd » Theme Builder, find the Header template part, and click the Edit Design link.
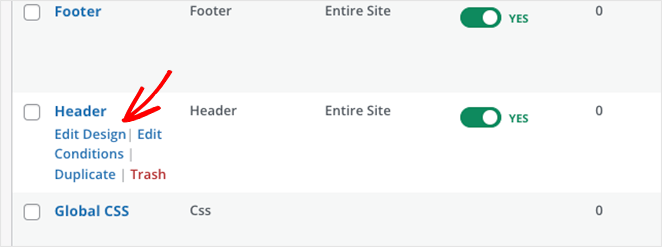
The header will open in the visual editor, where you can click, drag, and drop to customize the content.
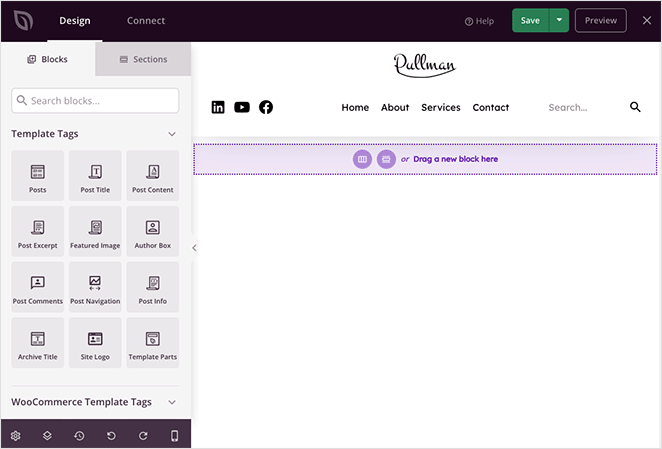
Click the default logo on the live preview to open the settings in the left-hand panel. Then click the trashcan icon to remove the logo image.
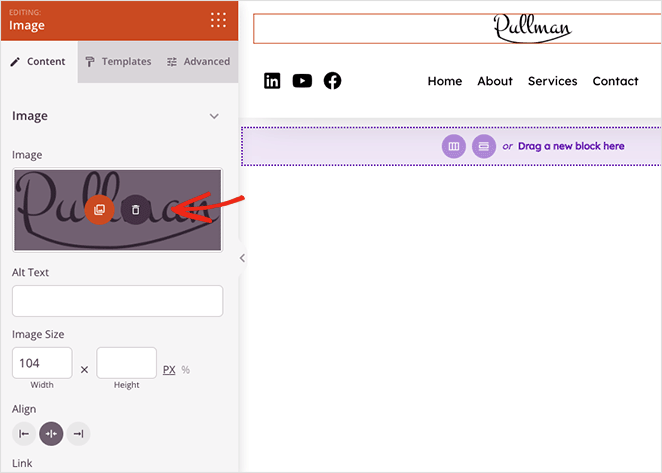
Now you can upload a custom logo from your WordPress media library, add a custom link to the image, and adjust its size and alignment.
Here are a few other things you can customize in the header template:
- Navigation menu
- Search box
- Social media links
When you’re happy with your customizations, click the Save button in the top-right corner. You can now check out your new header on the front end of your site.

Customizing Your Content
SeedProd’s templates come with demo content to make it easier to visualize your finished website. However, you’ll need to replace this content with information about your business, products, or services.
You can replace the default content easily by using the same principles as customizing the header content.
Template Parts
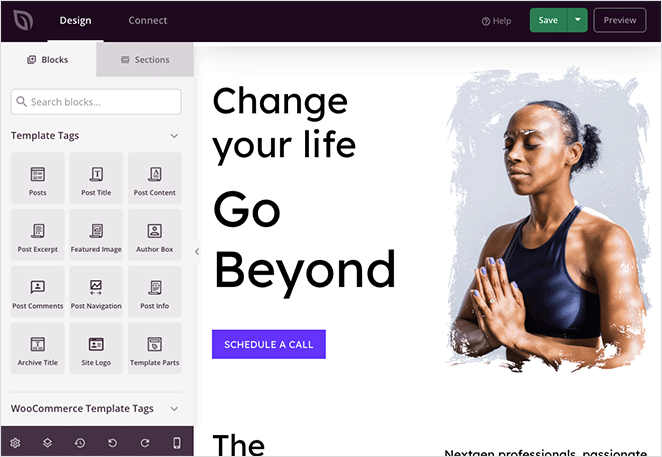
For example, to customize your WordPress homepage, click the Edit Design link on the Homepage template. You can then customize every part of the design in the visual editor.
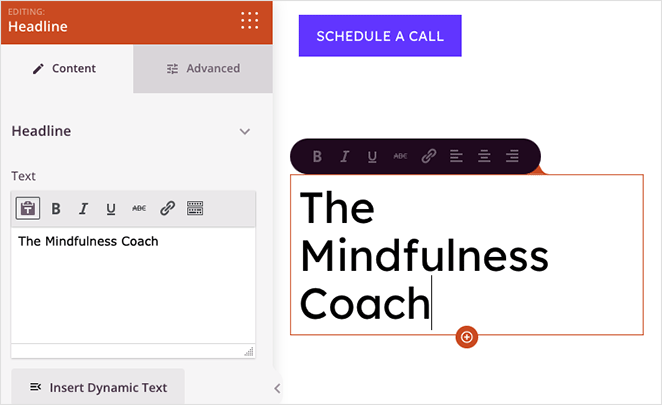
For example, clicking any heading allows you to edit the heading text directly on your preview or the content settings panel.
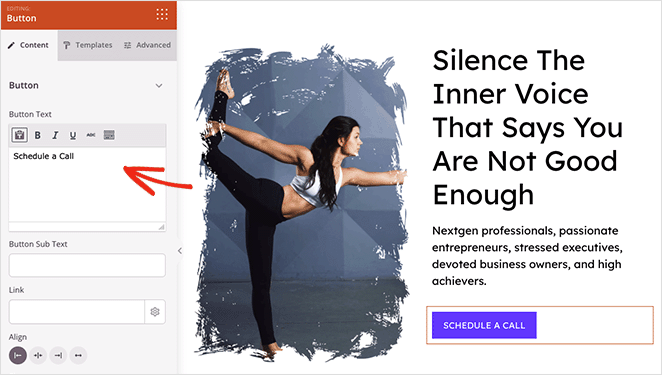
You can also change images as you did with your logo and edit the call-to-action buttons to boost clicks and conversions.
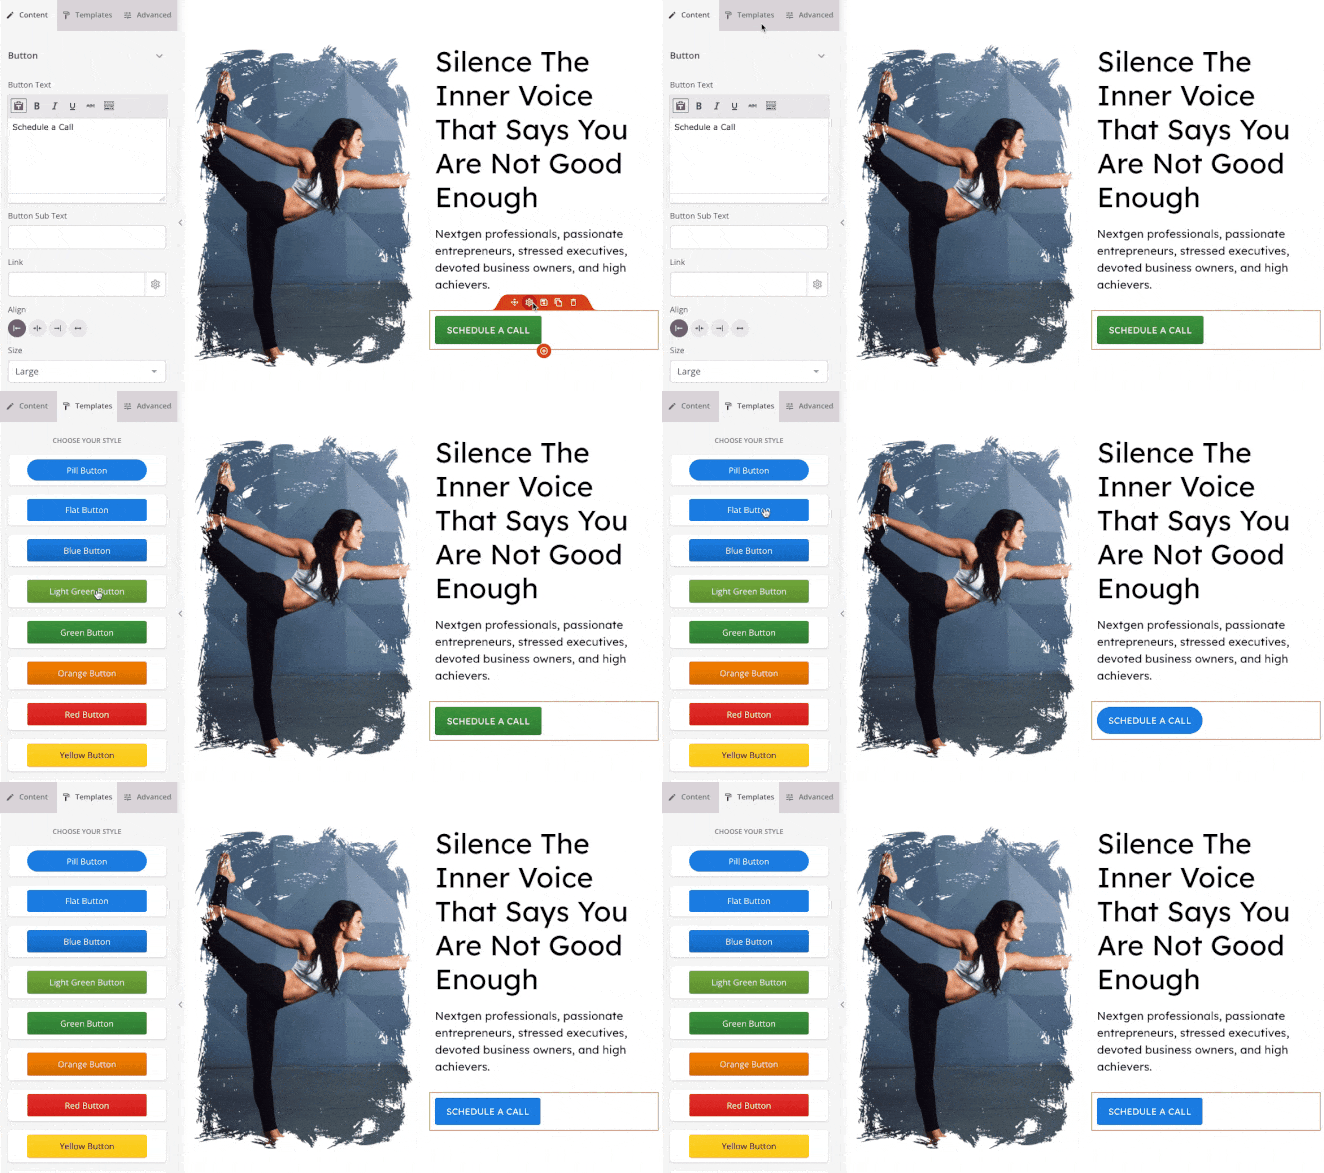
Pro Tip: SeedProd’s Button blocks have pre-made templates for easy styling. Click the Templates tab in the Settings panel and select any button style with a single click.
Content Pages
You’ll want to edit your content pages, such as your About, Contact, and Services pages. Because these pages are not template parts, you can find them by going to Pages » All Pages from your WordPress admin.
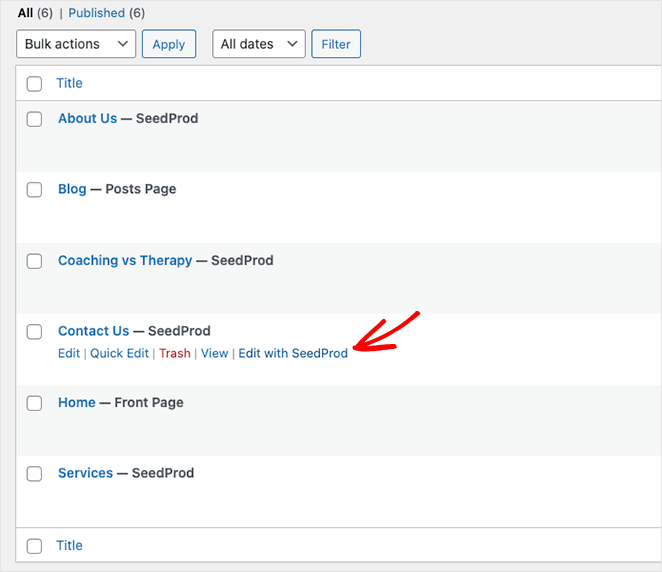
From there, click the Edit with SeedProd link to open the page in the visual editor.
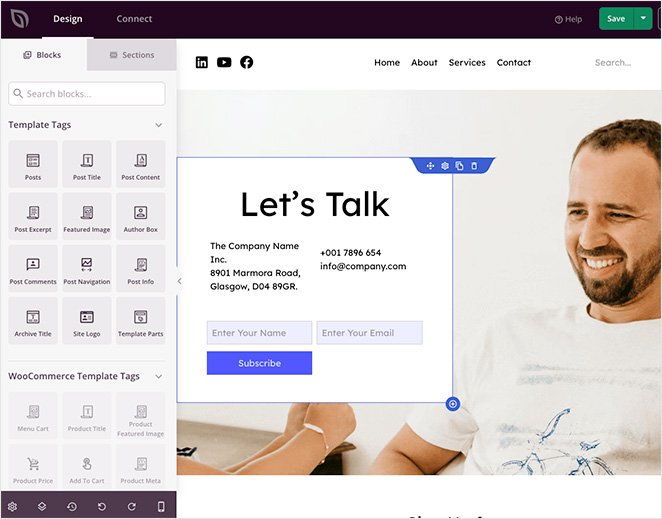
Customizing the page works the same as before. You can click anywhere on the preview to edit and drag blocks from the block menu to add more page elements.
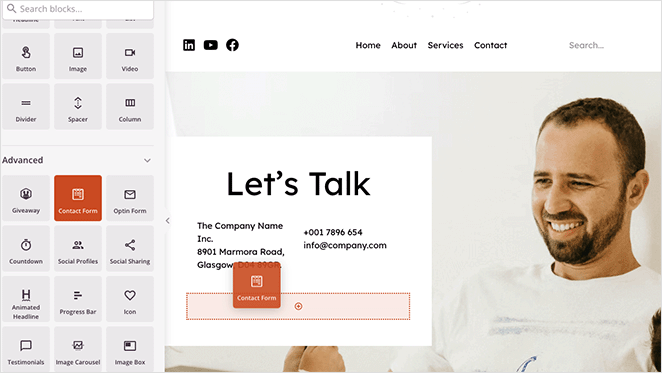
For example, you can remove the optin form block by clicking the trashcan icon, then drag over the Contact Form block to add your WPForms contact form.
Editing Your Global Template Kit Settings
You may also want to customize your template’s fonts and colors to match your small business branding. This is easy to do with SeedProd’s Global CSS settings.
From the Theme Builder dashboard, click the Edit Design link on the Global CSS template to open it in the visual editor.
Now you can adjust the styling of elements across your whole website. Simply expand a heading and change the settings to suit your needs.
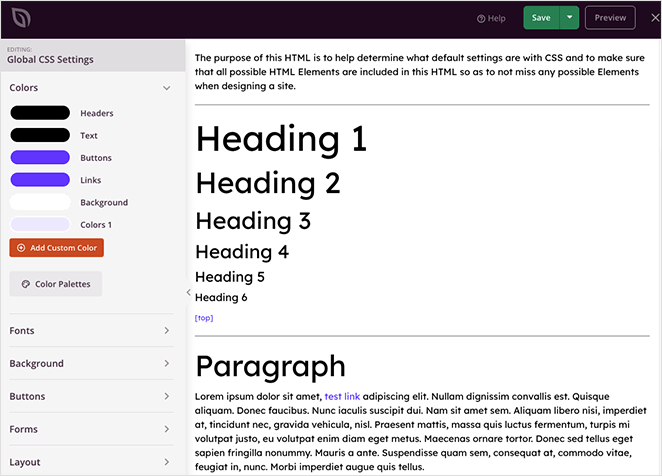
For example, you can choose custom colors for links, buttons, text, and backgrounds. You can also customize your site’s typography, buttons, layout, and custom CSS to apply the changes across your whole site automatically.
As you can see, SeedProd makes it effortless to customize any part of your WordPress site without learning code or hiring a developer.
Next Steps
We hope you enjoyed this article and it helped you learn how to install template kits in WordPress.
Here are some other guides you may find helpful for your business website:
- How to Create Fancy Section Dividers for WordPress Websites
- How to Create a Blog Page on WordPress
- How to Easily Customize Your WooCommerce Shop Page
Thanks for reading! We’d love to hear your thoughts, so please feel free to leave a comment with any questions and feedback.
You can also follow us on YouTube, X (formerly Twitter), and Facebook for more helpful content to grow your business.

