The WooCommerce Additional Information tab is a handy spot for extra product details shoppers love, like detailed specs, shipping info, and care instructions. But here’s the catch: WooCommerce already has built-in features for that.
In this guide, I’ll show you how to unlock the real power of the Additional Information tab. We’ll ditch the redundant stuff, customize what’s left, and create a product page that converts.
The Additional Information tab is tied to your WooCommerce product data, but that doesn’t mean you’re stuck with how it looks or what it shows. In this guide, I’ll walk you through how to change, rename, restyle, or remove it, depending on what makes sense for your store.
Table of Contents
- What’s the WooCommerce Additional Information Tab?
- How to Add Additional Information to WooCommerce Products
- How to Customize the WooCommerce Additional Information Tab
What’s the WooCommerce Additional Information Tab?
The Additional Information tab appears alongside the Description tab on the product page, part of the layout shoppers see before reaching the WooCommerce cart page. By default, WooCommerce uses this tab to show basic product attributes like size, weight, and material.
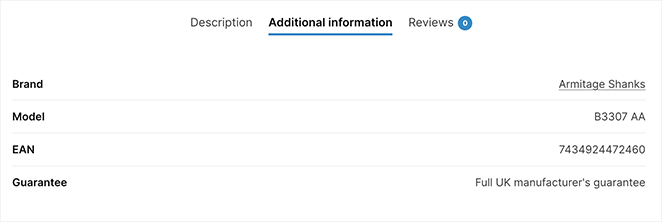
But the Additional Information tab can do so much more. Instead of just listing basic details, consider this space prime real estate for boosting sales.
Why? Because 87% of consumers are unlikely to buy from you again if their first purchase is plagued by inaccurate or incomplete product information. (source)
This guide will show you how to transform your Additional Information tab from a bland afterthought into a key part of a positive customer journey.
How to Add Additional Information to WooCommerce Products
Before we explore the customization options, let’s examine how to add product details to the additional information tab in WooCommerce.
WooCommerce’s built-in attributes feature is a great place to start for simple additions like material, dimensions, or care instructions.
In your WordPress dashboard, go to Products » Attributes. This is where you’ll manage all the attributes of your products.
Give your attribute a descriptive name, such as “Battery Life,” “Material,” or “Warranty Info.” This is what customers will see on the front end.
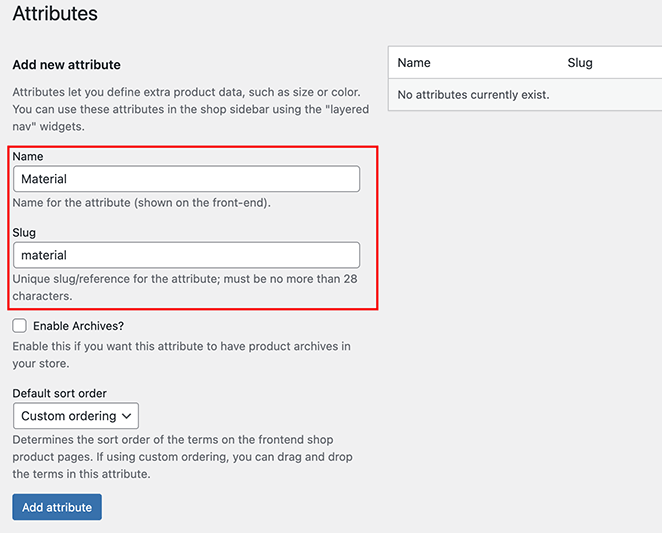
Then click Add Attribute.
Now, edit the product where you want to add this information, scroll down to the Product data section, and click the Attributes tab.
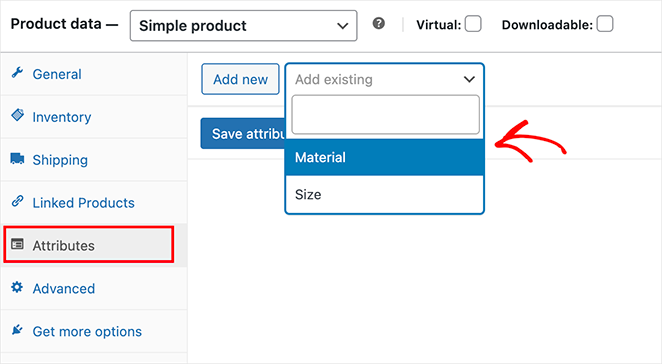
Choose your new attribute from the dropdown menu, then add the relevant information in the Value(s) field.
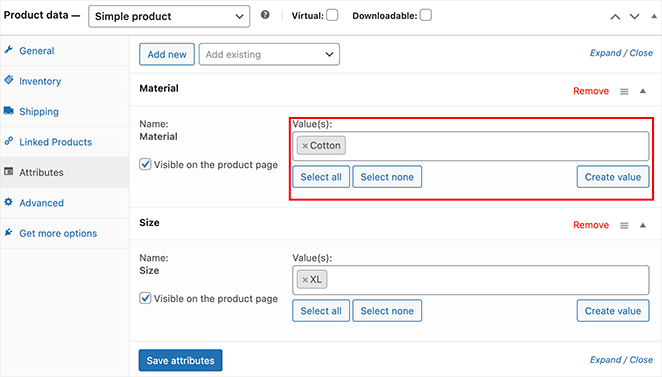
Now, click Save Attributes, then Update your product.
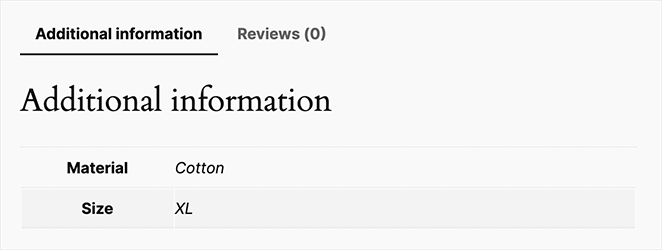
Your new attribute will now appear neatly organized on the Additional Information tab on the product page.
How to Customize the WooCommerce Additional Information Tab
You’ve added valuable product details to your Additional Information tab. But a generic tab doesn’t exactly scream, “Look at me!” It’s time to make this tab your own and use it to guide shoppers toward a purchase.
Change Additional Information Tab Styling
The Additional Information tab is prime real estate on your product page – don’t let it blend into the background. With SeedProd, you can easily customize its style to match your brand and draw attention to this valuable information.

SeedProd is the best WordPress website builder for creating stunning, conversion-focused WooCommerce stores. Its drag-and-drop interface and pre-built blocks give you total design freedom, even if you’re not a coder.
New to SeedProd? Check out this guide to learn how to set up an online store in WordPress.
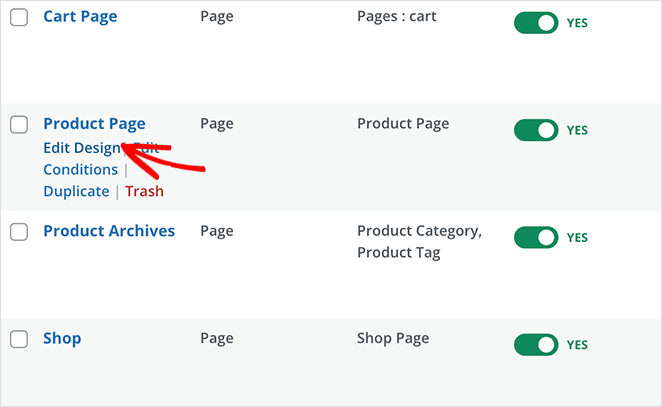
When you’re ready to style the Additional Information tab, head to SeedProd » Theme Builder from your WordPress dashboard and click “Edit Design” on the Product Page template.
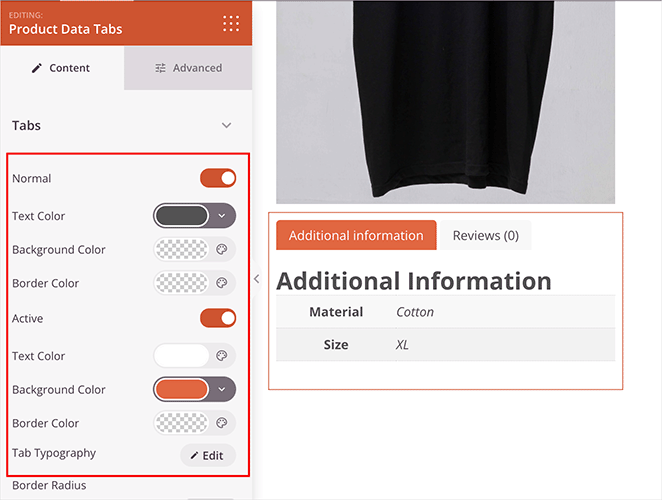
Once inside the visual editor, look for the block called Product Data Tabs. This controls the layout for your WooCommerce product tabs, including the Additional Information section.
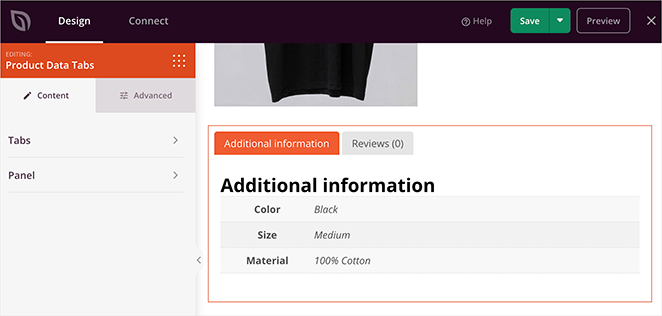
Click on the block to open its design settings, which gives you complete control over:
- Tab Colors: Change the background, text, and border colors for active and inactive states.
- Typography: Adjust the font, size, weight, and style of the tab’s text.
- Spacing and Padding: Control the spacing around and within the tab content.
- Borders: Add or customize borders to make the tab stand out.
- Table Styles: Style the product data table, including text colors, padding, and even add a shadow effect.
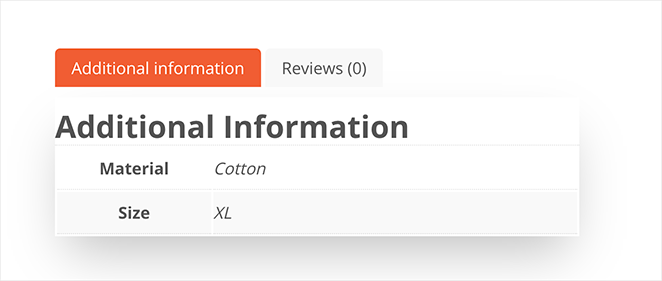
When you’re happy with the design, click “Save” and preview your changes. Here’s how my changes look when I preview the product page:
Move Additional Information to the Description
Want to simplify your product page and make the key info easy to find? You can directly move the Additional Information content into your Product Description inside SeedProd.
First, edit the product page to view the visual editor. Depending on which block you’re using, drag the Product Data Tabs from its current location to below your product description.
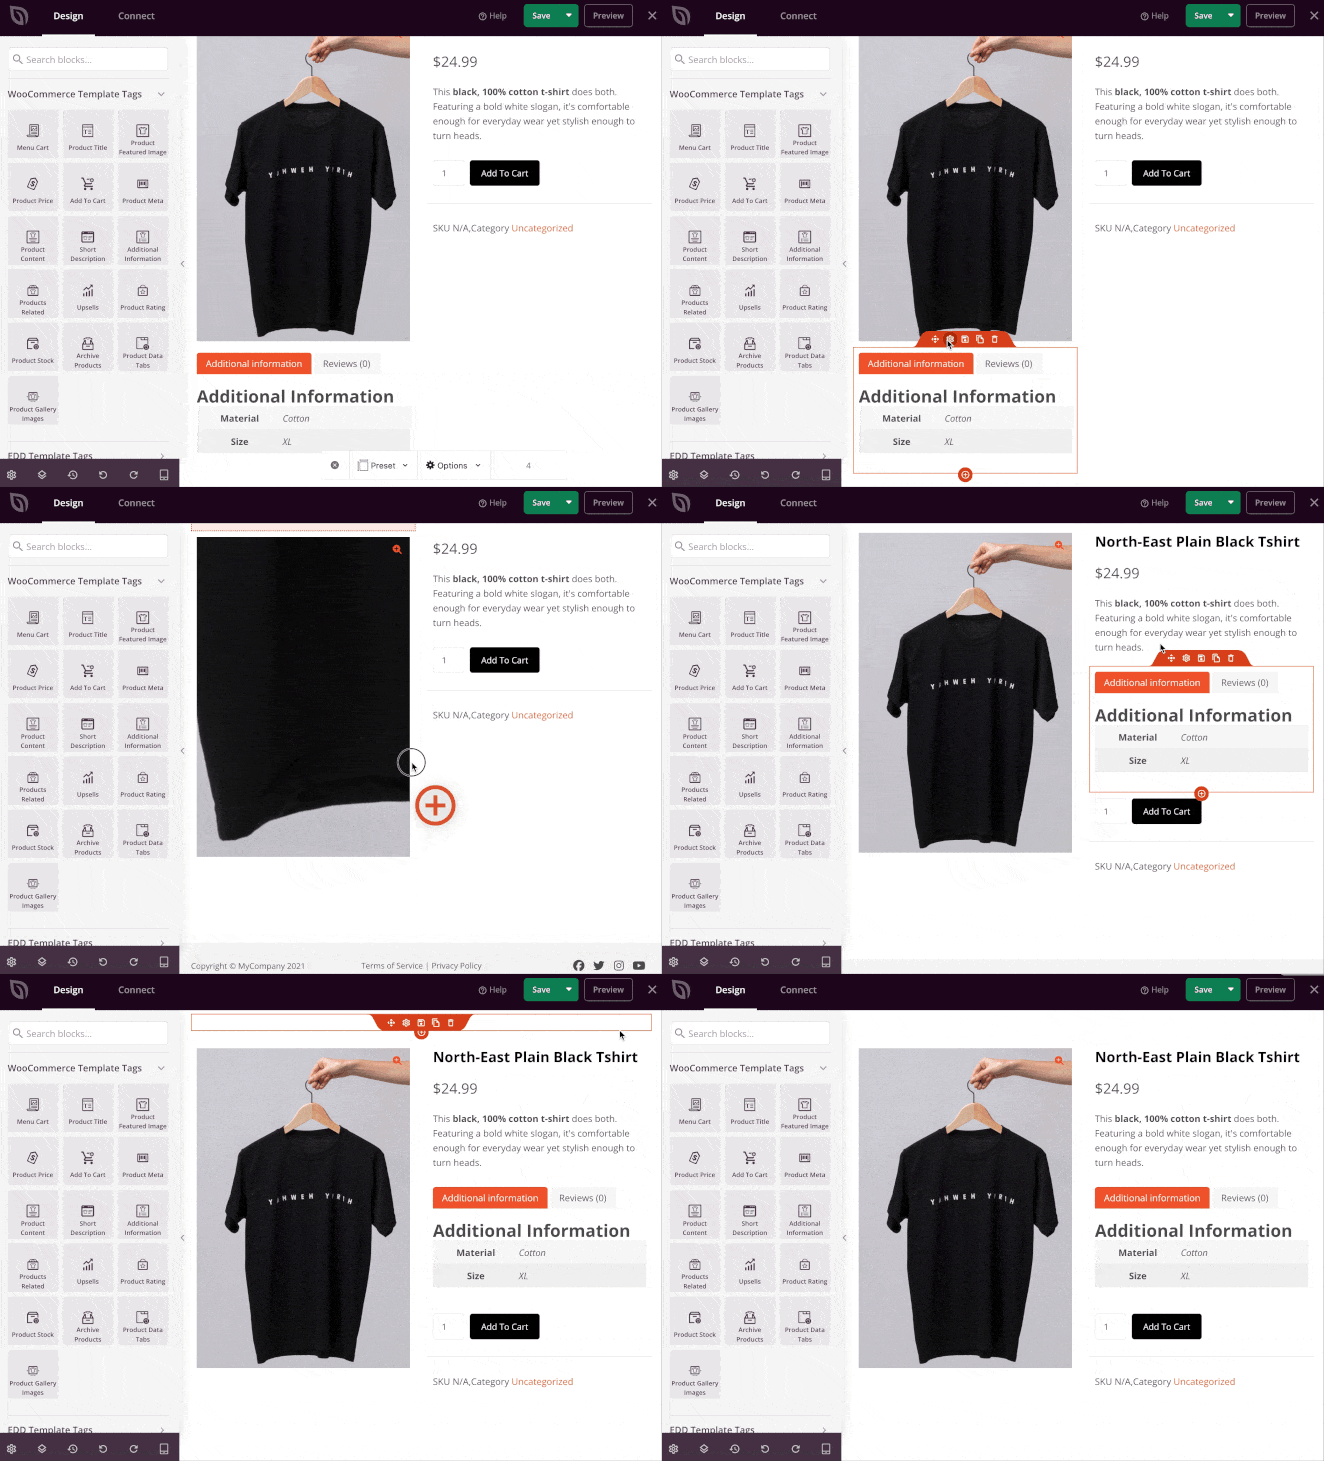
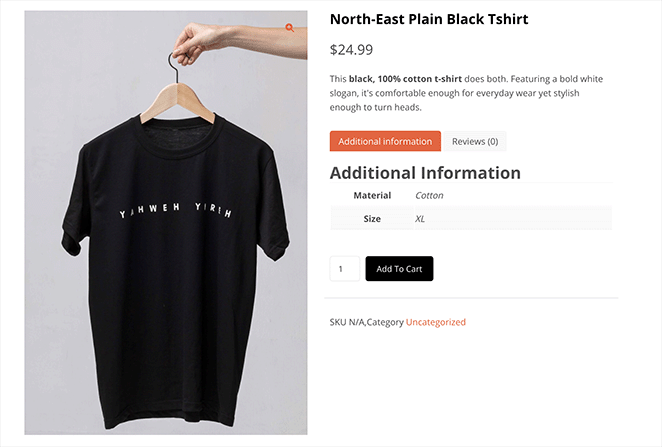
Now click “Save” and preview your product page to see how it looks.
Hide WooCommerce Additional Information
Do you have a product that’s so awesome it doesn’t need any extra details? I get it. Sometimes, less is more. If you’re not using the Additional Information tab, it’s best to remove it altogether and create a super-streamlined product page.
If you’re using SeedProd to customize your WooCommerce product page, you can simply remove the Product Data Tabs block with a few clicks.
Hover over the Product Data Tabs block and click the trashcan icon to delete it.
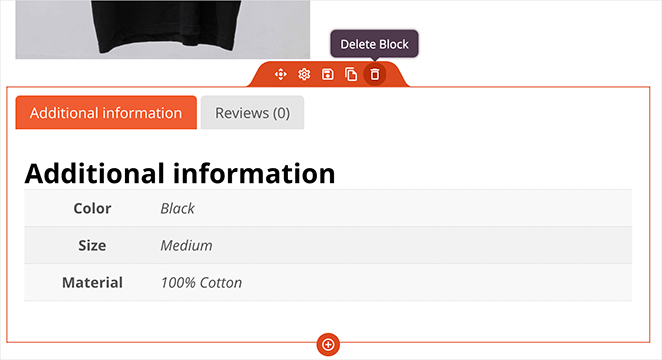
That’s it. Now, your product pages are free of unnecessary clutter.
Remove WooCommerce Additional Information
Want more granular control? You can remove Additional Information on a product-by-product basis. This option is good if you only want to declutter specific product pages.
To do this, go to “Products” in your WordPress dashboard and choose the product you want to edit.
In the “Product Data” panel, click on the “Attributes” tab. Then, click remove on the attributes you want to remove.
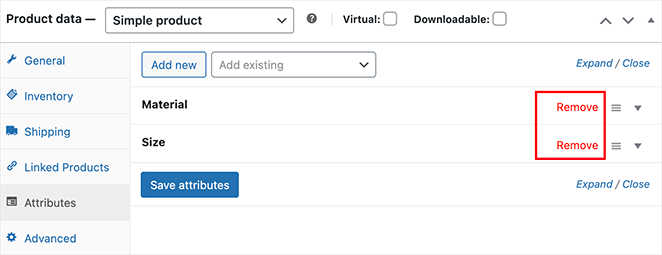
When you view that product page, the Additional Info tab will be gone.
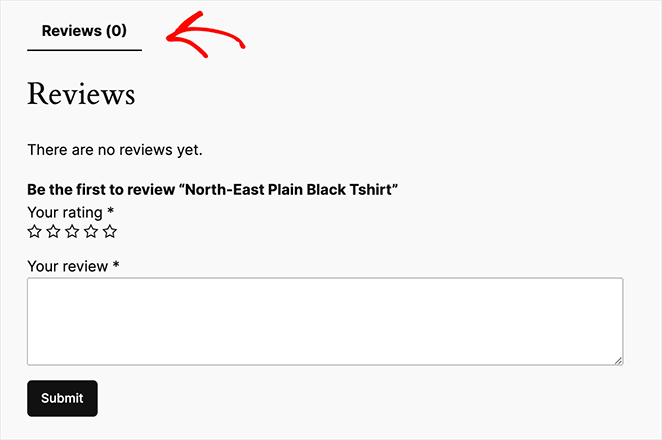
Rename the Additional Information Tab
“Additional Information” – it’s a mouthful, isn’t it? If you want to edit the Additional Information tab in WooCommerce to better reflect your product content, you can change the tab name with a quick code snippet.
If you haven’t already, install and activate the WPCode plugin.
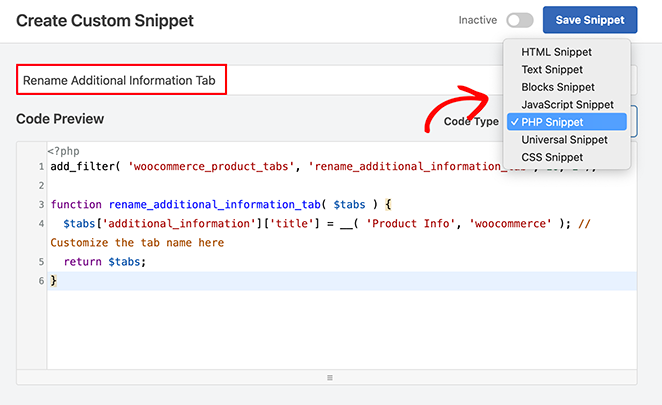
Upon activation, go to Code Snippets » Add New and choose “Add Your Custom Code (New Snippet).”
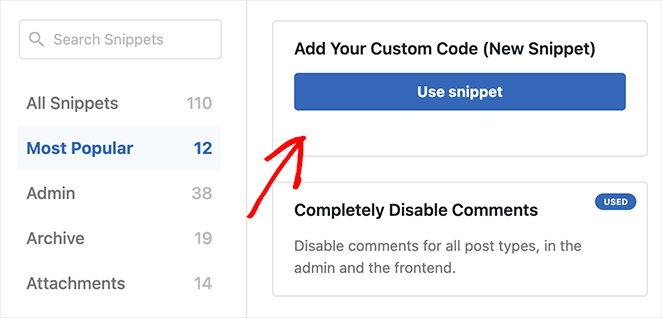
Next, give your snippet a title: Something like “Rename Additional Info Tab” will work. Then paste the following code into the code editor:
add_filter( 'woocommerce_product_tabs', 'rename_additional_information_tab', 10, 1 );

function rename_additional_information_tab( $tabs ) {
  $tabs['additional_information']['title'] = __( 'Your New Tab Name', 'your-theme-textdomain' ); // Customize the tab name here
  return $tabs;
}
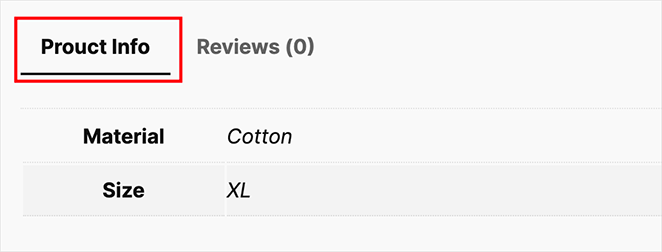
Now, replace ‘Your New Tab Name’ with your desired tab name (e.g., ‘Product Specs,’ ‘More Info’, etc.). I used “Product Info.”
If you’re unsure about your theme’s text domain, you can leave ‘your-theme-textdomain’ as ‘woocommerce.’
Under “Code Type,” select “PHP Snippet.”
Now, click the “Save Snippet” button, then toggle the “Inactive” switch to “Active.”

That’s it. Check out your product page – your Additional Information tab now has a brand-new name.
Add Custom Content to Additional Information Tab
Ready to go beyond basic product attributes? You can turn your Additional Info tab into a complete content hub. Let’s look at two ways to add dynamic content: using PHP snippets for flexibility or WordPress plugins for ease of use.
Method 1: Using PHP Snippets
If you’re comfortable with a bit of code, PHP snippets give you more control over what content appears on your tab. We’ll use the trusty WPCode plugin to keep things organized.
Create a new snippet with a descriptive title (e.g., “Add Custom Content to Additional Info Tab”).
Then, paste the following code into the snippet editor:
add_action( 'woocommerce_product_additional_information', 'add_custom_content_to_additional_info' );
function add_custom_content_to_additional_info() {
  // Add your custom content here!
  echo '<p>This is some custom content added to the Additional Information tab!</p>';
  echo '<ul>';
  echo '<li>You can add text, HTML, shortcodes...</li>';
  echo '<li>...even output content from custom fields!</li>';
  echo '</ul>';
}
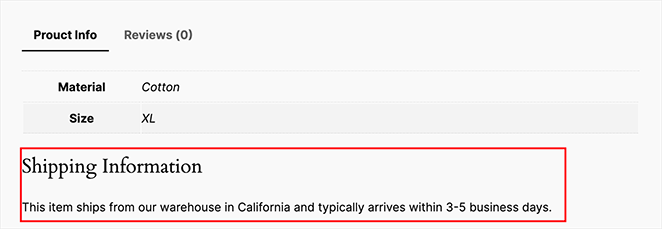
You can replace the example content within the echo statements with your desired content. In my example, I’ll add details about shipping information.
Then, save your snippet, set its “Code Type” to “PHP Snippet,” and activate it.
Now you can view your product page to see the new information:
Method 2: Using WordPress Plugins
Prefer a more visual approach? Several WooCommerce plugins make adding custom content to the WooCommerce Additional Information tab easier:
- Tabs Manager Plugins: Plugins like YITH WooCommerce Tab Manager and WooCommerce Product Tabs let you create entirely new tabs (not just customize the existing one) with drag-and-drop.
- Custom Fields Plugins: If you’re already using a plugin like Advanced Custom Fields (ACF) to manage custom product data, you can also use its features to display that content on the Additional Info tab.
Ready to Create Product Pages That Convert?
By now, you’re on your way to mastering the WooCommerce Additional Information tab. You’ve learned how to add valuable content, ditch the clutter, customize the styling, and even move things around to create a smoother, more persuasive shopping experience.
Now it’s your turn. Use SeedProd to make building beautiful, conversion-driven product pages ridiculously easy.
Here are some more WooCommerce tips, tricks, and tutorials you may find helpful:
- How to Add View Cart Button in WooCommerce
- How to Change Shop Page Title in WooCommerce
- How to Create a Stunning Product Image Gallery in WooCommerce
- How to Add Star Rating to WooCommerce Product Pages
- How to Hide Out of Stock Products in WooCommerce
Thanks for reading! We’d love to hear your thoughts, so please feel free to join the conversation on YouTube, X and Facebook for more helpful advice and content to grow your business.

