As a writer, I’ve always used WordPress’s password protection feature to lock pages with sensitive information I’m working on. It’s a useful way to keep drafts and confidential content away from the public. But I’ve often struggled with making that password-protected page look good.
The default password-protected page isn’t very appealing—it looks plain and might not leave the best impression if visitors stumble upon it. It doesn’t match the style or professionalism of your website, and that can be jarring.
It got me thinking about how you can make those pages more user-friendly and aligned with your site’s branding.
In this guide, I’ll share the solution I found to customize the appearance of your password-protected WordPress pages without writing any code. This way, you can keep your site’s look consistent and ensure that even the protected pages offer a positive experience for your visitors.
Why Customize a Password Protected Page in WordPress?
If you want to create exclusive content on your WordPress site that only members or clients can access, WordPress’s password protection feature is a handy tool. It allows you to protect a WordPress page or even your entire website easily.
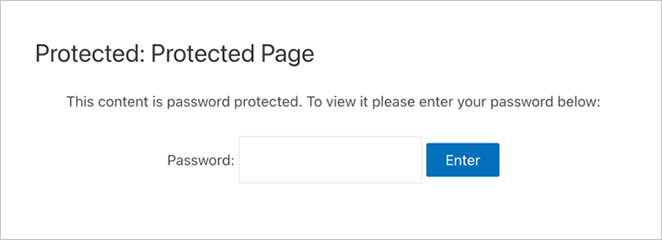
However, the default design for a password protected page is quite basic. It’s just a plain box asking for a password:
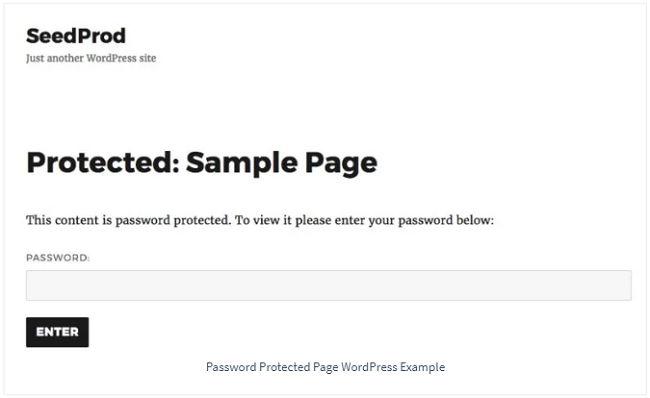
This is where customization can help. By tailoring the look and feel of password protected pages, you can:
- Create a more engaging experience for your visitors.
- Keep a consistent and professional brand identity.
- Guide users seamlessly towards entering the password or taking desired actions.
With this in mind, I’ll show you how to enable password protection and ways to customize the default page, specific pages, different sections, and your entire website.
Before diving into the customization methods, let’s first look at how to password protect a page in WordPress.
How to Password Protect a WordPress Page
You can password protect WordPress pages using the default WordPress visibility settings by following these steps:
- Open the page or post you want to protect
- In the Publish meta box, click the Visibility option
- Choose Password Protected from the dropdown menu
- Enter the password you want users to enter to access the protected content
- Click the blue Publish button to save your changes
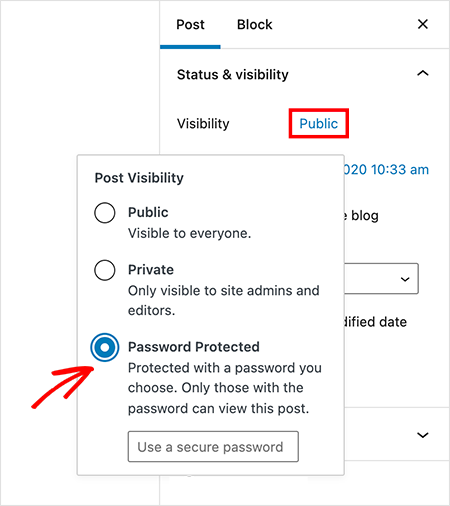
You now know how to password protect your WordPress page. After saving your changes, you can visit your site and see the password protected page in action:
Now, let’s see how to customize WordPress password-protected pages.
Customizing A Password Protected Page in WordPress
1. Customize Specific Password Protected Pages
First, let’s look at how to customize specific pages you’ve password protected. When you customize these pages, you make them look professional and consistent with the rest of your site. This improves user experience and strengthens your brand’s appearance.
My top choice for customizing individual password protected pages, is SeedProd. It’s one of the best WordPress website builders with a front-end visual editor.

It also includes Access Controls that let you restrict access to pages you password protect. This ensures only the people you want can see the pages you’re working on. You can then use its advanced customization options to change the page design.
SeedProd has many customization options for password-protected pages, including:
- Templates and Layouts: Choose from pre-designed templates or create your own custom layout using the drag-and-drop interface.
- Typography: Access a wide range of fonts and typographic controls for all text elements on your page.
- Color Schemes: Apply custom color palettes to your entire page or individual elements.
- Form Customization: Design custom password input fields and submit buttons with various styles and effects.
- Advanced Design Options: Add custom backgrounds, overlays, borders, and even animations to your page elements.
- Responsive Controls: Adjust your design for different devices to ensure a consistent look across all screen sizes.
For a full walk-through, please see the video tutorial below:
Alternatively, you can follow these written instructions:
First, get started with SeedProd here. Then follow these instructions for installing the SeedProd page builder plugin.
Next, create a coming soon or maintenance mode landing page. These are special access-controlled pages for restricting your website.
To do that, click the SeedProd icon from your WordPress admin. This takes you to the SeedProd dashboard, where you can add new pages and edit them in the customizer.
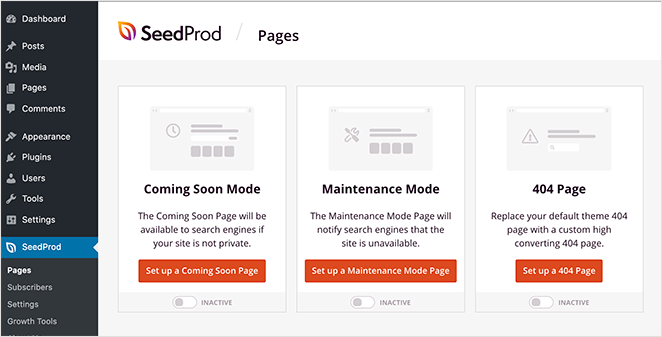
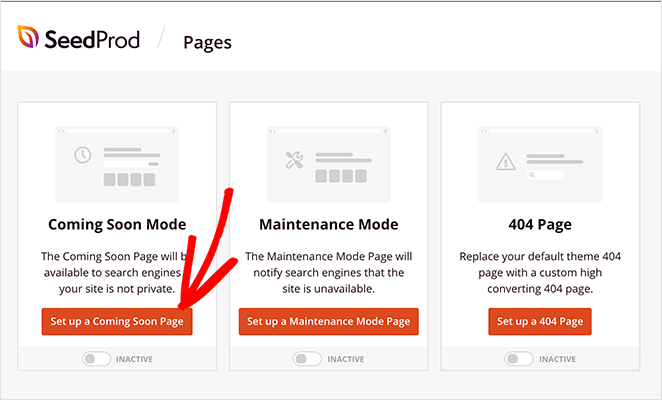
After that, click the Set Up a Coming Soon Page button.
Next, you’ll see several custom templates to use as a starting point for your page design.

For our example, we’ll use the Swipe coming soon template. To launch the template, hover your mouse over the thumbnail and click the tick icon.

Your coming soon page template will appear in the drag-and-drop page builder. Here, you can begin to customize the password protected page to suit your brand.
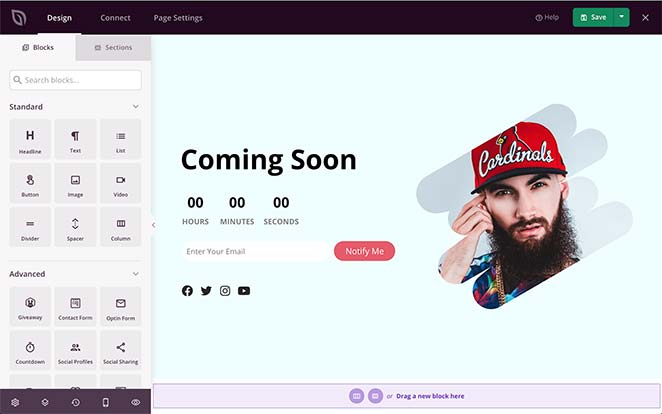
SeedProd’s page builder is like the WordPress customizer in that you can make changes in real time.
It also has WordPress blocks. These blocks make it easy to customize the password-protected page without prior design experience.
You can choose from standard blocks like headlines, buttons, images, videos, dividers, etc.
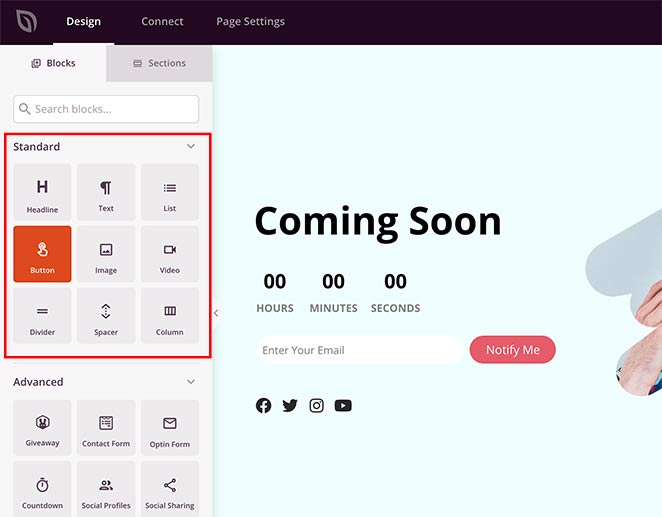
Or you can use landing page blocks to drive more leads and conversions, such as:
- Giveaways – Add a RafflePress giveaway to your page with the ready-made giveaway block.
- Contact Forms – Add contact forms made with WPForms to your landing page.
- Optin Forms – Boost leads with sign-up forms that come with custom templates and styles
- Countdown Timers – Create a sense of urgency with live countdowns.
- Social Buttons – Grow your social media followers with social profiles and sharing buttons.
- And much more.
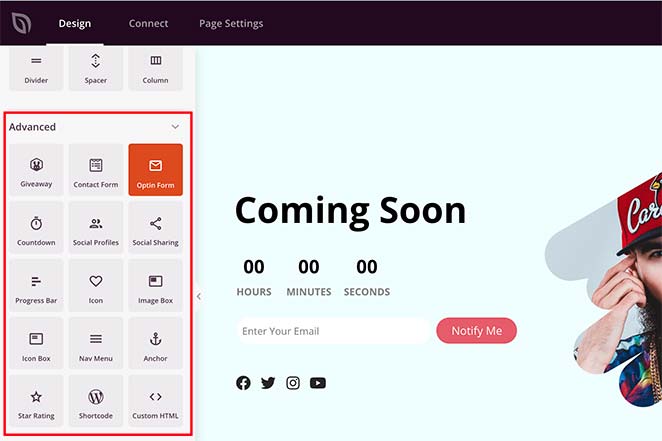
You can add these features to your page by dragging them from the left to your live page preview on the right.
Then, click any element to edit the content. You can also choose a custom block template and add advanced changes.
You can include a password input field on your page. Users have to type a password before clicking Submit to access your protected content.
To do that, drag the Custom HTML block onto your live page editor.
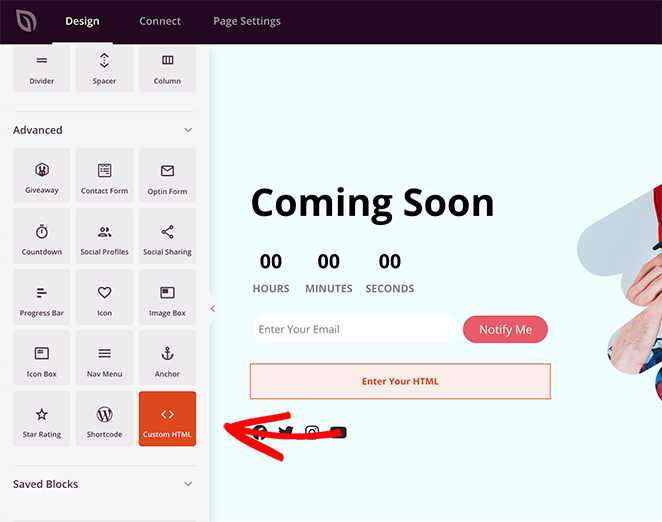
Then click the block to edit the content. Now paste this shortcode seed_bypass_form into the content editor with square brackets on either side.
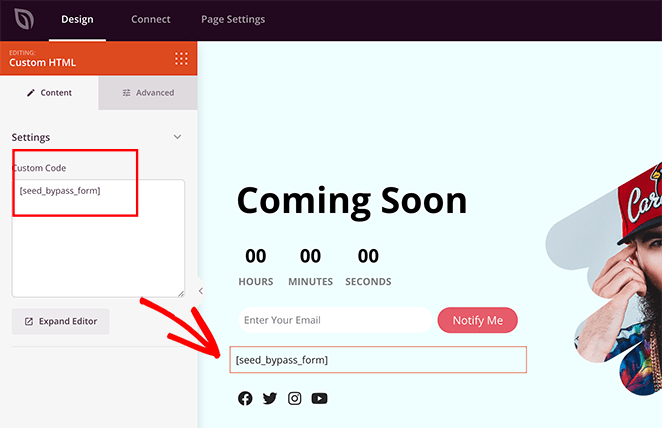
You won’t see the password input field until you preview your live page. Then, the system will ask users to “please enter your password.”
Set Up Password Protection on Specific Pages
After customizing your page with the bypass form shortcode, you’ll want to set up password protection for specific pages of your WordPress site.
To do this, click the Page Settings tab at the top of the builder and select the Access Controls heading. Next, add a password in the ‘Bypass URL’ field. This acts as a password for your page, and also a link clients and team members can use to get past the password protection and access the page.
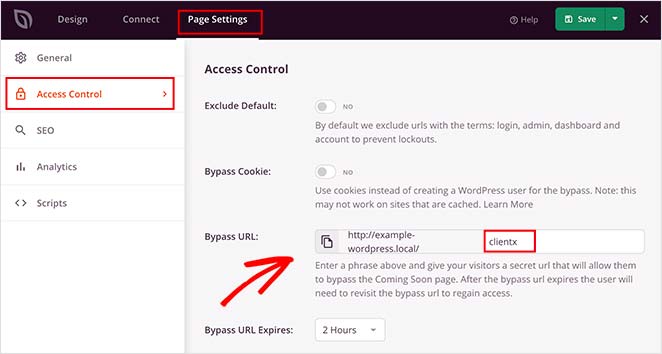
You can also exclude pages from password protections, such as your dashboard, admin, and login, so you don’t get locked out of your site.
Now, you need to decide which pages will be password protected. This could be pages with members-only content, lead magnets, or even an unfinished landing page.
Simply find the ‘Include URLs’ heading and add the WordPress password protected page you want to restrict in the text box. For example, you can add specific landing pages and posts, or even use this feature for password protected categories.
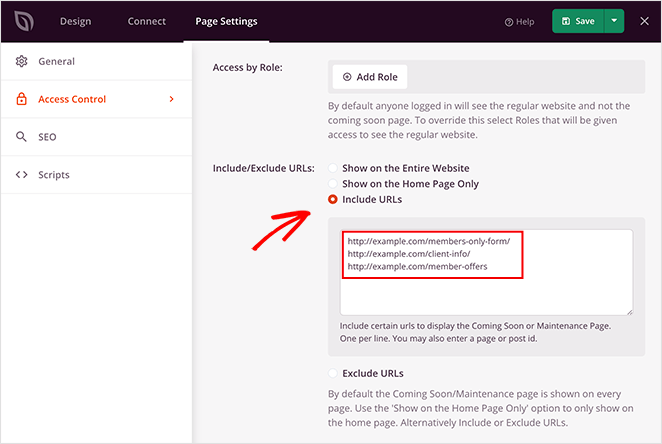
Once you’re happy with the customizations for your protected WordPress page, it’s time to publish it.
To publish a password-protected page, click the down arrow next to the Save button, then click Publish.
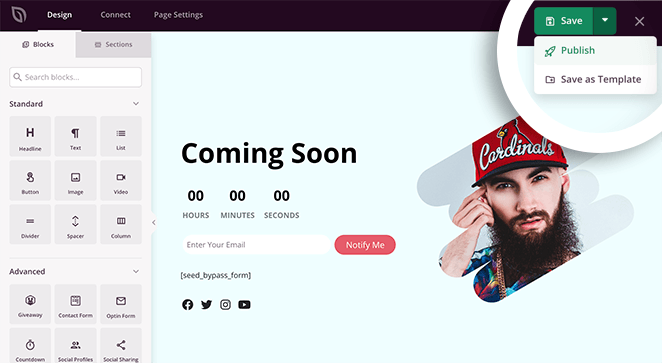
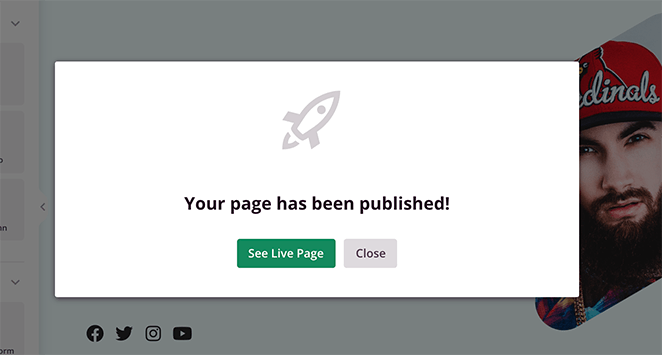
You’ll see a lightbox popup telling you that your page is published. You can then click the See Live Page button to preview your changes.
To make your page live, head back to your SeedProd dashboard. Under the Coming Soon Mode section, switch the Inactive toggle to Active.
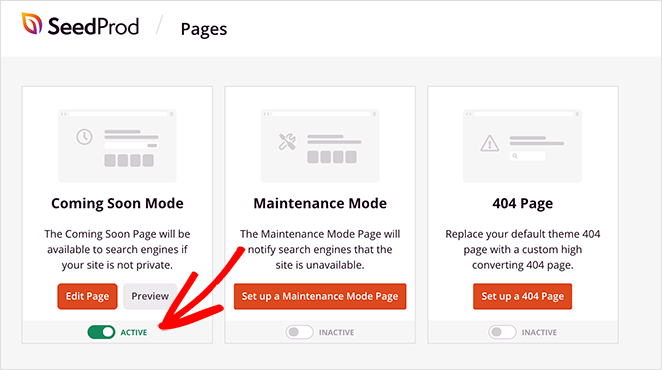
Your custom password-protected page is now live!

If you want to change your page again, click the Edit Page button in SeedProd. Then, you can change your page message, content, and style again.
2. Customize Default Password-Protected WordPress Page
When you password protect a WordPress page from the WordPress editor, your page inherits the styling from your WordPress theme.
To customize it, you can use a visual editor plugin like CSS Hero. It lets you edit the CSS of any page without editing the code.
First, get CSS Hero here and install the plugin on your website. Then, navigate to your password-protected page in WordPress.
From the WordPress admin bar at the top of your page, click the Customize with CSS Hero option.
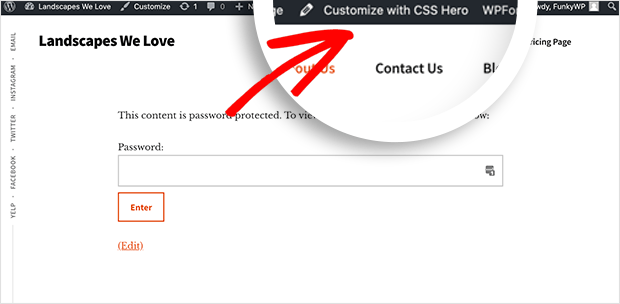
This reveals a simple point-and-click visual editor to edit and customize your WordPress page.
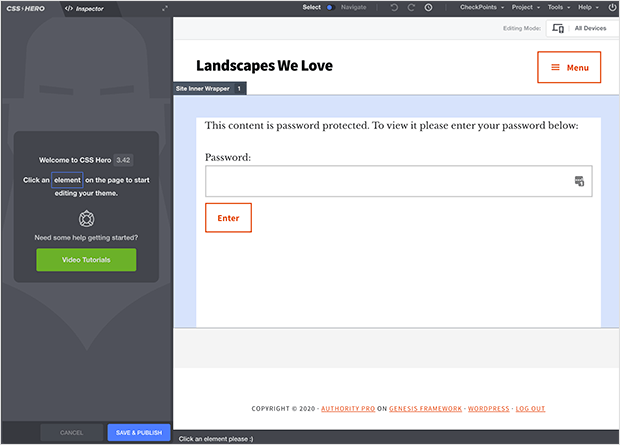
With CSS Hero, you can customize various elements of your password-protected page, including:
- Typography: Change font styles, sizes, and colors for the page title, form labels, and other text elements.
- Form Elements: Modify the appearance of the password input field, including its border, background color, and placeholder text.
- Button Design: Customize the submit button with different colors, hover effects, rounded corners, or even add icons.
- Layout Adjustments: Alter the positioning and spacing of elements, add padding or margins, and adjust the overall layout of the form.
- Background Effects: Beyond simple colors, you can add gradients, patterns, or even background images to the entire page or specific sections.
- Responsive Design: Ensure your customizations look good on all devices by adjusting styles for different screen sizes.
Click the header to open the options panel on the left. Then, you can choose a color from the color picker tool.
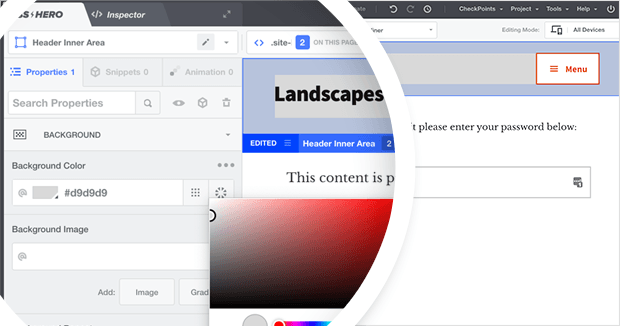
Click your page’s background. You can change it by choosing a color or gradient from the list, or you can add your own background image.
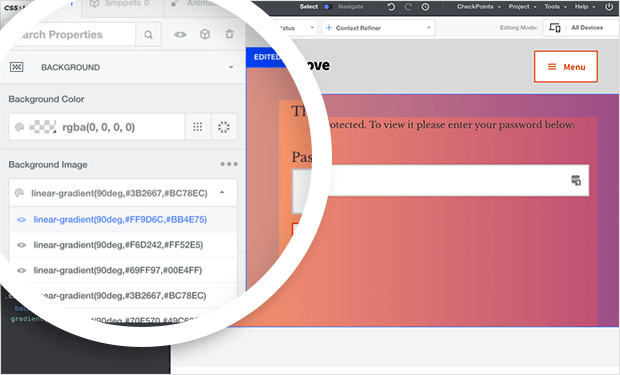
The drawback of using CSS Hero is you can’t add elements like contact forms, signup forms, and social buttons. For those, we suggest using the SeedProd method below.
Continue customizing your page, clicking different elements, and adding custom colors and fonts.
When you’re happy with your design, click the Save and Publish button. Then, click the Quit icon in the top-right corner of your screen.
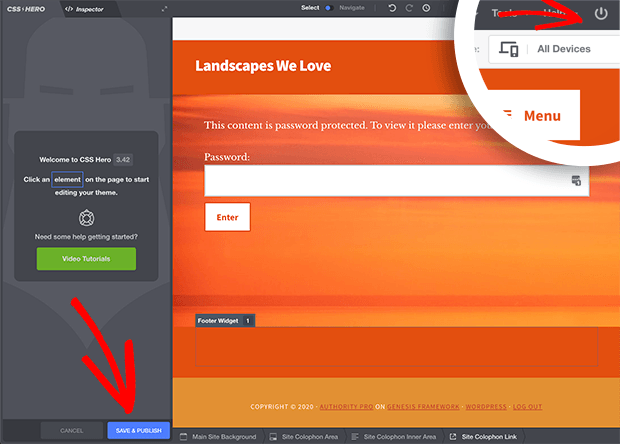
This will take you to your newly edited locked page design, complete with its password form.
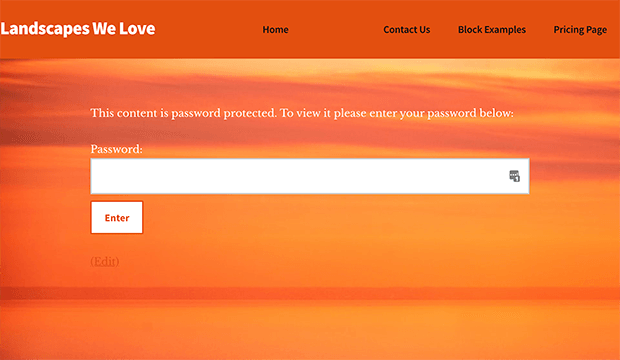
3. Show a Custom Protected Page on Your Entire Website
You can also use SeedProd to customize and show a password protected page on every page of your website. That way, users will need to enter a password to access any of your content.
The steps to password protect your WordPress website are the same as above. Go to SeedProd » Landing Pages, and in the Coming Soon panel, click Edit Page.
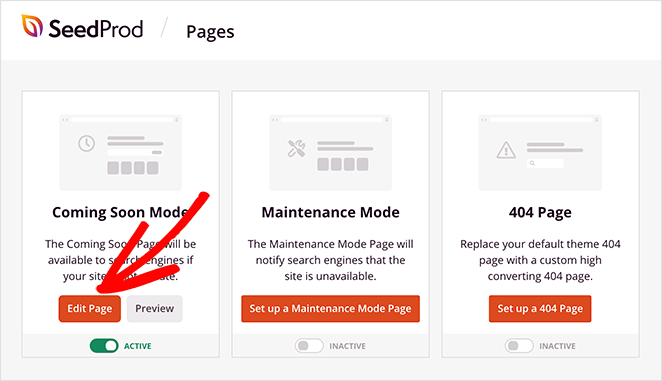
From there, click the Page Settings tab and find the Access Controls heading. Here, scroll to the ‘Include/Exclude URLs’ area and click the ‘Show on the Entire Website’ radio button.
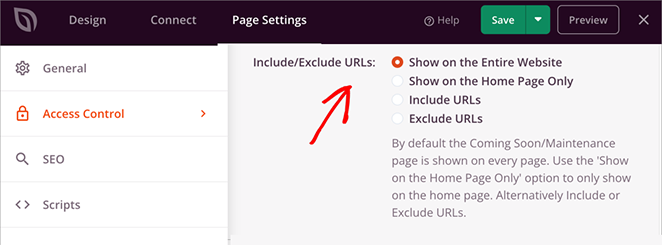
Once you’ve saved the changes, your custom password page will appear on every page of your entire site.
Frequently Asked Questions
There you have it!
More WordPress Password Protection Tips
You now know how to customize password-protected pages in WordPress.
While customizing protected pages in WordPress can seem daunting, it doesn’t have to be. Using the methods above, you can create stunning, locked pages without writing a single line of code.
You don’t need to edit your PHP file or change any of your theme files manually. With SeedProd’s handy page builder, you won’t have to start from scratch and can include essential lead generation elements like opt-in forms to grow your business.
So what are you waiting for?
For even more tips on password-protecting your WordPress site, please see these expert guides:
- How to Password Protect a WordPress Site: The Ultimate Guide
- How to Password Protect a WordPress Page (Step by Step)
- How to Password Protect a WordPress Site While Under Development
- How to Secure Your WordPress Site from Hackers (17 Expert Tips)
Thanks for reading! We’d love to hear your thoughts, so please feel free to leave a comment with any questions and feedback.
You can also follow us on YouTube, X (formerly Twitter), and Facebook for more helpful content to grow your business.

