Do you want to embed Facebook videos in WordPress?
The videos you post on Facebook can also make exciting content for your WordPress website. By embedding Facebook videos and video feeds, you can add fresh content to your WordPress site while growing your Facebook followers.
In this guide, we’ll share 3 easy ways to embed a Facebook video in WordPress step-by-step.
Can You Embed a Facebook Video on WordPress?
You can absolutely embed a Facebook video in WordPress. However, there are different ways to do so with varying difficulty levels.
One of the easiest ways to add Facebook videos to your WordPress site is using a WordPress plugin with embedded video player functionality. Later in this guide, we’ll share 2 of the best WordPress plugins for the job.
Why Embed Facebook Videos in WordPress?
Embedding Facebook videos in WordPress is about more than just making your site look good. One of the best advantages is it enhances the user experience, making your content more interactive and engaging.
Additionally, embedding videos from Facebook on your website can help drive traffic to your site from social media platforms and keep it there for longer. This gives visitors enough time to learn more about your business and dive deeper into what you offer.
It’s also an effective way to improve your site’s search engine optimization (SEO), as higher engagement can lower bounce rates.
The cherry on top? Adding a Facebook video to WordPress is incredibly easy with the right tools, so click any of the quick links below to jump to your favorite method:
How to Embed Facebook Video in WordPress Using SeedProd
One way to add videos to your WordPress site is during the design and development phase. For example, you may want to include a welcome video on your homepage or an explainer video on a product landing page.
Since studies show that including videos on landing pages can help you achieve up to 34% higher conversion rates, doing so is a smart move for any website owner. So instead of using a YouTube video, why not reuse a video from your Facebook page?
The best way to build a landing page or custom WordPress design is with a WordPress page builder like SeedProd.

SeedProd has hundreds of pre-made templates and a drag-and-drop builder that lets anyone create stunning WordPress landing pages without code. With its Theme Builder feature, you can also create custom WordPress themes from the ground up without hiring a developer.
Its library of Facebook blocks makes it an excellent tool for embedding Facebook videos. With a few clicks, you can embed Facebook posts, videos, comments, timelines, events, or messages. This means you can streamline your design workflow without adding extra WordPress plugins to your site.
Follow the tutorial below to embed a Facebook video in WordPress using SeedProd.
Step 1. Install and Activate SeedProd
First, install and activate the SeedProd plugin on your WordPress site. In this guide, we’ll use SeedProd Pro for its advanced features.
For help with this step, please see our detailed documentation on installing SeedProd.
Step 2. Choose a Template
The next step is to choose a template to use as the foundation for your custom WordPress design.
There are 2 ways to do this in SeedProd:
- Theme Builder – You can start with a pre-made website kit and customize each template to build a custom WordPress theme that replaces your current theme.
- Landing Page Builder – Or you can choose a landing page template and customize it to create a standalone page that works seamlessly with your existing WordPress theme.
Note: Both options let you use Facebook blocks to embed your videos.
For this guide, we’ll use the Landing Page Builder option. So navigate to SeedProd » Landing Pages from your WordPress dashboard, and click the Add New Landing Page button.
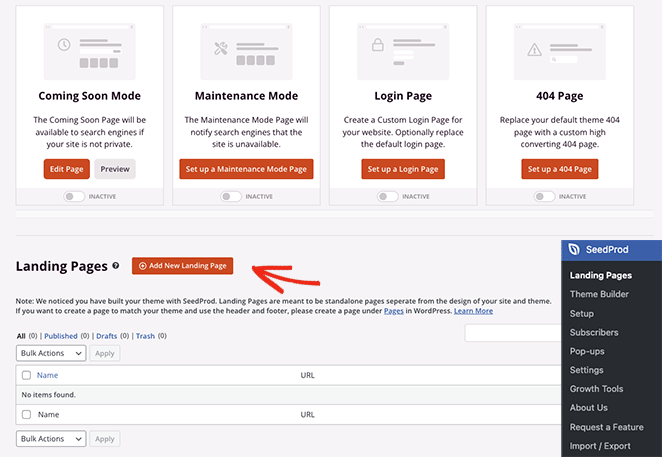
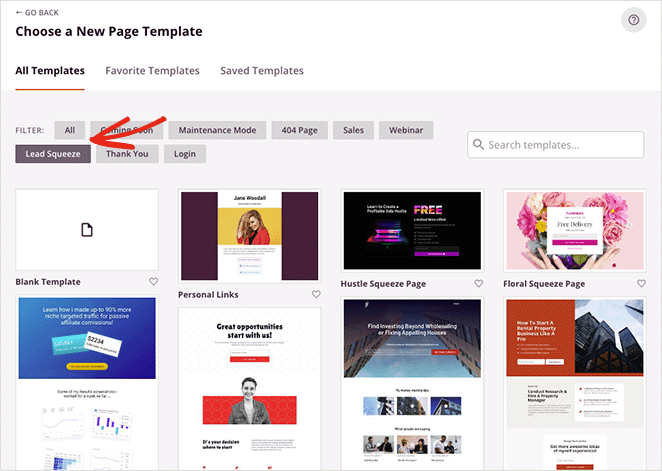
From there, browse through the landing page templates until you find one that works for you. Remember, you can customize any template to your needs, so look for one close to what you’re after.
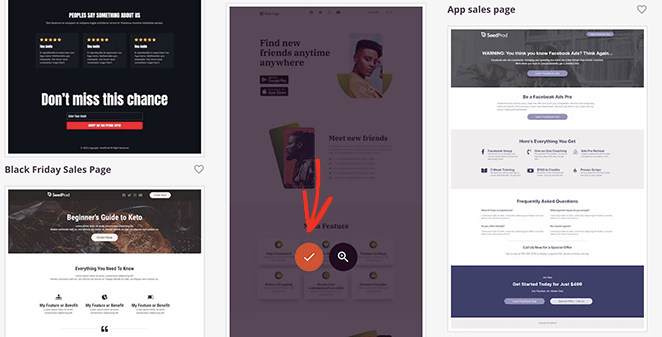
Once you’ve found a template you like, hover over it and click the checkmark icon to choose it.
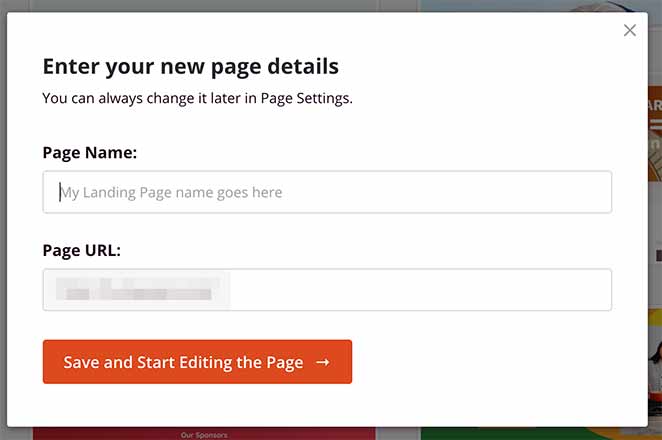
Next, you’ll see a popup that allows you to enter your landing page name and URL. When you’re happy with those details, click the Save and Start Editing the Page button.
Step 3. Customize Your Landing Page Template
On the next screen, you’ll see SeedProd’s drag-and-drop page builder. It will preview your template on the right and show several blocks and settings on the left.

You can click anywhere on the preview to see the settings for that particular design element. For instance, selecting the template’s headline opens a panel on the left where you can change the text, heading level, and alignment.
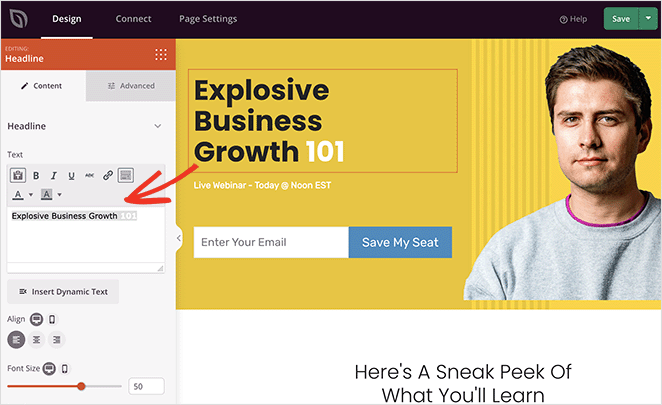
If you need more customization options, hit the Advanced tab for that block. Here you’ll see customization options for the typography, color, padding, spacing, mobile responsiveness, and more.

Since this template doesn’t have a video element built-in, we’ll need to add one to display the Facebook video. We’ll show you how to do that next.
Step 4. Add the Facebook Embed Block
To embed a Facebook video on your landing page, scroll through the Advanced Blocks section on the left and find the Facebook Embed block. Now drag this block into place on your landing page.
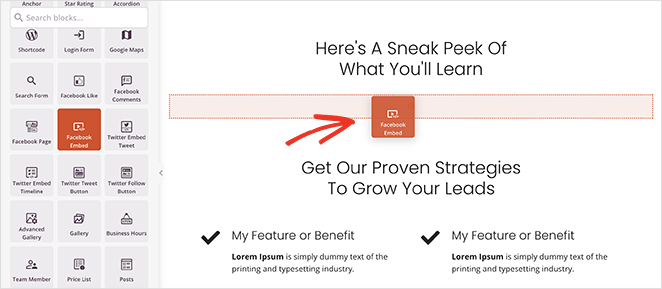
By default, the Facebook Embed block will display a placeholder Facebook post instead of a video. To change this, open the block settings by clicking on it, and choose the “Video” option from the “Type” dropdown menu.
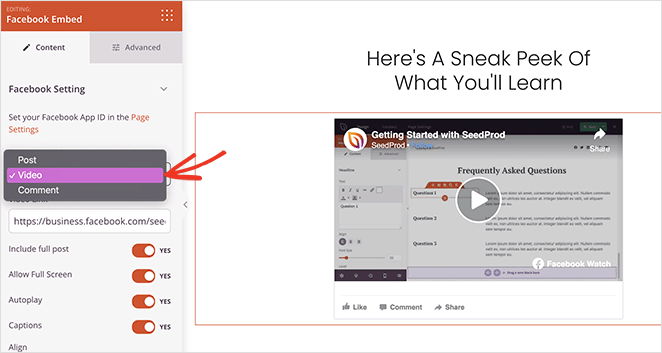
Next, paste your Facebook video URL into the “Video Link” field. You should now see a preview of your Facebook video embedded on your landing page.
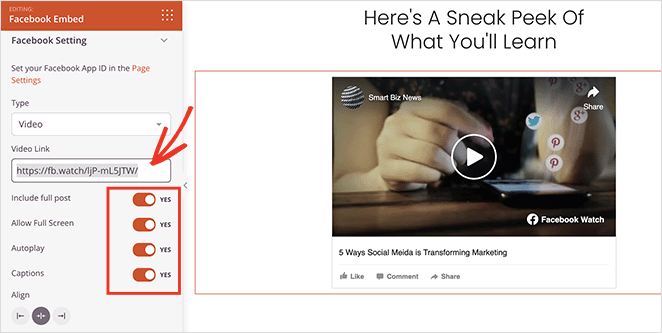
There are several ways to customize how your video embed looks. For instance, you can turn toggles on or off to allow fullscreen, autoplay videos, and include captions.
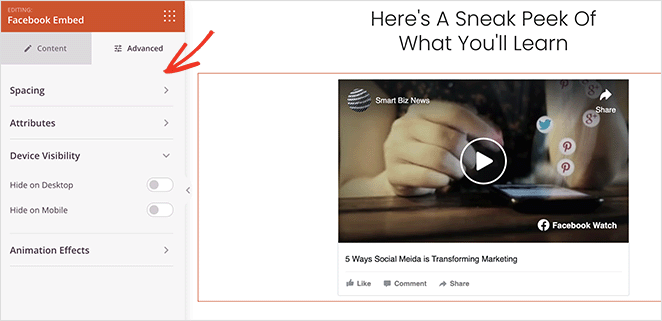
In the Advanced tab, there are settings to change the video spacing, CSS attributes, device visibility, and add animation effects.
Continue customizing your landing page until you’re happy with the design. For example, you may also want to add a Facebook Like button, testimonials, or even an opt-in form to collect email addresses.
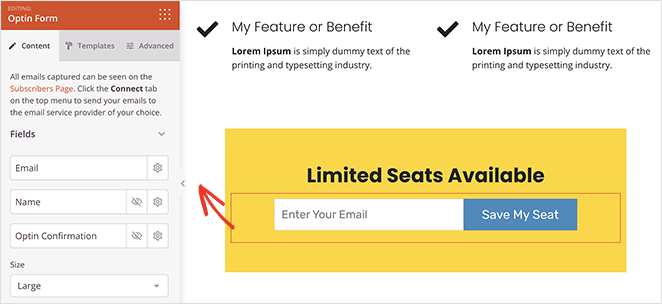
Remember to click the Save button to store your changes.
Pro tip: When customizing your landing page, click the Page Settings tab to configure your on-page SEO settings and add your Facebook pixel tracking information.

Step 5. Publish Your Facebook Video Page
Before publishing your page, click the mobile icon in the bottom-right corner to see if your design looks good on mobile devices.
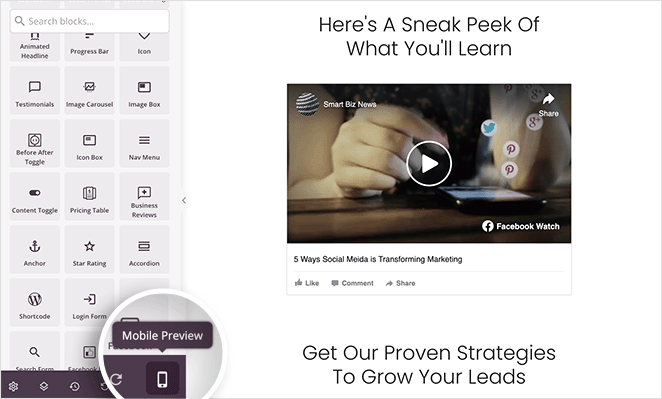
If anything doesn’t look right, you can easily edit the mobile version of your page to suit users visiting from smartphones and tablets.
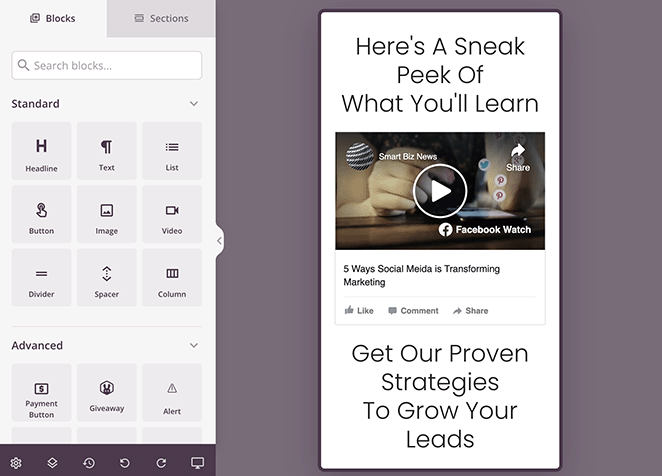
From there, you can go ahead and click Publish under the Save button to make your landing page with Facebook video embed live.
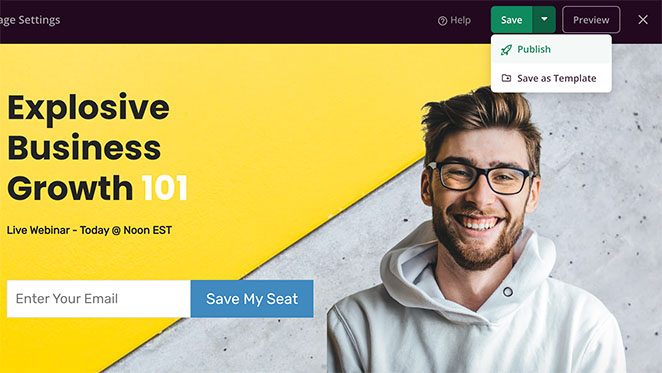
Now anyone visiting your page can watch your Facebook video. Moreover, depending on your settings, they can also like, comment, and share the video from your WordPress website.


How to Embed Facebook Video Using a Facebook Video Plugin
Another way to embed Facebook videos on your WordPress website is using a social media feed plugin. The benefit of this approach is you can add attractive gallery feeds to your site that update automatically whenever you publish a new video on Facebook.
For example, you could add a Facebook video feed to your blog sidebar or include one inside a WordPress post to illustrate it with user-generated content.
In this method, we’ll use the Custom Facebook Feed Pro plugin from Smash Balloon.

It’s the best social media feeds plugin, allowing you to easily embed Facebook videos, albums, comments, reviews, community posts, and more on your WordPress website.
Additionally, the Pro version of Smash Balloon’s video plugin lets you embed HD, 360o, and Facebook Live videos, along with the total number of likes, comments, shares, and reactions for each post. This is super helpful if you publish regular live streams.
Step 1. Install Facebook Feed Pro Plugin
To get started, install and activate the Custom Facebook Feed Pro plugin on your WordPress site. If you need help with this, you can follow this guide on installing and activating a WordPress plugin.
Once the plugin is active, navigate to Facebook Feed » Settings from your WordPress admin and enter your Smash Balloon license key. This information is under your account on the Smash Balloon website.
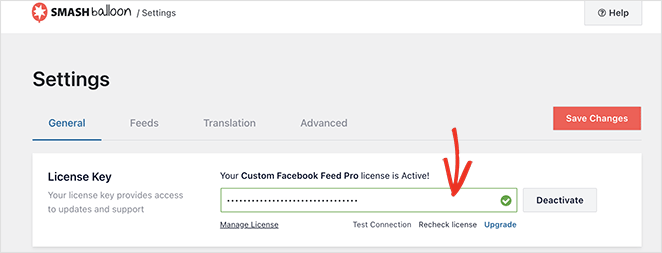
After entering your key, click the Activate button.
Step 2. Connect Your Facebook Page or Group to WordPress
In Smash Balloon, you can embed videos from a Facebook page or group feed. However, you first need to connect your Facebook group or page to WordPress to do this.
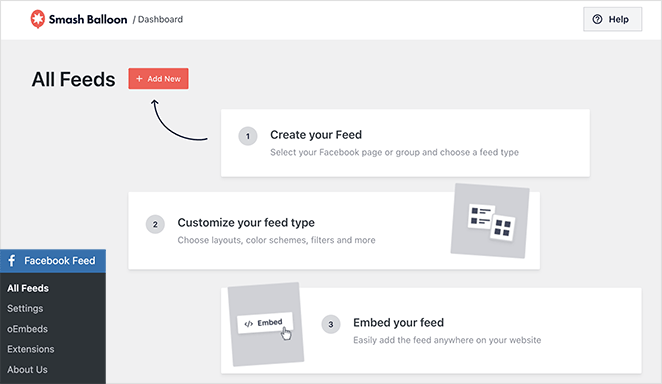
So head to Facebook Feed » All Feeds and click the Add New button.
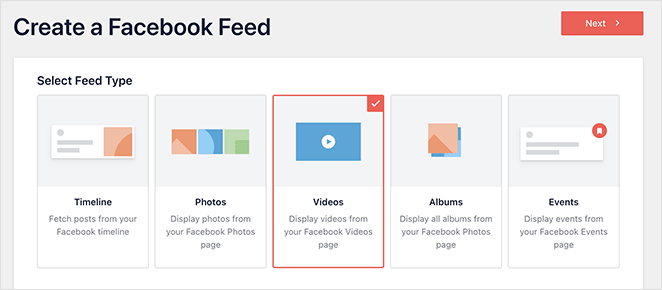
On the next screen, you’ll see several feed types: Timeline, Events, Photos, Albums, and more. Since we want to embed a Facebook Video, select the Videos option and click Next.
Now you can choose a source for your feed: a Facebook page or a group. To do this, click Add New.
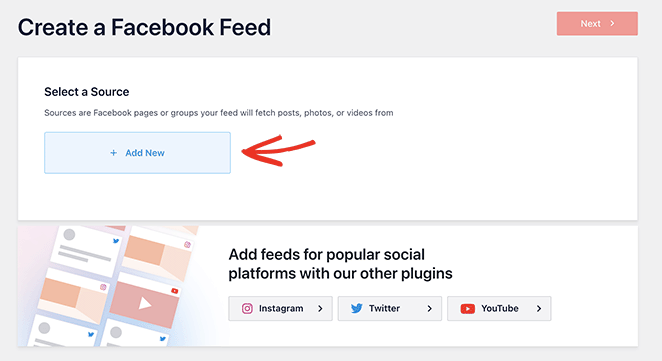
Next, select either the Facebook Page or Facebook Group option and click the Connect to Facebook button.
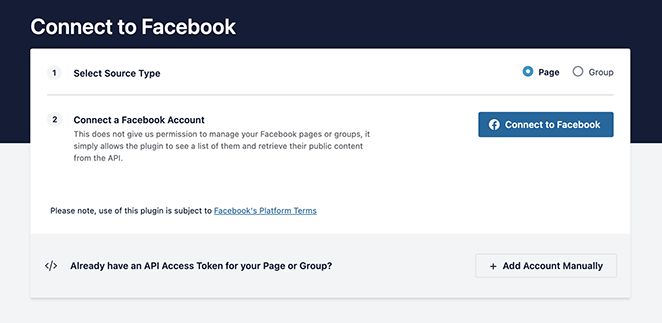
This will open a window where you can connect to your Facebook account and select the pages or groups to use with Smash Balloon.
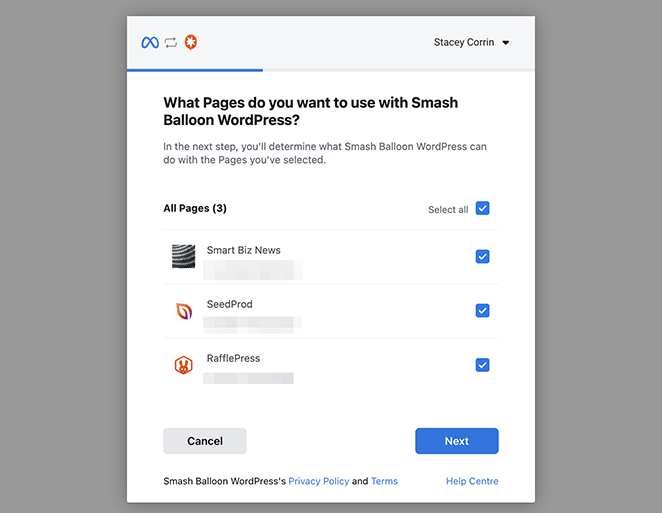
After that, click Next.
Now Facebook will let you choose the type of information that Smash Balloon can access and the functions it can perform. To restrict access, disable any of the toggles.
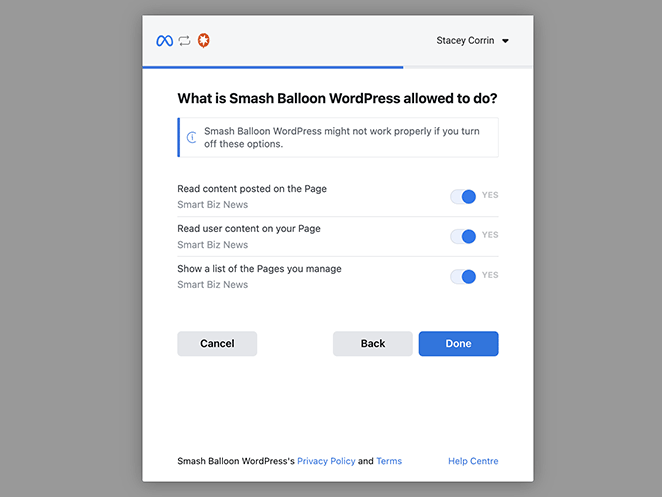
Note: Disabling some of these permission settings may affect the videos you can embed.
When you’re happy with the permissions, click Done to head back to your WordPress dashboard.
After returning to your WordPress site, you’ll see a popup window with the groups or pages linked to your website. Here you can choose which one to embed on your site.
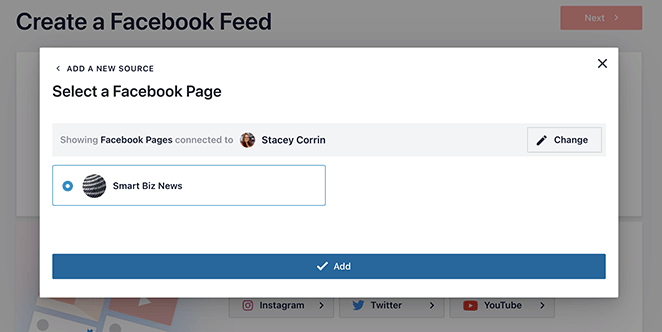
Simply click the radio button beside one and select the Add button.
Step 3. Create Your Facebook Video Feed Layout
Now, Smash Balloon will return you to the “Create a Facebook Feed” page. Here, you can select the page you just added and click the Next button.
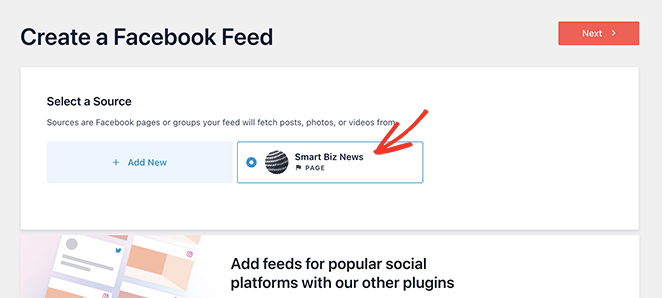
The next step is to create the layout of your Facebook video feed. On the following screen, you can choose from several different themes with different styling effects:
- Default
- Modern
- Social Wall
- Outline
- Overlap
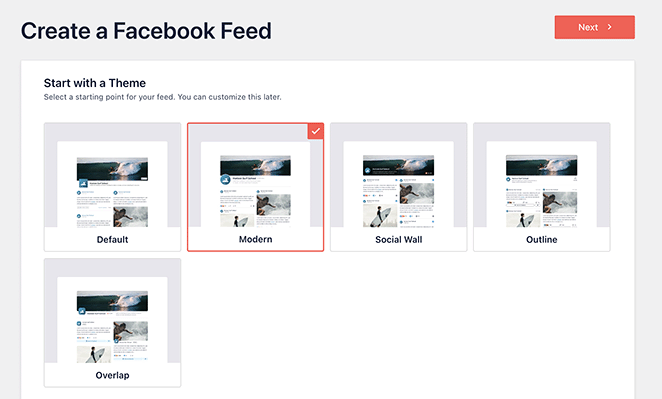
Select a theme you like, then click the Next button.
Now you can choose a template that dictates how individual feed items will display on your website. For example, you can use the default grid layout, a simple masonry design, a widget, a large grid, the latest post layout, a showcase carousel, or a simple carousel.
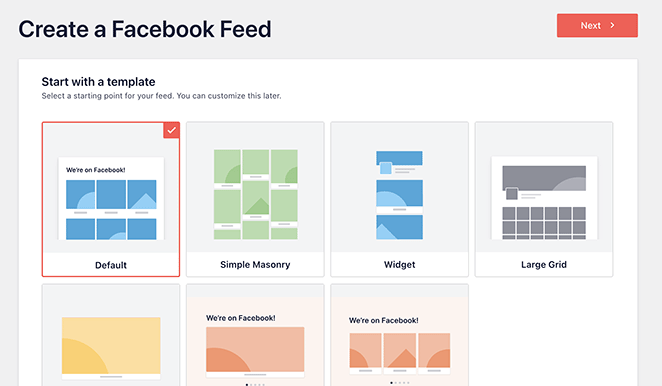
We’re using the Default layout, but you can select any layout you like and click Next.
After that, you’ll need to choose between showing all videos or videos from a Facebook playlist.
If you choose the Playlist option, you’ll need to paste the playlist URL into the box before clicking Next.
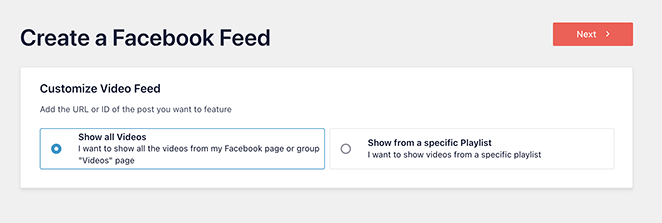
The plugin will now create a feed based on your Facebook source and the template you’ve chosen. This is a great way to start; however, you may want to customize how the videos look on your site further.
Step 4. Customize Your Facebook Videos
Smash Balloon provides many different ways to customize how your Facebook videos appear on your website. To find these settings, simply click the pencil icon next to any of your feeds.

You’ll now see your Facebook video feed open in the feed editor, where you can change your feed’s look and feel with a few clicks.
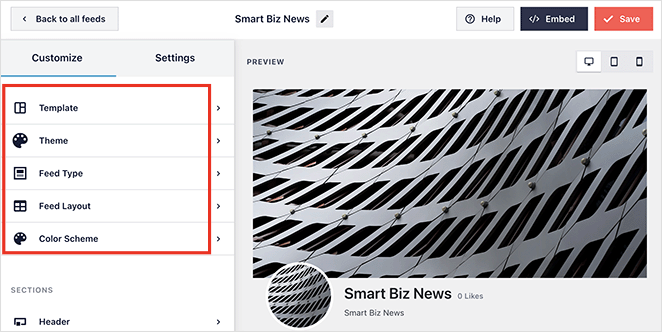
On the left is a panel with customization options for adjusting your:
- Template
- Theme
- Feed Type
- Feed Layout
- Color Scheme
Below that, you can customize the different feed sections. For instance, you can change the header style, post elements, feed margins, like box, background, lightbox, and more.
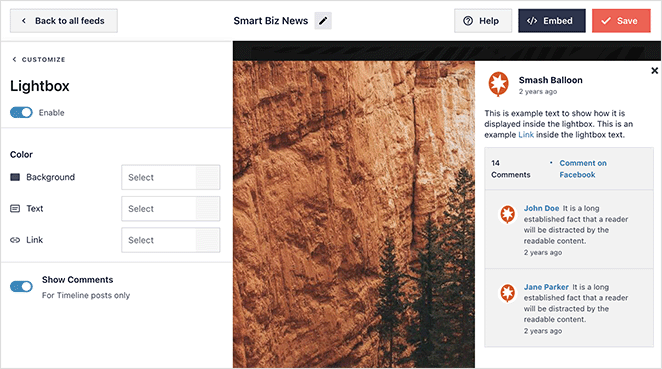
Remember to click the Save button to save your changes.
Step 5. Embed Your Facebook Videos in WordPress
Now it’s time to embed your custom Facebook feed on your WordPress site, and Smash Balloon makes the process easy.
From the feed editor, click the Embed button in the top-right corner.
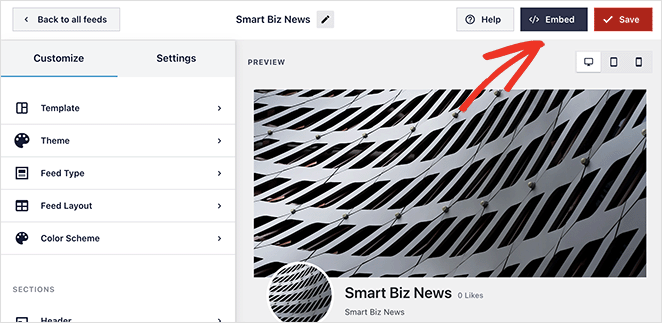
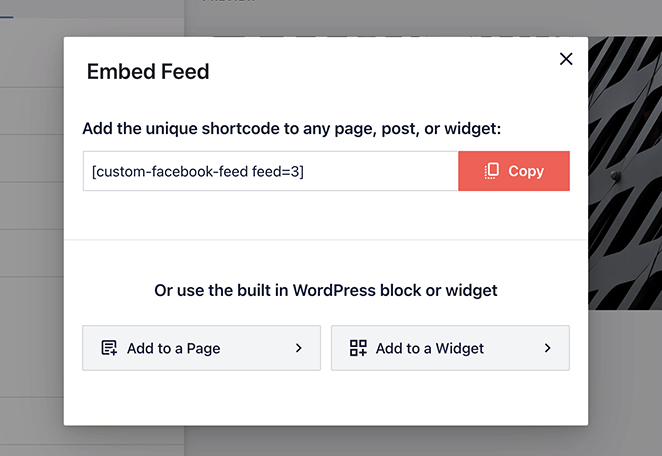
This opens a popup with 3 different ways to publish your Facebook videos:
- With the Smash Balloon shortcode
- Using the Smash Balloon block on a WordPress page
- Using the Smash Balloon block in a widget area
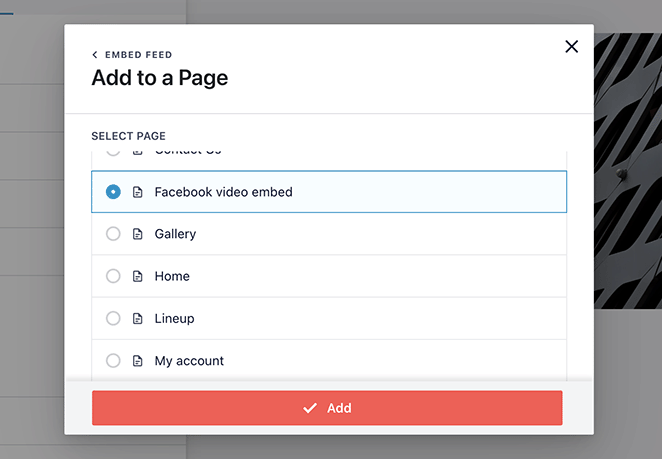
Clicking the Page option will open a list of available pages on your website. Simply select the radio button on the relevant page and click the Add button.
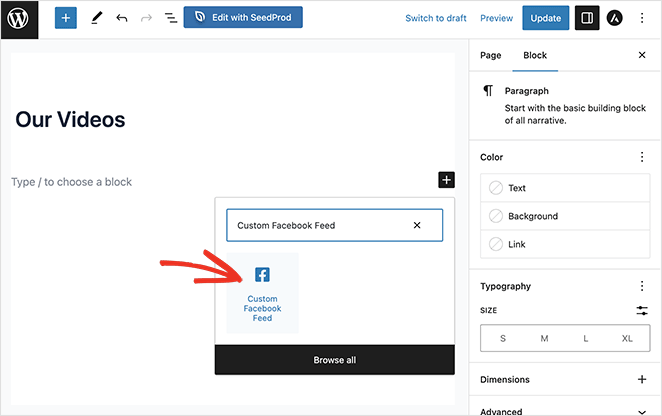
The page you selected will open automatically. From there, you can click the Plus icon to add a new WordPress block and search for the Custom Facebook Feed block.
After adding the block to your page, Smash Balloon will preview your feed so you can review it before publishing.
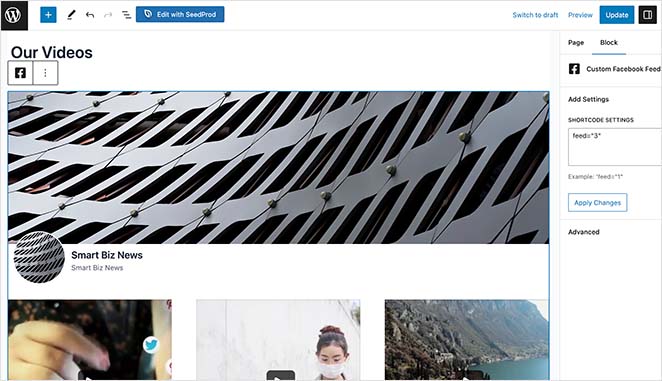
From there, it’s a case of publishing or updating the page to make your Facebook video feed live.

Adding your feed to a widget area follows a similar process. Navigate to Appearance » Widgets, click the plus icon on any widget area, and search for the Custom Facebook Feed block.
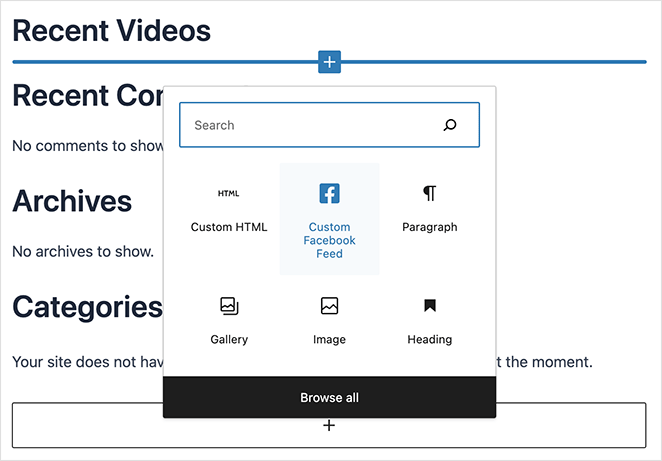
You’ll see a preview as before once you add it to your widget area. Then you can go ahead and save your changes.
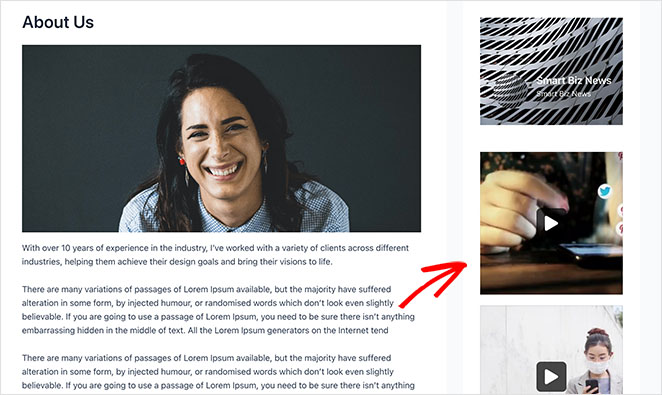
Here’s a screenshot of how adding your Facebook video feed to a WordPress sidebar may look:
How to Embed Facebook Videos in WordPress Without a Plugin
The final method we’ll cover in this guide is how to embed Facebook videos on your WordPress site without using a plugin. Some people may prefer this method for adding individual videos to a blog post.
However, this method offers fewer customization options than the earlier solutions. It also requires copying and pasting HTML code snippets from the configurator, so if you’re uncomfortable with this, we recommend method 1 or 2.
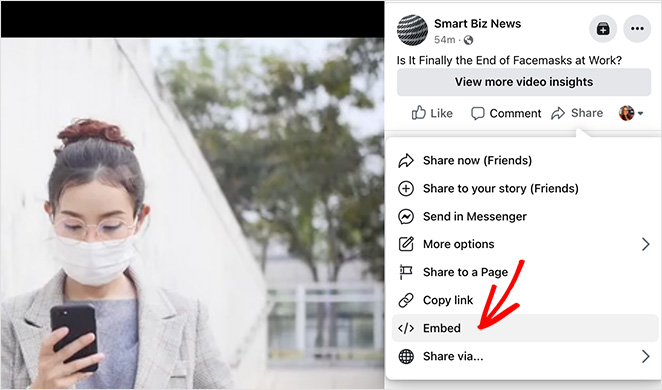
To manually embed a Facebook video in WordPress, you first need to find the embed code for your chosen video. You can find this by clicking the “Share” icon below any video and selecting the “Embed” option.
This opens a popup with an iframe code that you can copy and paste into your WordPress site. You can either include the full post or embed the video from a specific start time.
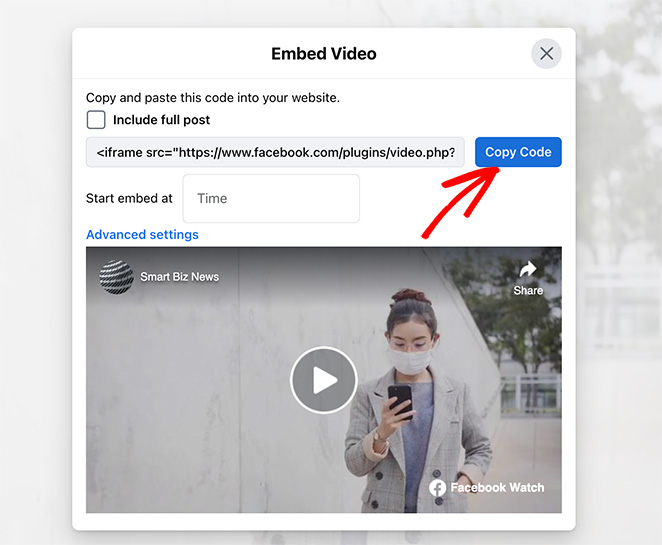
Simply click the Get Code button to copy it to your clipboard.
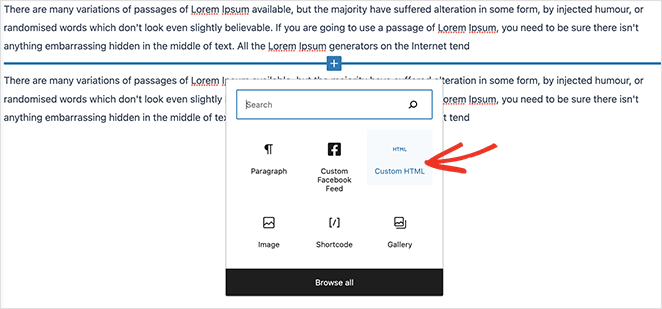
After copying the code, create or edit a post or page in WordPress, and add the Custom HTML block in the block editor.
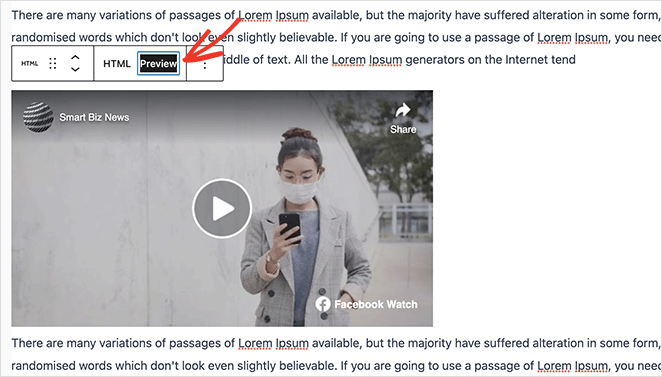
Now paste the video embed code into the Custom HTML block. If you like, you can click the Preview tab to see how it looks.
From there, click the publish or update button to make your video live.
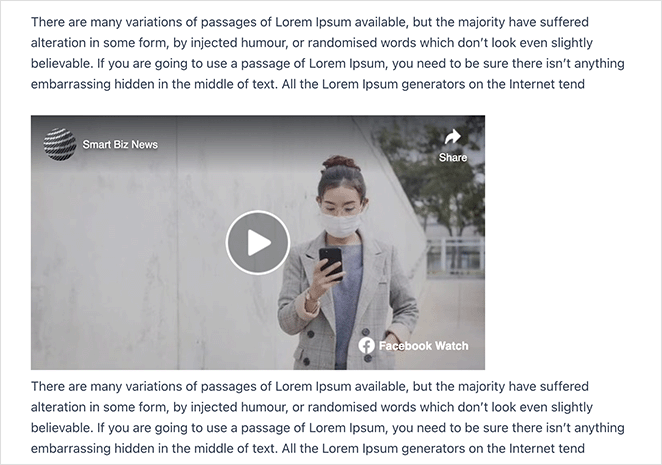
There you have it!
We hope this guide has helped you to embed a Facebook video in WordPress. For even more helpful tips and tutorials, check out the guides below:
- 23 Facebook Giveaway Ideas to Grow Your Business
- How to Create a Video Landing Page Easily (+ 5 Templates)
- How to Add a Twitter Widget to WordPress (Step-by-Step)
Thanks for reading! We’d love to hear your thoughts, so please feel free to leave a comment with any questions and feedback.
You can also follow us on YouTube, X (formerly Twitter), and Facebook for more helpful content to grow your business.

