Do you want to know how to add view cart button in WooCommerce?
A view cart button lets potential customers see all items in their shopping cart and quickly enter your checkout page. In turn, it can increase conversion rates by eliminating unnecessary steps in the checkout process.
In this guide, we’ll show you how to add a view cart button in WooCommerce step-by-step.
Why Add a View Cart Button in WooCommerce?
Adding a view cart button to a WooCommerce store is an excellent way for store owners to improve user experience. It’s easier for customers to view their items, make changes, and checkout. This can lead to increased sales and customer satisfaction.
View cart buttons are also effective at reducing shopping cart abandonment. According to a study by Baymard Institute, 69.57% of online shopping carts are abandoned.
One of the most common reasons for cart abandonment is that customers forget what is in their cart. A view cart button can help to reduce cart abandonment by making it easy for customers to keep track of their items.
Ultimately, adding a view cart button to your online store is a simple way to improve customer experience and increase sales.
Why Use SeedProd to Customize WooCommerce?
There are many ways to add a cart icon to your WordPress site. You could use custom code to customize the default WooCommerce buttons or an alternative WooCommerce plugin.

For this guide, we’ll be using SeedProd, one of the best drag-and-drop page builders for WordPress. But what makes SeedProd an excellent choice for customizing WooCommerce?
Well, here’s the kicker. With SeedProd, you can customize your entire WooCommerce site without touching a single line of HTML, CSS, or PHP code. Instead of hiring a developer or adding custom code snippets and shortcodes yourself, you can build your ideal eCommerce site visually with drag-and-drop.
SeedProd comes with hundreds of pre-made templates, including WooCommerce themes. This means you can pick one and set up your store in a few clicks.
From there, you can customize your product pages, storefront, cart page, buy now button, and everything else without code. You won’t even need to install a child theme to make the changes.
How to Add a View Cart Button In WooCommerce with SeedProd
Besides helping you set up an online store quickly and easily, SeedProd lets you add a view cart button virtually anywhere you like. To learn how to do it, follow the easy steps below.
Step 1. Install and Activate SeedProd
First, you’ll need to install and activate SeedProd Elite on your WordPress website.
The Elite plan gives you access to SeedProd’s WooCommerce customization features, theme builder, Easy Digital Downloads support, and domain mapping.
For help getting set up, please see our documentation on how to install SeedProd.
Step 2. Choose a WooCommerce Site Kit
Upon activating the plugin, navigate to SeedProd » Theme Builder from your WordPress dashboard.
You’ll need to build a custom WooCommerce theme to add a view cart and WooCommerce custom add to cart button. But don’t worry; it’s straightforward and takes just a few minutes.
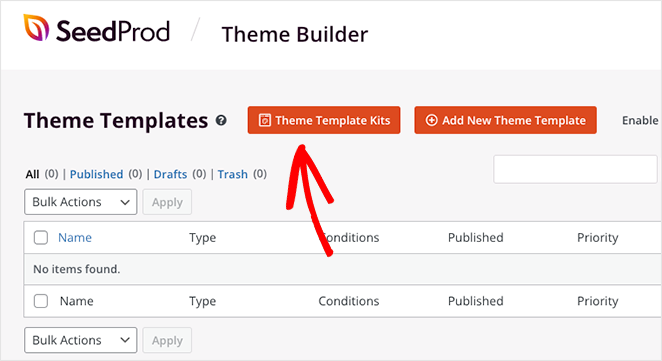
From the Theme Builder page, click the Theme Template Kits button.
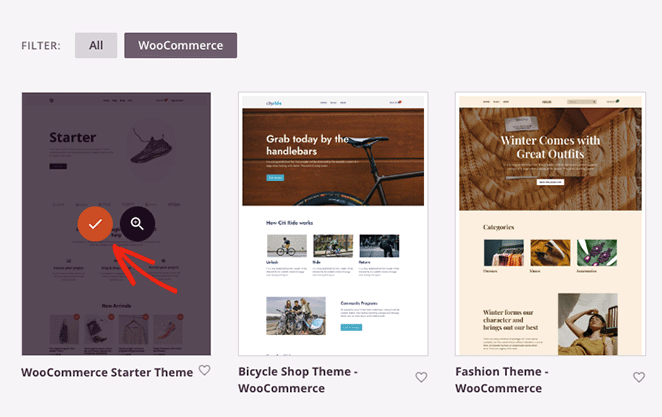
On the next screen, you’ll see SeedProd’s pre-made website kits. Click the WooCommerce tab to see all the kits designed for eCommerce stores.

Browse through the designs until you find one you like, then hover over it and click the checkmark icon.
In a few seconds, SeedProd will add the theme to your website. Like the example below, you’ll see all the templates that make up your WordPress theme in a list.
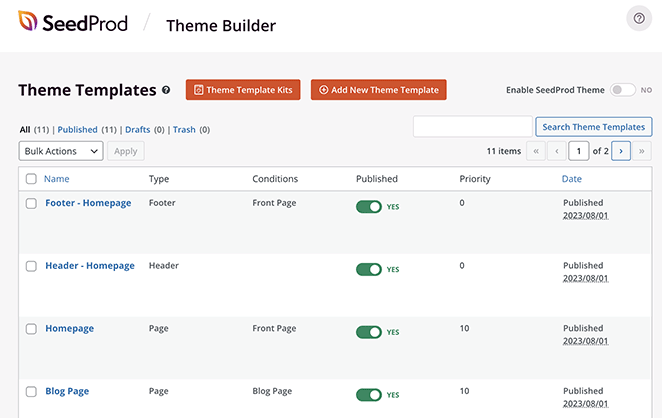
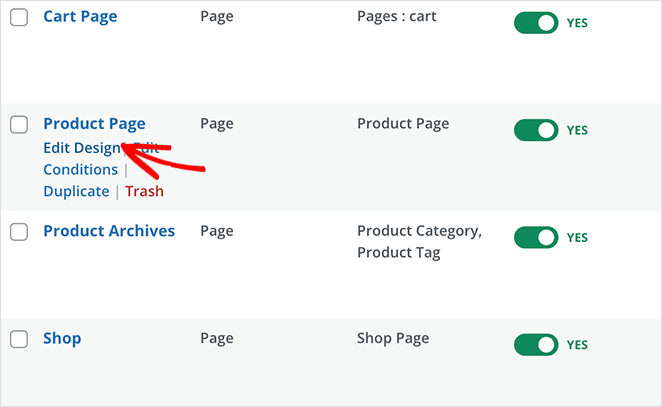
You can customize any of these templates by clicking the Edit Design link. Doing so will open the template in SeedProd’s visual page builder, where you can tailor the pre-made design to your store’s needs.
For full step-by-step customization instructions, please see our ultimate guide on how to set up an online store in WordPress. It explains how to use the drag-and-drop page builder, customize template elements, and add new design elements to each page.
Once you’re familiar with how SeedProd’s builder works, you can move on to the next step, which shows you how to add a view cart button to your product pages.
Step 3. Add a View Cart Button on WooCommerce Product Page
To add a view cart button to your product pages, you’ll need to open the single product page template on the Theme Builder dashboard. After finding it, hover over the template and click the Edit Design link.
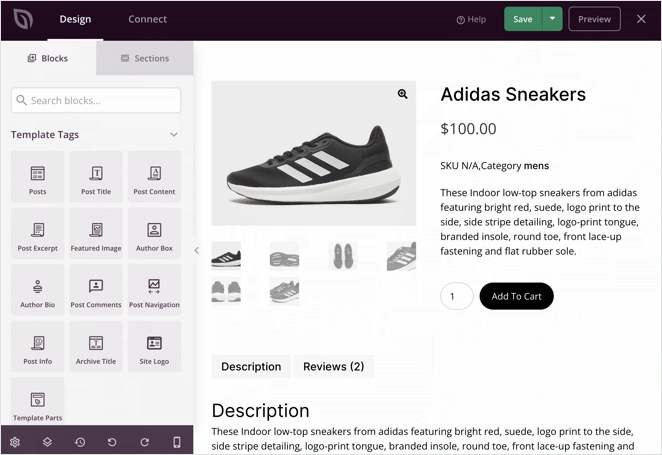
When this template opens, you’ll see a page with details of individual products in your store. Depending on your chosen theme, it’ll show your product description, variable product info, product photos, pricing, and an add-to-cart button.
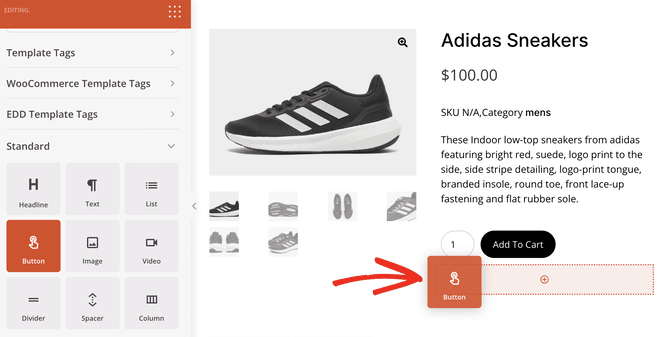
To add a view cart button, you’ll need to drag over the Button block from the left-hand sidebar.
You can then click this block to open its customization options. Here, you can change the button text, adjust the alignment, and add a custom button link.
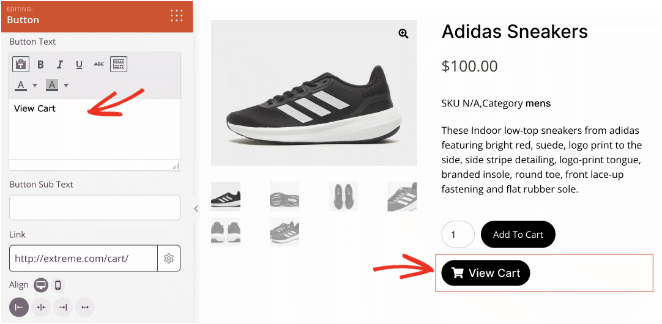
Let’s change the button text to “View Cart” and set the alignment to the left.
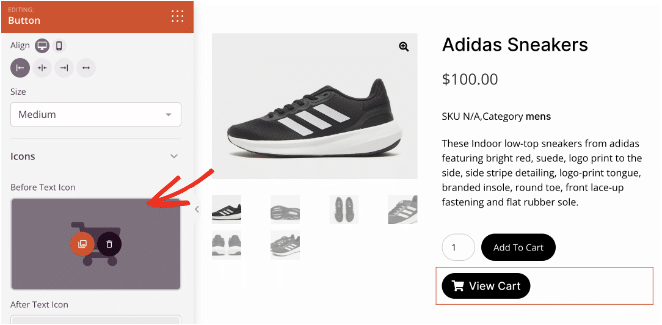
You can also expand the “Icon” tab and choose a cart icon from the font awesome icon library.
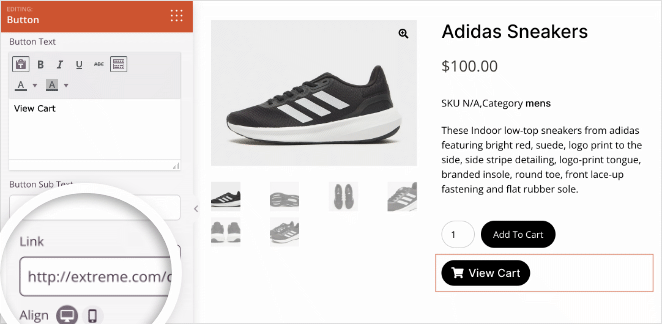
Now, you’ll need to link the button to your shopping cart page. To do this, paste the URL of your cart page into the “Link” text field.
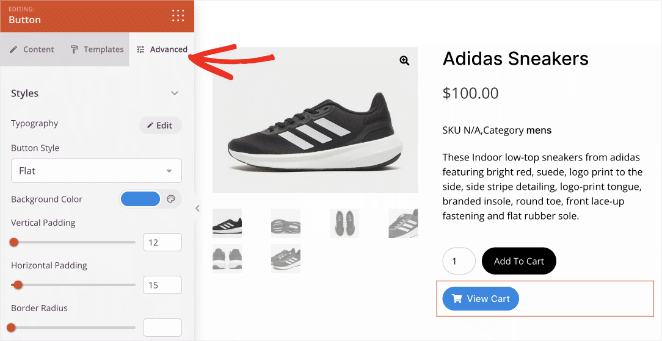
If you want to add more styling options to your view cart button, click the Advanced tab in the block settings.
You can change the cart button text font, button color, border radius, spacing, and more in this panel.
Keep customizing the button until you’re happy with how it looks.
Now, we’ll show a trick to save time should you want to add the same button to other site areas. Hover over the button on your preview, then click the Save icon.
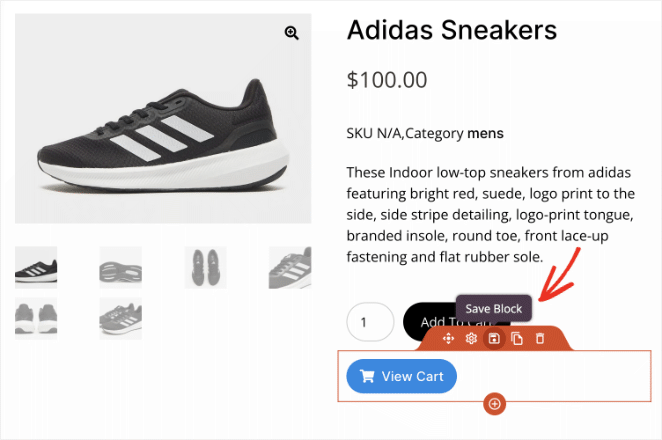
This will open a window where you can give the button a name and save it to your Saved Blocks. After saving it, you’ll be able to re-use it without building it from scratch again.
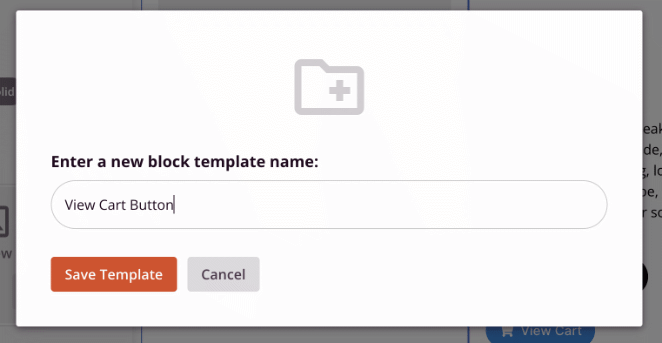
Before exiting this page, click the Save button in the top right corner to save your changes.

Now, you can exit back to the theme builder dashboard and continue customizing your online store.
Step 4. Add a View Cart Button on WooCommerce Shop Page
Your WooCommerce shop page is another area where you can add a view cart button. For this, you’ll need to click the Edit Design link on your shop page template.
Once you’re inside the page builder for this page, scroll down to the Saved Blocks section and look for the custom view cart button you created in the previous step.
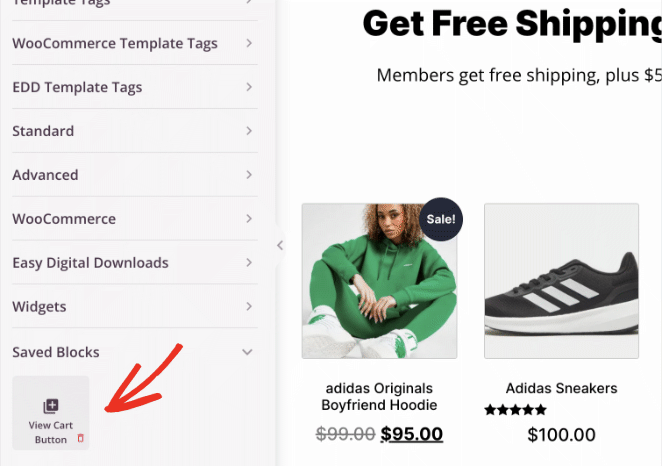
Now drag this block where you want it on your shop page. In this example, we’ve added it to the top of the page, but you can place it anywhere you like.
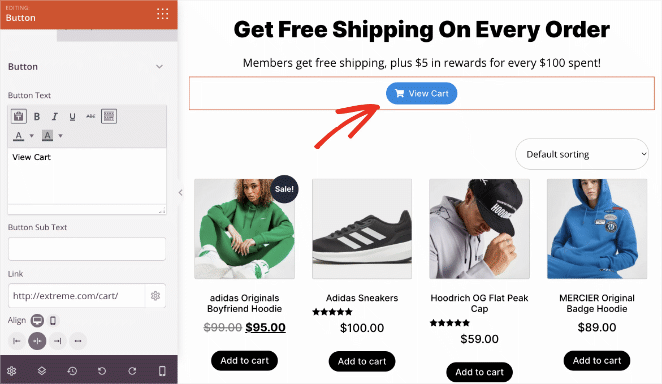
As before, you can open the block settings to customize it for that particular page. For example, you can change the background color or make the button bigger to stand out more.
Remember to click the Save button before exiting the page.
Step 5. Add a View Cart Button on WooCommerce Menu
Another place that makes sense for adding a view cart button is your WooCommerce menu. Since shoppers use the menu to navigate your store, adding a button here will make finding the cart page easier.
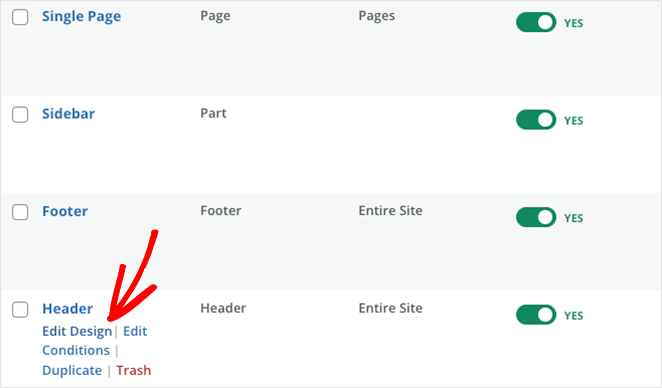
From the SeedProd theme builder dashboard, you’ll need to find your header template and click the Edit Design link to customize it.
Instead of adding the view cart button you made earlier, you can use one of SeedProd’s pre-made blocks.
Inside the WooCommerce Template Tags panel on the left-hand side, you’ll find a block called Menu Cart.
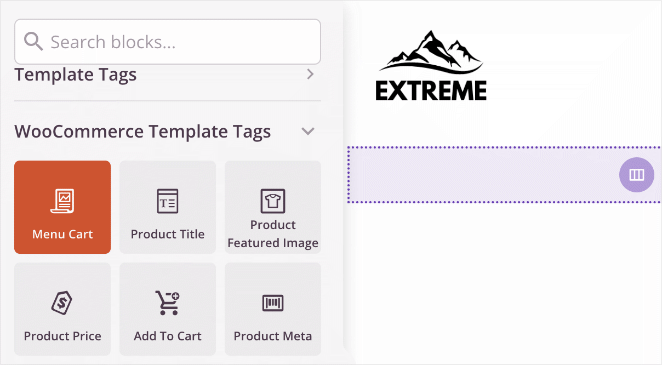
This block will display an icon and estimate the shopper’s total cart value. When they click it, they’ll go instantly to the shopping cart, where they can check out or make changes.
After dragging this button onto your header, you can customize it the same as any other SeedProd block.
You can change the button alignment, hide it if there’s nothing in the cart, and show or hide the cart subtotal.

In the advanced tab, you can adjust further styling options, including badge colors, animations, spacing, and more.
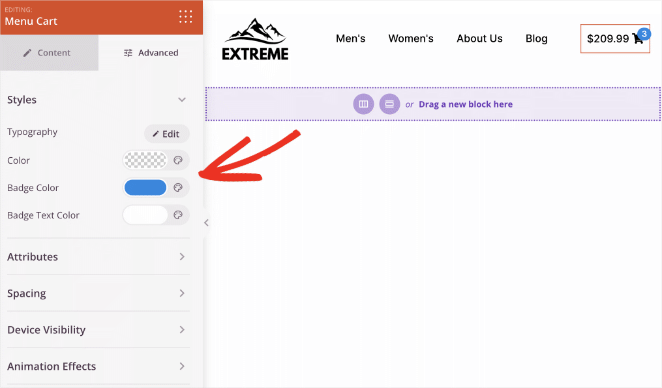
When it looks how you want, click the Save button and exit the page builder.
Step 6. Publish Your WooCommerce Website Changes
The final step in this guide is to make your custom WooCommerce theme live. From the theme builder dashboard, find the heading titled “Enable SeedProd Theme” and click the toggle button to switch it to the Yes position.

That’s it! Your custom store is live, and shoppers can see the view cart button on your menu, shop page, and product page.
Here are some examples of the changes we’ve made today. Click any image to open them in a new window and take a closer look.



We hope this guide has helped you learn how to add a view cart button in WooCommerce. If you need even more inspiration, check out the following helpful WooCommerce tutorials:
- How to Change Shop Page Title in WooCommerce
- How to Customize the WooCommerce Additional Information Tab
- How to Add Star Rating to WooCommerce Product Pages
- How to Fix WooCommerce View Cart Not Working
- How to Make a One Product Website in WooCommerce
- How to Display Related Products in WooCommerce
- How to Make a Custom WooCommerce Thank You Page
- How to Display Product Categories and Tags in WooCommerce
- How to Display Featured Products in WooCommerce
- How to Hide Out of Stock Products in WooCommerce
Thanks for reading! We’d love to hear your thoughts, so please feel free to leave a comment with any questions and feedback.
You can also follow us on YouTube, X (formerly Twitter), and Facebook for more helpful content to grow your business.

