Do you want to add an animated particle background effect to your WordPress website?
By adding a background with particle.js to your site, you can make important content stand out and boost your WordPress site’s interactivity. In this article, we’ll show you how to add particle backgrounds to any WordPress page easily.
What Is Particle.js?
Particle.js is a JavaScript library that lets you create and animate small particles on your webpage. These particles can be customized in size, shape, color, and movement to create interesting visual effects that enhance your website’s design and user experience.
Think of it like a digital fireworks show, where each particle is like a little firework that can move and change color in response to user interactions or other events on the page.
Why Add Particle.js Backgrounds to WordPress?
Particle backgrounds can add an extra layer of visual interest and interactivity to your WordPress site, making it more engaging and memorable for visitors.
For example, if you run a creative agency or a design portfolio, you can use Particle.js to create an eye-catching visual effect that showcases your creativity and design skills. You can use particle backgrounds to create a dynamic and visually appealing background for your header, hero section, or any other site section.

Particle.js can also create unique and creative loading animations to keep visitors engaged and entertained while waiting for your site to load. This is particularly important for areas with large images or videos, which can take a while to load on slower connections.
Overall, Particle.js is a great way to add a sense of interactivity and dynamism to your WordPress site, making it more engaging and memorable for your visitors.
How to Add Particle.js Backgrounds to My WordPress Site?
There are several ways to add particle backgrounds to your WordPress site, even if you’re a beginner.
First, you can use a WordPress Particle.js plugin or WordPress page builder with built-in particle effect features. We recommend this option for beginners because it typically requires zero coding knowledge or tech skills.
Another way to add particle effects to your site is using a WordPress theme that includes particle.js. This is handy if you’re starting a new site and still need a WordPress theme.
The final option is using custom code to add particle effects to your website manually. We only recommend this option if you’re comfortable with coding.
In this guide, we’ll stick with the easiest option: using a WordPress plugin. Let’s get to it!
Add a Particle Background to WordPress Sections Using SeedProd
First, we’ll use a WordPress page builder plugin with the particles.js library built into its functionality: SeedProd.

SeedProd is the best website and page builder for WordPress, with over 1 million users. You can use its drag-and-drop builder to create custom WordPress themes, landing pages, WooCommerce websites, and any other layout without writing code.
With hundreds of pre-made page templates, design elements, and built-in particle backgrounds, creating stunning particle animations takes only a few minutes.
Follow the steps below to add particle backgrounds to your site with SeedProd.
Step 1. Install and Activate SeedProd
First, click here to get started with SeedProd and download the plugin. Then install and activate the plugin on your WordPress website.
If you need help with this, you can see our documentation on installing SeedProd. It walks you through the installation process and finding and activating your plugin license key.
Step 2. Choose a Pre-made Template
Your next step is to choose a pre-made template. The type of template you select depends on whether you want to make a WordPress theme or a landing page.
With SeedProd’s Theme Builder, you can build a complete WordPress theme from scratch. However, choosing this option will overwrite your existing website design.
Alternatively, the Landing Page Builder lets you create any page without touching your existing theme. For this guide, we’ll go with this option.
From your WordPress admin dashboard, navigate to SeedProd » Landing Pages. On this page, you’ll see various page modes at the top and the option to create your own custom page.
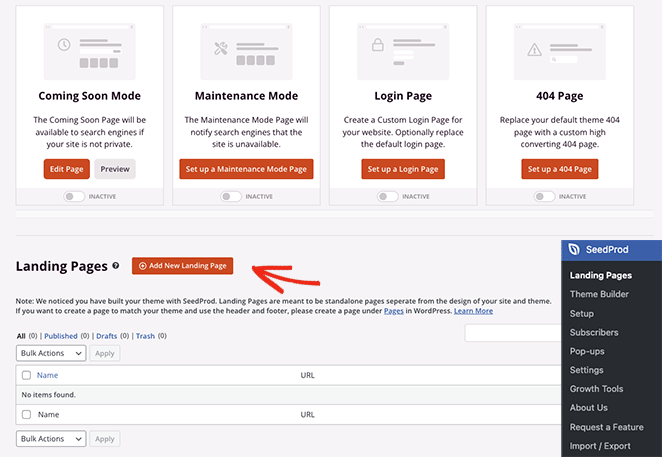
Go ahead and click the Add New Landing Page button.
Here, you can choose from hundreds of pre-made landing page templates.

You can filter them by type by clicking the tabs along the top, including:
- Coming Soon
- Maintenance Mode
- 404 Page
- Sales
- Webinar
- Lead Squeeze
- Thank You
- Login
To choose a template design, click the orange checkmark icon.

This will open a popup window where you can enter your landing page name. SeedProd automatically generates the landing page slug (URL) for you, but if you like, you can change this.

When you’re happy with those details, click the Save and Start Editing the Page button.
Navigating the Page Builder
Your template will now open in SeedProd’s drag-and-drop visual editor. You’ll see a left-hand panel with blocks, sections, and settings and a live preview on the right-hand side.

Clicking anywhere on the preview lets you view and customize that element’s settings and see the changes in real-time.
For example, clicking the main header section opens its settings in the left-hand panel. From there, you can choose a new background image, choose a different background-position, and dim the background with a color overlay.

Additionally, you can add new elements to your template by dragging them from the left-hand blocks panel and dropping them into place.

Step 3. Enable and Customize Particle Backgrounds
As we mentioned earlier, SeedProd has particle.js built into the page builder settings. Currently, you can use this feature on any page section.
To do this, click on any section until you see a purple border, then select the Advanced tab.
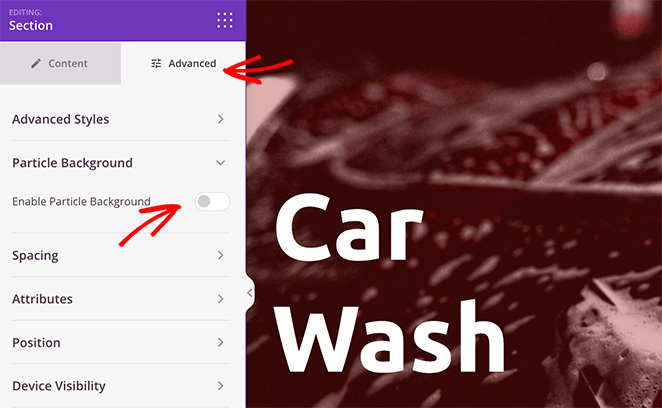
Now find the Particle Background heading, expand it, and switch the Enable Particle Background toggle to the on position.
Immediately, you’ll see a Polygon animation effect on the section background.
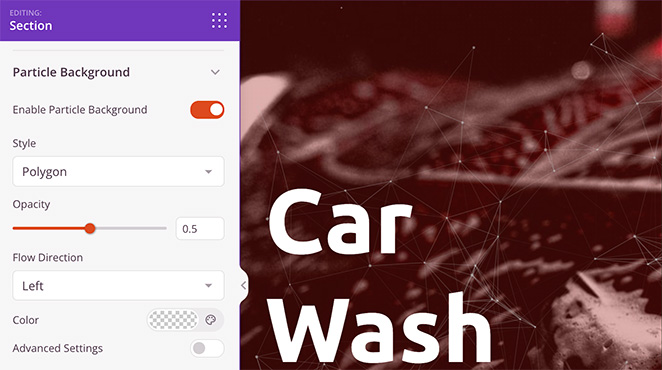
If you click the ‘Style’ dropdown menu, you can change the particles to either:
- Space
- Snow
- Snowflakes
- Christmas
- Halloween
- Custom

After choosing a particle style, you can set the particle opacity, flow direction, and color.
If you want more control over the particle customization, enable the Advanced Settings toggle.
Here, you can increase the number of particles, change the particle size, and use the selector to adjust the particle movement speed.
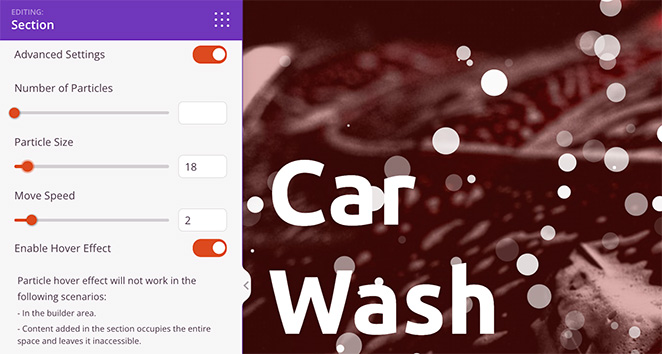
Note: Increasing the number of particles can impact your page speed. It’s best to keep this setting as low as possible for the best performance.
In the same panel is an option to enable particle hover effects. If you enable it, the particles will scatter when you move over them with your cursor. However, you can only see this effect when previewing your page outside the page builder.
Adding Custom Particle Backgrounds
If you want to add custom particle effects, simply choose the Custom option from the Style dropdown menu. As you can see, the instructions indicate that you’ll need to add a custom JSON file.
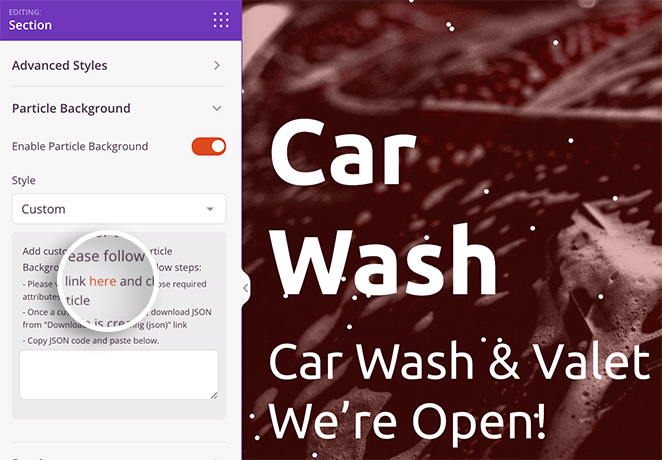
Luckily, the instructions include a link to vincentgarreau.com/particle.js, a JavaScript library that lets you set custom attributes for your particle background by pointing and clicking.
In the particle json config panel, you can choose custom shapes, densities, sizes, speeds, colors, and more. You can also set custom CSS for the background and enable movement effects.
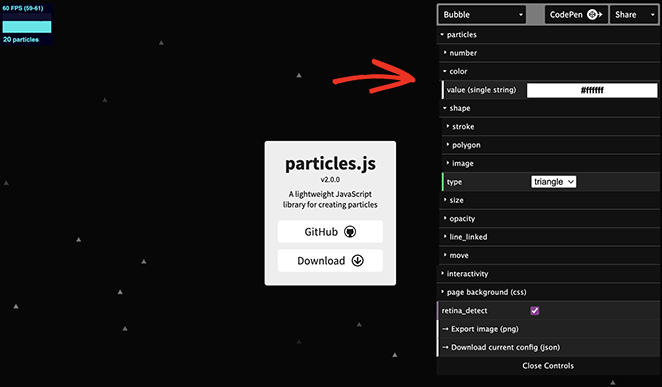
When you’re happy with your particle settings, click the ‘Download current config’ heading. This will download the configuration file to your computer.
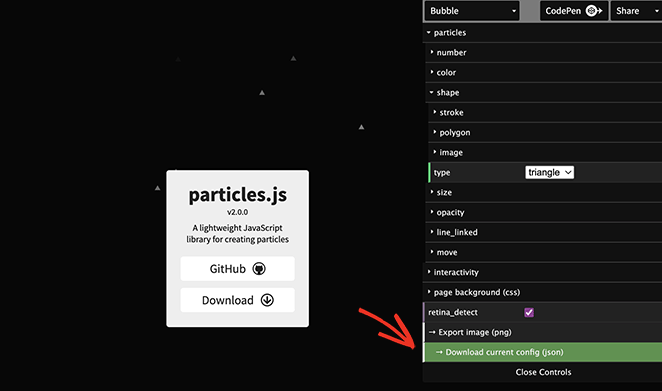
Now open and copy the code from the file, and paste it into the empty box in your page builder.
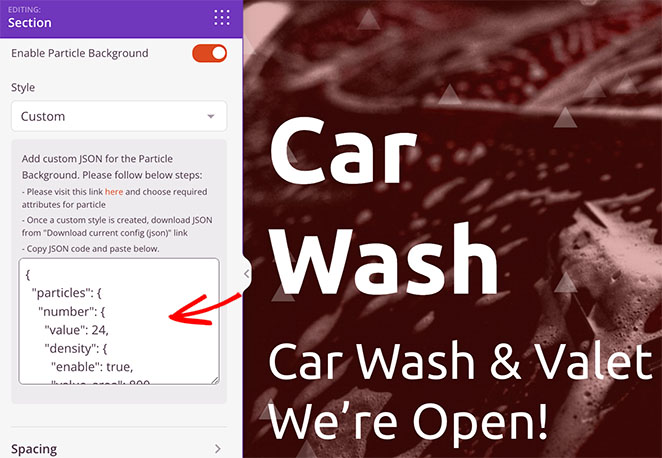
Your custom particle background will appear instantly!
From there, continue customizing your landing page until it looks exactly how you want it. Remember to click Save to store your changes.
Step 4. Publish Your Changes
Once you’re happy with the customizations to your landing page, you’re ready to make it live.
To do this, click the Save dropdown arrow, and click Publish.

Now you can visit your landing page to see your particle background in action.

Use the Particle Background WP Plugin
Another way to add particle backgrounds to your WordPress site is to use the Particle Background WP plugin.
This is a free WordPress particle.js plugin. However, its customization options aren’t as easy or extensive as SeedProd.
First, you’ll need to install and activate Particle Background WP on your WordPress website. Then, click the Particle Background menu item in your WordPress admin panel.
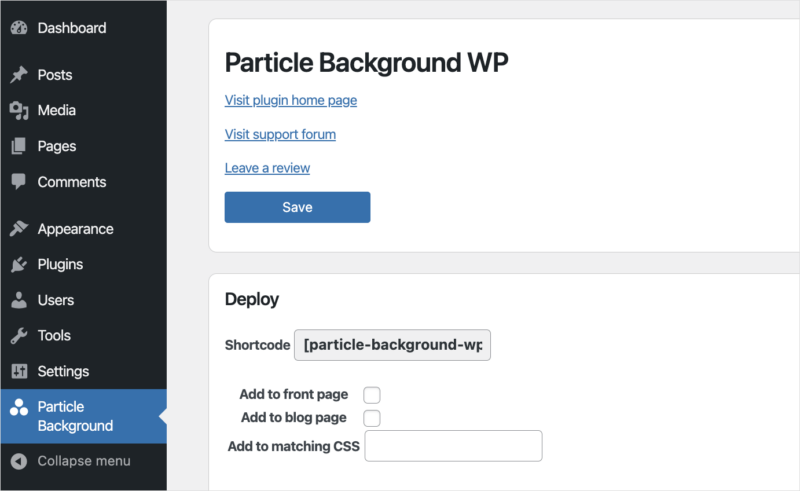
In the first panel, you can show the particle background banner on your front and blog pages or with the shortcode. We’ve enabled the banner for our blog page.
Below that is a content area you can customize with the WYSIWYG editor. Here you can enter a heading for your banner, a description, and a call to action.

The next panel includes particle customization options, including density, color, and background color. You can also enter custom CSS.

After saving your changes, you can visit your blog page and see the banner with a particle background in place.

You can also use the shortcode to add the same banner on any page or post. However, it’s important to note that your banner will sit over the content, not behind it, as on SeedProd.
More Ways to Add Particle.js to WordPress
If you’re still looking for other ways to add particle.js to your WordPress site, you may find the following tools helpful:
- Ultimate Addons for Elementor: With this addon, you can add particle effects to pages you’ve made using the Elementor page builder plugin.
- Ultimate Addons for Beaver Builder: Add particle animations to pages made using the Beaver Builder plugin.
- Manually: We only recommend this approach if you’re comfortable with HTML, PHP, JavaScript, and other coding languages.
Ultimately, the easiest way to add Particle Backgrounds to WordPress is with SeedProd. It’s easy to use, requires zero coding, and has tons of customization options that take a few clicks to set up.
Frequently Asked Questions
No, you do not need coding experience to add particle backgrounds to WordPress. SeedProd has a code-free interface to make adding the effect to your site easy without code.
While particle.js backgrounds can be visually appealing, they require additional JavaScript and may slow down your website’s load time. It’s important to optimize your site to ensure it loads quickly and doesn’t negatively impact the user experience.
We suggest only using low-density particle backgrounds on the most important areas of your site.
Yes! SeedProd allows you to customize the particle’s color, shape, density, and other parameters to create a unique and visually appealing effect on your website.
Yes, particle.js backgrounds can be mobile-friendly if optimized properly. However, testing your particle background on different devices and screen sizes is vital to ensure it doesn’t negatively impact the user experience. You can do this with SeedProd’s built-in mobile preview feature.
In addition to particle backgrounds, you can use several other types of animated backgrounds on your WordPress site, including parallax scrolling, video backgrounds, and animated gradients. These effects help create a visually engaging and dynamic experience.
There you have it!
We hope this guide has helped you learn how to create Particle Backgrounds in WordPress.
You might also like this guide on the best WordPress photo gallery plugins to compliment your new particle backgrounds. Or this guide on how to add snow effects in WordPress.
Thanks for reading! We’d love to hear your thoughts, so please feel free to leave a comment with any questions and feedback.
You can also follow us on YouTube, X (formerly Twitter), and Facebook for more helpful content to grow your business.

